Android存储卡读写文件与Application数据保存的实现介绍
作者:Shewyoo
这篇文章主要介绍了Android在存储卡上读写文件、Application保存数据的实现步骤,文中通过示例代码介绍的非常详细,对大家的学习或者工作具有一定的参考学习价值,需要的朋友们下面随着小编来一起学习吧
一、在存储卡上读写图片文件
Android的位图工具是Bitmap,App读写Bitmap可以使用性能更好的BufferedOutputStream和BufferedInputStream。
Android还提供了BitmapFactory工具用于读取各种来源的图片,相关方法如下:
- decodeResource:该方法可从资源文件中读取图片信息。
- decodeFile:该方法可将指定路径的图片读取到Bitmap对象。
- decodeStream:该方法从输入流中读取位图数据。
例:点击保存再点击读取后出现图片


XML文件
<LinearLayout xmlns:android="http://schemas.android.com/apk/res/android"
    android:layout_width="match_parent"
    android:layout_height="match_parent"
    android:orientation="vertical">
    <Button
        android:id="@+id/btn_save"
        android:layout_width="match_parent"
        android:layout_height="wrap_content"
        android:text="保存"/>
    <Button
        android:id="@+id/btn_read"
        android:layout_width="match_parent"
        android:layout_height="wrap_content"
        android:text="读取"/>
    <ImageView
        android:id="@+id/iv_content"
        android:layout_width="match_parent"
        android:layout_height="400dp"
        android:scaleType="fitCenter"/>
</LinearLayout>
java代码
public class ImageWriteActivity extends AppCompatActivity implements View.OnClickListener {
    private ImageView iv_content;
    private String path;
    @Override
    protected void onCreate(Bundle savedInstanceState) {
        super.onCreate(savedInstanceState);
        setContentView(R.layout.activity_image_write);
        iv_content = findViewById(R.id.iv_content);
        findViewById(R.id.btn_save).setOnClickListener(this);
        findViewById(R.id.btn_read).setOnClickListener(this);
    }
    @Override
    public void onClick(View view) {
        switch (view.getId()){
            case R.id.btn_save:
                String fileName = System.currentTimeMillis()+".jpeg";
//                获取当前APP的私有下载目录
                path = getExternalFilesDir(Environment.DIRECTORY_DOWNLOADS).toString()+ File.separatorChar+fileName;
//                从指定的资源文件中获取位图对象
                Bitmap b1 = BitmapFactory.decodeResource(getResources(),R.drawable.thing1);
//                把位图对象保存为图片文件
                FileUtil.saveImage(path,b1);
                Toast.makeText(this,"保存成功",Toast.LENGTH_SHORT).show();
                break;
            case R.id.btn_read:
                Bitmap b2 = FileUtil.openImage(path);
                iv_content.setImageBitmap(b2);
                break;
        }
    }
}
FileUtil类
public class FileUtil {
    //    把位图数据保存到指定路径的图片文件
    public static void saveImage(String path, Bitmap bitmap) {
        FileOutputStream fos = null;
        try {
            fos = new FileOutputStream(path);
//            把文件数据压缩到文件输出流
            bitmap.compress(Bitmap.CompressFormat.JPEG, 100, fos);
        } catch (Exception e) {
            e.printStackTrace();
        } finally {
            if (fos != null) {
                try {
                    fos.close();
                } catch (IOException e) {
                    e.printStackTrace();
                }
            }
        }
    }
    //从指定路径的图片文件中读取位图数据
    public static Bitmap openImage(String path) {
        Bitmap bitmap = null;
        FileInputStream fis = null;
        try {
            fis = new FileInputStream(path);
            bitmap = BitmapFactory.decodeStream(fis);
        } catch (Exception e) {
            e.printStackTrace();
        } finally {
            if (fis != null) {
                try {
                    fis.close();
                } catch (IOException e) {
                    e.printStackTrace();
                }
            }
        }
        return bitmap;
    }
}
二、Application
1、Application生命周期
Application是Android的一大组件,在App运行过程中有且仅有一个Application对象贯穿整个生命周期。
清单文件AndroidMainifest.xml文件中有个application标签,没有指定则使用默认;
可以新建一个MyApplication类继承Application,然后在清单文件中加入以下代码指定使用自定义的application。
android:name=".MyApplication"
MyApplication类
public class MyApplication extends Application {
//App启动时调用
    public void onCreate() {
        super.onCreate();
        mApp = this;
    }
//App终止调用
    @Override
    public void onTerminate() {
        super.onTerminate();
    }
//App配置改变调用,如竖屏变为横屏
    @Override
    public void onConfigurationChanged(@NonNull Configuration newConfig) {
        super.onConfigurationChanged(newConfig);
    }
}
2、利用Application操作全局变量
全局的意思是其他代码都可以引用该变量,因此全局变量是共享数据和消息传递的好方法。
适合在Application中保存的全局变量主要有:
- 会频繁读取的信息,如用户名、手机号等。
- 不方便由意图传递的数据,如位图对象、非字符串类型的集合对象等。
- 容易因频繁分配内容而导致内存泄漏的对象,如Handler对象等。
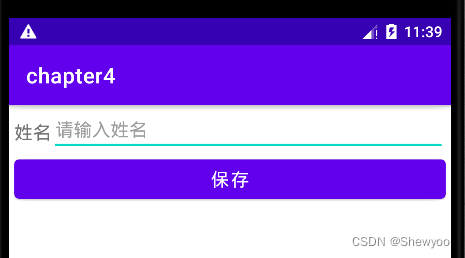
例:输入信息点击保存,只要应用不挂掉,重新回到应用还会有输入的信息。


XML文件
<LinearLayout xmlns:android="http://schemas.android.com/apk/res/android"
    android:layout_width="match_parent"
    android:layout_height="match_parent"
    android:orientation="vertical"
    android:padding="5dp">
    <LinearLayout
        android:layout_width="match_parent"
        android:layout_height="40dp"
        android:orientation="horizontal">
        <TextView
            android:id="@+id/tv_name"
            android:layout_width="wrap_content"
            android:layout_height="match_parent"
            android:gravity="center"
            android:text="姓名"
            android:textSize="17sp"/>
        <EditText
            android:id="@+id/et_name"
            android:layout_width="0dp"
            android:layout_height="match_parent"
            android:layout_weight="1"
            android:hint="请输入姓名"
            android:inputType="text"
            android:textSize="17sp"/>
    </LinearLayout>
    <Button
        android:id="@+id/btn_save"
        android:layout_width="match_parent"
        android:layout_height="wrap_content"
        android:text="保存"
        android:textSize="17sp"/>
</LinearLayout>
java类
public class AppWriteActivity extends AppCompatActivity implements View.OnClickListener {
    private EditText et_name;
    private MyApplication app;
    @Override
    protected void onCreate(Bundle savedInstanceState) {
        super.onCreate(savedInstanceState);
        setContentView(R.layout.activity_app_write);
        et_name = findViewById(R.id.et_name);
        app = MyApplication.getInstance();
        findViewById(R.id.btn_save).setOnClickListener(this);
        reload();
    }
    private void reload() {
        String name = app.infoMap.get("name");
        if(name == null)
            return;
        et_name.setText(name);
    }
    @Override
    public void onClick(View view) {
        String name = et_name.getText().toString();
        app.infoMap.put("name",name);
    }
}
MyApplication类
public class MyApplication extends Application {
    private static MyApplication mApp;
//    声明一个公共的信息映射对象,可当作全局变量使用
    public HashMap<String,String> infoMap = new HashMap<>();
    public static MyApplication getInstance(){
        return mApp;
    }
//App启动时调用
    public void onCreate() {
        super.onCreate();
        mApp = this;
    }
//App终止调用
    @Override
    public void onTerminate() {
        super.onTerminate();
    }
//App配置改变调用,如竖屏变为横屏
    @Override
    public void onConfigurationChanged(@NonNull Configuration newConfig) {
        super.onConfigurationChanged(newConfig);
    }
}
到此这篇关于Android存储卡读写文件与Application数据保存的实现介绍的文章就介绍到这了,更多相关Android存储卡读写文件内容请搜索脚本之家以前的文章或继续浏览下面的相关文章希望大家以后多多支持脚本之家!
