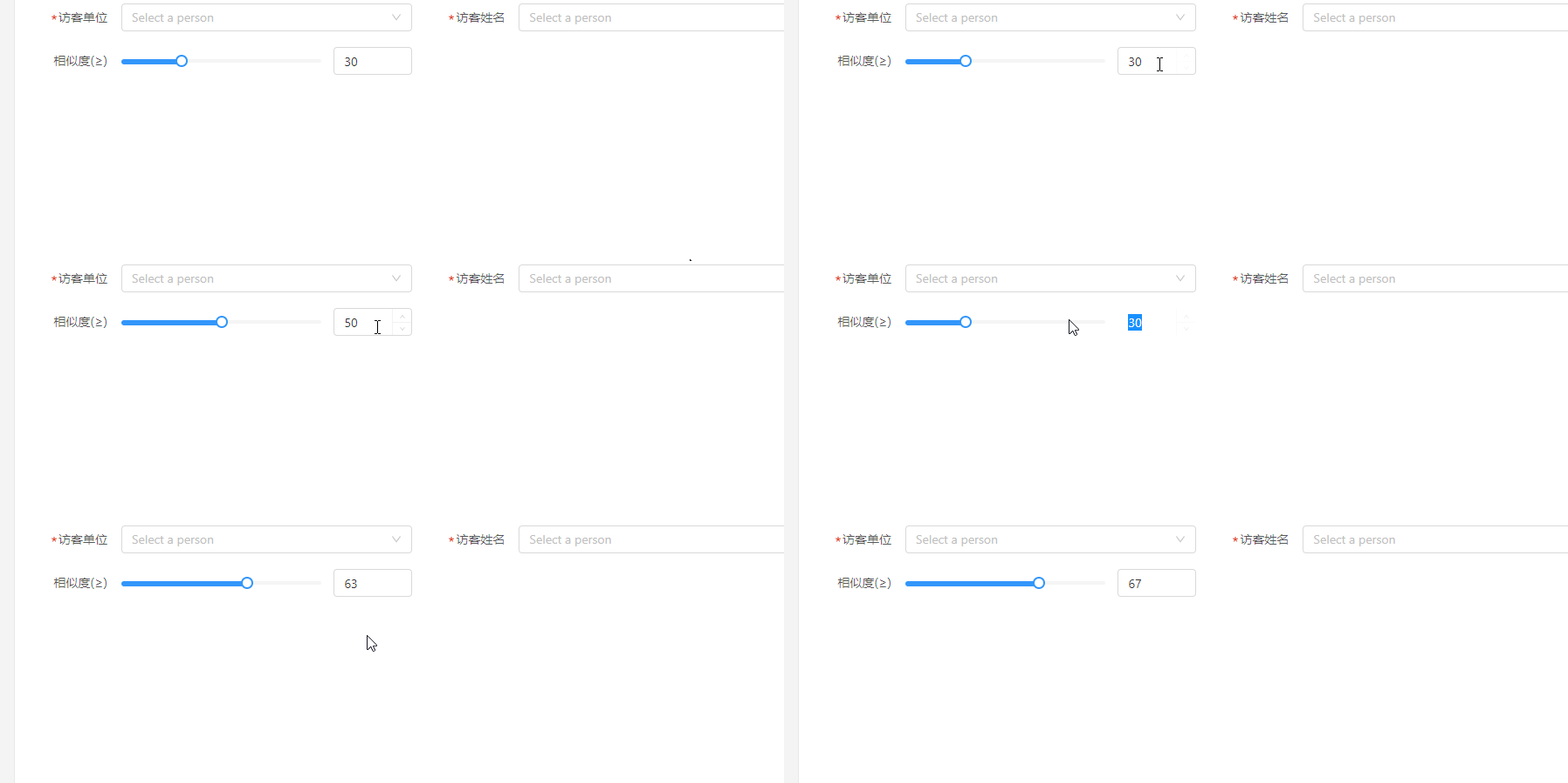
vue+Ant Design进度条滑块与input联动效果实现
作者:周家大小姐.
最近接到这样一个需求滑块进度与输入框为一致,默认值为80,最小不能小于30,最大为100,怎么实现这个联动效果呢,下面小编给大家分享下基于vue+Ant Design进度条滑块与input联动效果的实现,感兴趣的朋友跟随小编一起看看吧
需求:滑块进度与输入框为一致,默认值为80,最小不能小于30,最大为100

子组件:
<template>
  <div class="progress-box">
    <div
      ref="slider"
      class="slider"
    >
      <div
        class="process"
        :style="{ width }"
      ></div>
      <div
        ref="trunk"
        class="thunk"
        :style="{ left }"
      >
        <div class="block"></div>
      </div>
    </div>
    <div>
      <a-input-number
        v-model="per"
        class="input-num"
        :min="inputMin"
        :max="inputMax"
        @change="handleChangeNum"
      />
    </div>
  </div>
</template>
<script>
export default {
  props: {
    sliderMin: { // 最小值
      type: Number,
      default: 0
    },
    sliderMax: { // 进度条最大值
      type: Number,
      default: 0
    },
    value: { // 对当前值进行双向绑定实时显示拖拽进度
      type: Number,
      default: 0
    },
    inputMin: {
      type: Number,
      default: 0
    },
    inputMax: {
      type: Number,
      default: 100
    }
  },
  data() {
    return {
      slider: null, // 滚动条DOM元素
      thunk: null, // 拖拽DOM元素
      per: Math.max(this.sliderMin, this.value) // 当前值
    }
  },
  computed: {
    // 设置一个百分比,提供计算slider进度宽度和trunk的left值
    scale() { // 百分比
      return this.per / this.sliderMax
    },
    width() {
      if (this.slider) { // 设置进度激活的宽度
        return (this.slider.offsetWidth * this.scale) + 'px'
      } else {
        return 0 + 'px'
      }
    },
    left() { // trunk left = slider进度width + trunk宽度/2
      if (this.slider) { // 设置圆点所在的位置
        return (this.slider.offsetWidth * this.scale) - this.thunk.offsetWidth / 2 + 'px'
      } else {
        return 0 + 'px'
      }
    }
  },
  // 渲染到页面的时候
  mounted() {
    this.slider = this.$refs.slider
    this.thunk = this.$refs.trunk
    const _this = this
    this.thunk.onmousedown = function(e) {
      const width = parseInt(_this.width)
      const disX = e.clientX
      document.onmousemove = function(e) {
        // 拖拽的时候获取的新width
        const newWidth = (e.clientX - disX + width)
        // 拖拽的时候得到新的百分比
        const scale = newWidth / _this.slider.offsetWidth
        _this.per = Math.ceil((_this.sliderMax) * scale)// 对一个数进行上取整把小数转为整数(0.3=>30)
        _this.per = Math.max(_this.per, _this.sliderMin)
        _this.per = Math.min(_this.per, _this.sliderMax)
        _this.$emit('input', _this.per)
      }
      document.onmouseup = function() {
        document.onmousemove = document.onmouseup = null
      }
      return false
    }
  },
  methods: {
    handleChangeNum(e) {
      this.per = e
    }
  }
}
</script>
<style lang="scss" scoped>
.progress-box {
  display: flex;
  align-items: center;
  justify-content: space-between;
  -webkit-user-select: none;
  -moz-user-select: none;
  -ms-user-select: none;
  user-select: none;
}
.clear:after {
  content: '';
  display: block;
  clear: both;
}
.slider {
  user-select: none;
  position: relative;
  width: calc(100% - 104px);
  height: 4px;
  background: #f5f5f5;
  border-radius: 5px;
  cursor: pointer;
  .process {
    position: absolute;
    left: 0;
    top: 0;
    width: 112px;
    height: 6px;
    border-radius: 5px;
    background: #3296fa;
  }
  .thunk {
    position: absolute;
    left: 100px;
    top: -5px;
    width: 14px;
    height: 14px;
  }
  .block {
    width: 14px;
    height: 14px;
    border-radius: 50%;
    border: 2px solid #3296fa;
    background: rgba(255, 255, 255, 1);
    transition: 0.2s all;
  }
}
</style>
父组件使用
  <div class="xk-control-item">
      <div class="xk-item-title">
          <span>相似度(≥)</span>
       </div>
       <div class="xk-item-value">
           <c-progress
            v-model="per"
            :sliderMin="30"
            :sliderMax="100"
            :inputMin='30'
              />
        </div>
   </div>

<script>
import CProgress from '@/components/CProgress'
export default {
  name: 'VisitorTrack',
  components: {
    CProgress
  },
  data() {
    return {
    }
  },
  computed: {
    per: {
      get() {
        return 80
      },
      set(val) {
        // console.log(val)
      }
    }
  },
  watch: {

  },
  methods: {


  }

}
</script>
补充知识
ant-design-vue 动态添加input行及动态校验
这里涉及到动态input表单校验 我仅给自己记录一下
<!-- 动态添加行 -->
   <a-form-model-item
       :wrapper-col="newWrapper"
       style="padding-left:63px;padding-right:40px;"
       v-for="(item, index) in form.information"
       :key="item.key"
       >
       <a-form-model-item class="fl" :prop="'information.' + index + '.name'"
       :rules="{
           required: true,
           message: '店铺名不能为空',
           trigger: ['blur','change'],
       }">
           <a-input
               v-model.trim="form.information[index].name"
               placeholder="请输入店铺名称"
               style="margin-right: 1%"
           />
       </a-form-model-item>
       <a-form-model-item class="fl" :prop="'information.' + index + '.address'"
       :rules="{
           required: true,
           message: '店铺地址不能为空',
           trigger: ['blur','change'],
       }">
           <a-input
               v-model.trim="form.information[index].address"
               placeholder="请输入店铺地址"
               style="margin-right: 1%"
           />
       </a-form-model-item>
       <a-form-model-item class="fl" :prop="'information.' + index + '.storeManagerName'"
       :rules="{
           required: true,
           message: '店长姓名不能为空',
           trigger: ['blur','change'],
       }">
           <a-input
               v-model.trim="form.information[index].storeManagerName"
               placeholder="请输入店长姓名"
               style="margin-right: 1%"
           />
       </a-form-model-item>
       <a-form-model-item class="fl" style="margin-right: 3%;" :prop="'information.' + index + '.storeManagerPhone'"
       :rules="[{required: true,message: '店长手机不能为空',trigger: ['blur','change']},
               {validator: mobilephoneValidate,trigger: ['blur','change'] }]"
       >
           <a-input
               v-model.trim="form.information[index].storeManagerPhone"
               placeholder="请输入店长手机号"
           />
       </a-form-model-item>
       <a
       v-if="form.information.length > 1"
       :disabled="form.information.length === 1"
       @click="removeRows(item)"
       >删除</a>
   </a-form-model-item>
添加 删除的方法
// 动态删除添加输入行
        removeRows(item) {
            let index = this.form.information.indexOf(item);
            if (index !== -1) {
                this.form.information.splice(index, 1);
            }
        },
        addRows() {
            this.form.information.push({
                name: '',
                address: '',
                storeManagerName: '',
                storeManagerPhone: '',
                key: Date.now(),
            });
        },
手机号或者其他单独的表单校验写在methods里
// 动态添加行 店长手机号验证
        testMobilephone: function (str) {
            const regex = /^1[3456789]\d{9}$/
            if (!regex.test(str)) {
            return false
            } else {
            return true
            }
        },
        mobilephoneValidate (rule, value, callback) {
        // 主要就是添加一个对undefined和空串的判断
        if (typeof (value) === 'undefined' || value === '') {
            callback()
            } else {
                if (!this.testMobilephone(value)) {
                callback(new Error('请输入正确手机格式'))
                }
                callback()
            }
        },
这里information数组 在data里写上一组空对象 是为了保证有一组input行显示出来 不写input行则会隐藏掉

到此这篇关于vue+Ant Design进度条滑块与input联动的文章就介绍到这了,更多相关vue+Ant Design进度条滑块内容请搜索脚本之家以前的文章或继续浏览下面的相关文章希望大家以后多多支持脚本之家!
