
Flutter实现笑嘻嘻的动态表情的示例代码
作者:岛上码农
前言
身在孤岛有很多无奈,比如说程序员属于比较偏门的职业。尤其是早些年,在行业里跳过几次槽后,可能你就已经认识整个圈子的人了。然后,再跳槽很可能就再次“偶遇”前同事了,用大潘的口头语来说就是:“好尴尬呀”。因此, 问起职业,往往只能是回答是搞计算机的。结果可能更尴尬,问的人可能笑嘻嘻地瞅着你,像看怪物一样看着你,接着突然冒出一句灵魂拷问:“我家电脑坏了,你能修不?”不过也不奇怪,那个时候在岛上重装一个 Windows XP 系统都需要100大洋。唉,当初后悔没在中关村的鼎好多学习攒机技术……
image.png
这个印象太深刻,本篇我们就用动画复现一下这种表情,效果如下图所示。

笑脸动画.gif
AnimatedContainer 介绍
在实现之前,先介绍一个新组件 —— AnimatedContainer 。看这个名字就知道和 Container 有关,实际上AnimatedContainer是 Flutter 中的一个动画容器,Container 有的属性基本上它都有,我们看一下二者的构造方法的区别。
AnimatedContainer({
    Key? key,
    this.alignment,
    this.padding,
    Color? color,
    Decoration? decoration,
    this.foregroundDecoration,
    double? width,
    double? height,
    BoxConstraints? constraints,
    this.margin,
    this.transform,
    this.transformAlignment,
    this.child,
    this.clipBehavior = Clip.none,
    Curve curve = Curves.linear,
    required Duration duration,
    VoidCallback? onEnd,
  });

Container({
    Key? key,
    this.alignment,
    this.padding,
    this.color,
    this.decoration,
    this.foregroundDecoration,
    double? width,
    double? height,
    BoxConstraints? constraints,
    this.margin,
    this.transform,
    this.transformAlignment,
    this.child,
    this.clipBehavior = Clip.none,
  });
可以看到,实际上 AnimatedContainer 和 Container 只差了3个属性,而这三个属性就是控制动画的参数:
curve:动画曲线,默认是线性;duration:动效时长参数;onEnd:动效结束后的回调方法。
AnimatedContainer的特性是所有涉及外观的属性都会生成一个过渡动效,当这些外观属性发生改变的时候就会使用生成的的动效来完成过渡,从而展现出动画效果。像我们要实现的笑嘻嘻的表情其实就是利用 AnimatedContainer 实现的。
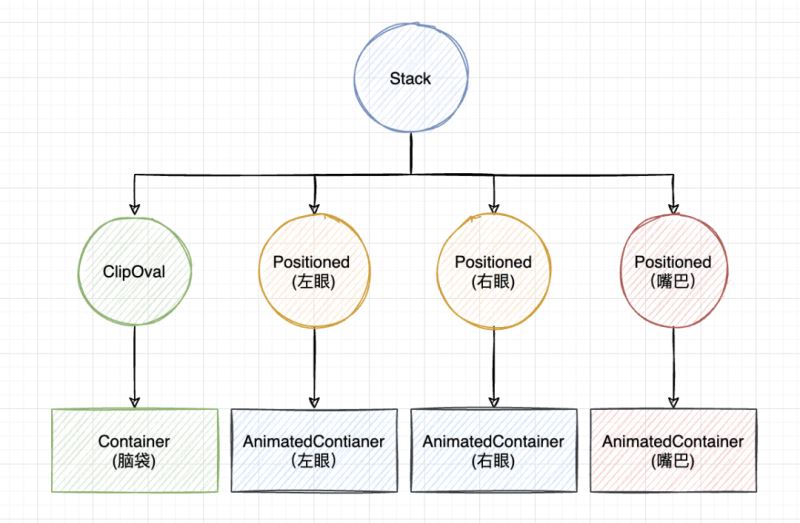
组件结构
我们的笑嘻嘻动效,底部是一个圆形脑袋,上面有两颗眼睛和一个嘴巴,其中眼睛和嘴巴有移动动效,而眼睛的眼珠还有方向的动效。这些动效都可以使用AnimatedContainer来实现。大的页面结构如下:
细节实现
脑袋这个很容易,直接用原型裁剪,设置尺寸和底色即可:
// 脑袋
ClipOval(
  child: Container(
    width: 120,
    height: 120,
    color: Colors.blue,
  ),
),
眼睛左眼和右眼有点不一样,眼球实际就是AnimatedContainer使用 borderRadius 裁剪为圆形,而眼珠是AnimatedContainer的子组件 —— 黑色的圆圈。具体实现向左或向右看使用一个变量 seeLeft 控制,而向左向右的转换过渡效果都由 AnimatedContainer 控制。
seeLeft = true,向左看:眼珠对齐的方式是bottomLeft,左眼纵向方向上稍微往下移一点;右眼往左移动一定的位置,这样就会有向左看的效果了;seeLeft = false,向右看:眼珠对齐的方式是bottomRight,右眼纵向方向上稍微往下移一点;左眼往右移动一定的位置,这样就会有向右看的效果了;
实现代码如下:
// 左眼
Positioned(
  top: marginTop,
  left: marginLR,
  child: AnimatedContainer(
    alignment:
        seeLeft ? Alignment.bottomLeft : Alignment.bottomRight,
    padding: EdgeInsets.all(eyePadding),
    transform: Matrix4.identity()
      ..translate(
          seeLeft ? 0.0 : sideOffset, seeLeft ? eyeOffset : 0.0, 0),
    duration: Duration(seconds: 1),
    curve: Curves.fastOutSlowIn,
    width: eyeSize,
    height: eyeSize,
    decoration: BoxDecoration(
      color: Colors.white,
      borderRadius: BorderRadius.circular(eyeSize / 2),
    ),
    child: ClipOval(
      child: Container(
        color: Colors.black,
        width: eyeBallSize,
        height: eyeBallSize,
      ),
    ),
  ),
),
// 右眼
Positioned(
  top: marginTop,
  right: marginLR,
  child: AnimatedContainer(
    alignment:
        seeLeft ? Alignment.bottomLeft : Alignment.bottomRight,
    padding: EdgeInsets.all(eyePadding),
    transform: Matrix4.identity()
      ..translate(seeLeft ? -sideOffset : 0.0,
          seeLeft ? 0.0 : eyeOffset, 0),
    duration: Duration(seconds: 1),
    curve: Curves.fastOutSlowIn,
    width: eyeSize,
    height: eyeSize,
    decoration: BoxDecoration(
      color: Colors.white,
      borderRadius: BorderRadius.circular(eyeSize / 2),
    ),
    child: ClipOval(
      child: Container(
        color: Colors.black,
        width: eyeBallSize,
        height: eyeBallSize,
      ),
    ),
  ),
),
这里的眼珠对齐使用的就是AnimatedContainer 的 alignment参数控制,而眼球的位置使用 Matrix4 的平移实现:
Matrix4.identity()
  ..translate(seeLeft ? -sideOffset : 0.0, seeLeft ? 0.0 : eyeOffset, 0),
笑脸的实现使用ClipPath,绘制两条弧线就可以了,然后平移的幅度和眼珠保持一致,就可以感觉是转头的效果了,AnimatedContainer 部分的代码如下:
// 笑嘻嘻的嘴巴
Positioned(
  bottom: 10,
  height: 40,
  left: 0,
  child: AnimatedContainer(
    alignment:
        seeLeft ? Alignment.bottomLeft : Alignment.bottomRight,
    padding: EdgeInsets.all(4.0),
    transform: Matrix4.identity()
      ..translate(seeLeft ? 25.0 : 35.0, 0, 0),
    duration: Duration(seconds: 1),
    curve: Curves.fastOutSlowIn,
    child: ClipPath(
      clipper: SmileClipPath(),
      child: Container(
        width: 60,
        height: 40,
        color: Colors.yellow,
      ),
    ),
  ),
),
笑嘻嘻的嘴巴的裁剪类 SmileClipPath 代码如下:
class SmileClipPath extends CustomClipper<Path> {
  @override
  Path getClip(Size size) {
    return Path()
      ..moveTo(0, 0)
      ..arcToPoint(
        Offset(size.width, 0),
        radius: Radius.circular(size.width * 0.55),
        clockwise: false,
      )
      ..arcToPoint(
        Offset(0, 0),
        radius: Radius.circular(size.width),
        clockwise: true,
      );
  }

  @override
  bool shouldReclip(covariant CustomClipper<Path> oldClipper) {
    return false;
  }
}
最后,控制状态变量 seeLeft 的变化通过一个按钮点击触发就好了。
floatingActionButton: FloatingActionButton(
  child: Icon(Icons.play_arrow, color: Colors.white),
  onPressed: () {
    setState(() {
      seeLeft = !seeLeft;
    });
  },
),
最终运行效果如下,完整代码已提交至:动画相关代码。

笑脸动画.gif
总结
本篇主要介绍 AnimatedContainer 的使用,对于要对 Container 实现动效的场合,可以直接使用AnimatedContainer进行替换,然后通过更改AnimatedContainer的属性就可以实现过渡动效了。比如官网就搞了个随机的形状、弧度和颜色的动效,看着也挺有趣的。
AnimatedContainer 官方动效.gif
以上就是Flutter实现笑嘻嘻的动态表情的示例代码的详细内容,更多关于Flutter动态表情的资料请关注脚本之家其它相关文章!