
Android使用OpenGL和MediaCodec录制功能
作者:布拉德很帅
一,什么是opengl
Open Graphics Library 图形领域的工业标准,是一套跨编程语言、跨平台的、专业的图形编程(软件)接口。它用于二维、三维图像,是一个功能强大,调用方便的底层图形库。
与硬件无关。可以在不同的平台如Windows、Linux、Mac、Android、IOS之间进行移植。因此,支持OpenGL的软件具有很好的移植性,可以获得非常广泛的应用。
OpenGL ES 1.0 和 1.1 :Android 1.0和更高的版本支持这个API规范。 OpenGL ES 2.0 :Android 2.2(API 8)和更高的版本支持这个API规范。 OpenGL ES 3.0 :Android 4.3(API 18)和更高的版本支持这个API规范。 OpenGL ES 3.1 : Android 5.0(API 21)和更高的版本支持这个API规范
还须要由设备制造商提供了实现支持 目前广泛支持的是2.0 <uses-feature android:glEsVersion="0x00020000" android:required="true"/>
二,什么是Android OpenGL ES
针对手机、PDA和游戏主机等嵌入式设备而设计的OpenGL API 子集。
GLSurfaceView
继承至SurfaceView,它内嵌的surface专门负责OpenGL渲染。 管理Surface与EGL 允许自定义渲染器(render)。 让渲染器在独立的线程里运作,和UI线程分离。 支持按需渲染(on-demand)和连续渲染(continuous)。
OpenGL是一个跨平台的操作GPU的API,但OpenGL需要本地视窗系统进行交互,这就需要一个中间控制层, EGL就是连接OpenGL ES和本地窗口系统的接口,引入EGL就是为了屏蔽不同平台上的区别。
三, OpenGL 绘制流程
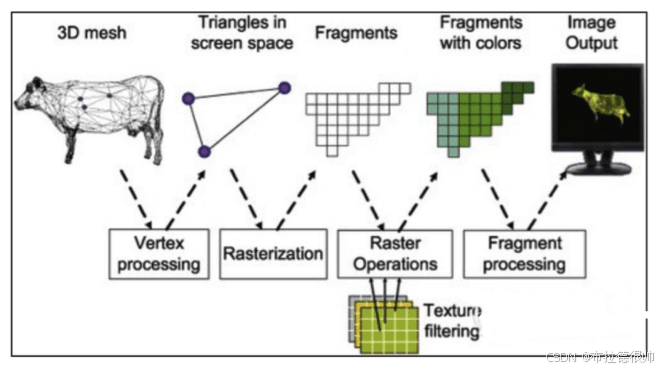
其实就是一个可编程管线pipline

渲染管线做的事情就是让计算机完成图形功能。 固定管线:程序员只能设置参数。比如 f(x)=axx + bx + c程序员只能设置a,b,c的值,却不能修改这个公式。 可编程管线:程序员掌控一切。
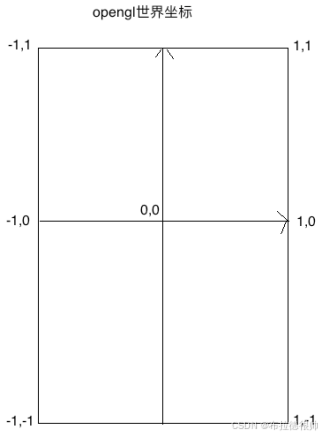
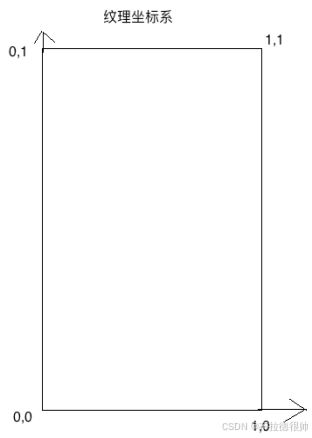
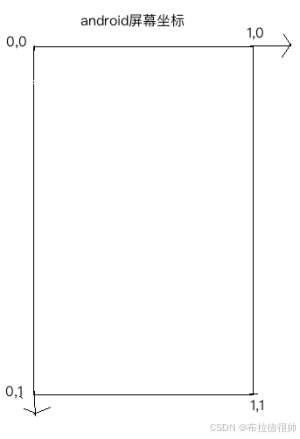
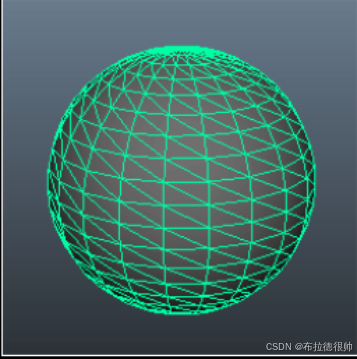
四, OpenGL坐标系
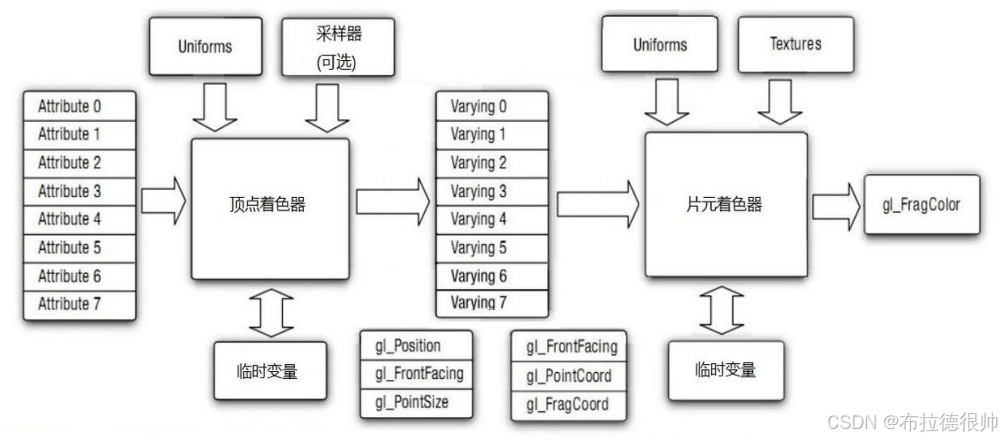
五, OpenGL 着色器
着色器(Shader)是运行在GPU上的小程序。顶点着色器(vertex shader) 如何处理顶点、法线等数据的小程序。片元着色器(fragment shader) 如何处理光、阴影、遮挡、环境等等对物体表面的影响,最终生成一副图像的小程序
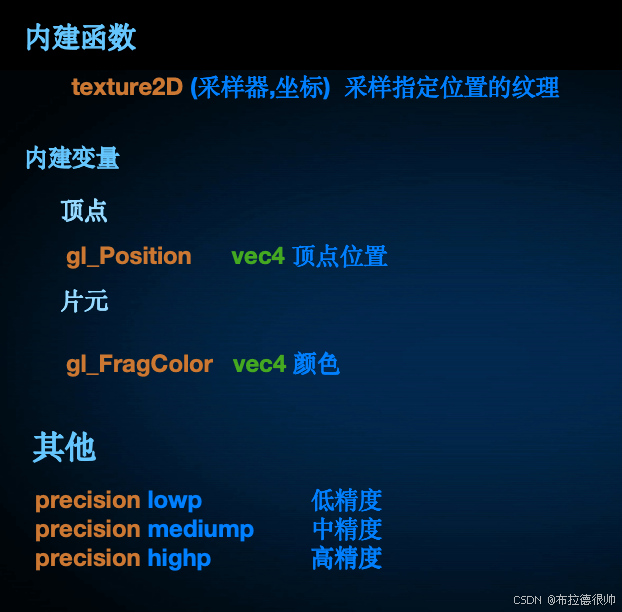
六, GLSL编程语言
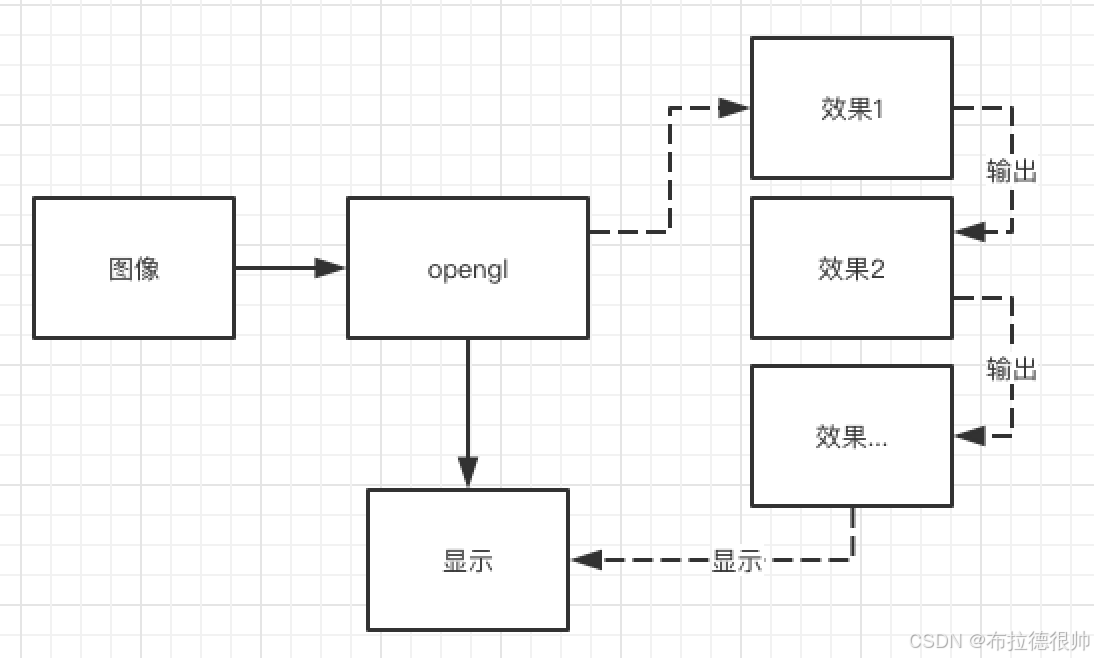
七,使用MediaCodec录制在Opengl中渲染架构
八,代码实现
8.1 自定义渲染view继承GLSurfaceView
public class TigerView extends GLSurfaceView {
    private TigerRender mTigerRender;
    //默认正常速度
    private Speed mSpeed = Speed.MODE_NORMAL;
    public void setSpeed(Speed speed) {
        mSpeed = speed;
    }
    public enum Speed {
        MODE_EXTRA_SLOW, MODE_SLOW, MODE_NORMAL, MODE_FAST, MODE_EXTRA_FAST
    }
    public TigerView(Context context) {
        super(context);
    }
    public TigerView(Context context, AttributeSet attrs) {
        super(context, attrs);
        /**
         * 设置egl版本
         */
        setEGLContextClientVersion(2);
        /**
         * 设置渲染器
         */
        mTigerRender = new TigerRender(this);
        setRenderer(mTigerRender);
        /**
         * 设置按需渲染,当我们调用requestRender()的时候就会调用GlThread回调一次onDrawFrame()
         */
        setRenderMode(RENDERMODE_WHEN_DIRTY);
    }
    public void startRecord() {
        float speed = 1.f;
        switch (mSpeed) {
            case MODE_EXTRA_SLOW:
                speed = 0.3f;
                break;
            case MODE_SLOW:
                speed = 0.5f;
                break;
            case MODE_NORMAL:
                speed = 1.f;
                break;
            case MODE_FAST:
                speed = 1.5f;
                break;
            case MODE_EXTRA_FAST:
                speed = 3.f;
                break;
        }
        mTigerRender.startRecord(speed);
    }
    public void stopRecord() {
        mTigerRender.stopRecord();
    }
}
8.2 自定义渲染器TigerRender
public class TigerRender implements GLSurfaceView.Renderer, SurfaceTexture.OnFrameAvailableListener {
    private final TigerView mView;
    private CameraHelper mCameraHelper;
    private SurfaceTexture mSurfaceTexture;
    float[] mtx = new float[16];
    private ScreeFilter mScreeFilter;
    private int[] mTextures;
    private CameraFilter mCameraFilter;
    private MediaRecorder mMediaRecorder;
    public TigerRender(TigerView tigerView) {
        mView = tigerView;
    }
    /**
     * 画布创建好了
     *
     * @param gl     the GL interface. Use <code>instanceof</code> to
     *               test if the interface supports GL11 or higher interfaces.
     * @param config the EGLConfig of the created surface. Can be used
     *               to create matching pbuffers.
     */
    @Override
    public void onSurfaceCreated(GL10 gl, EGLConfig config) {
        mCameraHelper = new CameraHelper(Camera.CameraInfo.CAMERA_FACING_BACK);
        //准备好摄像头绘制的画布
        //通过open gl创建一个纹理id
        mTextures = new int[1];
        GLES20.glGenTextures(mTextures.length, mTextures, 0);
        mSurfaceTexture = new SurfaceTexture(mTextures[0]);
        //设置有一帧新的数据到来的时候,回调监听
        mSurfaceTexture.setOnFrameAvailableListener(this);
        //必须要在GlThread里面创建着色器程序
        mCameraFilter = new CameraFilter(mView.getContext());
        mScreeFilter = new ScreeFilter(mView.getContext());
        EGLContext eglContext = EGL14.eglGetCurrentContext();
        mMediaRecorder = new MediaRecorder(mView.getContext(), "/mnt/sdcard/test.mp4", CameraHelper.HEIGHT, CameraHelper.WIDTH, eglContext);
    }
    /**
     * 画布发生改变
     *
     * @param gl     the GL interface. Use <code>instanceof</code> to
     *               test if the interface supports GL11 or higher interfaces.
     * @param width
     * @param height
     */
    @Override
    public void onSurfaceChanged(GL10 gl, int width, int height) {
        mCameraHelper.startPreview(mSurfaceTexture);
        mCameraFilter.onReady(width, height);
        mScreeFilter.onReady(width, height);
    }
    /**
     * 画画
     *
     * @param gl the GL interface. Use <code>instanceof</code> to
     *           test if the interface supports GL11 or higher interfaces.
     */
    @Override
    public void onDrawFrame(GL10 gl) {
        //告诉open gl需要把屏幕清理成 什么样子的颜色
        GLES20.glClearColor(0, 0, 0, 0);
        //开始真正的屏幕颜色清理,也就是上一次设置的屏幕颜色
        GLES20.glClear(GLES20.GL_COLOR_BUFFER_BIT);
        //把摄像头采集的数据输出出来
        //更新纹理,然后我们才可以使用opengl从SurfaceTexure当中获取数据,进行渲染
        mSurfaceTexture.updateTexImage();
        //mSurfaceTexture比较特殊,在设置坐标的时候,需要一个变换矩阵,使用的是特殊的采样器samplerExternalOES
        //这种采样器,正常的是sample2D
        mSurfaceTexture.getTransformMatrix(mtx);
        mCameraFilter.setMatrix(mtx);
        int id = mCameraFilter.onDrawFrame(mTextures[0]);
        //在这里添加各种效果,相当于责任链
        //开始画画
        mScreeFilter.onDrawFrame(id);
        mMediaRecorder.encodeFrame(id, mSurfaceTexture.getTimestamp());
    }
    /**
     * SurfaceTexture有一个新的有效的图片的时候会被回调,此时可以把这个数据回调给GLSurfaceView的onDrawFrame
     *
     * @param surfaceTexture
     */
    @Override
    public void onFrameAvailable(SurfaceTexture surfaceTexture) {
        if (mView != null) {
            //开始渲染,有一帧新的图像,就开始调用GLSurfaceView的onDrawFrame进行绘制
            mView.requestRender();
        }
    }
    public void startRecord(float speed) {
        try {
            mMediaRecorder.start(speed);
        } catch (IOException e) {
            throw new RuntimeException(e);
        }
    }
    public void stopRecord() {
        mMediaRecorder.stop();
    }
}
8.3 创建编码器MediaRecorder
/**
 * 视频录制
 */
public class MediaRecorder {
    private final Context mContext;
    private final String mPath;
    private final int mWidth;
    private final int mHeight;
    private final EGLContext mEglContext;
    private MediaCodec mMediaCodec;
    private Surface mInputSurface;
    private MediaMuxer mMediaMuxer;
    private Handler mHandler;
    private EGLBase mEglBase;
    private boolean isStart;
    private int index;
    private float mSpeed;
    /**
     * @param context
     * @param path    视频保存地址
     * @param width   视频宽
     * @param height  视频高
     */
    public MediaRecorder(Context context, String path, int width, int height, EGLContext eglContext) {
        mContext = context.getApplicationContext();
        mPath = path;
        mWidth = width;
        mHeight = height;
        mEglContext = eglContext;
    }
    /**
     * 开始录制视频
     */
    public void start(float speed) throws IOException {
        /**
         * 配置MediaCodec编码器,视频编码的宽,高,帧率,码率
         * 录制成mp4格式,视频编码格式是h264 MIMETYPE_VIDEO_AVC 高级编码
         */
        mSpeed = speed;
        MediaFormat videoFormat = MediaFormat.createVideoFormat(MediaFormat.MIMETYPE_VIDEO_AVC, mWidth, mHeight);
        //配置码率 1500kbs
        videoFormat.setInteger(MediaFormat.KEY_BIT_RATE, 1500_000);
        //帧率
        videoFormat.setInteger(MediaFormat.KEY_FRAME_RATE, 20);
        //关键字间隔
        videoFormat.setInteger(MediaFormat.KEY_I_FRAME_INTERVAL, 20);
        //创建视频高级编码器
        mMediaCodec = MediaCodec.createEncoderByType(MediaFormat.MIMETYPE_VIDEO_AVC);
        //因为是从Surface中读取的,所以不需要设置这个颜色格式
        videoFormat.setInteger(MediaFormat.KEY_COLOR_FORMAT, MediaCodecInfo.CodecCapabilities.COLOR_FormatSurface);
        //配置编码器,CONFIGURE_FLAG_ENCODE,
        mMediaCodec.configure(videoFormat, null, null, MediaCodec.CONFIGURE_FLAG_ENCODE);
        //交给虚拟屏幕,通过opengl 将预览的纹理绘制到这一个虚拟屏幕中,这样子Mediacodc 就会自动编码这一帧图像
        mInputSurface = mMediaCodec.createInputSurface();
        //mp4 播放流程  解复用--》解码 》绘制
        //mp4 编码流程  封装器--》编码
        //MUXER_OUTPUT_MPEG_4 MP4格式封装器,将h.264通过他写出到文件就可以了
        mMediaMuxer = new MediaMuxer(mPath, MediaMuxer.OutputFormat.MUXER_OUTPUT_MPEG_4);
        /**
         * 配置EGL环境,也就是配置我们的虚拟屏幕环境
         */
        HandlerThread handlerThread = new HandlerThread("ViewoCodec");
        handlerThread.start();
        Looper looper = handlerThread.getLooper();
        //子线程和子线程之间的通信
        mHandler = new Handler(looper);
        //EGl的绑定线程,对我们自己创建的EGl环境,都是在这个线程里面进行
        mHandler.post(() -> {
            //创建我们的EGL环境(虚拟设备,EGL上下文 )
            mEglBase = new EGLBase(mContext, mWidth, mHeight, mInputSurface, mEglContext);
            //启动编码器
            mMediaCodec.start();
            isStart = true;
        });
    }
    /**
     * textureId 纹理id
     * 调用一次,就有一个新的图片需要编码
     */
    public void encodeFrame(int textureId, long timesnap) {
        if (!isStart) {
            return;
        }
        //切换到子线程中编码
        mHandler.post(() -> {
            //把图像纹理画到虚拟屏幕里面
            mEglBase.draw(textureId, timesnap);
            //此时我们需要从编码器里面的输出缓冲区获取编码以后的数据就可以了,
            getCodec(false);
        });
    }
    private void getCodec(boolean endOfStream) {
        if (endOfStream) {
            //表示停止录制,此时我们不录制了,需要给mediacoic 通知
            mMediaCodec.signalEndOfInputStream();
        }
        MediaCodec.BufferInfo bufferInfo = new MediaCodec.BufferInfo();
        //希望将已经编码完成的数据都获取到,然后写出到mp4文件中
        while (true) {
            //并不是传给mediacodec一帧数据就表示可以编码出一帧数据,有可能需要好多帧数据才可以同时编码出数据出来
            //输出缓冲区
            //传递-1表示一直等到输出缓冲区有一个编码好的有效的数据以后才会继续向下走,不然就会一直卡在127行,
            //10_000超时时间
            int status = mMediaCodec.dequeueOutputBuffer(bufferInfo, 10_000);
            if (status == MediaCodec.INFO_TRY_AGAIN_LATER) {
                //如果是停止,就继续循环,
                // 继续循环就表示不会接收到新的等待编码的图像了
                //相当于保证mediacodic中所有待编码的数据都编码完成
                // 标记不是停止,我们退出,下一轮接收到更多的数据才来输出编码以后的数据,我们就让继续走
                // 表示需要更多数据才可以编码出图像  false是继续录制,未来还有机会在调用getCodec
                if (!endOfStream) {
                    //结束录制了
                    break;
                }
                //否则继续
            } else if (status == MediaCodec.INFO_OUTPUT_FORMAT_CHANGED) {
                //开始编码,就会调用一次
                MediaFormat outputFormat = mMediaCodec.getOutputFormat();
                //配置封装器,增加一路指定格式的媒体流
                index = mMediaMuxer.addTrack(outputFormat);
                //启动封装器
                mMediaMuxer.start();
            } else if (status == MediaCodec.INFO_OUTPUT_BUFFERS_CHANGED) {
                //忽略
            } else {
                //成功取出一个有效的输出
                ByteBuffer outputBuffer = mMediaCodec.getOutputBuffer(status);
                if ((bufferInfo.flags & MediaCodec.BUFFER_FLAG_CODEC_CONFIG) != 0) {
                    //如果获取的ByteBuffer是配置信息,那么就不需要写出到mp4文件中
                    bufferInfo.size = 0;
                }
                if (bufferInfo.size != 0) {
                    bufferInfo.presentationTimeUs = (long) (bufferInfo.presentationTimeUs / mSpeed);
                    //写出到 mp4文件中
                    //根据偏移定位去获取数据,而不是从0开始
                    outputBuffer.position(bufferInfo.offset);
                    //设置可读可写的总长度
                    outputBuffer.limit(bufferInfo.offset + bufferInfo.size);
                    mMediaMuxer.writeSampleData(index, outputBuffer, bufferInfo);
                }
                //输出缓冲区使用完毕了, 此时就可以回收了,让mediacodec继续使用
                mMediaCodec.releaseOutputBuffer(status, false);
                if ((bufferInfo.flags & MediaCodec.BUFFER_FLAG_END_OF_STREAM) != 0) {
                    //结束了,
                    break;
                }
            }
        }
    }
    public void stop() {
        isStart = false;
        mHandler.post(() -> {
            getCodec(true);
            mMediaCodec.stop();
            mMediaCodec.release();
            mMediaCodec = null;
            mMediaMuxer.stop();
            mMediaMuxer.release();
            mMediaMuxer = null;
            mEglBase.release();
            mEglBase = null;
            mInputSurface = null;
            mHandler.getLooper().quitSafely();
            mHandler = null;
        });
    }
}
8.4 配置egl环境
/**
 * EGL配置 和录制opengl的操作
 */
public class EGLBase {
    private final EGLSurface mEglSurface;
    private final ScreeFilter mScreeFilter;
    private EGLDisplay mEglDisplay;
    private EGLConfig mEglConfig;
    private EGLContext mEGLContext;
    /**
     * @param context
     * @param width
     * @param height
     * @param surface MediaCodec创建的surface, 我们需要将这个surface贴到虚拟屏幕里面
     */
    public EGLBase(Context context, int width, int height, Surface surface, EGLContext eglContext) {
        createEGL(eglContext);
        //把surface贴到EGLDisplay 虚拟屏幕里面
        int[] attrib_list = {
                //不需要配置什么属性
                EGL14.EGL_NONE};
        //就是向mEglDisplay这个虚拟屏幕上面画画
        mEglSurface = EGL14.eglCreateWindowSurface(mEglDisplay, mEglConfig, surface, attrib_list, 0);
        //必须要绑定当前线程的显示上下文,不然就绘制不上去,这样子之后操作的opelgl就是在这个虚拟屏幕上操作,读和写都是在同一个surface里面
        if (!EGL14.eglMakeCurrent(mEglDisplay, mEglSurface, mEglSurface, mEGLContext)) {
            throw new RuntimeException("eglMakeCurrent failed");
        }
        //向虚拟屏幕画画
        mScreeFilter = new ScreeFilter(context);
        mScreeFilter.onReady(width, height);
    }
    private void createEGL(EGLContext eglContext) {
        //创建虚拟显示器
        mEglDisplay = EGL14.eglGetDisplay(EGL14.EGL_DEFAULT_DISPLAY);
        if (mEglDisplay == EGL14.EGL_NO_DISPLAY) {
            throw new RuntimeException("eglGetDisplay failed");
        }
        int[] version = new int[2];
        //初始化虚拟设备
        if (!EGL14.eglInitialize(mEglDisplay, version, 0, version, 1)) {
            throw new RuntimeException("eglInitialize failed");
        }
        int[] attrib_list = new int[]{//rgba 红绿蓝透明度
                EGL14.EGL_RED_SIZE, 8, EGL14.EGL_GREEN_SIZE, 8, EGL14.EGL_BLUE_SIZE, 8, EGL14.EGL_ALPHA_SIZE, 8, EGL14.EGL_RENDERABLE_TYPE, EGL14.EGL_OPENGL_ES2_BIT,//和egl的版本有关系
                EGL14.EGL_NONE//这个很重要,一定要配置为NONE,表示配置结束了
        };
        EGLConfig[] configs = new EGLConfig[1];
        int[] num_config = new int[1];
        boolean eglChooseConfig = EGL14.eglChooseConfig(mEglDisplay, attrib_list, 0, configs, 0, configs.length, num_config, 0);
        if (!eglChooseConfig) {
            //如果配置失败
            throw new IllegalArgumentException("eglChooseConfig failed");
        }
        mEglConfig = configs[0];
        int[] attriblist = {EGL14.EGL_CONTEXT_CLIENT_VERSION, 2, EGL14.EGL_NONE};
        //创建EGL上下文
        //share_context 共享上下,传递绘制线程的(GLThread)EGL上下文,达到共享资源的目的
        mEGLContext = EGL14.eglCreateContext(mEglDisplay, mEglConfig, eglContext, attriblist, 0);
        if (mEGLContext == null || mEGLContext == EGL14.EGL_NO_CONTEXT) {
            mEGLContext = null;
            throw new RuntimeException("createContex error !");
        }
    }
    /**
     * @param textureId 纹理id,代表一张图片
     * @param timesnap  时间戳
     */
    public void draw(int textureId, long timesnap) {
        //必须要绑定当前线程的显示上下文,不然就绘制不上去,这样子之后操作的opelgl就是在这个虚拟屏幕上操作,读和写都是在同一个surface里面
        //画画之前也必须要绑定
        if (!EGL14.eglMakeCurrent(mEglDisplay, mEglSurface, mEglSurface, mEGLContext)) {
            throw new RuntimeException("eglMakeCurrent failed");
        }
        //向虚拟屏幕画画
        mScreeFilter.onDrawFrame(textureId);
        //刷新eglSurface时间戳
        EGLExt.eglPresentationTimeANDROID(mEglDisplay, mEglSurface, timesnap);
        //交换数据,EGL工作模式,双缓存模式,内部有两个frameBuff,当EGL将一个frame显示到屏幕上以后,
        // 另一个frame就在后台等待opengl进行交换
        //也就是画完一次,交换一次
        EGL14.eglSwapBuffers(mEglDisplay, mEglSurface);
    }
    public void release() {
        EGL14.eglDestroySurface(mEglDisplay, mEglSurface);
        EGL14.eglMakeCurrent(mEglDisplay, EGL14.EGL_NO_SURFACE, EGL14.EGL_NO_SURFACE, EGL14.EGL_NO_CONTEXT);
        EGL14.eglDestroyContext(mEglDisplay, mEGLContext);
        EGL14.eglReleaseThread();
        EGL14.eglTerminate(mEglDisplay);
    }
}
8.5 配置shader
public class AbstractFilter {
    protected FloatBuffer mGLVertexBuffer;
    protected FloatBuffer mGLTextureBuffer;
    //顶点着色
    protected int mVertexShaderId;
    //片段着色
    protected int mFragmentShaderId;
    protected int mGLProgramId;
    /**
     * 顶点着色器
     * attribute vec4 position;
     * 赋值给gl_Position(顶点)
     */
    protected int vPosition;
    /**
     * varying vec2 textureCoordinate;
     */
    protected int vCoord;
    /**
     * uniform mat4 vMatrix;
     */
    protected int vMatrix;
    /**
     * 片元着色器
     * Samlpe2D 扩展 samplerExternalOES
     */
    protected int vTexture;
    protected int mOutputWidth;
    protected int mOutputHeight;
    public AbstractFilter(Context context, int vertexShaderId, int fragmentShaderId) {
        this.mVertexShaderId = vertexShaderId;
        this.mFragmentShaderId = fragmentShaderId;
        // 4个点 x,y = 4*2 float 4字节 所以 4*2*4
        mGLVertexBuffer = ByteBuffer.allocateDirect(4 * 2 * 4).order(ByteOrder.nativeOrder()).asFloatBuffer();
        mGLVertexBuffer.clear();
        float[] VERTEX = {-1.0f, -1.0f, 1.0f, -1.0f, -1.0f, 1.0f, 1.0f, 1.0f};
        mGLVertexBuffer.put(VERTEX);
        mGLTextureBuffer = ByteBuffer.allocateDirect(4 * 2 * 4).order(ByteOrder.nativeOrder()).asFloatBuffer();
        mGLTextureBuffer.clear();
        float[] TEXTURE = {0.0f, 1.0f, 1.0f, 1.0f, 0.0f, 0.0f, 1.0f, 0.0f};
        mGLTextureBuffer.put(TEXTURE);
        initilize(context);
        initCoordinate();
    }
    protected void initilize(Context context) {
        String vertexSharder = OpenGLUtils.readRawTextFile(context, mVertexShaderId);
        String framentShader = OpenGLUtils.readRawTextFile(context, mFragmentShaderId);
        mGLProgramId = OpenGLUtils.loadProgram(vertexSharder, framentShader);
        // 获得着色器中的 attribute 变量 position 的索引值
        vPosition = GLES20.glGetAttribLocation(mGLProgramId, "vPosition");
        vCoord = GLES20.glGetAttribLocation(mGLProgramId, "vCoord");
        vMatrix = GLES20.glGetUniformLocation(mGLProgramId, "vMatrix");
        // 获得Uniform变量的索引值
        vTexture = GLES20.glGetUniformLocation(mGLProgramId, "vTexture");
    }
    public void onReady(int width, int height) {
        mOutputWidth = width;
        mOutputHeight = height;
    }
    public void release() {
        GLES20.glDeleteProgram(mGLProgramId);
    }
    public int onDrawFrame(int textureId) {
        //设置显示窗口
        GLES20.glViewport(0, 0, mOutputWidth, mOutputHeight);
        //使用着色器
        GLES20.glUseProgram(mGLProgramId);
        //传递坐标
        mGLVertexBuffer.position(0);
        GLES20.glVertexAttribPointer(vPosition, 2, GLES20.GL_FLOAT, false, 0, mGLVertexBuffer);
        GLES20.glEnableVertexAttribArray(vPosition);
        mGLTextureBuffer.position(0);
        GLES20.glVertexAttribPointer(vCoord, 2, GLES20.GL_FLOAT, false, 0, mGLTextureBuffer);
        GLES20.glEnableVertexAttribArray(vCoord);
        GLES20.glActiveTexture(GLES20.GL_TEXTURE0);
        //绑定
        GLES20.glBindTexture(GLES20.GL_TEXTURE_2D, textureId);
        GLES20.glUniform1i(vTexture, 0);
        GLES20.glDrawArrays(GLES20.GL_TRIANGLE_STRIP, 0, 4);
        //解绑
        GLES20.glBindTexture(GLES20.GL_TEXTURE_2D, 0);
        return textureId;
    }
    //修改坐标
    protected void initCoordinate() {
    }
}
到此这篇关于Android使用OpenGL和MediaCodec录制的文章就介绍到这了,更多相关Android使用OpenGL和MediaCodec内容请搜索脚本之家以前的文章或继续浏览下面的相关文章希望大家以后多多支持脚本之家!