简单学习CSS网页布局(初学者)
脚本之家
XHTML主要用div标签进行网页的布局,而控制布局的工具是CSS代码,以使网页符合Web标准。所以很多网页设计师把这种布局方法的网页叫做“Div+CSS”网页。其实这是不太准确的说法,因为Web标准不太被行外人士所熟识,导致“Div+CSS”的概念取代了Web标准。
11.1.6 div元素的嵌套
类似于表格布局页面,为了实现复杂的布局结构,div元素也需要互相嵌套。不过在布局页面时尽量少嵌套,因为XHTML元素多重嵌套将影响浏览器对代码的解析速度。在D:\web\目录下创建网页文件(XHTML1.0),命名为div_div.htm,编写div_div.htm文件代码如代码11.6所示。
代码11.6 div嵌套:div_div.htm
<!DOCTYPE html PUBLIC "-//W3C//DTD XHTML 1.0 Transitional//EN" "http://www.w3. org/TR/xhtml1/DTD/xhtml1-transitional.dtd">
<html xmlns="http://www.w3.org/1999/xhtml">
<head>
<meta http-equiv="Content-Type" content="text/html; charset=gb2312" />
<title>div嵌套</title>
<style type="text/css">
*{margin:0px;
padding:0px;
}
#all{width:400px;
height:300px;
background-color:#600;
margin:0px auto;
}
#one{width:300px;
height:120px;
background-color:#eee;
border:1px solid #000;
margin:0px auto;
}
#two{width:300px;
height:120px;
background-color:#eee;
border:1px solid #000;
margin:0px auto;
}
</style></head>
<body>
<div id="all">
<div id="one">顶部</div>
<div id="two">底部</div>
</div>
</body>
</html>
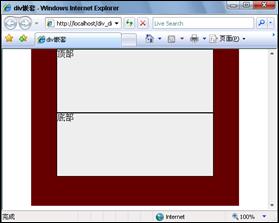
为了更方便看到div的表现,笔者给内部div设置了浅灰色背景色和黑色边框,而外部的div为深红色背景色。本示例综合了div居中的知识,内部的2个div水平居中在其父容器(外部div)中。在浏览器地址栏输入http://localhost/div_div.htm,浏览效果如图11.6所示。

图11.6 div嵌套
11.1.7 div元素的浮动
作为块状元素,通过div布局网页,CSS设置其属性,完全符合内容与表现分离。不过一个div标签占据一行,怎样实现布局中并列的2块区域呢?块状元素有一个很重要的“float”属性,可以使多个块状元素并列于一行。
float属性也被称为浮动属性,这个词非常形象。对前面的div元素设置浮动属性后,当前面的div元素留有足够的空白宽度时,后面的div元素将自动浮上来,和前面的div元素并列于一行。float属性的值有left、right、none和inherit。很多对象都有inherit属性,这是继承属性,代表继承父容器的属性。float属性值为none时,块状元素不会浮动,这也是块状元素的默认值。float属性值为left时,块状元素将向左浮动;float属性值为right时,块状元素将向右浮动。
— 注意:使2个div并列于一行的前提是:这一行有足够的宽度容纳2个div的宽度。
(1)在D:\web\目录下创建网页文件(XHTML1.0),命名为div_float.htm,编写div_float.htm文件代码如代码11.7所示。
代码11.7 设置div浮动:div_float.htm
<!DOCTYPE html PUBLIC "-//W3C//DTD XHTML 1.0 Transitional//EN" "http://www.w3. org/TR/xhtml1/DTD/xhtml1-transitional.dtd">
<html xmlns="http://www.w3.org/1999/xhtml">
<head>
<meta http-equiv="Content-Type" content="text/html; charset=gb2312" />
<title>设置div浮动</title>
<style type="text/css">
*{margin:0px;
padding:0px;
}
#one{width:125px;
height:120px;
background-color:#eee;
border:1px solid #000;
float:left;
}
#two{width:200px;
height:120px;
background-color:#eee;
border:1px solid #000;
}
</style></head>
<body>
<div id="one">第1个div</div>
<div id="two">第2个div</div>
</body>
</html>
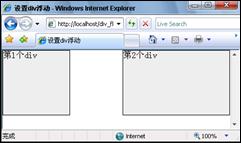
(2)为了更方便看到div的表现,笔者给div设置了浅灰色背景色和黑色边框,在浏览器地址栏输入http://localhost/div_float.htm,浏览效果如图11.7所示。
(3)笔者只设置了第1个div元素向左浮动,第2个div元素“流”上来了,并紧挨着第1个div元素。设置第2个div向右浮动如代码11.8所示。
代码11.8 设置div浮动:div_float.htm
#two{width:200px;
height:120px;
background-color:#eee;
border:1px solid #000;
float:right;
}
(4)在浏览器地址栏输入http://localhost/div_float.htm,浏览效果如图11.8所示。


图11.7 设置div向左浮动 图11.8 div左浮动和右浮动
(5)这时,第2个div紧挨着其父容器(浏览器)的右边框,当然,这2个div元素也可以换个位置,即设置CSS如代码11.9所示。
代码11.9 设置div浮动:div_float.htm
#one{width:125px;
height:120px;
background-color:#eee;
border:1px solid #000;
float:right;
}
#two{width:200px;
height:120px;
background-color:#eee;
border:1px solid #000;
float:left;
}
(6)在浏览器地址栏输入http://localhost/div_float.htm,浏览效果如图11.9所示。

图11.9 交换div浮动方向
浮动属性是CSS布局的最佳利器,可以通过不同的浮动属性值灵活地定位div元素,以达到灵活布局网页的目的。块状元素(包括div)浮动的范围由其被包含的父容器所决定,以上实例div元素的父容器就是body或html。
为了更加灵活地定位div元素,CSS提供了clear属性,中文意思即为“清除”。clear属性的值有none、left、right和both,默认值为none。当多个块状元素由于第1个设置浮动属性而并列时,如果某个元素不需要被“流”上去,即可设置相应的clear属性。
(1)在D:\web\目录下创建网页文件(XHTML1.0),命名为div_clear.htm,编写div_clear.htm文件代码如代码11.10所示。
代码11.10 div的清除属性:div_clear.htm
<!DOCTYPE html PUBLIC "-//W3C//DTD XHTML 1.0 Transitional//EN" "http://www. w3.org/TR/xhtml1/DTD/xhtml1-transitional.dtd">
<html xmlns="http://www.w3.org/1999/xhtml">
<head>
<meta http-equiv="Content-Type" content="text/html; charset=gb2312" />
<title>div的清除属性</title>
<style type="text/css">
*{margin:0px;
padding:0px;
}
.all{width:400px;
height:170px;
background-color:#600;
margin:0px auto;
}
.one,.two,#three_1,#three_2,#three_3,#three_4{width:120px;
height:50px;
background-color:#eee;
border:1px solid #000;
}
.one{float:left;}
.two{float:right;}
#three_1{clear:none;}
#three_2{clear:both;}
#three_3{clear:right;}
#three_4{clear:left;}
</style></head>
<body>
<div class="all">
<div class="one">第1个div</div>
<div class="two">第2个div</div>
<div id="three_1">第3个div(clear:none;)</div>
</div>
<div class="all">
<div class="one">第1个div</div>
<div class="two">第2个div</div>
<div id="three_2">第3个div(clear:both;)</div>
</div>
<div class="all">
<div class="one">第1个div</div>
<div id="three_3">第2个div(clear:right;)</div>
<div class="two">第3个div</div>
</div>
<div class="all">
<div class="one">第1个div</div>
<div id="three_4">第2个div(clear:left;)</div>
<div class="two">第3个div</div>
</div>
</body>
</html>
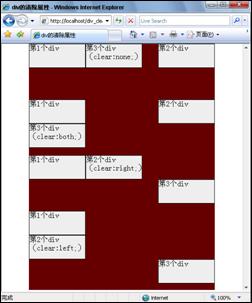
(2)为了更方便看到div的表现,笔者给内部div设置了浅灰色背景色和黑色边框,而外部的div为深红色背景色。在浏览器地址栏输入http://localhost/div_clear.htm,浏览效果如图11.10所示。

图11.10 div清除属性
— 第1种情况为默认情况,即clear属性值为none,由于前面的div都设置了浮动属性(1个向左浮动,1个向右浮动),所以第3个div元素自动“流”上去,处于2个div之间的空白处。
— 第2种情况clear属性值为both,即不管前面的div设置向左浮动还是向右浮动,此div元素不自动“流”上去。其不受浮动影响,保持在底部不动。
— 第3种情况clear属性值为right,第2个div两边都有浮动的div,但不允许向右浮动的div处于同一行,所以第3个div元素自动换行。
— 第4种情况clear属性值为left,第2个div两边都有浮动的div,但不允许向右浮动的div处于同一行,所以第2个div元素自动换行。
通过clear属性,div元素的定位更加方便自如,希望读者多加练习。
