Python GUI程序类写法与Label介绍
作者:小鱼干儿♛
这篇文章主要介绍了Python GUI程序类写法与Label介绍,文中通过示例代码介绍的非常详细,对大家的学习或者工作具有一定的参考学习价值,需要的朋友们下面随着小编来一起学习吧
GUI应用程序类的经典写法 — 面向对象
通过类Application组织整个GUI程序,类Application继承了Frame以及通过继承拥有了父类的特性,通过__init__初始化窗口中的对象,通过createWidget()创建窗口中的对象
Frame框架是一个Tkiner的组件,表示一个矩形的区域,一般作为容器使用,可以放置其他组件,从而实现复杂的布局
经典的GUI程序类的写法
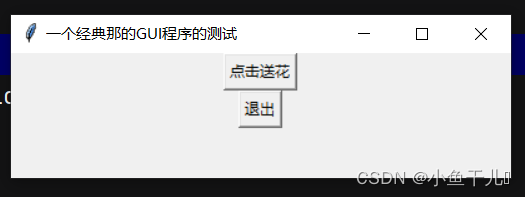
效果的基本示意图

from tkinter import *
from tkinter import messagebox
class Application(Frame):  # 继承Frame
    """
    一个经典的GUI程序类的写法
    """
    def __init__(self, master=None):
        """
        构造器,用来构造组件对象
        :param master:
        """
        super().__init__(master)  # super() 代表的是父类的定义,而不是父类的对象
        self.master = master
        self.pack()
        self.createWidget()  # 再组件中创建其他组件
    def createWidget(self):
        """创建组件,可以构造函数中调用"""
        self.btn01 = Button(self)
        self.btn01['text'] = '点击送花'
        self.btn01.pack()
        self.btn01['command'] = self.songhua
        # 创建一个退出按钮
        # command绑定事件对象(相应函数)
        self.btn02 = Button(self, text='退出', command=root.destroy)
        self.btn02.pack()  # 通过布局管理器放到组件中
    def songhua(self):  # e就是事件对象
        messagebox.showinfo("Message", "送你一朵玫瑰花")
        print('送你玫瑰花')
if __name__ == '__main__':
    root = Tk()  # 根窗口对象
    root.geometry("400x100+300+300")
    root.title("一个经典那的GUI程序的测试")
    # 创建一个Application对象
    app = Application(master=root)  # master=root 创建的对象放到root里面
    root.mainloop()
实际效果图

Label 的介绍
参数的介绍
Label(text='程序员', width=10, height=2, bg='blue',fg='white',font=("黑体",30),justify='center')
"""
	text 文本内容
	width 宽度 一个英文占1个,一个汉字占2个
	height 高度
	bg  背景
	fg  前景色
	font=() 指定字体和大小
	justify 多行文字的对齐方式
"""
使用Label标签
添加内容,设置高度宽度,背景颜色,前景色,修改显示的字体和字号
		self.label01 = Label(self,text='程序员',width=10,height=2,bg='black',fg='white')
        self.label01.pack()
        self.label02 = Label(self, text='程序员2', width=10, height=2, bg='blue',
                             fg='white',font=("黑体",30),justify='center')
        self.label02.pack()
使用Lable标签显示图像
注意要将图片对象声明为全局变量
# 显示图像
        global photo  # 将phone声明成全局变量,如果是局部变量,本方法执行完图像就会销毁,窗口显出不出来
        photo = PhotoImage(file="py.png")  # 图像的路径,有些照片的类型python可能不支持,需要额外注意
        self.label03 = Label(self,image =photo,width=300,height=200)
        self.label03.pack()
多行文字对齐的方式选择
		self.label04 = Label(self, text="图片\n我有一个图片\n一个好看的图片", borderwidth=1,relief="solid",justify='right')
        self.label04.pack()
全部源代码
"""测试Label组件的基本用法,使用面向对象的方式 """
from tkinter import *
class Application(Frame):
    def __init__(self, master=None):
        super().__init__(master)  # super() 代表的是父类的定义,而不是父类的对象
        self.master = master
        self.pack()
        self.createWidget()
    def createWidget(self):
        """创建组件"""
        self.label01 = Label(self,text='程序员',width=10,height=2,bg='black',fg='white')
        self.label01.pack()
        self.label02 = Label(self, text='程序员2', width=10, height=2, bg='blue',
                             fg='white',font=("黑体",30),justify='center')
        self.label02.pack()
        # 显示图像
        global photo  # 将phone声明成全局变量,如果是局部变量,本方法执行完图像就会销毁,窗口显出不出来
        photo = PhotoImage(file="py.png")  # 图片支持gif对象
        self.label03 = Label(self,image =photo,width=300,height=200)
        self.label03.pack()
        self.label04 = Label(self, text="图片\n我有一个图片\n一个好看的图片", borderwidth=1,relief="solid",justify='right')
        self.label04.pack()
if __name__ == '__main__':
    root = Tk()
    root.geometry("600x400+300+300")
    root.title("Label的测试")
    app = Application(master=root)
    root.mainloop()
到此这篇关于Python GUI程序类写法与Label介绍的文章就介绍到这了,更多相关Python GUI程序类 内容请搜索脚本之家以前的文章或继续浏览下面的相关文章希望大家以后多多支持脚本之家!
