
Spring Boot 教程之创建项目的三种方式
作者:author icon
一、前言
如果你是一个浸淫 SpringBoot 已久的老手,那么可能下面的内容可能不那么适合你,写得很简单。但如果是 对于一个刚学习 SpringBoot 的新手而言,我想多少还是有些用的。本文就来手把手教你如何创建一个 SpringBoot 项目,并对其中的一些关键信息进行简单分析,让你更加快速地掌握如何创建一个 SpringBoot 项目。
二、Spring Boot 简介
使用 Servlet/JSP 开发 JavaWeb 时,一个接口对应一个Servlet,配置很繁琐。为尽量减少这种麻烦,Spring Boot 应用而生。它是由 Pivotal 团队提供的全新框架,目的是用于简化 Spring 应用的初始搭建即开发过程。该框架使用特定方式进行配置,从而使开发人员无需定义样板化的配置。
三、如何创建 Spring Boot 项目
Sping Boot 项目的本质其实还是一个 Maven 项目,主要有如下几种创建 Spring Boot 项目的方式;
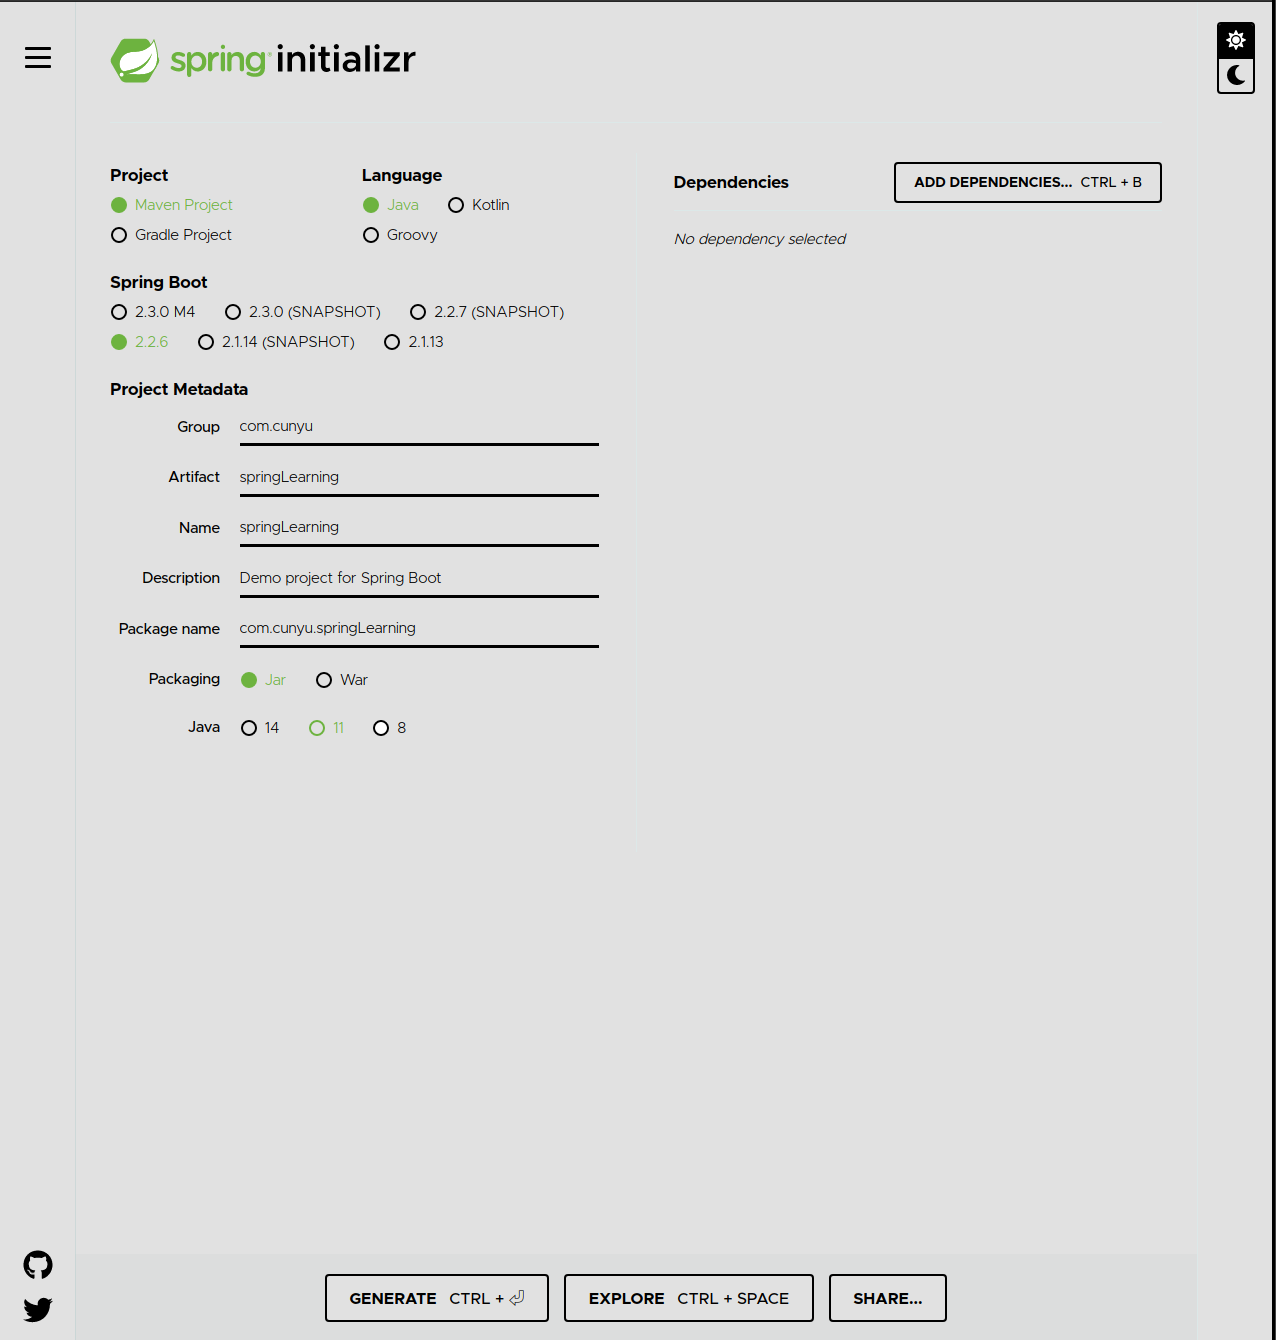
在线创建
- 打开 https://start.spring.io/ 来生成
Spring Boot项目;

- 然后选择和填写相关配置;
- Project:表示使用什么构建工具,Maven or Gradle;
- Language:表示使用什么编程语言, Java 、Kotlin or Groovy;
- Spring Boot:Spring Boot 的版本;
- Project Metadata:项目元数据,即 Maven项目基本元素,根据自己的实际情况填写;
- Dependencies:要加入的 Spring Boot 组件;
- 然后点击生成或
Ctrl + Enter即可;
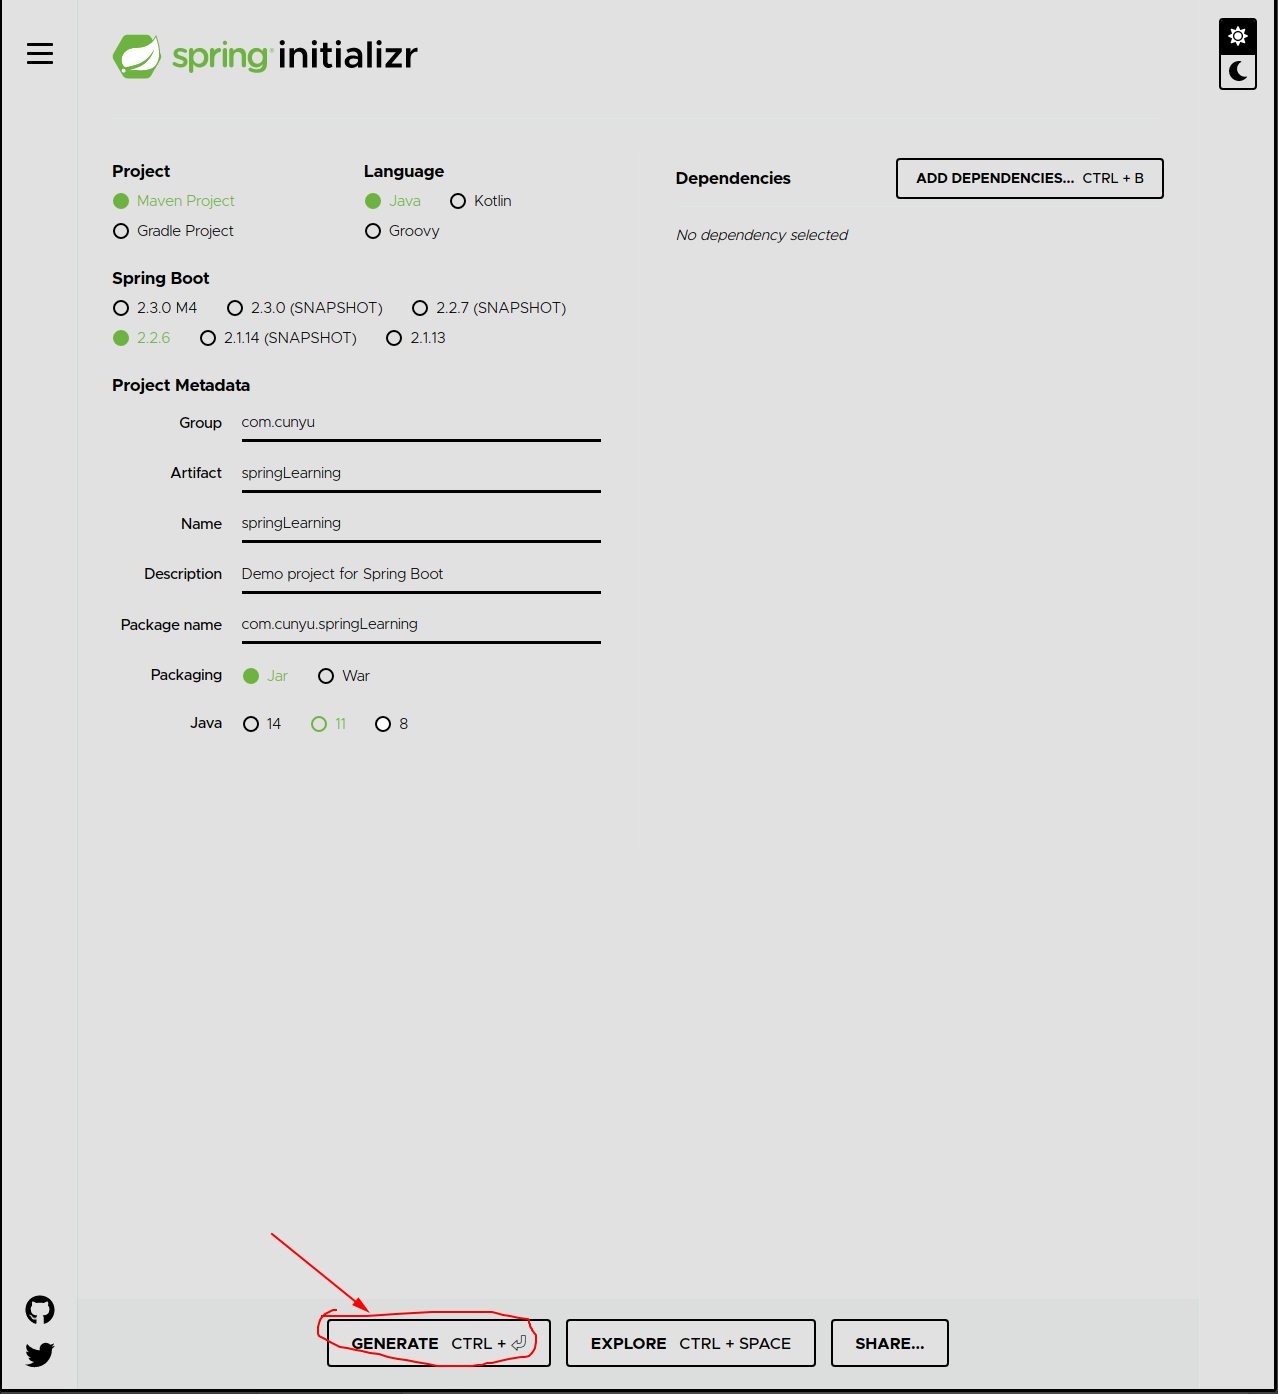
- 将压缩包下载后,解压缩后用自己喜欢的 IDE 开发即可;
IntelliJ IDEA 创建
- 新建项目时选择
Spring Initializr;
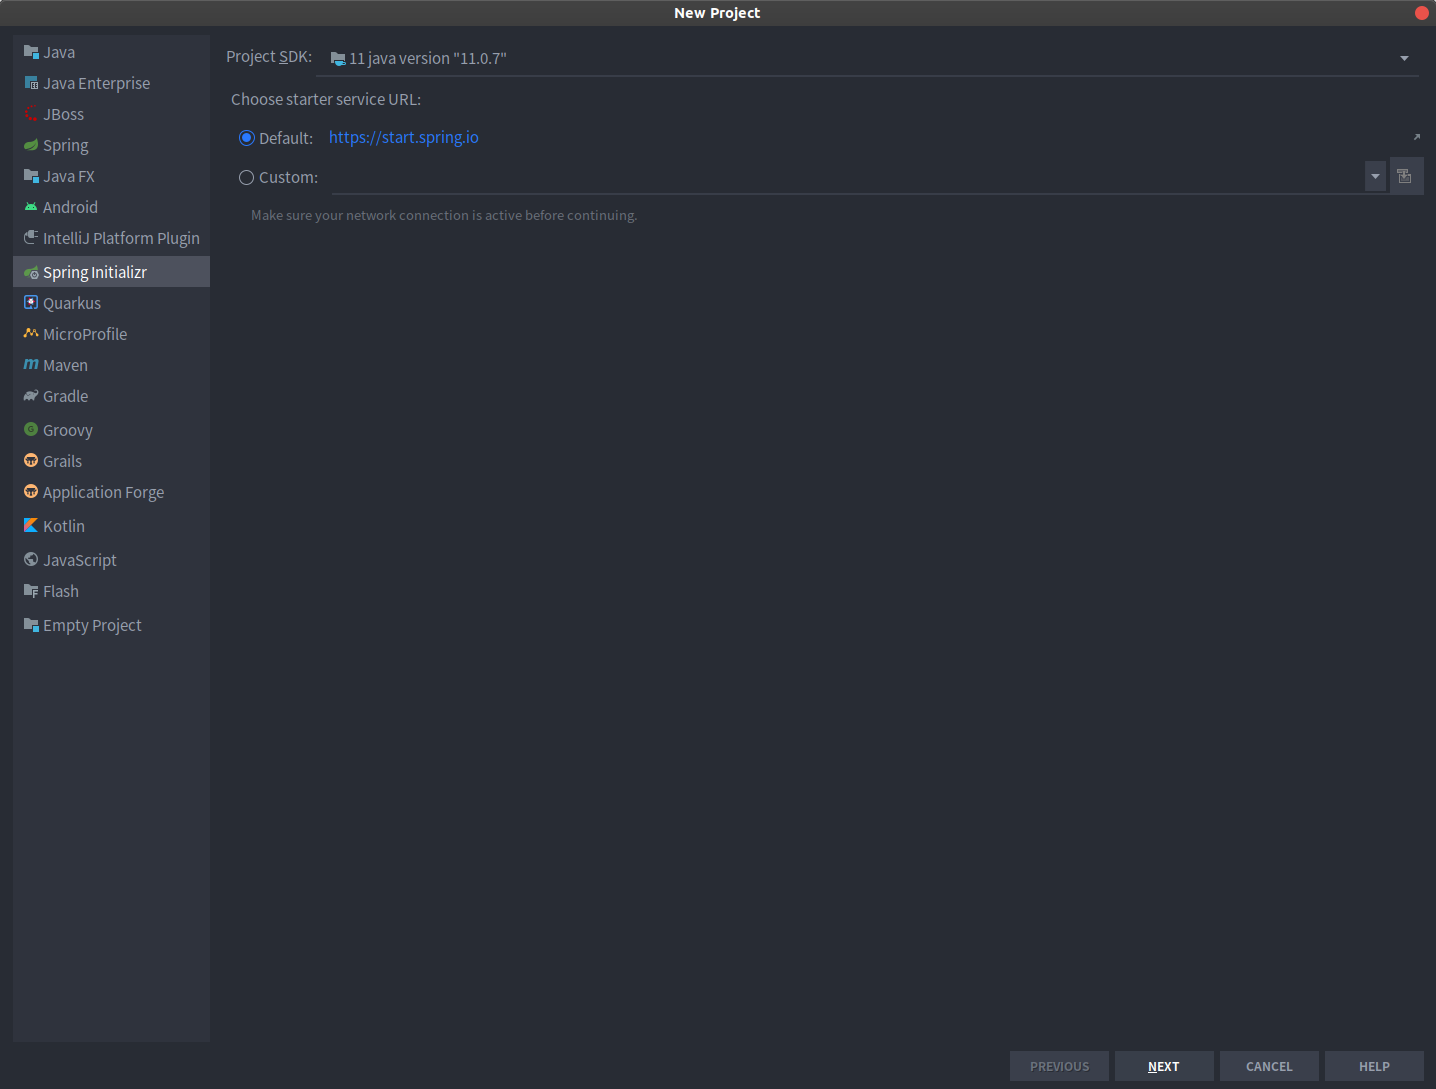
- 点击下一步,填写相关配置;
Group:组织 ID,一般分为多个段,一般第一段为域,而第二段则是 公司名称;Artifact:唯一标识符,一般是项目名;

- 选择包,添加相关依赖;
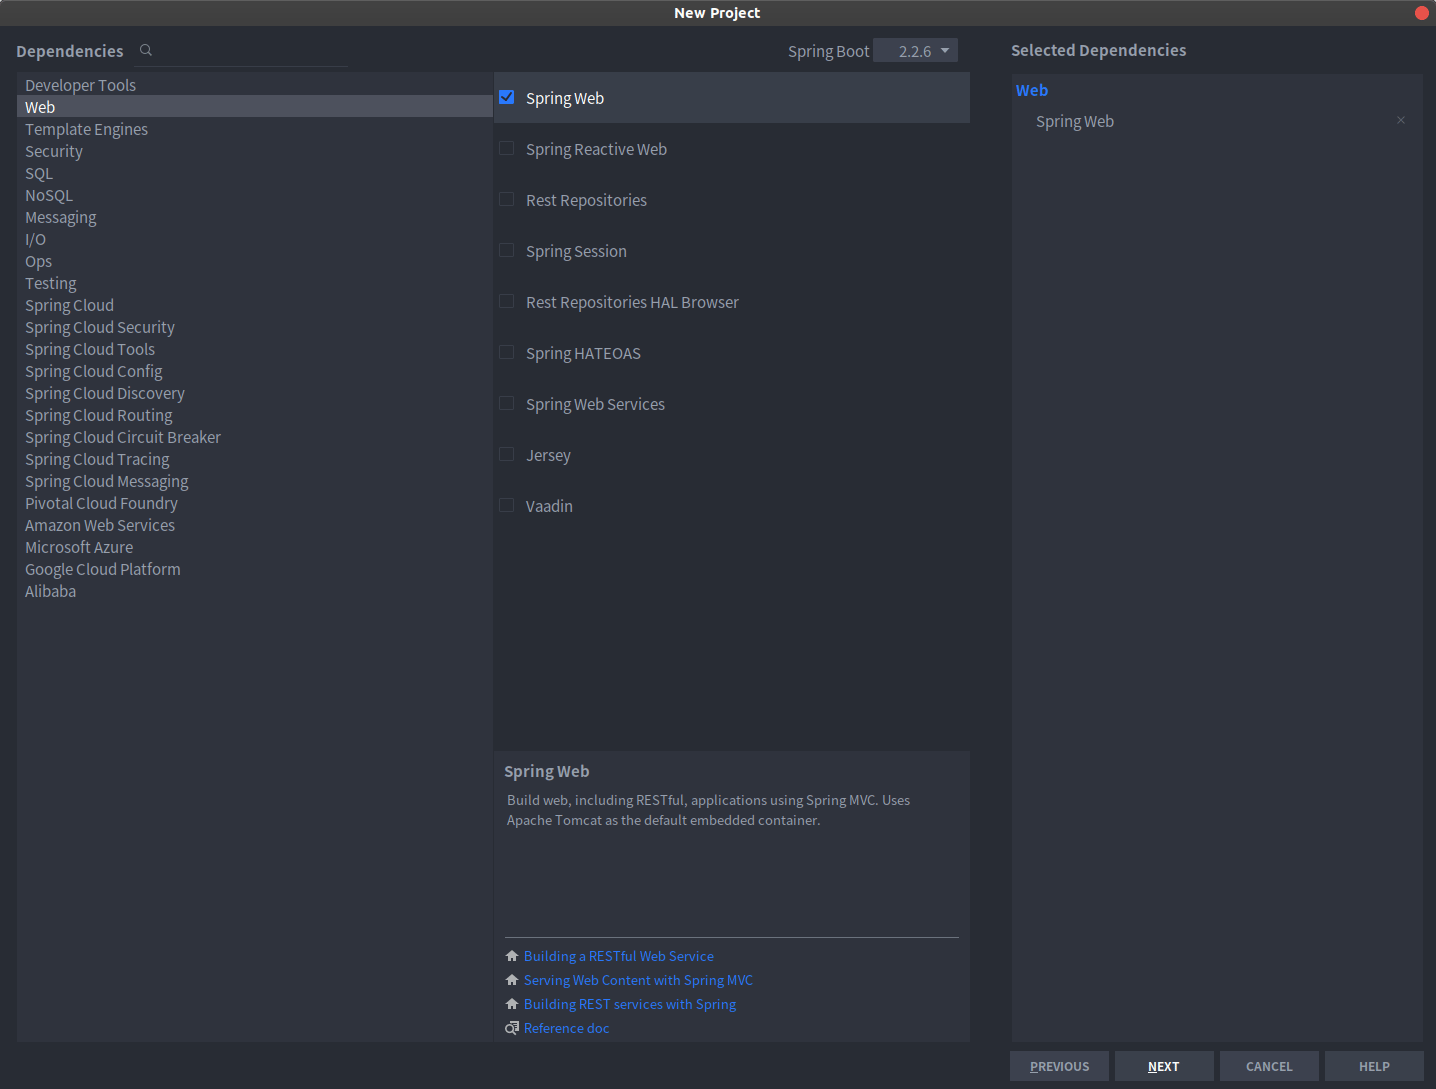
- 配置项目名,点击完成即可;
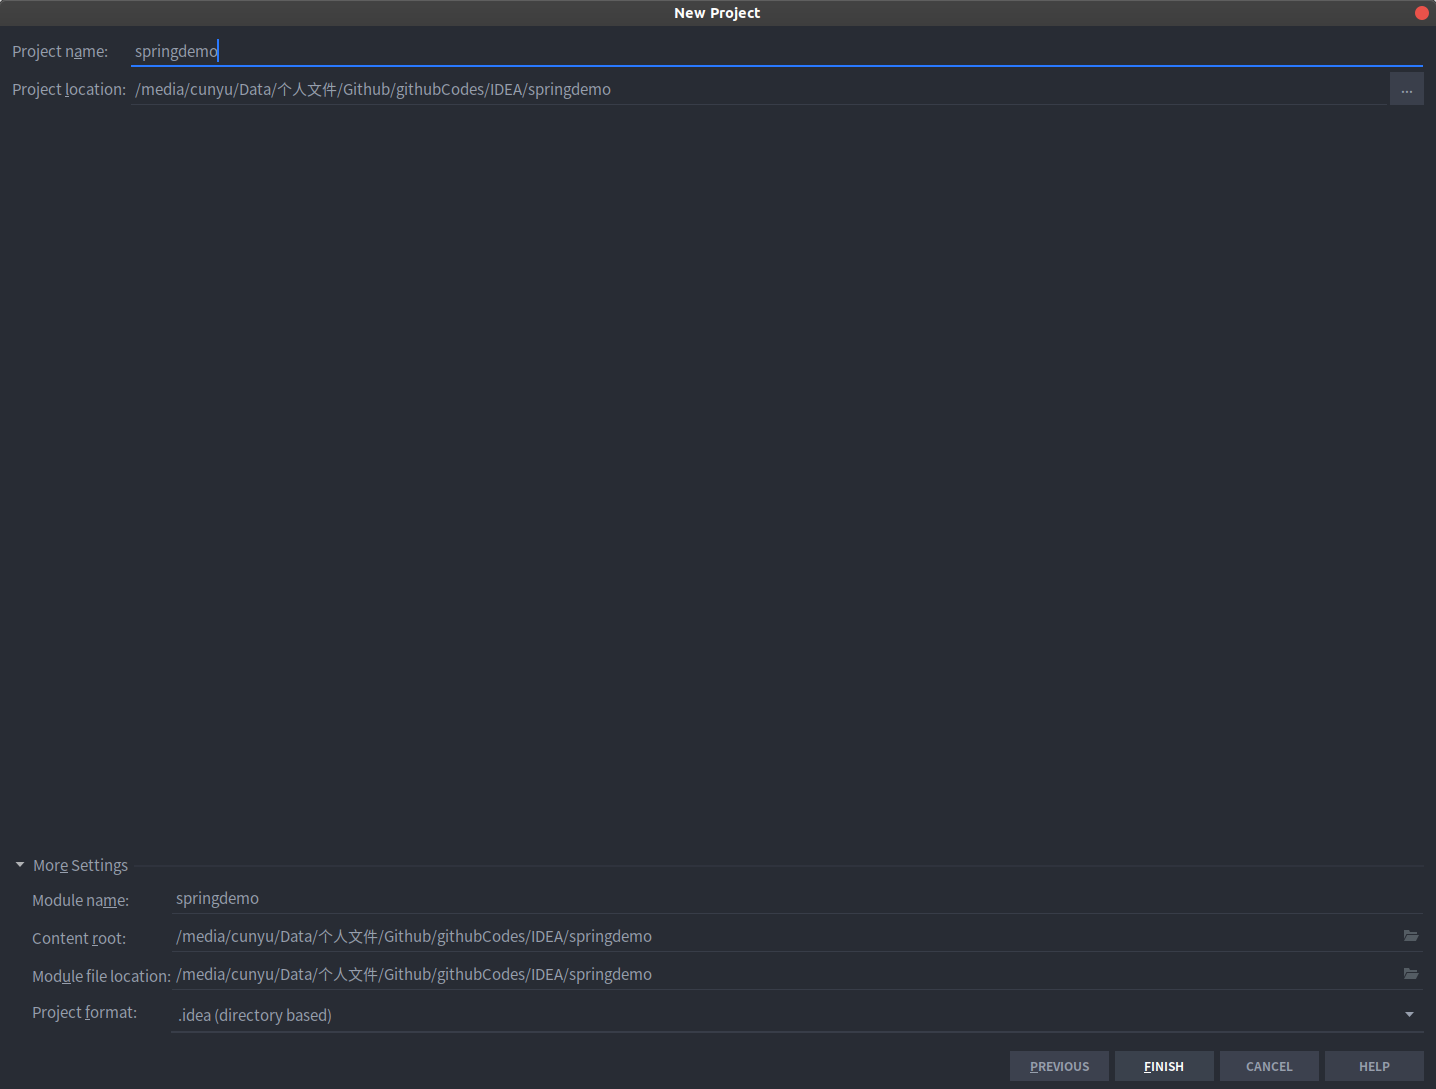
Maven 创建
- 新建 Maven 项目;

- 填写项目名和相关配置;

- 点击完成即可;

- 配置
pom.xml添加依赖;
<?xml version="1.0" encoding="UTF-8"?>
<project xmlns="http://maven.apache.org/POM/4.0.0"
         xmlns:xsi="http://www.w3.org/2001/XMLSchema-instance"
         xsi:schemaLocation="http://maven.apache.org/POM/4.0.0 http://maven.apache.org/xsd/maven-4.0.0.xsd">
    <modelVersion>4.0.0</modelVersion>
    <groupId>org.cunyu1943</groupId>
    <artifactId>springDemo</artifactId>
    <version>1.0-SNAPSHOT</version>
    <parent>
        <groupId>org.springframework.boot</groupId>
        <artifactId>spring-boot-starter-parent</artifactId>
        <version>2.2.6.RELEASE</version>
    </parent>
    <dependencies>
        <dependency>
            <groupId>org.springframework.boot</groupId>
            <artifactId>spring-boot-starter-web</artifactId>
            <version>2.2.6.RELEASE</version>
        </dependency>
    </dependencies>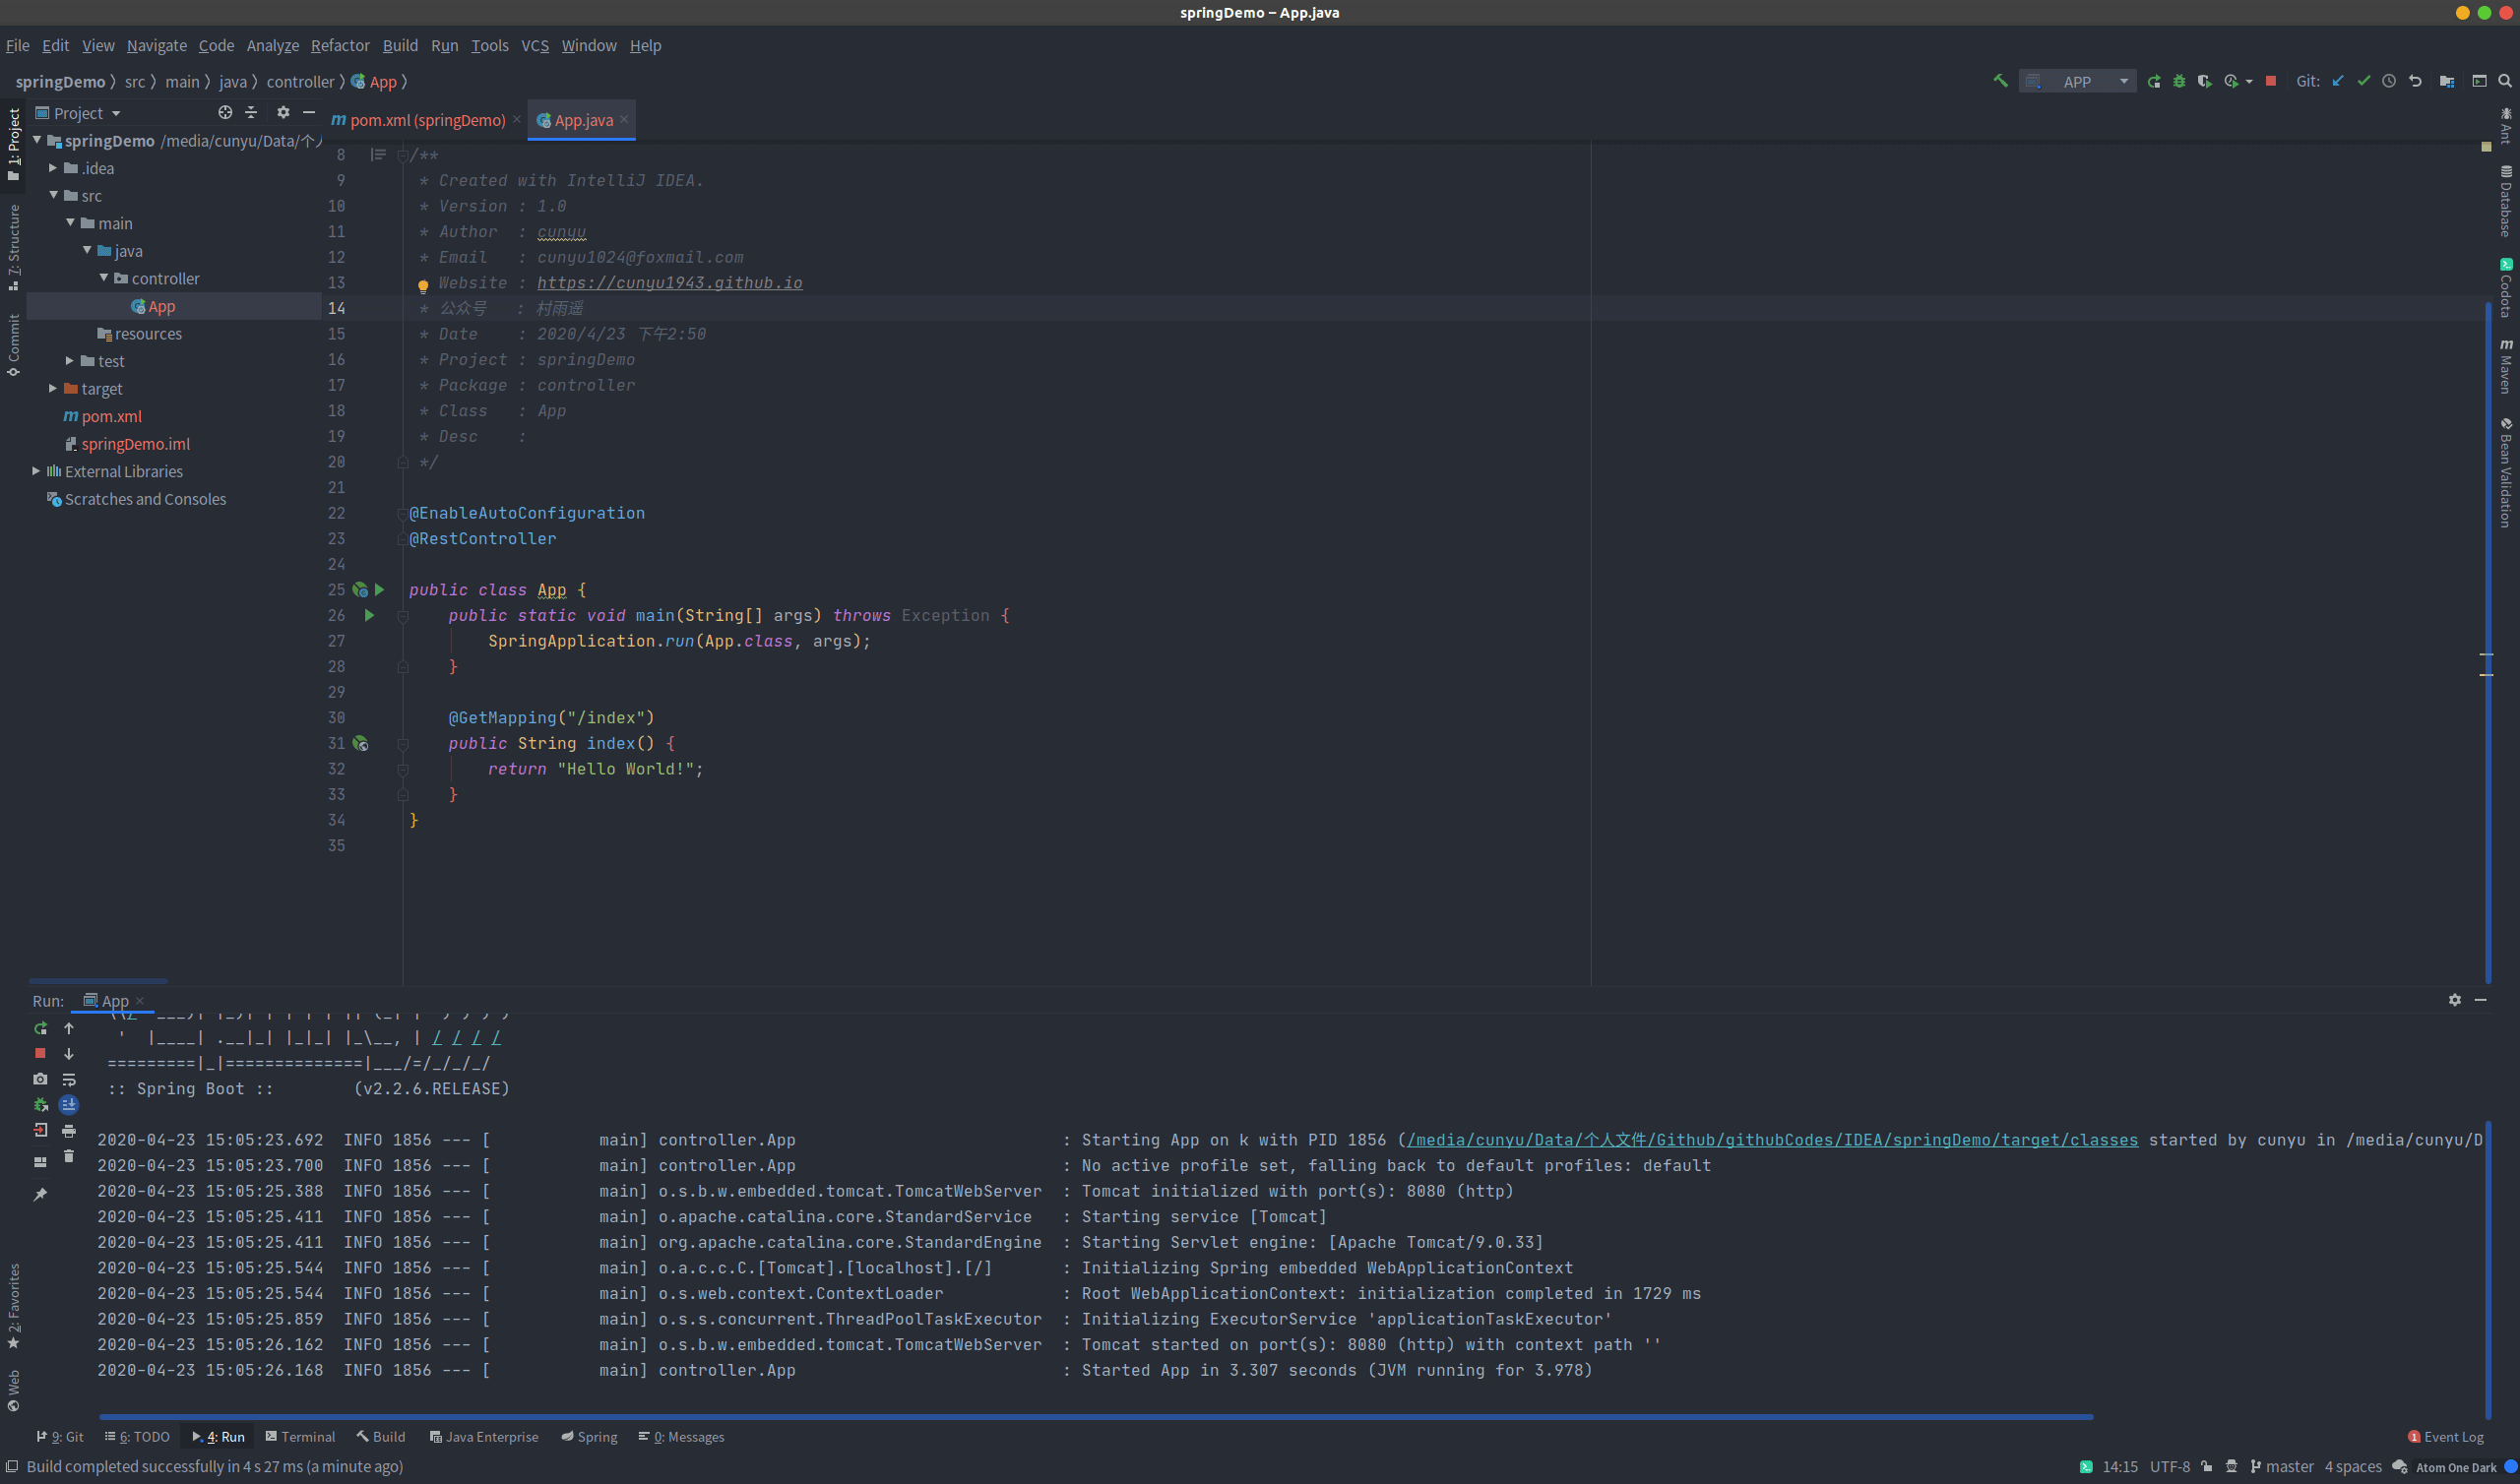
</project>- 在
main/java目录下创建一个包,然后新建一个类,比如我的如下;
package controller;
import org.springframework.boot.SpringApplication;
import org.springframework.boot.autoconfigure.EnableAutoConfiguration;
import org.springframework.web.bind.annotation.GetMapping;
import org.springframework.web.bind.annotation.RestController;

@EnableAutoConfiguration
@RestController
public class App {
    public static void main(String[] args) throws Exception {
        SpringApplication.run(App.class, args);
    }
    @GetMapping("/index")
    public String index() {
        return "Hello World!";
    }
}
- 运行上一步中的
main方法即可;
四、常见项目结构
代码层
根目录:com.springboot:
build:工程启动类;entity:实体类;dao:数据访问层;service:数据服务层,业务类代码;controller:前端访问控制器;config:配置信息类;util:工具类;constant:常用接口类;vo:数据传输类;Application.java:项目的启动类;
资源文件结构
根目录 src/main/resources:
config:.properties、.json等配置文件;i18n:国际化相关;META-INF/spring:spring.xml;static:页面以及js、css、image等分别放在各自文件夹下;
五、@SpringBootApplication 注解分析
相关代码
package org.springframework.boot.autoconfigure;
@Target(ElementType.TYPE)
@Retention(RetentionPolicy.RUNTIME)
@Documented
@Inherited
@SpringBootConfiguration
@EnableAutoConfiguration
@ComponentScan(excludeFilters = {
        @Filter(type = FilterType.CUSTOM, classes = TypeExcludeFilter.class),
        @Filter(type = FilterType.CUSTOM, classes = AutoConfigurationExcludeFilter.class) })
public @interface SpringBootApplication {
   ......
}
说明
@SpringBootApplication 标注该类是一个启动类,每个 Spring Boot 项目有且只有项目启动类才能用该注解。可以看做是 @Configuration、@EnableAutoConfiguration、@ComponentScan 的组合注解。
@Configuration:允许在上下文中注册额外的Bean或导入其他配置;@EnableAutoConfiguration:启动Spring Boot的自动配置机制;@ComponentScan:扫描被@ComponentScan(@Service、@Controller、@Repository)注解的Bean,默认扫描该类所在包下所有类,将这些Bean定义加载到 IOC 容器中;
六、pom.xml 分析
<?xml version="1.0" encoding="UTF-8"?>
<project xmlns="http://maven.apache.org/POM/4.0.0" xmlns:xsi="http://www.w3.org/2001/XMLSchema-instance"
         xsi:schemaLocation="http://maven.apache.org/POM/4.0.0 https://maven.apache.org/xsd/maven-4.0.0.xsd">
    <modelVersion>4.0.0</modelVersion>
    <parent>
        <groupId>org.springframework.boot</groupId>
        <artifactId>spring-boot-starter-parent</artifactId>
        <version>2.3.2.RELEASE</version>
        <relativePath/> <!-- lookup parent from repository -->
    </parent>
    <groupId>com.cunyu</groupId>
    <artifactId>springboot-03</artifactId>
    <version>0.0.1-SNAPSHOT</version>
    <name>springboot-03</name>
    <description>spring boot - 03</description>
    <properties>
        <java.version>1.8</java.version>
    </properties>
    <dependencies>
        <dependency>
            <groupId>org.springframework.boot</groupId>
            <artifactId>spring-boot-starter-web</artifactId>
        </dependency>
        <dependency>
            <groupId>org.springframework.boot</groupId>
            <artifactId>spring-boot-starter-test</artifactId>
            <scope>test</scope>
            <exclusions>
                <exclusion>
                    <groupId>org.junit.vintage</groupId>
                    <artifactId>junit-vintage-engine</artifactId>
                </exclusion>
            </exclusions>
        </dependency>
    </dependencies>
    <build>
        <plugins>
            <plugin>
                <groupId>org.springframework.boot</groupId>
                <artifactId>spring-boot-maven-plugin</artifactId>
            </plugin>
        </plugins>
    </build>
</project>
创建好项目后,如果没有选其他组件,会生成如上的 Spring Boot 项目依赖,主要有四个部分:
- 项目元数据
创建时输入的 Project Metadata 部分,即 Maven 项目的基本元素,包括 groupId、artifactId、version、name、description 等;
- parent
继承 spring-boot-starter-parent 的依赖管理,控制版本与打包等等内容;
- dependencies
项目具体依赖,默认包含 spring-boot-starter-web,用于实现HTTP接口(该依赖中包含了Spring MVC);spring-boot-starter-test用于编写单元测试的依赖包。后续开发中,主要就是在这里添加各种依赖。
- build
构建配置部分,默认使用 spring-boot-maven-plugin,配合 spring-boot-starter-parent 可以把 Spring Boot 应用打包成 jar 来直接运行。
七、总结
文章主要介绍了两种创建 SpringBoot 的方式,一种是通过 Spring 官网在线创建的方式,另一种则是通过 IDEA 创建的方式,两个方式其实效果都是一样的,只不过形式不同而已。
到此这篇关于Spring Boot 教程之创建项目的 三种方式的文章就介绍到这了,更多相关Spring Boot创建项目内容请搜索脚本之家以前的文章或继续浏览下面的相关文章希望大家以后多多支持脚本之家!