vue 如何使用vue-cropper裁剪图片你知道吗
作者:*且听风吟
这篇文章主要为大家介绍了vue 使用vue-cropper裁剪图片,具有一定的参考价值,感兴趣的小伙伴们可以参考一下,希望能够给你带来帮助
官网:
https://github.com/xyxiao001/vue-cropper
一、安装:
npm install vue-cropper
或者
yarn add vue-cropper
二、使用:
import VueCropper from 'vue-cropper'
设置component:
export default {
  components: {
    VueCropper
  }
}
template中插入:(外面需要套一个div,用于设置插件显示的大小)
<vueCropper
      ref="cropper"
      :img="option.img"
      :outputSize="option.size"
      :outputType="option.outputType"
></vueCropper>
    data(){
      return{
         option:{
            img: 'imgUrl', // img的URL或者base64
            size: 1,
            outputType: 'png',
         }
      }
    }
三、内置方法:
| 名称 | 功能 | 默认值 | 可选值 |
|---|---|---|---|
| img | 裁剪图片的地址 | 空 | url 地址 / base64 / blob |
| outputSize | 裁剪生成图片的质量 | 1 | 0.1 - 1 |
| outputType | 裁剪图片的地址 | jpg (jpg 需要传入jpeg) | jpeg / png / web |
内置方法:通过this.$refs.cropper 调用插件。
this.$refs.cropper.startCrop() 开始截图(如果没有设置截图框的话,通过这个启动截图框)
this.$refs.cropper.stopCrop() 停止截图
this.$refs.cropper.clearCrop() 清除截图
this.$refs.cropper.getCropData() 获取截图信息(得到截图的URL或者base64)
    // 获取截图的base64 数据
    this.$refs.cropper.getCropData((data) => {
      // do something
      console.log(data)
    })
    // 获取截图的blob数据
    this.$refs.cropper.getCropBlob((data) => {
      // do something
      console.log(data)
    })
四、使用:
<template>
  <div>
    <el-dialog title="图片剪裁" :visible.sync="show" append-to-body width="950px" center>
      <div class="cropper-content">
        <div class="cropper-box">
          <div class="cropper">
            <vue-cropper ref="cropper" :img="option.img" :outputSize="option.outputSize" :outputType="option.outputType" :info="option.info" :canScale="option.canScale" :autoCrop="option.autoCrop" :autoCropWidth="option.autoCropWidth" :autoCropHeight="option.autoCropHeight" :fixed="option.fixed" :fixedNumber="option.fixedNumber" :full="option.full" :fixedBox="option.fixedBox" :canMove="option.canMove" :canMoveBox="option.canMoveBox" :original="option.original" :centerBox="option.centerBox" :height="option.height" :infoTrue="option.infoTrue" :maxImgSize="option.maxImgSize" :enlarge="option.enlarge" :mode="option.mode" @realTime="realTime" @imgLoad="imgLoad">
            </vue-cropper>
          </div>
          <!--底部操作工具按钮-->
          <div class="footer-btn">
            <div class="scope-btn">
              <label class="btn" for="uploads">选择图片</label>
              <input type="file" id="uploads" style="position:absolute; clip:rect(0 0 0 0);" accept="image/png, image/jpeg, image/gif, image/jpg" @change="selectImg($event)">
              <el-button size="mini" type="danger" plain icon="el-icon-zoom-in" @click="changeScale(1)">放大</el-button>
              <el-button size="mini" type="danger" plain icon="el-icon-zoom-out" @click="changeScale(-1)">缩小</el-button>
              <el-button size="mini" type="danger" plain @click="rotateLeft">↺ 左旋转</el-button>
              <el-button size="mini" type="danger" plain @click="rotateRight">↻ 右旋转</el-button>
            </div>
            <div class="upload-btn">
              <el-button size="mini" type="success" @click="uploadImg('blob')">上传图片 <i class="el-icon-upload"></i></el-button>
            </div>
          </div>
        </div>
        <!--预览效果图-->
        <div class="show-preview">
          <div :style="previews.div" class="preview">
            <img :src="previews.url" :style="previews.img">
          </div>
        </div>
      </div>
    </el-dialog>
  </div>
</template>
<script>
import { VueCropper } from 'vue-cropper'
export default {
  name: "CropperImage",
  components: {
    VueCropper
  },
  data () {
    return {
      show: this.visible,
      name: this.Name,
      previews: {},
      option: {
        img: '',             //裁剪图片的地址
        outputSize: 1,       //裁剪生成图片的质量(可选0.1 - 1)
        outputType: 'jpeg',  //裁剪生成图片的格式(jpeg || png || webp)
        info: true,          //裁剪框的大小信息,图片大小信息
        canScale: true,      //图片是否允许滚轮缩放
        autoCrop: true,      //是否默认生成截图框
        autoCropWidth: 300,  //默认生成截图框宽度
        autoCropHeight: 200, //默认生成截图框高度
        fixed: true,         //是否开启截图框宽高固定比例
        fixedNumber: [1.5, 1], //截图框的宽高比例
        full: true,         //false按原比例裁切图片,不失真
        fixedBox: true,      //固定截图框大小,不允许改变
        canMove: false,      //上传图片是否可以移动
        canMoveBox: true,    //截图框能否拖动
        original: false,     //上传图片按照原始比例渲染
        centerBox: false,    //截图框是否被限制在图片里面
        height: true,        //是否按照设备的dpr 输出等比例图片
        infoTrue: false,     //true为展示真实输出图片宽高,false展示看到的截图框宽高
        maxImgSize: 3000,    //限制图片最大宽度和高度
        enlarge: 1,          //图片根据截图框输出比例倍数
        mode: '230px 150px'  //图片默认渲染方式
      }
    };
  },
  props: {
    visible: {
      type: Boolean,
      default: false
    },
    Name: {
      type: String,
      default: ''
    }
  },
  watch: {
    visible () {
      this.show = this.visible
    }
  },
  methods: {
    //初始化函数
    imgLoad (msg) {
    },
    //图片缩放
    changeScale (num) {
      num = num || 1
      this.$refs.cropper.changeScale(num)
    },
    //向左旋转
    rotateLeft () {
      this.$refs.cropper.rotateLeft()
    },
    //向右旋转
    rotateRight () {
      this.$refs.cropper.rotateRight()
    },
    //实时预览函数
    realTime (data) {
      this.previews = data
    },
    //选择图片
    selectImg (e) {
      let file = e.target.files[0]
      if (!/\.(jpg|jpeg|png|JPG|PNG)$/.test(e.target.value)) {
        this.$message({
          message: '图片类型要求:jpeg、jpg、png',
          type: "error"
        });
        return false
      }
      //转化为blob
      let reader = new FileReader()
      reader.onload = (e) => {
        let data
        if (typeof e.target.result === 'object') {
          data = window.URL.createObjectURL(new Blob([e.target.result]))
        } else {
          data = e.target.result
        }
        this.option.img = data
      }
      //转化为base64
      reader.readAsDataURL(file)
    },
    //上传图片
    uploadImg (type) {
      let _this = this
      if (type === 'blob') {
        // 获取截图的blob数据
        this.$refs.cropper.getCropBlob(async (data) => {
          let formData = new FormData();
          formData.append('file', data, new Date().getTime() + '.png')
          // 调用axios上传
          let { data: res } = await _this.$http.post(`${msBaseUrl}common-tools-web/file/upload/image`, formData)
          if (res.code === 200) {
            _this.$message({
              message: res.desc,
              type: "success"
            });
            let data = res.result
            let imgInfo = {
              name: data.name,
              id: data.id,
              url: data.url
            };
            _this.$emit('uploadImgSuccess', imgInfo);
          } else {
            _this.$message({
              message: '文件服务异常,请联系管理员!',
              type: "error"
            })
          }
        })
      }
    }
  }
}
</script>
<style scoped lang="less">
.cropper-content {
  display: flex;
  display: -webkit-flex;
  justify-content: flex-end;
  .cropper-box {
    flex: 1;
    width: 100%;
    .cropper {
      width: auto;
      height: 300px;
    }
  }
  .show-preview {
    flex: 1;
    -webkit-flex: 1;
    display: flex;
    display: -webkit-flex;
    justify-content: center;
    .preview {
      overflow: hidden;
      border: 1px solid #67c23a;
      background: #cccccc;
    }
  }
}
.footer-btn {
  margin-top: 30px;
  display: flex;
  display: -webkit-flex;
  justify-content: flex-end;
  .scope-btn {
    display: flex;
    display: -webkit-flex;
    justify-content: space-between;
    padding-right: 10px;
  }
  .upload-btn {
    flex: 1;
    -webkit-flex: 1;
    display: flex;
    display: -webkit-flex;
    justify-content: center;
  }
  .btn {
    outline: none;
    display: inline-block;
    line-height: 1;
    white-space: nowrap;
    cursor: pointer;
    -webkit-appearance: none;
    text-align: center;
    -webkit-box-sizing: border-box;
    box-sizing: border-box;
    outline: 0;
    -webkit-transition: 0.1s;
    transition: 0.1s;
    font-weight: 500;
    padding: 8px 15px;
    font-size: 12px;
    border-radius: 3px;
    color: #fff;
    background-color: #409eff;
    border-color: #409eff;
    margin-right: 10px;
  }
}
</style>
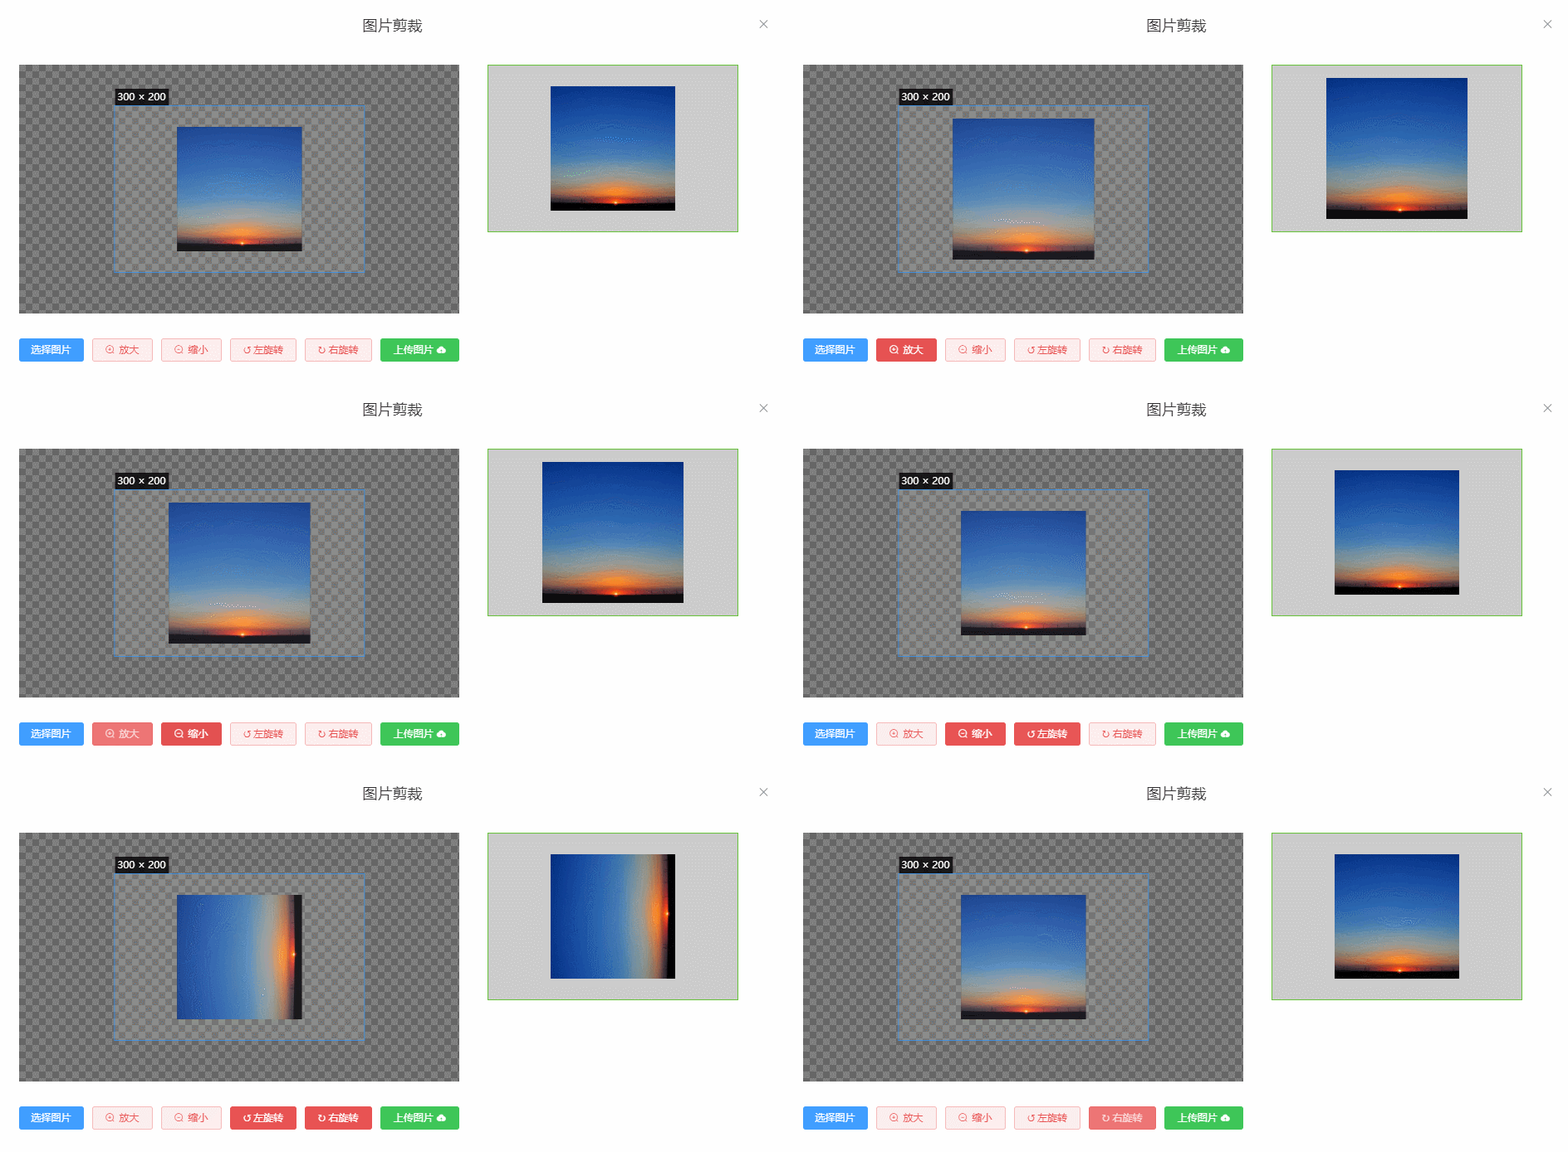
效果:

总结
本篇文章就到这里了,希望能够给你带来帮助,也希望您能够多多关注脚本之家的更多内容!
