Android之FanLayout制作圆弧滑动效果
作者:陈小缘
前言
在上篇文章(Android实现圆弧滑动效果之ArcSlidingHelper篇)中,我们把圆弧滑动手势处理好了,那么这篇文章我们就来自定义一个ViewGroup,名字叫就风扇布局吧,接地气。 在开始之前,我们先来看2张效果图 (表情包来自百度贴吧):
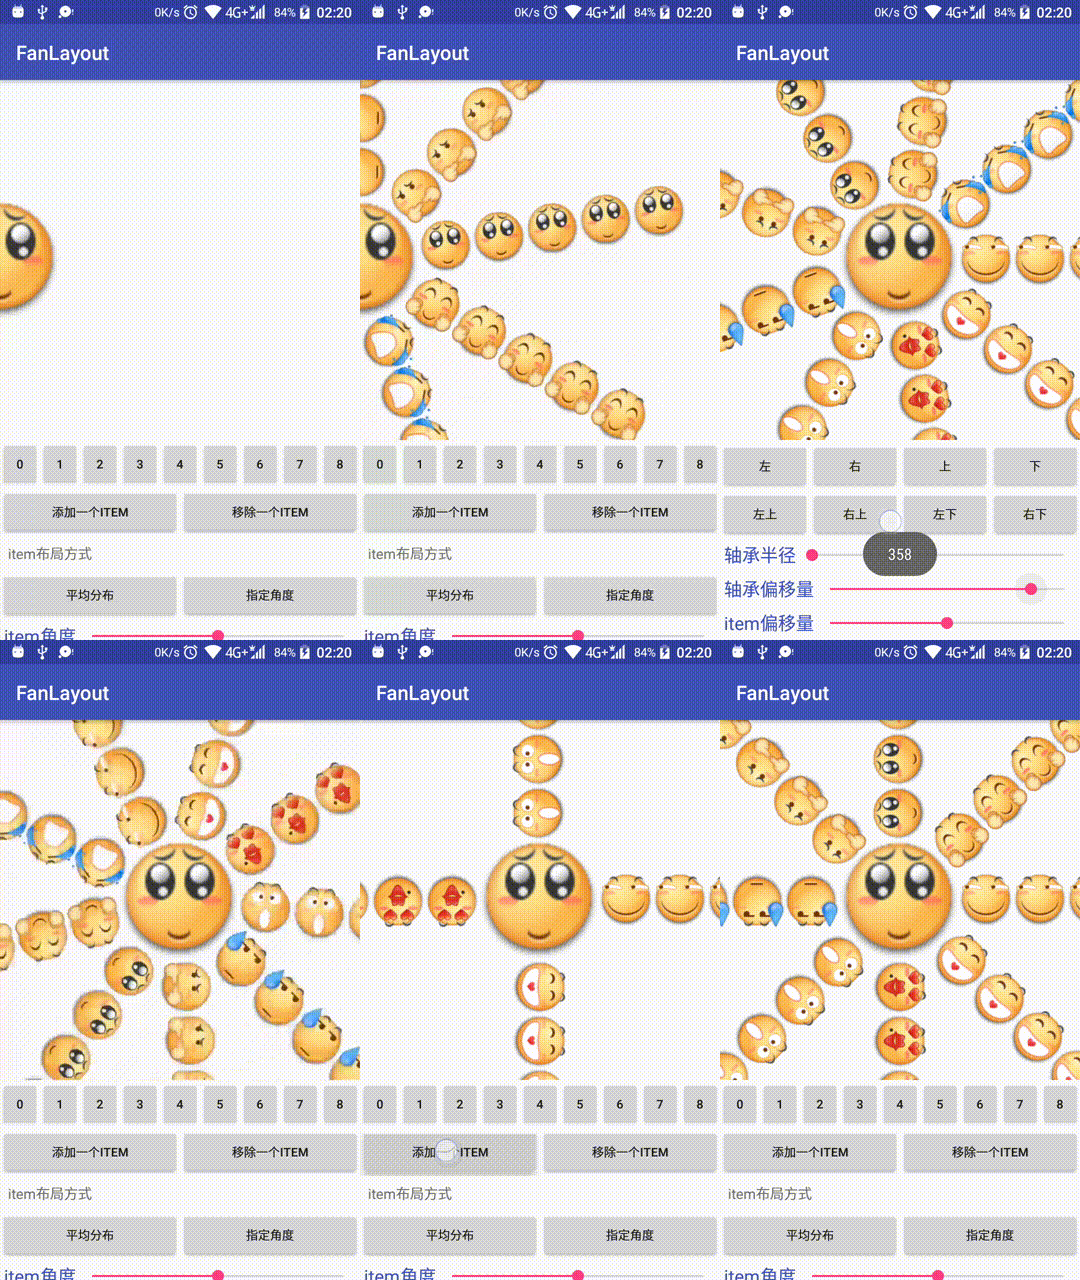

哈哈,其实还有以下特性的,就先不发那么多图了:
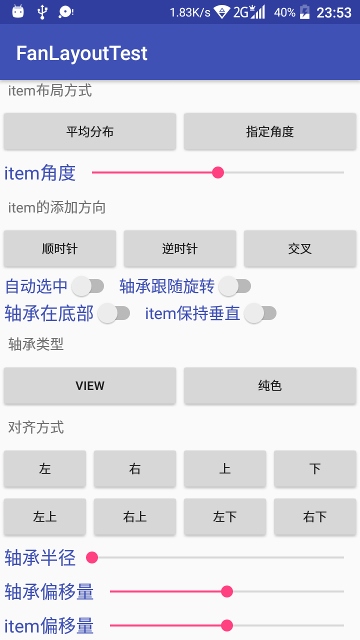
简单分析
圆弧手势滑动我们现在可以跳过了(因为在上一篇文章中做好了),先从最基本的开始,想一下该怎么layout? 其实也很简单:从上面几张效果图中我们可以看出来,那一串串小表情是围着大表情旋转的,即小表情的旋转点(mPivotX,mPivotY) = 大表情的中心点(宽高 ÷ 2),至于旋转,肯定是用setRotation方法啦,不过在setRotation之前,还要先set一下PivotX和PivotY。
创建FanLayout
首先是onLayout方法:
    @Override
    protected void onLayout(boolean changed, int l, int t, int r, int b) {
        int childCount = getChildCount();
        //每个item要旋转的角度
        float angle = 360F / childCount;
        //旋转基点,现在也就是这个ViewGroup的中心点
        mPivotX = getWidth() / 2;
        mPivotY = getHeight() / 2;
        for (int i = 0; i < childCount; i++) {
            View view = getChildAt(i);
            int layoutHeight = view.getMeasuredHeight() / 2;
            int layoutWidth = view.getMeasuredWidth();

            //在圆心的右边,并且垂直居中
            view.layout(mPivotX, mPivotY - layoutHeight, mPivotX + layoutWidth, mPivotY + layoutHeight);
            //更新旋转的中心点
            view.setPivotX(0);
            view.setPivotY(layoutHeight);
            //设置旋转的角度
            view.setRotation(i * angle);
        }
    }
onMeasure我们先不考虑那么细,measureChildren后直接setMeasuredDimension:
    @Override
    protected void onMeasure(int widthMeasureSpec, int heightMeasureSpec) {
        measureChildren(widthMeasureSpec, heightMeasureSpec);
        setMeasuredDimension(widthMeasureSpec, heightMeasureSpec);
    }
好了,就这么简单,我们来看看效果怎么样: 我们的布局 (item就是一排ImageView):
    <com.test.FanLayout xmlns:android="http://schemas.android.com/apk/res/android"
        android:layout_width="match_parent"
        android:layout_height="match_parent">

        <include layout="@layout/item" />

        <include layout="@layout/item" />

        <include layout="@layout/item" />

        <include layout="@layout/item" />

        <include layout="@layout/item" />

        <include layout="@layout/item" />

    </com.test.FanLayout>
效果:
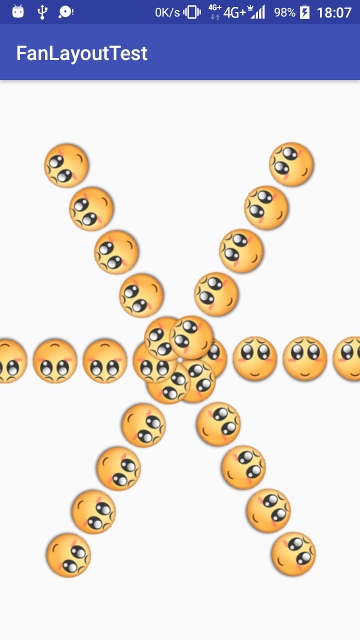
支持圆弧手势
哈哈,现在最基本的效果是出来了,但是还未支持手势,这时候我们上篇做的ArcSlidingHelper要登场了,我们把ArcSlidingHelper添加进来:
    @Override
    protected void onSizeChanged(int w, int h, int oldw, int oldh) {
        super.onSizeChanged(w, h, oldw, oldh);
        if (mArcSlidingHelper == null) {
            mArcSlidingHelper = ArcSlidingHelper.create(this, this);
            //开始惯性滚动
            mArcSlidingHelper.enableInertialSliding(true);
        } else {
            //刷新旋转基点
            mArcSlidingHelper.updatePivotX(w / 2);
            mArcSlidingHelper.updatePivotY(h / 2);
        }
    }
我们把ArcSlidingHelper放到onSizeChanged里面初始化,为什么呢,因为这个方法回调时,getWidth和getHeight已经能获取到正确的值了
    @Override
    public boolean onTouchEvent(MotionEvent event) {
        //把触摸事件交给Helper去处理
        mArcSlidingHelper.handleMovement(event);
        return true;
    }

    @Override
    protected void onDetachedFromWindow() {
        super.onDetachedFromWindow();
        //释放资源
        if (mArcSlidingHelper != null) {
            mArcSlidingHelper.release();
            mArcSlidingHelper = null;
        }
    }

    @Override
    public void onSliding(float angle) {
        for (int i = 0; i < getChildCount(); i++) {
            View child = getChildAt(i);
            //更新角度
            child.setRotation(child.getRotation() + angle);
        }
    }
onSliding方法就是ArcSlidingHelper的OnSlidingListener接口,当ArcSlidingHelper计算出角度之后,就会回调onSliding方法,我们在这里面直接更新了子view的角度,并且在onDetachedFromWindow释放了ArcSlidingHelper,哈哈,节约内存,从每一个细节做起。 好了,添加支持圆弧手势滑动就这么简单,我们来看看效果如何:

可以看到已经成功处理圆弧滑动手势了,但是还有一个情况就是,当子view设置了自己的OnClickListener,这个时候如果我们手指刚好是按在这个子view上,当手指移动时会发现,旋转不了,因为这个事件正在被这个子view消费。所以还要在onInterceptTouchEvent方法里处理一下:如果手指滑动的距离超过了指定的最小距离,则拦截这个事件,交给我们的ArcSlidingHelper来处理。 我们来看看代码怎么写:
    private float mStartX, mStartY;//上次的坐标
    private int mTouchSlop;//触发滑动的最小距离
    private boolean isBeingDragged;//手指是否滑动中

    @Override
    public boolean onInterceptTouchEvent(MotionEvent event) {
        //如果已经开始了滑动,那就直接拦截这个事件
        if ((event.getAction() == MotionEvent.ACTION_MOVE && isBeingDragged) || super.onInterceptTouchEvent(event)) {
            return true;
        }
        //set了enable为false就不要了
        if (!isEnabled()) {
            return false;
        }
        float x = event.getX(), y = event.getY();
        switch (event.getAction()) {
            case MotionEvent.ACTION_DOWN:
                //当手指按下时,停止惯性滚动
                mArcSlidingHelper.abortAnimation();
                //更新记录坐标
                mStartX = x;
                mStartY = y;
                break;
            case MotionEvent.ACTION_MOVE:
                //本次较上一次的滑动距离
                float offsetX = x - mStartX;
                float offsetY = y - mStartY;
                //判断是否触发拖动事件
                if (Math.abs(offsetX) > mTouchSlop || Math.abs(offsetY) > mTouchSlop) {
                    //标记已开始滑动 (拦截本次)
                    isBeingDragged = true;
                }
                break;
            case MotionEvent.ACTION_UP:
            case MotionEvent.ACTION_CANCEL:
            case MotionEvent.ACTION_OUTSIDE:
                //手指松开,刷新状态
                isBeingDragged = false;
                break;
        }
        return isBeingDragged;
    }
当然了,onTouchEvent方法也要加上手指松开后,标记isBeingDragged为false:
    @Override
    public boolean onTouchEvent(MotionEvent event) {
        //把触摸事件交给Helper去处理
        mArcSlidingHelper.handleMovement(event);

        switch (event.getAction()) {
            case MotionEvent.ACTION_UP:
            case MotionEvent.ACTION_CANCEL:
            case MotionEvent.ACTION_OUTSIDE:
                //手指抬起,清除正在滑动的标记
                isBeingDragged = false;
                break;
        }
        return true;
    }
mTouchSlop的初始化放在构造方法中:
mTouchSlop = ViewConfiguration.get(context).getScaledTouchSlop();
哈哈,那个拦截的方法是参考自ScrollView的 (我们平时从SDK源码中也能学到不少东西) 好的,看看效果怎么样:

额。。有没有发现,每次拦截之后,开始滑动时都是跳一下,是什么原因呢? 就是因为我们的ArcSlidingHelper内部也是用startX和startY来记录上一次手指坐标的,在FanLayout拦截事件之前,有一段距离已经被消费了,所以ArcSlidingHelper里面的startX和startY并不是最新的距离 (计算出来的滑动距离会偏长),就会出现上面这种:跳了一下 的情况。 那么,我们应该怎么解决呢,加上触发滑动的最小距离吗?哈哈,当然不是了,这个方法太麻烦,还要根据手指的滑动趋势来决定是加还是减。 其实ArcSlidingHelper早就已经准备了一个方法来应对这种情况:
    /**
     * 更新当前手指触摸的坐标,在ViewGroup的onInterceptTouchEvent中使用
     */
    public void updateMovement(MotionEvent event) {
        checkIsRecycled();
        if (event.getAction() == MotionEvent.ACTION_DOWN || event.getAction() == MotionEvent.ACTION_MOVE) {
            if (isSelfSliding) {
                mStartX = event.getRawX();
                mStartY = event.getRawY();
            } else {
                mStartX = event.getX();
                mStartY = event.getY();
            }
        }
    }
我们在onInterceptTouchEvent方法中更新一下坐标就可以了:
    @Override
    public boolean onInterceptTouchEvent(MotionEvent event) {
            ...
            case MotionEvent.ACTION_DOWN:
                ...
                //手指按下时更新一次
                mArcSlidingHelper.updateMovement(event);
                break;
            case MotionEvent.ACTION_MOVE:
                if (Math.abs(offsetX) > mTouchSlop || Math.abs(offsetY) > mTouchSlop) {
                    //开始拦截之前也更新一次
                    mArcSlidingHelper.updateMovement(event);
                    ...
                }
                break;
        return isBeingDragged;
    }
updateMovement方法里面直接更新了x和y的值,这样的话,就不会出现跳一下的情况了。
添加轴承(中间的大表情)
我们的轴承有两种类型:Color和View,Color类型就是指定一种颜色,不能接受点击事件,是直接用Paint画出来的。View类型可以自己定义轴承的内容,来看看下面两张效果图:

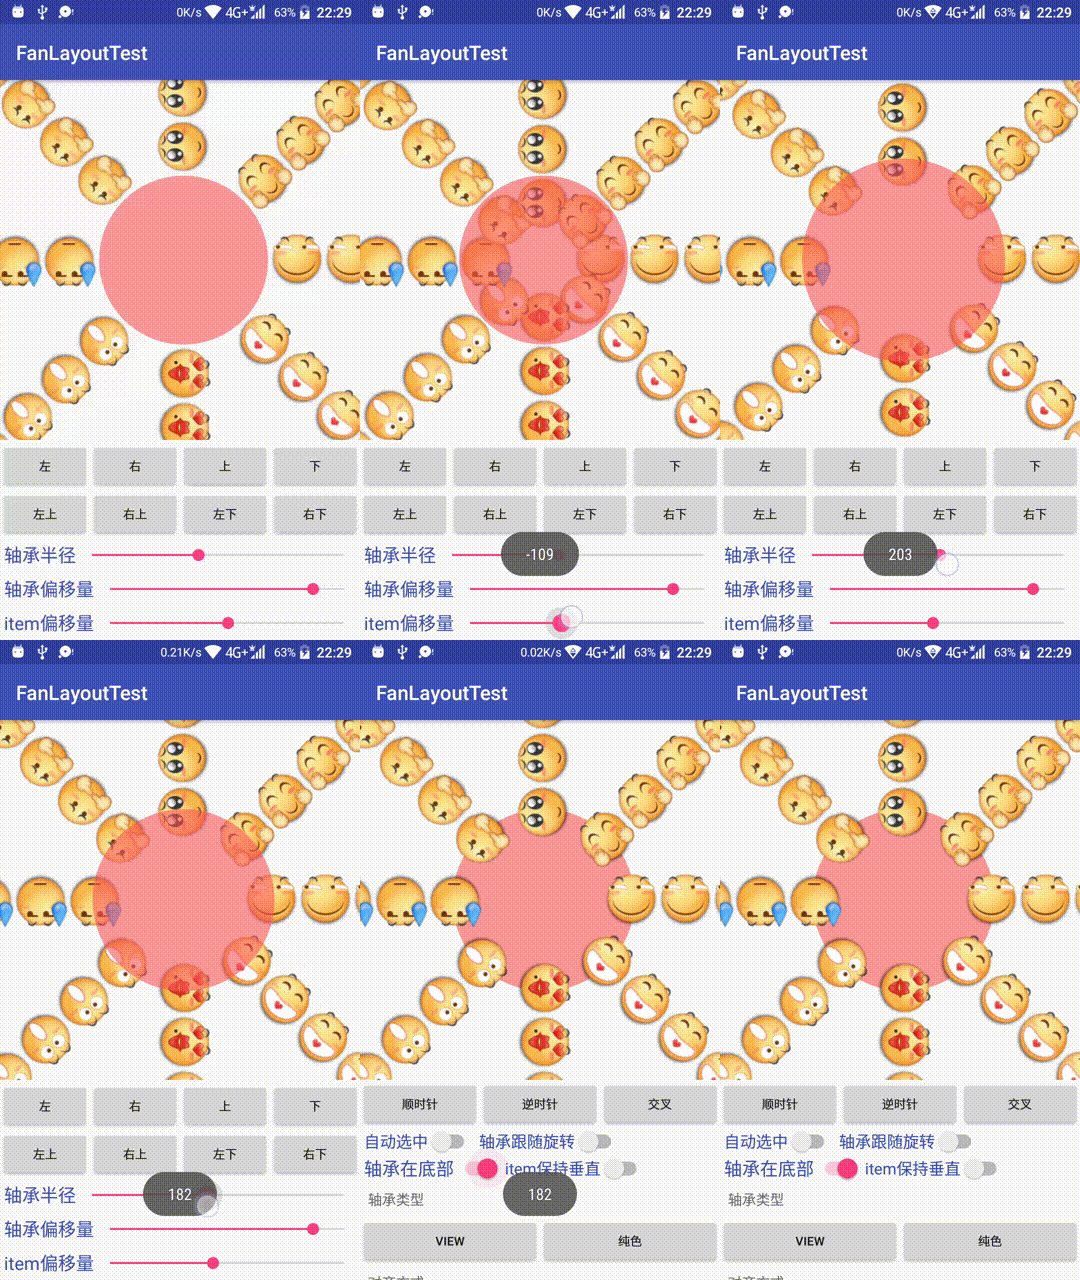
哈哈,可以看到,我们除了添加两种不同的轴承类型之外,还加上了动态切换轴承的位置(在顶部或底部)和圆形半径还有Item偏移量,View类型下还可以设置是否跟随子View旋转。
一下子多了这么多属性,但是不要怕,我们来逐个击破。 现在是时候在attr中自定义这些属性了:
<resources>
    <declare-styleable name="FanLayout">

        <!--轴承类型-->
        <attr name="bearing_type" format="enum">
            <enum name="color" value="0" />
            <enum name="view" value="1" />
        </attr>

        <!--轴承半径-->
        <attr name="bearing_radius" format="dimension" />

        <!--轴承颜色 (当type=color时才有效)-->
        <attr name="bearing_color" format="color" />

        <!--自定义的轴承布局 (当type=view时才有效)-->
        <attr name="bearing_layout" format="reference" />

        <!--轴承是否可以转动-->
        <attr name="bearing_can_roll" format="boolean" />

        <!--轴承是否在底部-->
        <attr name="bearing_on_bottom" format="boolean" />

        <!--item偏移量-->
        <attr name="item_offset" format="dimension" />
    </declare-styleable>
</resources>
好了,定义完布局属性之后,再回到FanLayout中,也要定义对应的属性:
    public static final int TYPE_COLOR = 0;//Color类型
    public static final int TYPE_VIEW = 1;//View类型

    private int mRadius;//轴承半径
    private int mItemOffset;//item偏移量
    private boolean isBearingCanRoll;//轴承是否可以滚动
    private boolean isBearingOnBottom;//轴承是否在底部
    private int mCurrentBearingType;//当前轴承类型
    private int mBearingColor;//轴承颜色
    private int mBearingLayoutId;//轴承布局id
    private View mBearingView;//轴承view
    private Paint mPaint;
最后,在构造方法中获取这些属性:
    public FanLayout(Context context, @Nullable AttributeSet attrs, int defStyleAttr) {
        ...
        initAttrs(context, attrs, defStyleAttr);
        ...
    }

    private void initAttrs(Context context, @Nullable AttributeSet attrs, int defStyleAttr) {
        TypedArray a = context.obtainStyledAttributes(attrs, R.styleable.FanLayout, defStyleAttr, 0);
        //轴承是否可以旋转,默认不可以
        isBearingCanRoll = a.getBoolean(R.styleable.FanLayout_bearing_can_roll, false);
        //轴承是否在底部,默认不可以
        isBearingOnBottom = a.getBoolean(R.styleable.FanLayout_bearing_on_bottom, false);
        //当前轴承类型,默认Color类型
        mCurrentBearingType = a.getInteger(R.styleable.FanLayout_bearing_type, TYPE_COLOR);
        //轴承颜色,需设置类型为Color才有效,默认黑色
        mBearingColor = a.getColor(R.styleable.FanLayout_bearing_color, Color.BLACK);

        //判断是否View类型
        if (isViewType()) {
            //获取轴承的布局id
            mBearingLayoutId = a.getResourceId(R.styleable.FanLayout_bearing_layout, 0);
            //如果轴承是View类型,必须要指定一个布局,否则报错
            if (mBearingLayoutId == 0) {
                throw new IllegalStateException("bearing layout not set!");
            } else {
                //加载这个布局,并添加在FanLayout中
                mBearingView = LayoutInflater.from(context).inflate(mBearingLayoutId, this, false);
                addView(mBearingView);
            }
        } else {
            //如果是Color类型,就获取轴承的半径,默认:0
            mRadius = a.getDimensionPixelSize(R.styleable.FanLayout_bearing_radius, 0);
            //初始化画笔
            mPaint = new Paint();
            mPaint.setAntiAlias(true);
            mPaint.setColor(mBearingColor);
            //使其回调onDraw方法
            setWillNotDraw(false);
        }
        //获取item偏移量
        mItemOffset = a.getDimensionPixelSize(R.styleable.FanLayout_item_offset, 0);
        //记得回收资源
        a.recycle();
    }

    /**
     * 判断当前轴承类型是否为View类型
     */
    private boolean isViewType() {
        return mCurrentBearingType == TYPE_VIEW;
    }
在获取到这些属性之后,我们需要改一下onMeasure方法了,刚刚贪方便,测量了子view后直接setMeasuredDimension了,这样做一般是不可取的,因为还要考虑宽高为wrap_content的情况,好,我们来看看修改之后的onMeasure方法:
    @Override
    protected void onMeasure(int widthMeasureSpec, int heightMeasureSpec) {
        //先测量子View们
        measureChildren(widthMeasureSpec, heightMeasureSpec);
        int specSize = MeasureSpec.getSize(widthMeasureSpec);
        int specMode = MeasureSpec.getMode(widthMeasureSpec);
        int size;
        //如果指定了宽度,那就用这个指定的尺寸
        if (specMode == MeasureSpec.EXACTLY) {
            size = specSize;
        } else {
            //获取最大的子View宽度
            int childMaxWidth = 0;
            for (int i = 0; i < getChildCount(); i++) {
                childMaxWidth = Math.max(childMaxWidth, getChildAt(i).getMeasuredWidth());
            }
            //如果没有指定宽度的话,那么FanLayout的宽就用 轴承的直径 + Item的偏移量 + 最大的子View宽度
            size = 2 * mRadius + mItemOffset + childMaxWidth;
        }
        int height = MeasureSpec.getSize(heightMeasureSpec);
        //这个时候,如果指定了高度,那就用这个指定的尺寸,如果没有的话,我们就把高度设置跟宽度一样
        setMeasuredDimension(size, MeasureSpec.getMode(heightMeasureSpec) == MeasureSpec.EXACTLY ? height : size);
        //如果是轴承是View类型的话,那么就更新圆的半径为 轴承View的宽和高中,更大的一方 的一半
        if (isViewType()) {
            mRadius = Math.max(mBearingView.getMeasuredWidth(), mBearingView.getMeasuredHeight()) / 2;
        }
    }
改完onMeasure方法后,onLayout方法也要改了,因为我们加入了轴承,如果是View类型,那就应该不能把它当作Item来layout,还加入了Item偏移量和轴承半径这两个属性,所以Item的位置也要调整一下:
    @Override
    protected void onLayout(boolean changed, int l, int t, int r, int b) {
        // 旋转基点,现在也就是这个ViewGroup的中心点
        mPivotX = getWidth() / 2;
        mPivotY = getHeight() / 2;
        // 是否View类型的轴承在底部
        boolean isHasBottomBearing = isViewType() && isBearingOnBottom;
        // 如果轴承为View类型,startIndex = 1,否则0,
        // 因为layoutItem的时候会根据子View的个数来计算出每个Item应该旋转的初始角度,而轴承是在中间的,不用参与本次旋转,
        // 所以等下会用childCount - startIndex
        int startIndex = layoutBearing();
        layoutItems(isHasBottomBearing, startIndex);
    }

    private int layoutBearing() {
        int startIndex = 0;
        //判断轴承是否View类型
        if (isViewType()) {
            int width = mBearingView.getMeasuredWidth() / 2;
            int height = mBearingView.getMeasuredHeight() / 2;
            //轴承放在旋转中心点上
            mBearingView.layout(mPivotX - width, mPivotY - height, mPivotX + width, mPivotY + height);
            startIndex = 1;
        }
        return startIndex;
    }

    private void layoutItems(boolean isHasBottomBearing, int startIndex) {
        int childCount = getChildCount();
        //每个item要旋转的角度 (如果轴承是View类型,要减一个)
        float angle = 360F / (childCount - startIndex);
        for (int i = 0; i < childCount; i++) {
            View view = getChildAt(i);
            //如果是轴承View的话,我们不处理,直接略过
            if (view == mBearingView) {
                continue;
            }
            int height = view.getMeasuredHeight() / 2;
            int width = view.getMeasuredWidth();
            //Item的left就是旋转点的x轴 + 轴承的半径 + Item的偏移量
            int baseLeft = mPivotX + mRadius + mItemOffset;
            //在圆心的右边,并且垂直居中
            view.layout(baseLeft, mPivotY - height, baseLeft + width, mPivotY + height);
            //更新旋转的中心点
            view.setPivotX(-mRadius - mItemOffset);
            view.setPivotY(height);
            //如果View类型的轴承在底部的话,还要减去1,因为我们要忽略这个轴承
            int index = isHasBottomBearing ? i - 1 : i;
            float rotation = index * angle;
            //设置旋转的角度
            view.setRotation(rotation);
        }
    }
可以看到,在layoutItem方法中,根据当前轴承的半径和Item偏移量来计算出正确的Item位置。
好吧,现在已经迫不及待的想看看效果了,等等,还是先在布局里面设置下刚刚加进去的一些属性吧:
<com.wuyr.testview.FanLayout xmlns:android="http://schemas.android.com/apk/res/android"
    xmlns:app="http://schemas.android.com/apk/res-auto"
    android:layout_width="match_parent"
    android:layout_height="match_parent"
    app:bearing_layout="@layout/bearing"
    app:bearing_type="view"
    app:item_offset="-20dp">

    <include layout="@layout/item" />

    <include layout="@layout/item" />

    <include layout="@layout/item" />

    <include layout="@layout/item" />

    <include layout="@layout/item" />

    <include layout="@layout/item" />

</com.wuyr.testview.FanLayout>
我们把bearing_type设置为View类型,并且指定了轴承的布局:
<ImageView xmlns:android="http://schemas.android.com/apk/res/android"
    android:layout_width="100dp"
    android:layout_height="100dp"
    android:src="@drawable/ic_4" />
轴承的布局就只是一个ImageView,还有,我们还把item_offset设置为-20dp,好了,现在来看看效果吧:

emmm,还差一个轴承在顶部的效果没实现呢,还有一个轴承不跟随旋转的,这个非常简单,我们在旋转的回调方法里面加一个条件就可以了,因为现在是遍历了全部的子View来设置旋转角度的:
    @Override
    public void onSliding(float angle) {
        for (int i = 0; i < getChildCount(); i++) {
            View child = getChildAt(i);
            //如果当前遍历到的子View是轴承View并且当前的轴承类型是View类型并且设置了轴承不能旋转的话,就略过
            if (child == mBearingView && isViewType() && !isBearingCanRoll) {
                continue;
            }
            //更新角度
            child.setRotation(child.getRotation() + angle);
        }
    }
好了,现在我们来想想轴承在顶部的效果应该要怎么做呢,可能有同学就会想了:真是的,把它放到最后添加不就行了,还用想吗? 额,其实还有2点要考虑的:因为我们现在做的是支持动态增删Item和动态的设置轴承在顶部还是在底部,这样一来,如果轴承添加进去之后,又继续添加了Item,这时候新添加的Item就会盖住轴承的了,所以我们决定重写addView方法:
    @Override
    public void addView(View child, int index, LayoutParams params) {
        //如果当前轴承是View类型并且设置了在顶部,那就应该在移除后继续添加回去
        boolean needAdd = false;

        //判断getChildCount() > 0是因为这个if的最终目的是移除轴承View,如果当前没有子View的话,自然不需要移除了
        //判断child != mBearingView是因为:如果本次添加的就是轴承View自己,证明现在还没有被添加进去,自然也不需要继续执行下去了
        if (isViewType() && !isBearingOnBottom && getChildCount() > 0 && child != mBearingView) {
            //如果现在已经添加了就先暂时移除
            if (mBearingView != null) {
                super.removeView(mBearingView);
                //标记一下需要添加
                needAdd = true;
            }
        }

        //调用父类的addView方法正常添加
        super.addView(child, index, params);

        //如果被标记过需要添加,证明轴承View已被移除,现在把它添加回去
        if (needAdd) {
            addView(mBearingView);
        }
    }
那现在来测试下刚刚加进去的那两个效果如何:

哈哈,可以看到,经过我们重写addView方法之后,如果是在顶部的话,就算新添加进去的Item,也不会遮住轴承View的,这是我们想看到的效果。
呼~~ 现在我们来看看Color类型的应该怎么做:其实很简单,这个圆形直接在onDraw里面去drawCircle就行了,不过这个onDraw方法是draw在子view的下面的,那么我们如果要它在上面的话怎么办呢,嘻嘻,其实View还有一个onDrawForeground方法,如果要画在子View上面的话,可以在这个方法里面draw,看下代码怎么写:
    @Override
    protected void onDraw(Canvas canvas) {
        //必须不是View类型,并且是在底部才draw
        if (!isViewType() && isBearingOnBottom) {
            canvas.drawCircle(mPivotX, mPivotY, mRadius, mPaint);
        }
    }

    @Override
    public void onDrawForeground(Canvas canvas) {
        //必须不是View类型,并且是在顶部才draw
        if (!isViewType() && !isBearingOnBottom) {
            canvas.drawCircle(mPivotX, mPivotY, mRadius, mPaint);
        }
    }
emmm,就是这么简单,在动态改变了轴承的位置之后(invalidate()),它也会根据isBearingOnBottom来决定圆形draw在顶部或底部。
对齐方式
我们的对齐方式有:左(默认)、右、上、下、左上、右上、左下、右下 8种,可能有同学看到一共有8种这么多就怕了,其实不用怕,这个很简单的,代码很少。 在开始之前,我们来回忆一下,刚刚的onLayout方法中,Item是怎么layout的:
//Item的left就是旋转点的x轴 + 轴承的半径 + Item的偏移量
int baseLeft = mPivotX + mRadius + mItemOffset;
//在圆心的右边,并且垂直居中
view.layout(baseLeft, mPivotY - height, baseLeft + width, mPivotY + height);
可以看到,Item的位置都是取决于mPivotX和mPivotY的,这样的话,我们只需改变一下mPivotX和mPivotY的值,然后requestLayout就行了。那么,怎么根据不同的对齐方式计算出正确的mPivotX和mPivotY呢?
在开始之前,我们先来看看这张图:
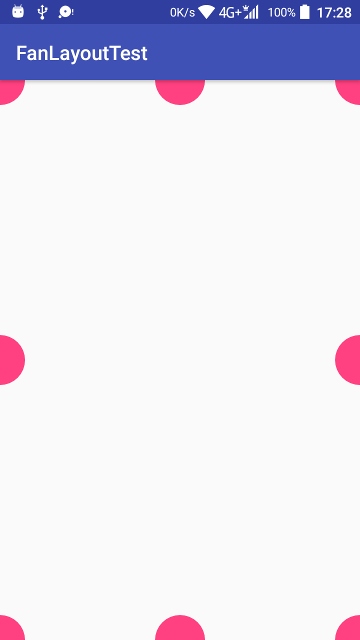
这样思路就清晰很多了,我们根本就不用怎么去计算,都是直接取:0,宽度、高度、一半宽度、一半高度就行了,好了,首先我们要声明一下有哪些对齐方式:
attr中:
    <!--对齐方式-->
    <attr name="bearing_gravity" format="enum">
        <enum name="left" value="0" />
        <enum name="right" value="1" />
        <enum name="top" value="2" />
        <enum name="bottom" value="3" />
        <enum name="left_top" value="4" />
        <enum name="left_bottom" value="5" />
        <enum name="right_top" value="6" />
        <enum name="right_bottom" value="7" />
    </attr>
FanLayout中:
    public static final int LEFT = 0;
    public static final int RIGHT = 1;
    public static final int TOP = 2;
    public static final int BOTTOM = 3;
    public static final int LEFT_TOP = 4;
    public static final int LEFT_BOTTOM = 5;
    public static final int RIGHT_TOP = 6;
    public static final int RIGHT_BOTTOM = 7;

    private int mCurrentGravity;//当前对齐方式
构造方法中也要加上一句:
    //对齐方式,默认:左
    mCurrentGravity = a.getInteger(R.styleable.FanLayout_bearing_gravity, LEFT);
再看看计算方法怎么写:
    /**
     * 更新旋转基点
     */
    private void updateCircleCenterPoint() {
        int cx = 0, cy = 0;
        int totalWidth = getMeasuredWidth();
        int totalHeight = getMeasuredHeight();
        switch (mCurrentGravity) {
            case RIGHT:
                cx = totalWidth;
                cy = totalHeight / 2;
                break;
            case LEFT:
                cy = totalHeight / 2;
                break;
            case BOTTOM:
                cy = totalHeight;
                cx = totalWidth / 2;
                break;
            case TOP:
                cx = totalWidth / 2;
                break;
            case RIGHT_BOTTOM:
                cx = totalWidth;
                cy = totalHeight;
                break;
            case LEFT_BOTTOM:
                cy = totalHeight;
                break;
            case RIGHT_TOP:
                cx = totalWidth;
                break;
            default:
                break;
        }
        mPivotX = cx;
        mPivotY = cy;
        //当然了,别忘记更新ArcSlidingHelper的旋转基点
        if (mArcSlidingHelper != null) {
            mArcSlidingHelper.updatePivotX(cx);
            mArcSlidingHelper.updatePivotY(cy);
        }
    }
好了,那么我们应该在哪里调用这个方法最好呢?哈哈,当然是onMeasure了:
    @Override
    protected void onMeasure(int widthMeasureSpec, int heightMeasureSpec) {
        ...
        updateCircleCenterPoint();
    }
现在可以把onLayout方法里面的
        mPivotX = getWidth() / 2;
        mPivotY = getHeight() / 2;
还有onSizeChanged里面的:
    @Override
    protected void onSizeChanged(int w, int h, int oldw, int oldh) {
        ...
        else {
            //刷新旋转基点
            mArcSlidingHelper.updatePivotX(w / 2);
            mArcSlidingHelper.updatePivotY(h / 2);
        }
        ...
    }
这4句删掉了。 再提供一个setGravity方法:
    /**
     * 设置对齐方式
     */
    public void setGravity(@Gravity int gravity) {
        if (mCurrentGravity != gravity) {
            mCurrentGravity = gravity;
            requestLayout();
        }
    }
@Gravity就是使用了@IntDef的自定义注解:
    @IntDef({LEFT, RIGHT, TOP, BOTTOM, LEFT_TOP, LEFT_BOTTOM, RIGHT_TOP, RIGHT_BOTTOM})
    @Retention(RetentionPolicy.SOURCE)
    private @interface Gravity {
    }
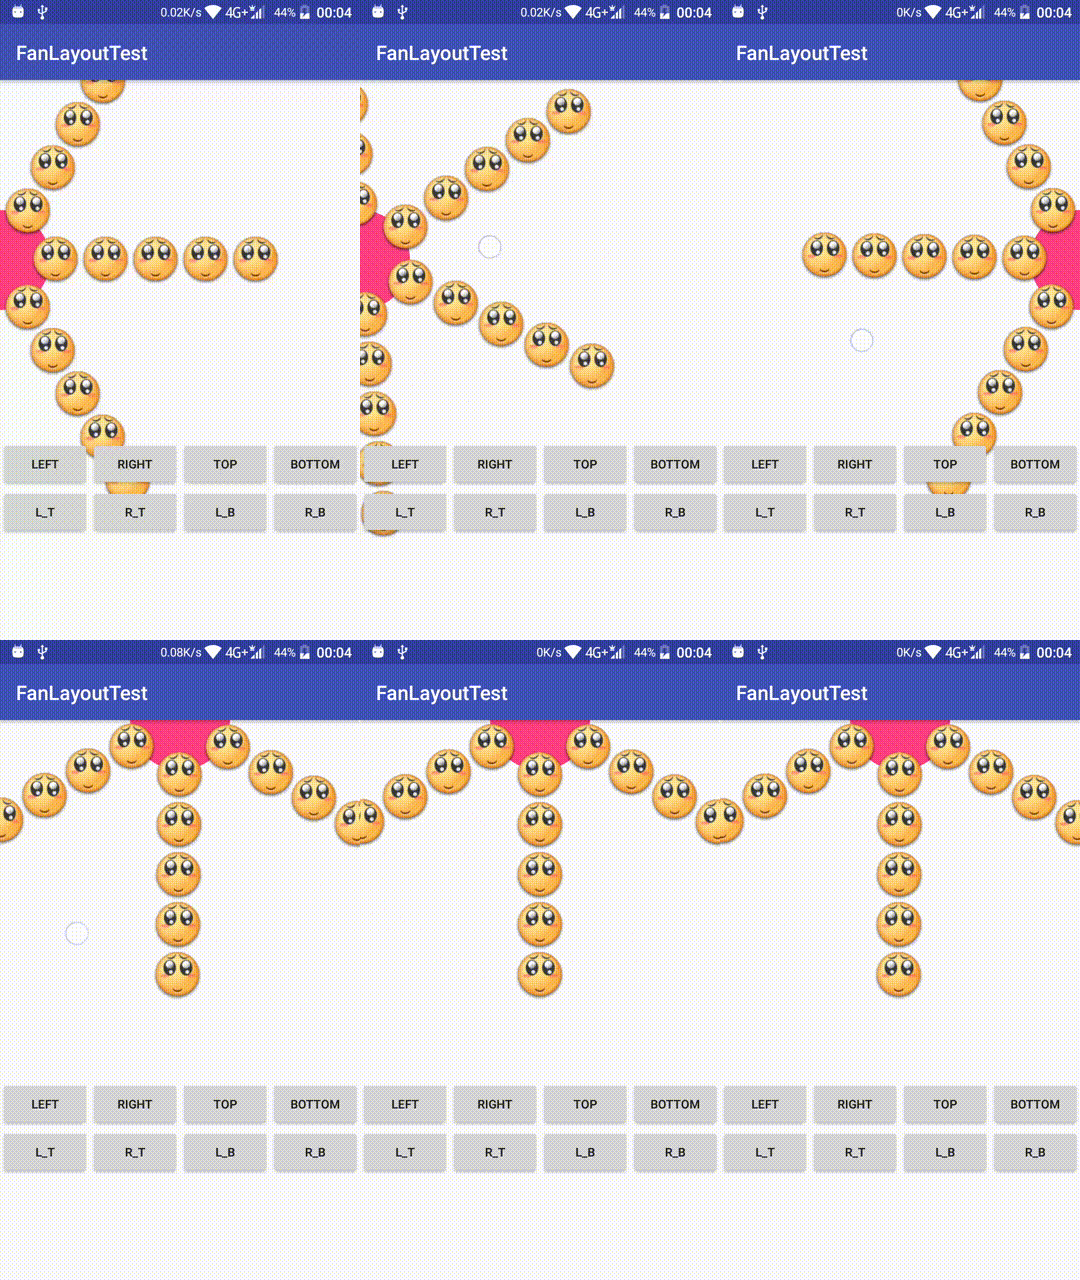
好,来看看效果:
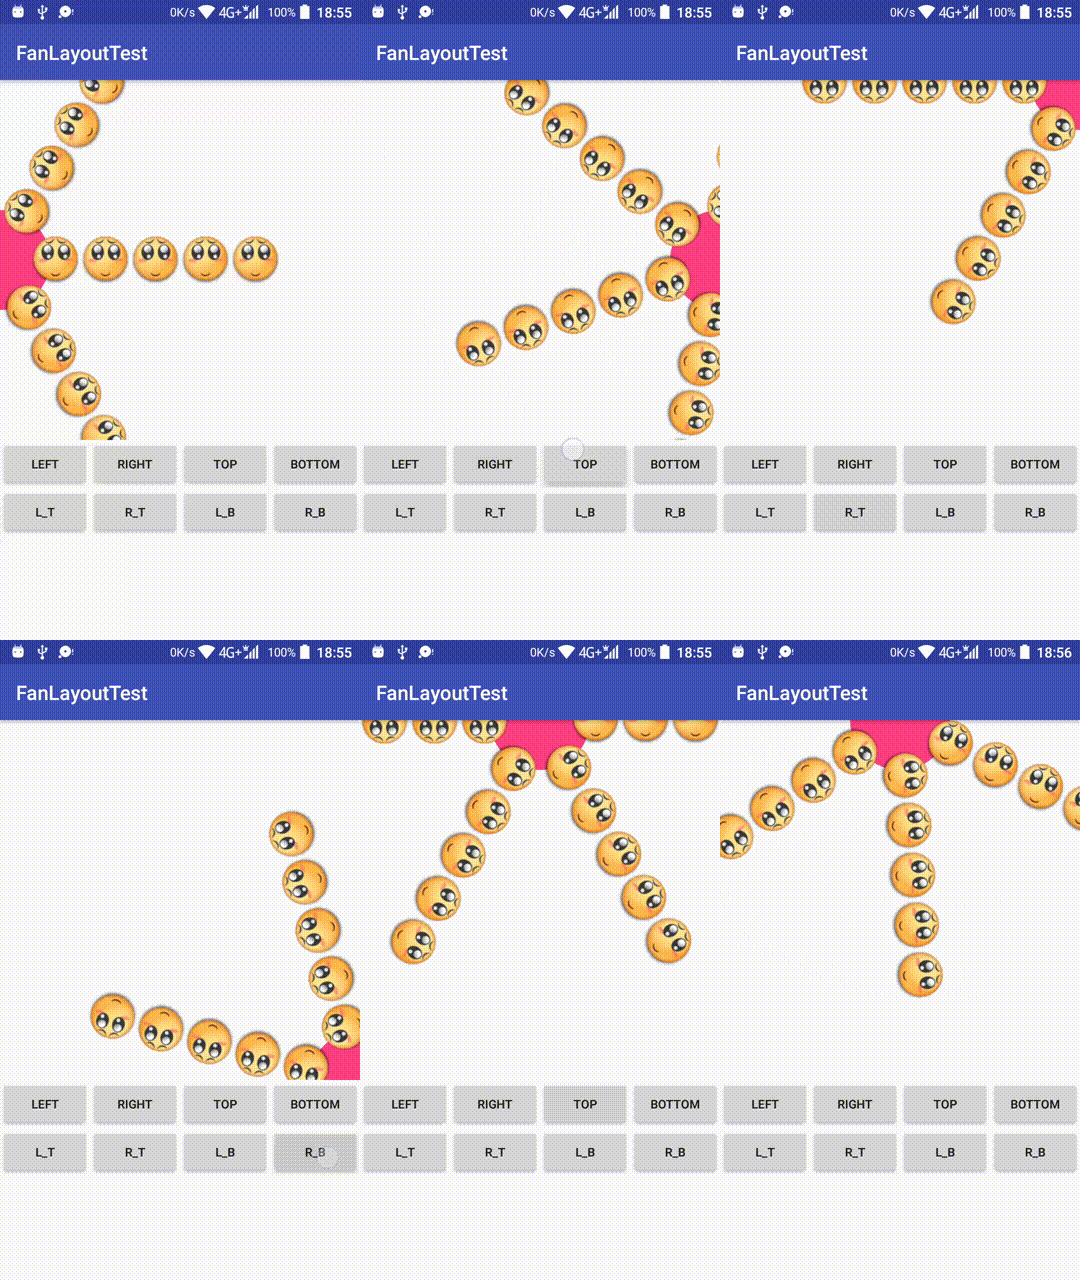
哈哈,可以了。 咦?等等!
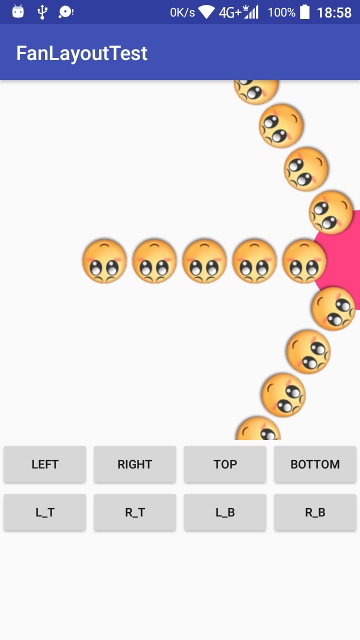
当设置为右对齐的时候,item居然反了。。额其实不是反了,只是它正的一面我们看不到而已,那么我们要怎么样使它变正呢?很简单,layoutItems方法中,加个条件判断是不是右边的对其方式,如果是,layout 子View时从左边开始就行:
    private void layoutItems(boolean isHasBottomBearing, int startIndex) {
        ...
        for (int i = 0; i < childCount; i++) {
            ...
            //判断对齐方式是不是右、右上、右下
            if (mCurrentGravity == RIGHT || mCurrentGravity == RIGHT_TOP || mCurrentGravity == RIGHT_BOTTOM) {
                //如果是,就把子View layout在圆心的左边,并且垂直居中
                int baseLeft = mPivotX - mRadius - mItemOffset;
                view.layout(baseLeft - width, mPivotY - height, baseLeft, mPivotY + height);
                //更新旋转的中心点
                view.setPivotX(width + mRadius + mItemOffset);
            } else {
                //如果不是就在圆心的右边,并且垂直居中
                int baseLeft = mPivotX + mRadius + mItemOffset;
                view.layout(baseLeft, mPivotY - height, baseLeft + width, mPivotY + height);
                //更新旋转的中心点
                view.setPivotX(-mRadius - mItemOffset);
            }
            ...
        }
    }
哈哈,这样就可以了。
Item保持垂直

哈哈,有没有发现开启这个效果之后,小表情们就充满活力了?其实实现这个效果非常简单: 首先attr中定义个属性:
    <!--设置item是否保持垂直-->
    <attr name="item_direction_fixed" format="boolean"/>
FanLayout中:
private boolean isItemDirectionFixed;
    private void initAttrs(Context context, @Nullable AttributeSet attrs, int defStyleAttr) {
        ...
        //item是否保持垂直
        isItemDirectionFixed = a.getBoolean(R.styleable.FanLayout_item_direction_fixed, false);
        ...
    }
接下来就是在旋转回调里面做手脚了,但是有一点需要注意的就是,这个所谓的Item保持垂直,并不是FanLayout的直接子View,而是FanLayout的子View的子View,为什么呢?因为现在FanLayout的Item布局都是一个LinearLayout里面水平放ImageView的,所以想要达到上图中的效果,必须拿FanLayout的子View的子View来旋转,而旋转角度,是跟子View的旋转角度相反,而非直接设置为0,我们来看代码:
    @Override
    public void onSliding(float angle) {
        for (int i = 0; i < getChildCount(); i++) {
            ...
            //如果开启了保持垂直效果
            if (isItemDirectionFixed) {
                if (child != mBearingView && child instanceof ViewGroup) {
                    ViewGroup viewGroup = (ViewGroup) child;
                    for (int j = 0; j < viewGroup.getChildCount(); j++) {
                        View childView = viewGroup.getChildAt(j);
                        //这个旋转角度正好跟item的旋转角度相反
                        childView.setRotation(-viewGroup.getRotation());
                    }
                }
            }
        }
    }
哈哈,这样就可以了,就是这么简单。
轴承偏移
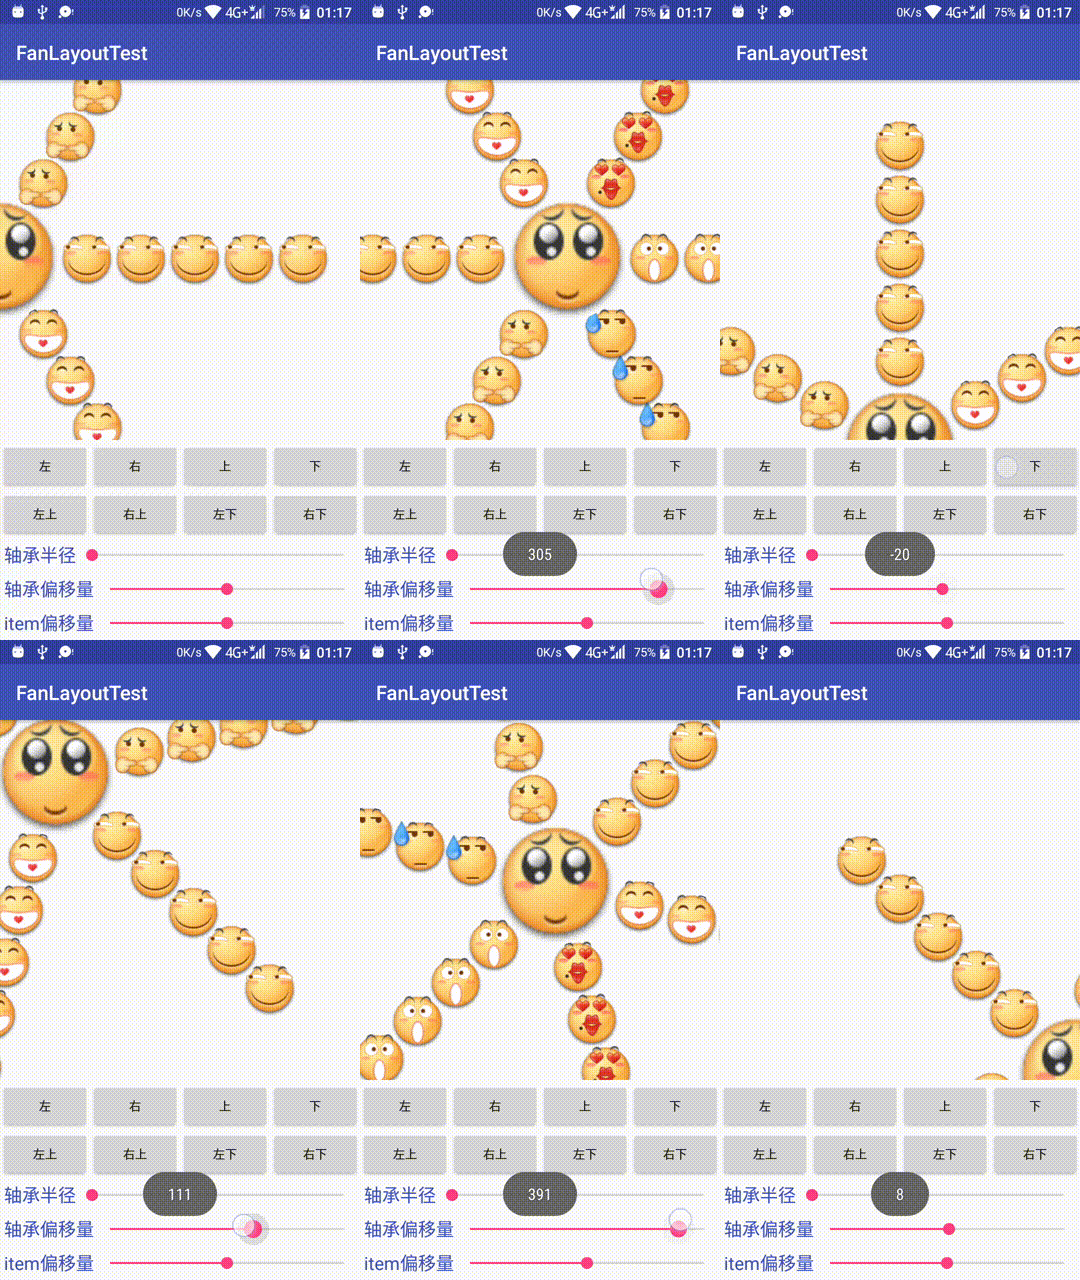
可以看到,当对齐方式不同的时候,设置偏移量,这个偏移的方向也会不同(它总是会朝着FanLayout的中心偏移) 其实这个也是非常简单的,因为我们刚刚已经做好了对齐方式,那么,现在只要在对齐方式的基础上,按规则加上或减去这个轴承的偏移量就行了。
我们添加mBearingOffset属性之后,把updateCircleCenterPoint方法改成这样:
    /**
     * 更新旋转的中心点位置
     */
    private void updateCircleCenterPoint() {
        int cx = 0, cy = 0;
        int totalWidth = getMeasuredWidth();
        int totalHeight = getMeasuredHeight();
        switch (mCurrentGravity) {
            case RIGHT:
                cx = totalWidth;
                cy = totalHeight / 2;
                //在右边: 偏移量越大,越往左边靠
                cx -= mBearingOffset;
                break;
            case LEFT:
                cy = totalHeight / 2;
                //在右边: 偏移量越大,越往右边靠
                cx += mBearingOffset;
                break;
            case BOTTOM:
                cy = totalHeight;
                cx = totalWidth / 2;
                //在底部: 偏移量越大,越往上面靠
                cy -= mBearingOffset;
                break;
            case TOP:
                cx = totalWidth / 2;
                //在顶部: 偏移量越大,越往下面靠
                cy += mBearingOffset;
                break;
            case RIGHT_BOTTOM:
                cx = totalWidth;
                cy = totalHeight;
                //右下: 同时向上和向左靠
                cx -= mBearingOffset;
                cy -= mBearingOffset;
                break;
            case LEFT_BOTTOM:
                cy = totalHeight;
                //左下: 同时向右和向上靠
                cx += mBearingOffset;
                cy -= mBearingOffset;
                break;
            case RIGHT_TOP:
                cx = totalWidth;
                //右上: 同时向左和向下靠
                cx -= mBearingOffset;
                cy += mBearingOffset;
                break;
            case LEFT_TOP:
                //左上的话,同时向右和向下靠,这里可以直接赋值了,因为此时的cx和cy都是0
                cx = cy = mBearingOffset;
                break;
            default:
                break;
        }
        mPivotX = cx;
        mPivotY = cy;
        //当然了,别忘记更新ArcSlidingHelper的旋转基点
        if (mArcSlidingHelper != null) {
            mArcSlidingHelper.updatePivotX(cx);
            mArcSlidingHelper.updatePivotY(cy);
        }
    }
哈哈,这样当偏移量设置得越大的时候,就越向中心靠拢了(当然了,太大也会超出范围的)。
自动选中
好了,到了自动选中就稍微有点复杂了,但是我们也不要怕他,先看看下面这张图:
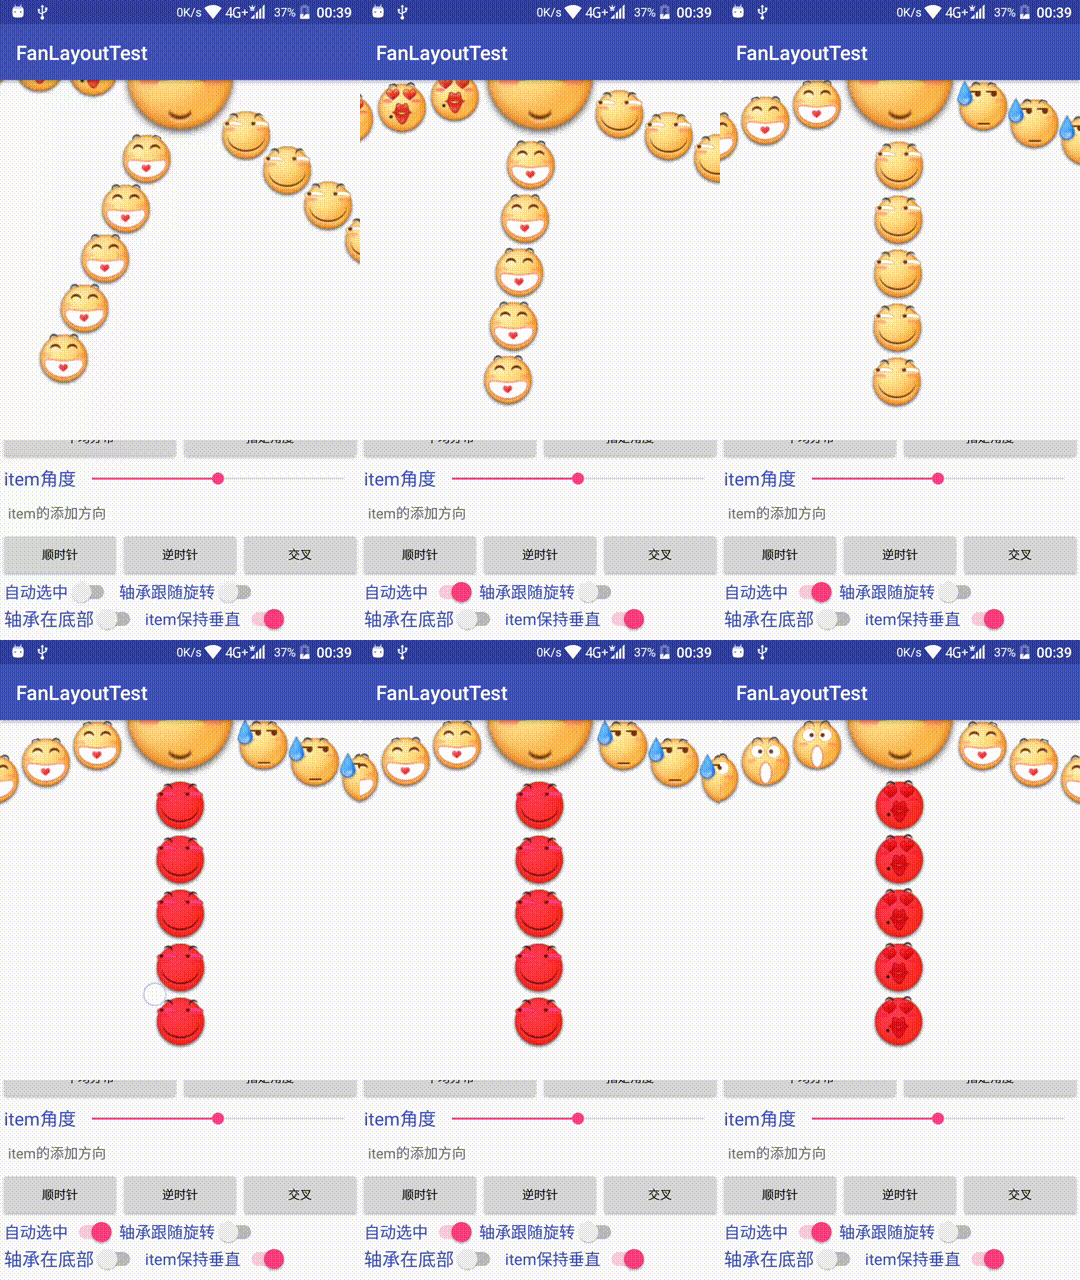
可以看到,当自动选中一打开,就自动选择了距离中线最近的那一个item,当惯性滚动结束后,也会自动选择距离最近的item。那现在我们已经有初步的思路了:找到离目标角度最近的item,然后平滑旋转它,直到item的角度 = 目标角度为止
但是怎么找到这个距离最近的item呢?因为目标角度是跟随着对齐方式的变化而变化的,所以肯定不能把代码写死了。 emmm,其实我们可以先根据当前的对齐方式来获取到目标角度:
    /**
     * 获取目标角度 (始终在屏幕内能看见的)
     */
    private int getTargetAngle() {
        int targetAngle;
        switch (mCurrentGravity) {
            case TOP:
                //在顶部时,选中的item就应该垂直向下了,所以应该是90度
                targetAngle = 90;
                break;
            case BOTTOM:
                //在底部时,跟顶部的相反,所以是-90,
                //因为在一个圆中我们看到的-90度跟270度是一样的,所以这里直接用正的角度
                targetAngle = 270;
                break;
            case LEFT_TOP:
            case RIGHT_BOTTOM:
                //左上,右下就是45度了
                //这里为什么左上的角度跟右下是一样的呢?
                //正常情况,这个角度应该是: 90+45=135才对
                //但是因为右,右上,右下这三种对齐方式,在onLayout时,都是layout在旋转基点的左边的
                //这时候在正常情况的角度来看,它已经是90度了,所以这里直接设置为45度了,下同
                targetAngle = 45;
                break;
            case LEFT_BOTTOM:
            case RIGHT_TOP:
                //左下,右上跟左上相反:360-45=315度
                targetAngle = 315;
                break;
            case LEFT:
            case RIGHT:
                //居左和居右,都是0了
            default:
                targetAngle = 0;
                break;
        }
        return targetAngle;
    }
拿到目标角度之后,下一步就是根据这个目标角度,来找出离它最近的那个item了,大概的思路就是:遍历子View,逐个判断,取距离目标角度更近的那一个item的索引。然后我们就可以根据这个索引找到对应的子View来计算出所需要的旋转角度了,最后判断是需要顺时针还是逆时针旋转,再播放旋转的动画就完成了。
我们来看看查找离目标角度最近的Item代码:
    /**
     * 找出最近的Item
     *
     * @param targetAngle 目标角度
     * @return 最近Item的index
     */
    private int findClosestViewPos(float targetAngle) {
        int childCount = getChildCount();
        //如果设置了轴承为View类型并且是放在底部的话,查找的时候就要跳过它
        int startIndex = isHasBottomBearing() ? 1 : 0;
        //获取第一个Item的当前旋转角度
        float temp = getChildAt(startIndex).getRotation();
        if (targetAngle == 0 && temp > 180) {
            //如果对齐方式是 左或右 那当这个Item的旋转角度>180时,即超过了半圆
            //这时候拿到的角度就不是更小的那一边了,所以这里要用360减去它,得到更小那一边的角度
            temp = 360 - temp;
        }
        //当前认为是离目标角度最近的角度
        float hitRotation = Math.abs(targetAngle - temp);
        //认为是离目标角度最近的Item索引
        int hitPos = startIndex;

        //遍历子View,逐个判断
        for (int i = startIndex; i < childCount; i++) {
            View childView = getChildAt(i);
            //如果是轴承View的话,就可以略过了
            if (childView == mBearingView) {
                continue;
            }
            //获取当前Item的旋转角度
            temp = childView.getRotation();
            //取更小的一边
            if (targetAngle == 0 && temp > 180) {
                temp = 360 - temp;
            }
            //计算当前Item距离
            float rotation = Math.abs(targetAngle - temp);
            //跟现在认为最近的距离做比较,取更近的那一方
            if (rotation < hitRotation) {
                hitPos = i;
                hitRotation = rotation;
            }
        }
        return hitPos;
    }
好,我们现在定义一个调整位置的方法:
    /**
     * 滚动结束后,调整位置的动画
     */
    private void playFixingAnimation() {
        int childCount = getChildCount();
        //如果手指正在拖动中或者没有Item的话,就不需要播放动画了
        if (isBeingDragged || childCount == 0 || (childCount == 1 && isViewType())) {
            return;
        }
        //先获取目标角度
        int targetAngle = getTargetAngle();
        //找到最近的Item索引
        int index = findClosestViewPos(targetAngle);
        //获取这个Item的旋转角度
        float rotation = getChildAt(index).getRotation();
        //判断一下要旋转的角度是否大于半圆,如果是的话,证明现在还不是最小的角度,需要取它另一边的角度
        if (Math.abs(rotation - targetAngle) > 180) {
            targetAngle = 360 - targetAngle;
        }
        //计算出需要旋转的角度
        float angle = Math.abs(rotation - fixRotation(targetAngle));
        //用当前Item的角度与目标角度做比较,如果当前角度比目标角度大的话,那么就是需要逆时针旋转了,反之
        startValueAnimator(rotation > fixRotation(targetAngle) ? -angle : angle, index);
    }
fixRotation方法就是来用调整角度,使其始终处于0和360之间的 (这个在上一篇也有介绍到):
    /**
     * 调整一下角度,使其保持在0~360之间
     */
    private float fixRotation(float rotation) {
        //周角
        float angle = 360F;
        if (rotation < 0) {
            //将负的角度变成正的, 比如:-1 --> 359,在视觉上是一样的,这样我们内部处理起来会比较轻松
            rotation += angle;
        }
        //避免大于360度,即:362 --> 2
        if (rotation > angle) {
            rotation %= angle;
        }
        return rotation;
    }
最后调用了startValueAnimator方法,来看看:
    /**
     * 开始播放动画
     *
     * @param end   end值
     * @param index 当前选中的index
     */
    private void startValueAnimator(float end, final int index) {
        //记录当前选中的Item索引
        mCurrentSelectedIndex = index;
        //如果上一次的动画未播放完,就先取消它
        if (mAnimator != null && mAnimator.isRunning()) {
            mAnimator.cancel();
        }
        mAnimator = ValueAnimator.ofFloat(0, end).setDuration(mFixingAnimationDuration);
        mAnimator.addUpdateListener(new ValueAnimator.AnimatorUpdateListener() {

            private float mLastScrollOffset;

            @Override
            public void onAnimationUpdate(ValueAnimator animation) {
                float currentValue = (float) animation.getAnimatedValue();
                if (mLastScrollOffset != 0) {
                    //开始旋转
                    onSliding(currentValue - mLastScrollOffset);
                }
                mLastScrollOffset = currentValue;
            }
        });
        mAnimator.start();
    }
很简单,就播放了一个ValueAnimator,mFixingAnimationDuration这个就是自定义的动画时长,贴心的我们还把它做成可以动态设置选中动画时长。 动画更新的时候,通过调用onSliding方法来旋转Item们,我们还可以提供一个OnItemSelectedListener,在动画播放结束后,利用它来通知外部有新的Item选中。
emmm,现在是万事俱备,只欠东风了,我们需要在手指停止滑动或惯性滚动结束后,来调用playFixingAnimation方法,这个接口在ArcSlidingHelper里也有提供了,哈哈,我们现在只需这样:
    mArcSlidingHelper.setOnSlideFinishListener(new ArcSlidingHelper.OnSlideFinishListener() {
        @Override
        public void onSlideFinished() {
            playFixingAnimation();
        }
    });
转为lambda后只有一行代码:
mArcSlidingHelper.setOnSlideFinishListener(this::playFixingAnimation);
添加是否自动选中的自定义属性的话,可以在调用playFixingAnimation方法之前判断一下是否已开启自动选中效果就行了。
好啦,快来看看效果吧:
哈哈,可以了,是不是很开心 (*^__^*)
布局模式
对了,那位同学提出了个问题就是:当Item只有四五个的时候,可不可以把他们都显示出来呢,因为现在是把360平均分了。 这个当然是可以的,我们干脆就分成两种布局模式吧:平均分布模式和指定角度模式。指定角度模式,那就肯定要指定一个角度了,所以如果是设置了这个模式的话,我们还要添加一个mItemAngleOffset属性来记录每个Item之间的偏移角度。 先来定义一下属性:
    <attr name="item_layout_mode" format="enum">
        <enum name="average" value="0" />
        <enum name="fixed" value="1" />
    </attr>

    <attr name="item_angle_offset" format="float" />
我们添加了2个新属性:item_layout_mode(布局方式)和item_angle_offset(Item偏移角度),布局方式有两种:average(平均)和fixed(指定角度),默认为前者。当设置为fixed的时候,还要再指定一个偏移的角度,因为FanLayout不知道每一个Item的偏移角度是多少。 在FanLayout中,也要添加对应的属性:
    public static final int MODE_AVERAGE = 0;//平均分布
    public static final int MODE_FIXED = 1;//指定角度

    private int mItemLayoutMode;//item布局模式
    private float mItemAngleOffset;//item角度偏移量
然后再在构造方法中获取到属性:
    //获取布局方式并判断是不是fixed模式
    if ((mItemLayoutMode = a.getInteger(R.styleable.FanLayout_item_layout_mode, MODE_AVERAGE)) == MODE_FIXED) {
        //如果设置了fixed模式,则获取Item偏移角度,如果角度不在1~360之间,则抛出异常
        mItemAngleOffset = a.getFloat(R.styleable.FanLayout_item_angle_offset, 0);
        if (mItemAngleOffset <= 0 || mItemAngleOffset > 360) {
            throw new IllegalStateException("item_angle_offset must be between 1~360!");
        }
    }
接下来就很简单了,只需要在layoutItems方法中改一行代码:
    private void layoutItems(boolean isHasBottomBearing, int startIndex) {
        ...
        //AVERAGE模式:每个item要旋转的角度 (如果轴承是View类型,要减一个)
        //FIXED模式:直接使用设置的偏移量
        float angle = mItemLayoutMode == MODE_AVERAGE ? 360F / (childCount - startIndex) : mItemAngleOffset;
        ...
    }
哈哈,判断一下是不是fixed模式,如果是fixed模式,直接使用指定的偏移角度就行了。 我们再来定义两个set方法来动态设置布局方式和Item偏移量:
    /**
     * item的布局方式: 默认: MODE_AVERAGE(平均)
     * 如设置为fixed需指定偏移角度: setItemAngleOffset(float angle)
     */
    public void setItemLayoutMode(@LayoutMode int layoutMode) {
        if (mItemLayoutMode != layoutMode) {
            mItemLayoutMode = layoutMode;
            requestLayout();
        }
    }

    /**
     * 指定Item的偏移角度  LayoutMode=MODE_FIXED时有效
     */
    public void setItemAngleOffset(float angle) {
        if (mItemAngleOffset != angle) {
            mItemAngleOffset = angle;
            if (mItemLayoutMode == MODE_FIXED) {
                requestLayout();
            }
        }
    }
setItemLayoutMode方法中的@LayoutMode也是使用了@IntDef的自定义注解。
好,我们来看看效果:
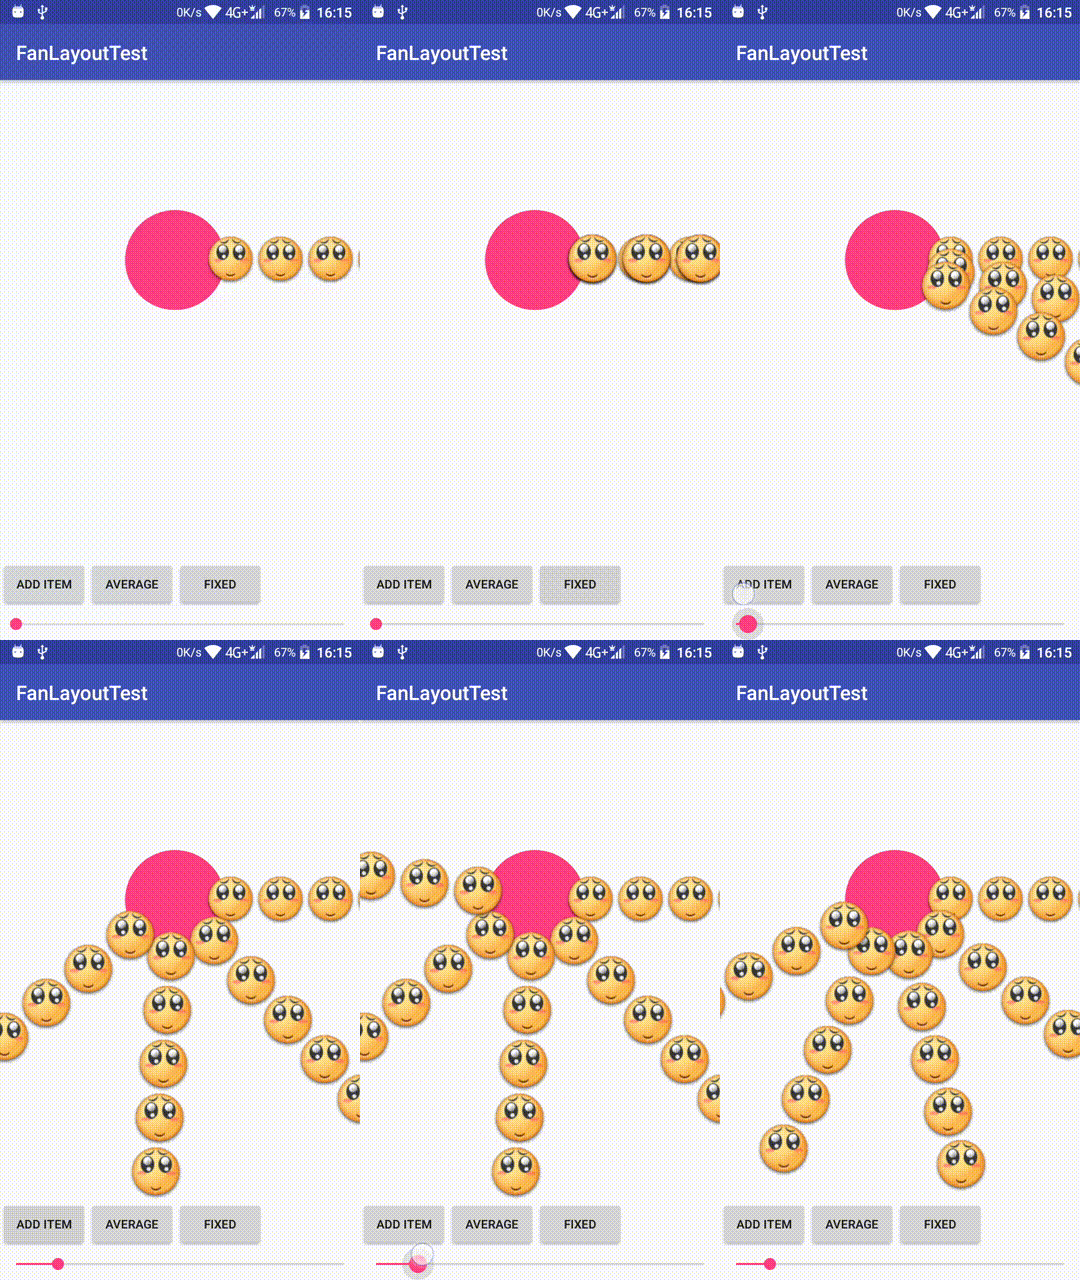
哈哈,可以了。 但是可能有同学会觉得:为什么添加新Item和偏移时只能是顺时针呢?而且现在的Item总是在轴承的右下方,如果我要Item显示在正右方怎么办?现在是这样:
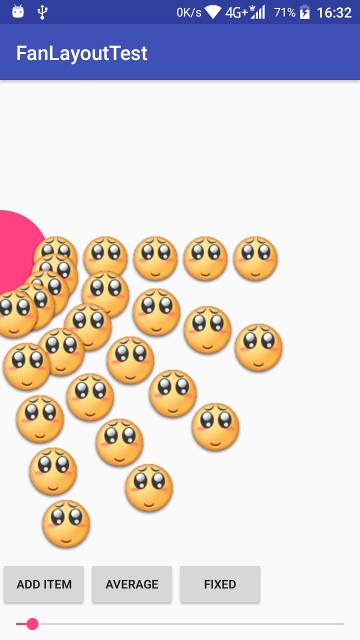
这样看上去就不是很舒服了,因为上方有一部分是没有Item的。 好吧,既然这样,那就再加上一个可以动态设置Item的添加方向的效果吧。
Item添加方向
除了顺时针和逆时针,我们还准备再添加一个交叉添加模式,哈哈,就是一个顺时针一个逆时针了,这样做的话,就可以实现刚刚说的:让Item整体保持在正右方。 先添加属性,首先是attr:
    <!--item的添加方向: 默认: 顺时针添加-->
    <attr name="item_add_direction" format="enum">
        <!--顺时针-->
        <enum name="clockwise" value="0" />
        <!--逆时针-->
        <enum name="counterclockwise" value="1" />
        <!--交叉添加-->
        <enum name="interlaced" value="2" />
    </attr>
FanLayout:
    public static final int ADD_DIRECTION_CLOCKWISE = 0;//顺时针方向添加
    public static final int ADD_DIRECTION_COUNTERCLOCKWISE = 1;//逆时针添加
    public static final int ADD_DIRECTION_INTERLACED = 2;//交叉添加

    private int mItemAddDirection;//item添加模式
我们在构造方法中拿到item_add_direction这个属性之后,就要想想接下来应该怎么做了:
- 其实如果是顺时针的话,我们什么都不用做,保持原来的就行;
- 如果是逆时针呢?那就刚好跟顺时针相反,顺时针是50度的话,那么逆时针就是-50度了,所以我们等下直接用360减去顺时针中的角度就行了;
- 交叉模式的话,我们是打算奇数顺时针添加,偶数逆时针添加,这样就能实现交叉的效果了;
好,来看看代码怎么写(也是只需要在layoutItems方法里面修改一下就行了):
    private void layoutItems(boolean isHasBottomBearing, int startIndex) {
        ...
        for (int i = 0; i < childCount; i++) {
            ...
            //排除轴承View之后的索引,也就是要忽略轴承View了
            int index;
            //Item最终要旋转的角度
            float rotation;

            if (mItemAddDirection == ADD_DIRECTION_COUNTERCLOCKWISE) {
                //逆时针添加
                //如果View类型的轴承在底部的话,还要减去1,因为我们要忽略这个轴承
                index = isHasBottomBearing ? i - 1 : i;
                //这个角度跟顺时针的相反,所以直接用360减去当前角度
                rotation = 360F - index * angle;
            } else if (mItemAddDirection == ADD_DIRECTION_INTERLACED) {
                //交叉添加
                //这里计算的index为什么跟顺时针的和逆时针的不同呢?总是比它们大1
                //是因为第一个Item不用动,改变添加方向的是从第二个Item开始的,所以这里要比其他两个方向的index值要大1
                index = isHasBottomBearing ? i : i + 1;
                //当前index前面相同方向的item个数
                int hitCount = 0;
                //当前index是否偶数
                boolean isDual = index % 2 == 0;
                //从0开始数起,一直数到当前index
                for (int j = 0; j < index; j++) {
                    //判断当前index是否偶数
                    if (isDual) {
                        //进一步判断当前遍历到的是否偶数,如果是偶数的话才+1
                        //为什么还要这样判断呢?
                        //是因为: 上面判断isDual,仅仅是为了确定当前index的item究竟是逆时针添加还是顺时针添加,
                        //添加的方向是确定了,但要偏移的角度还不知道,而这一次的判断呢,
                        //就是为了计算出当前index的前面还有多少个跟它相同方向的item,下同
                        if (j % 2 == 0) {
                            hitCount++;
                        }
                    } else {
                        //如果是奇数的话,也进一步判断当前遍历到的是否奇数才+1
                        if (j % 2 != 0) {
                            hitCount++;
                        }
                    }
                }
                //我们设置,如果当前index是奇数的话,就顺时针添加,否则逆时针添加,这样的话,就能实现交叉添加了
                rotation = isDual ? 360F - hitCount * angle : hitCount * angle;
            } else {
                //顺时针添加
                //如果View类型的轴承在底部的话,还要减去1,因为我们要忽略这个轴承
                index = isHasBottomBearing ? i - 1 : i;
                rotation = index * angle;
            }
            //设置旋转的角度
            view.setRotation(fixRotation(rotation + getTargetAngle()));
        }
    }
好了,在添加seter方法之后,看看效果如何:
    /**
     * 设置Item的添加方向 默认: 顺时针添加
     */
    public void setItemAddDirection(@DirectionMode int direction) {
        if (mItemAddDirection != direction) {
            mItemAddDirection = direction;
            requestLayout();
        }
    }

哈哈哈,三种模式我们都实现了,是不是很开心。
添加指定选中
可能还有同学不满足,ListView有setSelection,RecyclerView有scrollToPosition,为什么FanLayout就不能有一个选中指定Item的方法呢? 好吧,那我们也加一个这个的效果吧:
    /**
     * 指定选中
     *
     * @param index    item索引
     * @param isSmooth 是否播放平滑动画
     */
    public void setSelection(int index, boolean isSmooth) {
        //必须要开启自动选中,并且将要选中的index不能大于当前子view数量,再排除轴承view
        if (isAutoSelect && index < getChildCount() && getChildCount() > (isViewType() ? 1 : 0)) {
            //判断轴承是否View类型
            if (isViewType()) {
                //如果轴承在底部的话,那就是要+1了,因为要排除轴承View
                if (isBearingOnBottom) {
                    //+1的前提是不溢出
                    if (index + 1 < getChildCount()) {
                        index++;
                    }
                } else {
                    //如果轴承在顶部的话,并且传进来的index刚好是轴承的index,则-1(排除轴承View)
                    if (index == getChildCount() - 1) {
                        index--;
                        //如果减了1之后<0的话,也没必要继续了
                        if (index < 0) {
                            return;
                        }
                    }
                }
            }
            //转动到指定的index
            scrollToPosition(index, isSmooth);
        }
    }

    /**
     * 转动到指定的index
     *
     * @param isSmooth 是否平滑滚动
     */
    private void scrollToPosition(int index, boolean isSmooth) {
        //刷新当前选中的index
        mCurrentSelectedIndex = index;
        View view = getChildAt(index);
        //目标角度
        float targetAngle = getTargetAngle();
        //当前index对应的view的角度
        float rotation = view.getRotation();
        //取更小的那一边
        if (Math.abs(rotation - targetAngle) > 180) {
            targetAngle = 360 - targetAngle;
        }
        //先拿到正的角度
        float angle = Math.abs(rotation - fixRotation(targetAngle));
        //如果是平滑滚动,就交给ValueAnimator去处理
        if (isSmooth) {
            startValueAnimator(rotation > fixRotation(targetAngle) ? -angle : angle, index);
        } else {
            //如果不是就直接滚动到目标角度
            onSliding(rotation > fixRotation(targetAngle) ? -angle : angle);
            //回调有新的Item选中
            notifyListener();
        }
    }

    private void notifyListener() {
        if (mOnItemSelectedListener != null) {
            //根据记录的当前选中index来获取到对应的view
            View view = getChildAt(mCurrentSelectedIndex);
            //检查下这个view是不是轴承view,如果是的话,还要排除它,并且找到正确的item
            if (isViewType() && view == mBearingView) {
                //如果轴承在底部的话,那就是要+1了
                if (isBearingOnBottom) {
                    //+1的前提是不溢出
                    if (mCurrentSelectedIndex + 1 < getChildCount()) {
                        mCurrentSelectedIndex++;
                    } else {
                        //如果溢出了,也没必要继续了
                        return;
                    }
                } else {
                    //逻辑同上
                    if (mCurrentSelectedIndex - 1 >= 0) {
                        mCurrentSelectedIndex--;
                    } else {
                        return;
                    }
                }
            }
            //回调接口
            mOnItemSelectedListener.onSelected(getChildAt(mCurrentSelectedIndex));
        }
    }

    /**
     * Item被选中的回调
     */
    public interface OnItemSelectedListener {
        void onSelected(View item);
    }
我们一气之下 一口气加了三个方法,经过之前的一些分析,相信上面那些代码大家都可以轻松看懂了。
来看看效果如何:
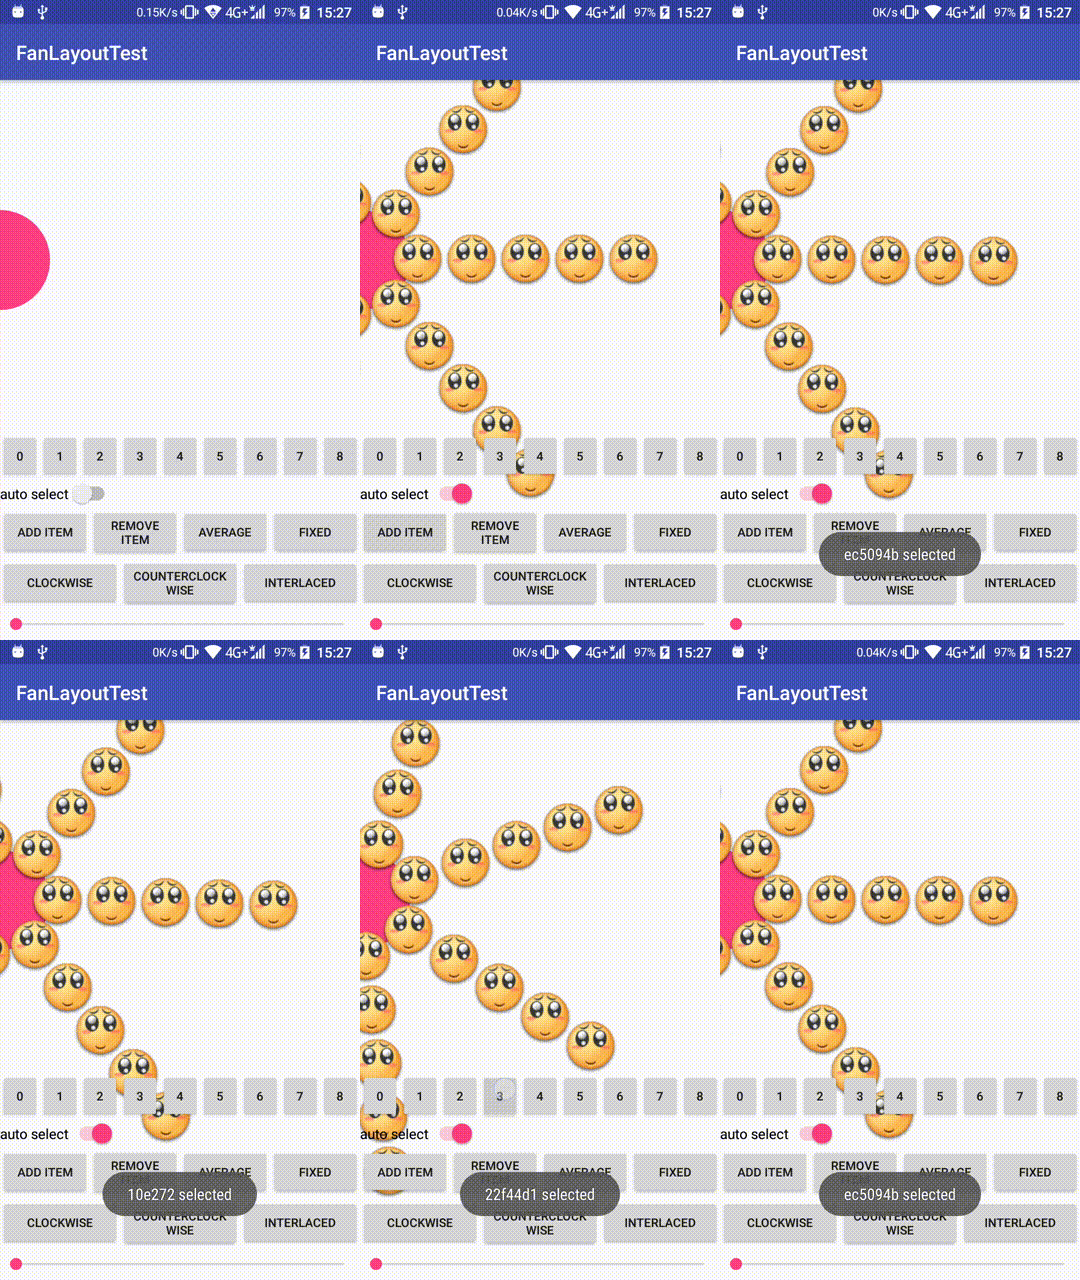
哈哈,可以看到,开启自动选中之后,通过点击上面那一排数字,也能正确地旋转到对应的Item了。
好啦,我们这篇文章算是结束了,有错误的地方请指出,谢谢大家! github地址:https://github.com/wuyr/FanLayout 欢迎star
到此这篇关于Android之FanLayout制作圆弧滑动效果的文章就介绍到这了,更多相关FanLayout圆弧滑动效果内容请搜索脚本之家以前的文章或继续浏览下面的相关文章希望大家以后多多支持脚本之家!
