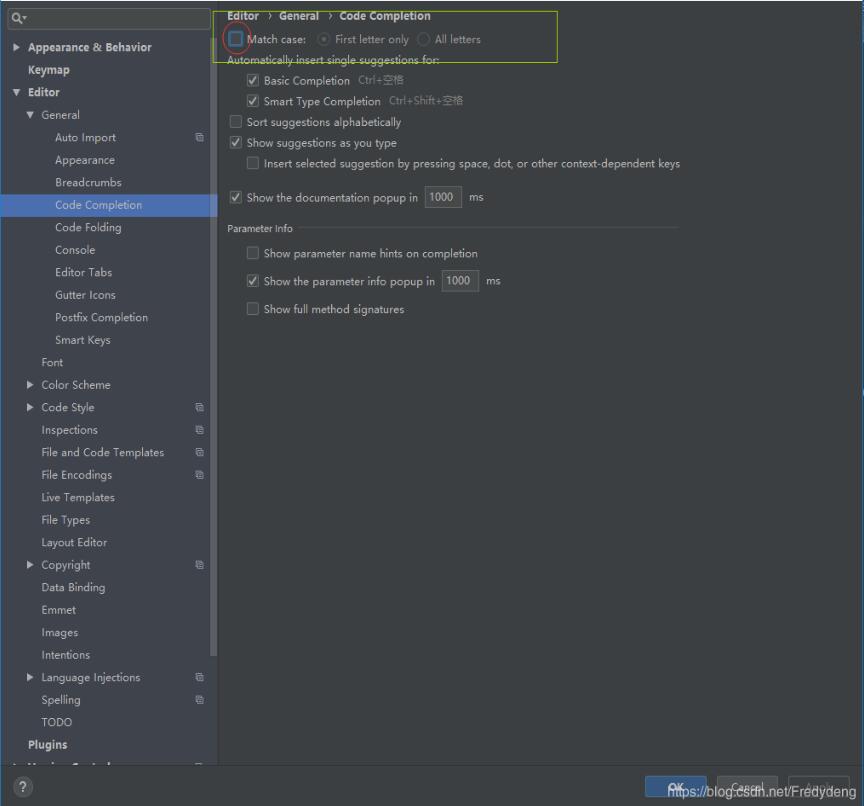
android studio3.3.1代码提示忽略大小写的设置
作者:Fredydeng
这篇文章主要介绍了android studio3.3.1代码提示忽略大小写的设置,具有很好的参考价值,希望对大家有所帮助。一起跟随小编过来看看吧
跟以往设置有区别,此处为取消红框勾选,设置即可

补充知识:Android Studio高级控件(自动提示文本框)
一、高级控件与低级控件区别?
是否使用适配器
二、适配器种类和作用
种类
1、数组适配器 ArrayAdapter
new ArrayAdapter(this,R.layout.actv_style, names);
2、简单适配器 SimpleAdapter
3、自定义适配器
三、高级控件使用步骤
1、获取数据
2、创建适配器
3、绑定适配器
例如:
1、自动提示文本框
独特属性:android:completionThreshold=”2”—–设置输入多少字符时自动匹配
1、AutoCompleteTextView(单一提示)
2、MultiAutoCompleteTextView(多次提示)
设置多次提示时,设置分隔符方法
mactv_main.setTokenizer(new MultiAutoCompleteTextView.CommaTokenizer());
activity_main.xml
<?xml version="1.0" encoding="utf-8"?>
<LinearLayout xmlns:android="http://schemas.android.com/apk/res/android"
  xmlns:app="http://schemas.android.com/apk/res-auto"
  xmlns:tools="http://schemas.android.com/tools"
  android:layout_width="match_parent"
  android:layout_height="match_parent"
  android:orientation="vertical"
  tools:context=".MainActivity">

  <!--自动提示文本框-->
  <!--(单一提示)-->
  <AutoCompleteTextView
    android:id="@+id/act_main_act1"
    android:layout_width="match_parent"
    android:layout_height="60dp"
    android:hint="单一提示"/>

  <!--多次提示-->
  <MultiAutoCompleteTextView
    android:id="@+id/mact_main_mact1"
    android:layout_width="match_parent"
    android:completionThreshold="1"
  android:layout_height="60dp"
    android:hint="多次提示"/>


</LinearLayout>
MainActivity.java
package com.example.t212_a6;

import android.support.v7.app.AppCompatActivity;
import android.os.Bundle;
import android.util.Log;
import android.view.View;
import android.widget.AdapterView;
import android.widget.ArrayAdapter;
import android.widget.AutoCompleteTextView;
import android.widget.MultiAutoCompleteTextView;
import android.widget.SimpleAdapter;
import android.widget.Spinner;
import android.widget.Toast;

import java.util.ArrayList;
import java.util.HashMap;
import java.util.List;
import java.util.Map;

public class MainActivity extends AppCompatActivity {

  private String[] data1;
  private ArrayAdapter<String> adapter1;
  private AutoCompleteTextView act_main_act1;

  private ArrayAdapter<String> adapter4;
  private MultiAutoCompleteTextView mact_main_mact1;


  @Override
  protected void onCreate(Bundle savedInstanceState) {
    super.onCreate(savedInstanceState);
    setContentView(R.layout.activity_main);
    act_main_act1 = findViewById(R.id.act_main_act1);
    mact_main_mact1 = findViewById(R.id.mact_main_mact1);

//    1、
//    高级控件使用步骤
//    3.1 获取数据
    data1 = new String[] { "愤怒的小鸟", "汤姆猫", "落汤鸡", "牛牛", "哈巴狗", "神龙", "烤鸭",
        "小象", "美人鱼", "九尾狐" };
//    3.2 创建适配器
    adapter1 = new ArrayAdapter<String>(this,R.layout.act_main_item1,data1);
//    3.3 绑定适配器
    act_main_act1.setAdapter(adapter1);

    //设置分隔符

    adapter4 = new ArrayAdapter<String>(this,R.layout.act_main_item1,data1);
    mact_main_mact1.setTokenizer(new MultiAutoCompleteTextView.CommaTokenizer());
    mact_main_mact1.setAdapter(adapter4);


  }

}
在layout中写一个项资源

<?xml version="1.0" encoding="utf-8"?>
<TextView
  xmlns:android="http://schemas.android.com/apk/res/android" android:layout_width="match_parent"
  android:textColor="@color/yellow"
  android:layout_height="match_parent">

</TextView>
以上这篇android studio3.3.1代码提示忽略大小写的设置就是小编分享给大家的全部内容了,希望能给大家一个参考,也希望大家多多支持脚本之家。
