详解Android登陆界面用户协议解决方案
作者:倔强码农
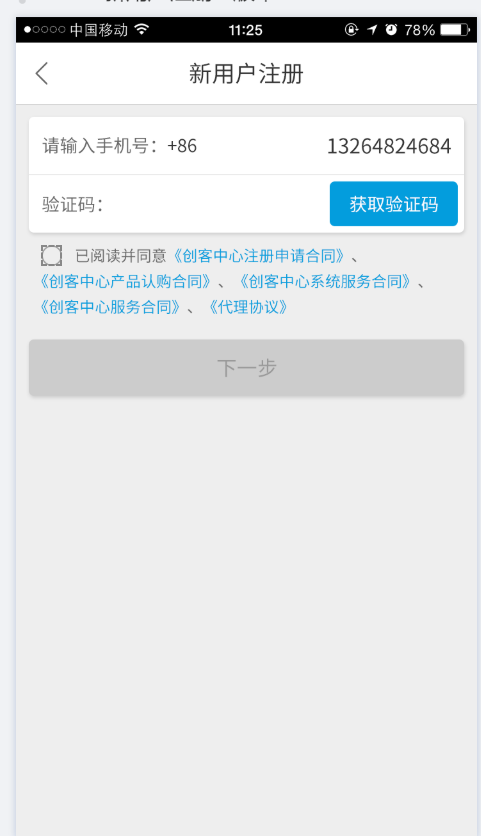
先上一张图来看要实现的东西

用户协议.png
一般来说每个app都有这个用户协议阅读相关的功能,之前做的都是一个协议,也都是单行的,完全没有复杂度,可以一个checkbox加上一个textview来搞定,那么像图上这种复杂的该怎们实现呢.
来看他有神们不同,有那些难点
1,选中框被文字包裹,单纯的checkbox和textview无法实现,因为选中框会在文字左方
2,协议文件有很多,不定项,文件是服务器返回的,而且每个文件中间都会有一个颜色不一样的点隔开
3,为每个文件都有点击事件,点击文件会产看对应的详情.....
其实这样一看很多人都知道可以用textview的span来搞定,算盘的想过内容就不复习了,直接上代码
首先模拟一个协议数据,创建一个是否阅读的变量
String[] protocols = {
      "《创客中心产品认购合同》",
      "《创客中心注册申请合同》",
      "《创客中心系统服务合同》",
      "《创客中心服务合同》",
      "《代理协议》"
  };
 private boolean isChecked;
然后我们为搞一个字符串,第一位来个空格作为图片的替换
接着我们创建一个该字符串的SpannableStringBuilder,然后调用setIconSapn方法为该字符串的第一个字符替换成图标(默认为位选中状态),setIconSapn方法在下面
然后我们为第一个字符位置设置一个点击事件imagClick ,根据对应的选中状态做图标的变化
final String string = " 已阅读并同意";
    //图标(默认位选中)
    spannableStringBuilder = new SpannableStringBuilder(string);
    setIconSapn(spannableStringBuilder, R.mipmap.app_login_unchecked);
    //选择按钮的点击事件
    ClickableSpan imagClick = new ClickableSpan() {
      @Override
      public void onClick(View widget) {
        //显示协议内容
        if (isChecked) {
          setIconSapn(spannableStringBuilder, R.mipmap.app_login_unchecked);
        } else {
          setIconSapn(spannableStringBuilder, R.mipmap.app_login_checked);
        }
        isChecked = !isChecked;
        mView.setProtocl(spannableStringBuilder);
      }

      @Override
      public void updateDrawState(TextPaint ds) {
        super.updateDrawState(ds);
        ds.setUnderlineText(false);
        ds.setColor(Color.WHITE);
      }
    };
    spannableStringBuilder.setSpan(imagClick, 0, 1, Spanned.SPAN_EXCLUSIVE_EXCLUSIVE);
setIconSapn方法
/**
   * 设置徐泽状态图标
   *
   * @param spannableStringBuilder
   * @param resId
   */
  private void setIconSapn(SpannableStringBuilder spannableStringBuilder, int resId) {
    MyImageSpan imageSpan = new MyImageSpan(mContext, BitmapFactory.decodeResource(mView.getResources(), resId), 2);
    spannableStringBuilder.setSpan(imageSpan, 0, 1, Spanned.SPAN_EXCLUSIVE_EXCLUSIVE);
  }
这里可以看到我没有用系统的ImageSpan,因为该文字存在换行,系统的ImageSpan图标无法进行居中,所以我们自定义一个ImageSpan,重写draw方法,解决了该问题,代码如下
@Override
  public void draw(Canvas canvas, CharSequence text, int start, int end, float x, int top, int y, int bottom,
           Paint paint) {

    //draw 方法是重写的ImageSpan父类 DynamicDrawableSpan中的方法,在DynamicDrawableSpan类中,虽有getCachedDrawable(),
    // 但是私有的,不能被调用,所以调用ImageSpan中的getrawable()方法,该方法中 会根据传入的drawable ID ,获取该id对应的
    // drawable的流对象,并最终获取drawable对象
    Drawable drawable = getDrawable(); //调用imageSpan中的方法获取drawable对象
    canvas.save();

    //获取画笔的文字绘制时的具体测量数据
    Paint.FontMetricsInt fm = paint.getFontMetricsInt();

    //系统原有方法,默认是Bottom模式)
    int transY = bottom - drawable.getBounds().bottom;
    if (mVerticalAlignment == ALIGN_BASELINE) {
      transY -= fm.descent;
    } else if (mVerticalAlignment == ALIGN_FONTCENTER) {  //此处加入判断, 如果是自定义的居中对齐
      //与文字的中间线对齐(这种方式不论是否设置行间距都能保障文字的中间线和图片的中间线是对齐的)
      // y+ascent得到文字内容的顶部坐标,y+descent得到文字的底部坐标,(顶部坐标+底部坐标)/2=文字内容中间线坐标
      transY = ((y + fm.descent) + (y + fm.ascent)) / 2 - drawable.getBounds().bottom / 2;
    }

    canvas.translate(x, transY);
    drawable.draw(canvas);
    canvas.restore();
  }
紧接着我们遍历拿到的协议组,挨个添加到之前的string中,为每个协议设置为蓝色,并设置点击事件,最后返回最终的SpannableStringBuilder (先添加点击事件,否则前景色会被点击事件的颜色淡化)
for (int i = 0; i < protocols.length; i++) {
      final String protocol = protocols[i];
      SpannableStringBuilder protocolStringBuild = new SpannableStringBuilder(protocol);
      //协议
      //点击span
      final int finalI = i;
      ClickableSpan clickableSpan = new ClickableSpan() {
        @Override
        public void onClick(View widget) {
          //显示协议内容
          mView.showProtocol(protocol, finalI, protocols.length);
        }

        @Override
        public void updateDrawState(TextPaint ds) {
          super.updateDrawState(ds);
          ds.setUnderlineText(false);
          ds.setColor(Color.WHITE);
        }
      };
      protocolStringBuild.setSpan(clickableSpan, 0, protocol.length(), Spanned.SPAN_EXCLUSIVE_EXCLUSIVE);
      //前景
      ForegroundColorSpan foregroundColorSpan = new ForegroundColorSpan(mView.getResources().getColor(R.color.colorPrimary));
      protocolStringBuild.setSpan(foregroundColorSpan, 0, protocol.length(), Spanned.SPAN_EXCLUSIVE_EXCLUSIVE);
      spannableStringBuilder.append(protocolStringBuild);
      //点
      if (i != protocols.length - 1) {
        SpannableStringBuilder dotStringBuild = new SpannableStringBuilder("、");
        ForegroundColorSpan dotSpan = new ForegroundColorSpan(mView.getResources().getColor(R.color.color_66));
        dotStringBuild.setSpan(dotSpan, 0, 1, Spanned.SPAN_EXCLUSIVE_EXCLUSIVE);
        spannableStringBuilder.append(dotStringBuild);
      }
    }
    return spannableStringBuilder;
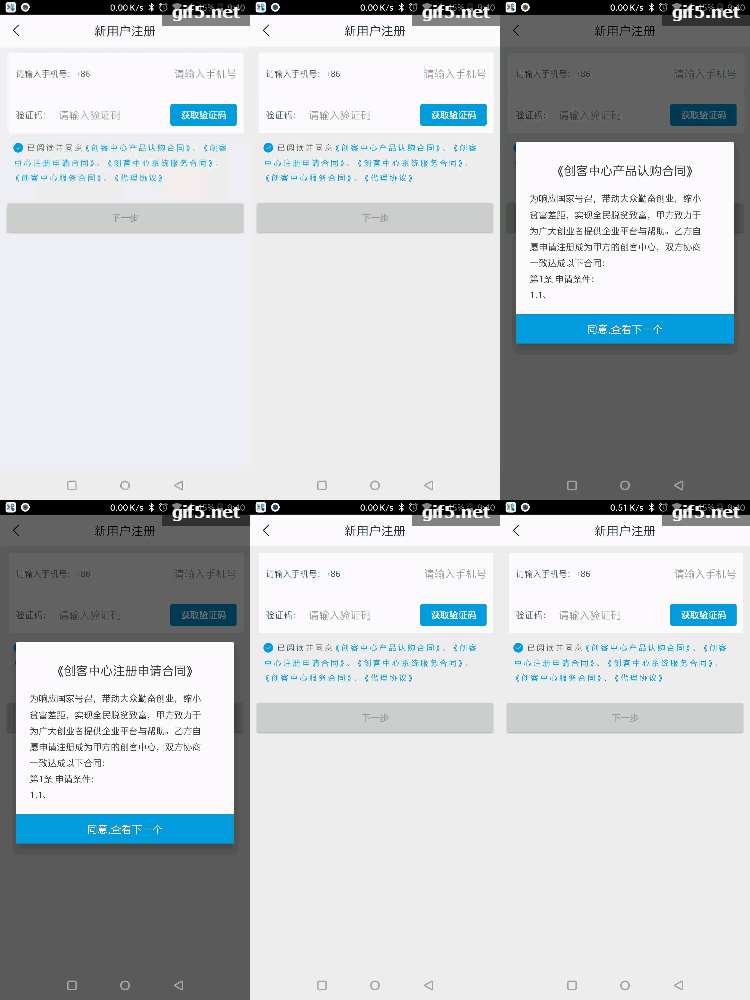
最后上一张效果图,不知为何录屏相当不清晰

协议.gif
以上就是本文的全部内容,希望对大家的学习有所帮助,也希望大家多多支持脚本之家。
