Android PopupWindow实现微信右上角的弹出菜单
作者:Elven_Shi
这篇文章主要为大家详细介绍了Android PopupWindow实现微信右上角的弹出菜单,文中示例代码介绍的非常详细,具有一定的参考价值,感兴趣的小伙伴们可以参考一下
日常开发过程中对于PopupWindown的使用也是比较多的。这里给大家展示一下PopupWindow的使用。
修改activity_main.xml布局:
<RelativeLayout xmlns:android="http://schemas.android.com/apk/res/android"
 xmlns:tools="http://schemas.android.com/tools"
 android:layout_width="match_parent"
 android:layout_height="match_parent"
 tools:context="${relativePackage}.${activityClass}" >

 <RelativeLayout
 android:layout_width="match_parent"
 android:layout_height="50dip"
 android:background="@android:color/holo_blue_dark">

 <ImageView
 android:layout_width="wrap_content"
 android:layout_height="wrap_content"
 android:layout_centerVertical="true"
 android:layout_marginLeft="10dip"
 android:background="@drawable/ic_launcher" />

 <ImageView
 android:id="@+id/rl_more"
 android:layout_width="wrap_content"
 android:layout_height="match_parent"
 android:background="@drawable/ability_show_item_bg"
 android:paddingLeft="15dp"
 android:paddingRight="5dp"
 android:layout_alignParentRight="true"
 android:src="@drawable/actionbar_more_icon" />

 </RelativeLayout>

</RelativeLayout>
新建popup_window.xml布局文件
<?xml version="1.0" encoding="utf-8"?>
<LinearLayout xmlns:android="http://schemas.android.com/apk/res/android"
 android:layout_width="match_parent"
 android:layout_height="match_parent"
 android:background="@android:color/white"
 android:gravity="center_horizontal"
 android:orientation="vertical" >

 <TextView
 android:id="@+id/settings"
 android:layout_width="match_parent"
 android:layout_height="45dp"
 android:gravity="center"
 android:padding="12dp"
 android:text="设置"
 android:textSize="16sp" />

 <View
 android:layout_width="match_parent"
 android:layout_height="1dp"
 android:background="#BDBDBD" />

 <TextView
 android:id="@+id/about"
 android:layout_width="match_parent"
 android:layout_height="45dp"
 android:gravity="center"
 android:padding="12dp"
 android:text="关于"
 android:textSize="16sp" />

 <View
 android:layout_width="match_parent"
 android:layout_height="1dp"
 android:background="#BDBDBD" />

 <TextView
 android:id="@+id/ability_logout"
 android:layout_width="match_parent"
 android:layout_height="45dp"
 android:gravity="center"
 android:padding="12dp"
 android:text="退出"
 android:textSize="16sp" />

</LinearLayout>
自定义PopupWindow类PopWindow
package com.syz.mypopupwindow;

import android.app.Activity;
import android.content.Context;
import android.graphics.drawable.ColorDrawable;
import android.view.LayoutInflater;
import android.view.View;
import android.view.View.OnClickListener;
import android.view.ViewGroup.LayoutParams;
import android.widget.PopupWindow;

/**
 * <p>Title:PopWindow</p>
 * <p>Description: 自定义PopupWindow</p>
 * @author syz
 * @date 2016-3-14
 */
public class PopWindow extends PopupWindow{
 private View conentView;
 public PopWindow(final Activity context){
 LayoutInflater inflater = (LayoutInflater) context
 .getSystemService(Context.LAYOUT_INFLATER_SERVICE);
 conentView = inflater.inflate(R.layout.popup_window, null);
 int h = context.getWindowManager().getDefaultDisplay().getHeight();
 int w = context.getWindowManager().getDefaultDisplay().getWidth();
 // 设置SelectPicPopupWindow的View
 this.setContentView(conentView);
 // 设置SelectPicPopupWindow弹出窗体的宽
 this.setWidth(w / 2 + 40);
 // 设置SelectPicPopupWindow弹出窗体的高
 this.setHeight(LayoutParams.WRAP_CONTENT);
 // 设置SelectPicPopupWindow弹出窗体可点击
 this.setFocusable(true);
 this.setOutsideTouchable(true);
 // 刷新状态
 this.update();
 // 实例化一个ColorDrawable颜色为半透明
 ColorDrawable dw = new ColorDrawable(0000000000);
 // 点back键和其他地方使其消失,设置了这个才能触发OnDismisslistener ,设置其他控件变化等操作
 this.setBackgroundDrawable(dw);
 // mPopupWindow.setAnimationStyle(android.R.style.Animation_Dialog);
 // 设置SelectPicPopupWindow弹出窗体动画效果
 this.setAnimationStyle(R.style.AnimationPreview);

 conentView.findViewById(R.id.about).setOnClickListener(new OnClickListener() {

 @Override
 public void onClick(View arg0) {
 //do something you need here
 PopWindow.this.dismiss();
 }
 });
 conentView.findViewById(R.id.ability_logout).setOnClickListener(new OnClickListener() {

 @Override
 public void onClick(View arg0) {
 // do something before signing out
 context.finish();
 PopWindow.this.dismiss();
 }
 });
 conentView.findViewById(R.id.settings).setOnClickListener(new OnClickListener() {

 @Override
 public void onClick(View arg0) {
 // do something you need here

 PopWindow.this.dismiss();
 }
 });
 }

 /**
 * 显示popupWindow
 *
 * @param parent
 */
 public void showPopupWindow(View parent) {
 if (!this.isShowing()) {
 // 以下拉方式显示popupwindow
 this.showAsDropDown(parent, parent.getLayoutParams().width / 2, 5);
 } else {
 this.dismiss();
 }
 }
}
添加自定义PopupWindow所需的style
AnimationPreview
<style name="AnimationPreview">
 <item name="android:windowEnterAnimation">@anim/fade_in</item>
 <item name="android:windowExitAnimation">@anim/fade_out</item>
 </style>
添加style所需的动画
fade_in.xml
<?xml version="1.0" encoding="utf-8"?>
<!-- 左上角扩大-->
 <scale xmlns:android="http://schemas.android.com/apk/res/android"
 android:interpolator="@android:anim/accelerate_decelerate_interpolator"
 android:fromXScale="0.001"
 android:toXScale="1.0"
 android:fromYScale="0.001"
 android:toYScale="1.0"
 android:pivotX="100%"
 android:pivotY="10%"
 android:duration="200" />
fade_out.xml
<?xml version="1.0" encoding="utf-8"?>
<!-- 左上角缩小 -->
 <scale xmlns:android="http://schemas.android.com/apk/res/android"
 android:interpolator="@android:anim/accelerate_decelerate_interpolator"
 android:fromXScale="1.0"
 android:toXScale="0.001"
 android:fromYScale="1.0"
 android:toYScale="0.001"
 android:pivotX="100%"
 android:pivotY="10%"
 android:duration="200" />
最后在MainActivity类中使用
package com.syz.mypopupwindow;

import android.app.Activity;
import android.os.Bundle;
import android.view.View;
import android.view.View.OnClickListener;

public class MainActivity extends Activity implements OnClickListener {

 @Override
 protected void onCreate(Bundle savedInstanceState) {
 super.onCreate(savedInstanceState);
 setContentView(R.layout.activity_main);
 findViewById(R.id.rl_more).setOnClickListener(this);
 }

 @Override
 public void onClick(View v) {
 if(v.getId() == R.id.rl_more){
 PopWindow popWindow = new PopWindow(this);
 popWindow.showPopupWindow(findViewById(R.id.rl_more));
 }
 }
}
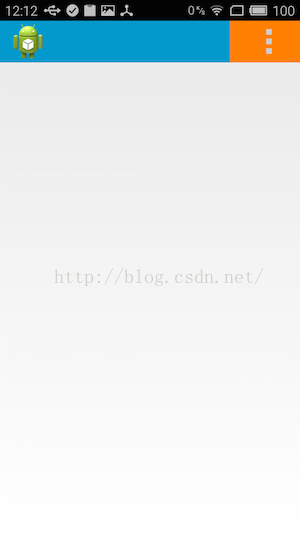
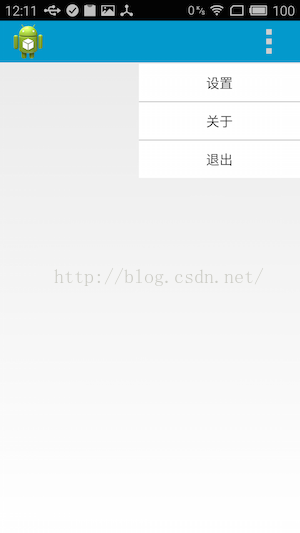
效果图:


以上就是本文的全部内容,希望对大家的学习有所帮助,也希望大家多多支持脚本之家。
