Android 使用Fragment模仿微信界面的实例代码
作者:IamCerian
什么是Fragment
自从Android 3.0中引入fragments 的概念,根据词海的翻译可以译为:碎片、片段。其目的是为了解决不同屏幕分辩率的动态和灵活UI设计。大屏幕如平板小屏幕如手机,平板电脑的设计使得其有更多的空间来放更多的UI组件,而多出来的空间存放UI使其会产生更多的交互,从而诞生了fragments 。
fragments 的设计不需要你来亲自管理view hierarchy 的复杂变化,通过将Activity 的布局分散到frament 中,可以在运行时修改activity 的外观,并且由activity 管理的back stack 中保存些变化。当一个片段指定了自身的布局时,它能和其他片段配置成不同的组合,在活动中为不同的屏幕尺寸修改布局配置(小屏幕可能每次显示一个片段,而大屏幕则可以显示两个或更多)。
Fragment必须被写成可重用的模块。因为fragment有自己的layout,自己进行事件响应,拥有自己的生命周期和行为,所以你可以在多个activity中包含同一个Fragment的不同实例。这对于让你的界面在不同的屏幕尺寸下都能给用户完美的体验尤其重要。
Fragment优点
Fragment可以使你能够将activity分离成多个可重用的组件,每个都有它自己的生命周期和UI。
Fragment可以轻松得创建动态灵活的UI设计,可以适应于不同的屏幕尺寸。从手机到平板电脑。
Fragment是一个独立的模块,紧紧地与activity绑定在一起。可以运行中动态地移除、加入、交换等。
Fragment提供一个新的方式让你在不同的安卓设备上统一你的UI。
Fragment 解决Activity间的切换不流畅,轻量切换。
Fragment 替代TabActivity做导航,性能更好。
Fragment 在4.2.版本中新增嵌套fragment使用方法,能够生成更好的界面效果。
Fragment做局部内容更新更方便,原来为了到达这一点要把多个布局放到一个activity里面,现在可以用多Fragment来代替,只有在需要的时候才加载Fragment,提高性能。
可以从startActivityForResult中接收到返回结果,但是View不能。

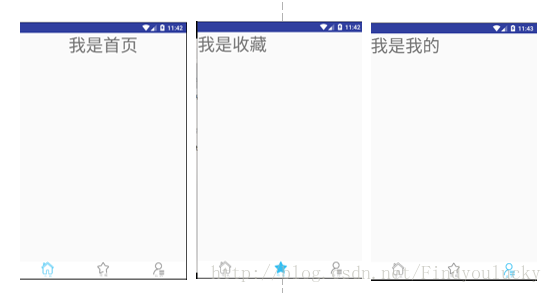
图片中给出了实例的效果,在点击下方的按钮时,上半部分会自动切换成对应的内容。这里使用的技术是fragment。
想必大家对fragment已经有所了解,就算不清楚,百度也有详细的介绍。在这里就着重介绍实现的过程。
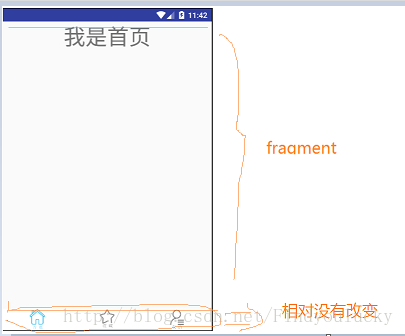
首先,拿其中的一个部分“首页”来讲:

上面一部分是fragment,下面则是相对固定的按钮区。也就是说,当点击按钮时,切换的只是上半部分内容。所以,每一个fragment都有一个自己的xml布局文件。就想图中所示的,“首页”这个fragment的xml文件就是由一个textview构成。
完成fragment的xml文件后,需要定义一个对应的Java类来找到它,比如:首页对应的类是homeFragment.java。注意,这个类需要继承fragment,并且每一个这样继承fragment的类都需要重写其onCreateView的方法。具体代码是:
import android.app.Fragment;
import android.os.Bundle;
import android.support.annotation.Nullable;
import android.view.LayoutInflater;
import android.view.View;
import android.view.ViewGroup;
import com.example.cerian.marcon.R;
/**
 * Created by Cerian on 2017/7/9.
 */
public class homeFragment extends Fragment {
  @Override
  public View onCreateView(LayoutInflater inflater, ViewGroup container,
               Bundle savedInstanceState) {
    View view=inflater.inflate(R.layout.fragment_home, null);
    //找到按钮前要加view.
    return view;
  }
}
完成到这步时,每一个fragment的内容就已经完成了。接下来要做的是,将每一个fragment与一个页面绑定并在其上显示。这里我用了一个menufunction.xml

代码是:
<?xml version="1.0" encoding="utf-8"?>
<RelativeLayout
  android:id="@+id/rl_layout"
  xmlns:android="http://schemas.android.com/apk/res/android"
  android:orientation="vertical"
  android:layout_width="match_parent"
  android:layout_height="match_parent">
  <LinearLayout
    android:id="@+id/ll_layout"
    android:layout_width="match_parent"
    android:layout_height="match_parent"
    android:orientation="vertical">
  </LinearLayout>
  <LinearLayout
    android:showDividers="beginning|end|middle"
    android:background="#ffffff"
    android:layout_width="match_parent"
    android:layout_height="40dp"
    android:orientation="horizontal"
    android:layout_alignParentBottom="true"
    android:layout_alignParentLeft="true"
    android:layout_alignParentStart="true">
    <ImageView
      android:id="@+id/ig_home"
      android:clickable="true"
      android:layout_weight="1"
      android:layout_width="0dp"
      android:layout_height="wrap_content"
      android:src="@mipmap/homepage1"/>
    <ImageView
      android:id="@+id/ig_lib"
      android:clickable="true"
      android:layout_weight="1"
      android:layout_width="0dp"
      android:layout_height="wrap_content"
      android:src="@mipmap/library1"/>
    <ImageView
      android:id="@+id/ig_my"
      android:clickable="true"
      android:layout_weight="1"
      android:layout_width="0dp"
      android:layout_height="wrap_content"
      android:src="@mipmap/my1"/>
  </LinearLayout>
</RelativeLayout>
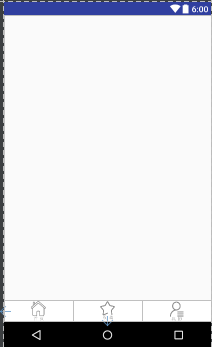
在这个布局中,上面的LinearLayout是用来显示fragment内容的,下面的是按钮。
然后,在这个menufunction.xml的对应java类中,找到定义好的fragment,并显示。主要的思想是:①拿到一个管理者②开启一个事务③替换fragment内容④提交,注意,这里的第四步很容易被遗忘。
代码是:
import android.app.FragmentManager;
import android.app.FragmentTransaction;
import android.os.Bundle;
import android.support.v7.app.AppCompatActivity;
import android.view.View;
import android.widget.ImageView;
import com.example.cerian.marcon.fragment.homeFragment;
import com.example.cerian.marcon.fragment.libFragment;
import com.example.cerian.marcon.fragment.myFragment;
/**
 * Created by Cerian on 2017/7/9.
 */
public class home extends AppCompatActivity implements View.OnClickListener {
  private ImageView ig_home, ig_lib, ig_my;
  @Override
  protected void onCreate(Bundle savedInstanceState) {
    super.onCreate(savedInstanceState);
    setContentView(R.layout.menufunction);
    ig_home = (ImageView) findViewById(R.id.ig_home);
    ig_lib = (ImageView) findViewById(R.id.ig_lib);
    ig_my = (ImageView) findViewById(R.id.ig_my);
    ig_home.setOnClickListener(this);
    ig_lib.setOnClickListener(this);
    ig_my.setOnClickListener(this);
/**
 * 第一步:拿到管理者
 * 第二步:开启事务
 * 第三步:替换
 * 第四步:提交
 */
    FragmentManager fragmentManager = getFragmentManager();
    FragmentTransaction beginTransaction = fragmentManager.beginTransaction();
    beginTransaction.replace(R.id.ll_layout, new homeFragment());
    ig_home.setImageResource(R.mipmap.homepage2);
    beginTransaction.commit();
  }
  @Override
  public void onClick(View view) {
    FragmentManager fragmentManager = getFragmentManager();
    FragmentTransaction beginTransaction = fragmentManager.beginTransaction();
    switch (view.getId()) {
      case R.id.ig_home: //点击的是主页
        beginTransaction.replace(R.id.ll_layout, new homeFragment());
        ig_home.setImageResource(R.mipmap.homepage2);
        ig_my.setImageResource(R.mipmap.my1);
        ig_lib.setImageResource(R.mipmap.library1);
        break;
      case R.id.ig_lib: //点击的是收藏
        beginTransaction.replace(R.id.ll_layout, new libFragment());
        ig_home.setImageResource(R.mipmap.homepage1);
        ig_my.setImageResource(R.mipmap.my1);
        ig_lib.setImageResource(R.mipmap.library2);
        break;
      case R.id.ig_my: //点击的是我的
        beginTransaction.replace(R.id.ll_layout, new myFragment());
        ig_home.setImageResource(R.mipmap.homepage1);
        ig_my.setImageResource(R.mipmap.my2);
        ig_lib.setImageResource(R.mipmap.library1);
        break;
    }
    beginTransaction.commit();
  }
}
其中,因为涉及到的点击事件有点多且相似,我用到了一个特殊的写法,也就是setonclicklistener(this),参数用了this,并重新定义了一个click方法。注意:这样写,必须要继承一个clicklistener的接口。
最后,提交就ok。
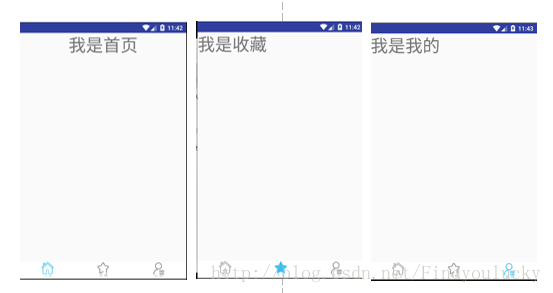
效果是:

这就是利用fragment来模拟微信界面。
以上所述是小编给大家介绍的Android 使用Fragment模仿微信界面的实例代码,希望对大家有所帮助,如果大家有任何疑问请给我留言,小编会及时回复大家的。在此也非常感谢大家对脚本之家网站的支持!
