
Linux GRUB引导程序配置与修复指南
作者:知远漫谈
引言
在现代 Linux 系统中,GRUB(Grand Unified Bootloader)是绝大多数发行版默认使用的引导加载程序。它负责在系统启动时加载内核并移交控制权,是操作系统能够正常运行的第一道“门神”。虽然 GRUB 通常默默无闻地工作,但一旦出现问题——比如双系统引导失败、内核更新后无法启动、磁盘分区调整导致引导丢失等——整个系统就可能陷入“黑屏”或“grub rescue>”状态,令用户手足无措。
本篇博客将深入讲解 GRUB 的结构、配置方式、常见故障及修复方法,并穿插 Java 代码示例用于模拟部分引导逻辑或配置解析过程,帮助开发者从编程角度理解 GRUB 的工作机制。我们还将使用 Mermaid 图表直观展示引导流程和配置结构,辅以实用的外部资源链接,助你全面掌握 GRUB 的配置与修复技巧。
什么是 GRUB?
GRUB 是 GNU 项目开发的多操作系统引导管理器,支持多种文件系统(如 ext4、Btrfs、NTFS、FAT32),可引导 Linux、Windows、BSD 等多个操作系统。当前主流版本为 GRUB 2,相比旧版 GRUB Legacy,它具有模块化架构、脚本支持、主题定制、国际化等先进特性。
GRUB 2 的核心组件包括:
grub.cfg:主配置文件,定义菜单项和启动参数grub-install:安装引导程序到 MBR 或 EFI 分区update-grub/grub-mkconfig:自动生成配置文件/boot/grub/:存放模块、字体、主题等资源
在 BIOS 系统中,GRUB 安装于主引导记录(MBR);在 UEFI 系统中,则安装于 EFI 系统分区(ESP)中的 /EFI/ 目录下。
GRUB 启动流程详解
了解 GRUB 的启动流程有助于诊断和修复引导问题。以下是典型的 GRUB 2 启动过程:
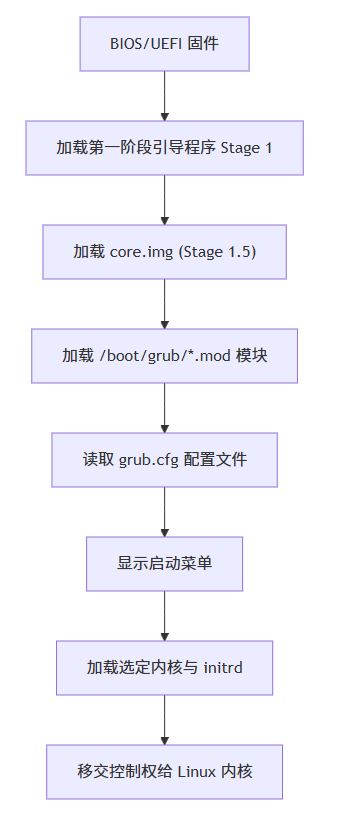
各阶段说明:
- Stage 1:位于 MBR 或 ESP 中,大小仅 446 字节,负责加载下一阶段。
- core.img (Stage 1.5):包含基础文件系统驱动,用于定位
/boot分区。 - Stage 2:加载完整模块和配置文件,呈现图形或文本菜单。
- 内核移交:GRUB 将控制权交给 Linux 内核,自身使命完成。
GRUB 配置文件结构解析
GRUB 的主配置文件通常位于 /boot/grub/grub.cfg,该文件由 grub-mkconfig 工具根据模板和系统信息自动生成,不建议手动编辑。其结构大致如下:
#
# DO NOT EDIT THIS FILE
#
# It is automatically generated by grub-mkconfig using templates
# from /etc/grub.d and settings from /etc/default/grub
#

### BEGIN /etc/grub.d/00_header ###
...
### END /etc/grub.d/00_header ###

### BEGIN /etc/grub.d/10_linux ###
menuentry 'Ubuntu' --class ubuntu --class gnu-linux {
    ...
}
### END /etc/grub.d/10_linux ###

### BEGIN /etc/grub.d/30_os-prober ###
menuentry 'Windows Boot Manager' {
    ...
}
### END /etc/grub.d/30_os-prober ###
实际配置应修改 /etc/default/grub 和 /etc/grub.d/ 下的脚本,再运行:
sudo update-grub
或
sudo grub-mkconfig -o /boot/grub/grub.cfg
常见 GRUB 配置选项
在 /etc/default/grub 中,你可以设置以下常用变量:
GRUB_DEFAULT=0                 # 默认启动项(0 表示第一个)
GRUB_TIMEOUT=5                 # 菜单显示时间(秒)
GRUB_DISTRIBUTOR=`lsb_release -i -s 2> /dev/null || echo Debian`
GRUB_CMDLINE_LINUX_DEFAULT="quiet splash"
GRUB_CMDLINE_LINUX=""
GRUB_DISABLE_RECOVERY="true"   # 禁用恢复模式
GRUB_GFXMODE=1920x1080         # 设置分辨率
修改后务必执行 sudo update-grub 生效。
Java 示例:模拟 GRUB 配置解析器
下面是一个简单的 Java 类,用于解析 /etc/default/grub 文件并提取关键配置项。虽然实际 GRUB 不使用 Java,但此示例有助于理解配置文件的结构化处理。
import java.io.*;
import java.util.HashMap;
import java.util.Map;
public class GrubConfigParser {
    private Map<String, String> configMap;
    public GrubConfigParser() {
        this.configMap = new HashMap<>();
    }
    public void parseFile(String filePath) throws IOException {
        try (BufferedReader reader = new BufferedReader(new FileReader(filePath))) {
            String line;
            while ((line = reader.readLine()) != null) {
                line = line.trim();
                if (line.isEmpty() || line.startsWith("#")) continue;
                int eqIndex = line.indexOf('=');
                if (eqIndex > 0) {
                    String key = line.substring(0, eqIndex).trim();
                    String value = line.substring(eqIndex + 1).trim();
                    // 去除首尾引号
                    if (value.startsWith("\"") && value.endsWith("\"")) {
                        value = value.substring(1, value.length() - 1);
                    }
                    configMap.put(key, value);
                }
            }
        }
    }
    public String get(String key) {
        return configMap.getOrDefault(key, null);
    }
    public void printAll() {
        System.out.println("=== GRUB Configuration ===");
        configMap.forEach((k, v) -> System.out.println(k + " = " + v));
    }
    public static void main(String[] args) {
        GrubConfigParser parser = new GrubConfigParser();
        try {
            // 假设有一个本地测试文件 "grub.default.sample"
            parser.parseFile("grub.default.sample");
            parser.printAll();
            System.out.println("\nTimeout: " + parser.get("GRUB_TIMEOUT"));
            System.out.println("Default Entry: " + parser.get("GRUB_DEFAULT"));
        } catch (IOException e) {
            System.err.println("Error reading GRUB config: " + e.getMessage());
        }
    }
}说明:
- 该程序读取类似
/etc/default/grub的配置文件。 - 自动忽略注释行和空行。
- 提取键值对并去除引号。
- 可用于构建配置管理工具或自动化脚本的预检查模块。
常见 GRUB 故障场景
尽管 GRUB 设计稳健,但在以下情况下仍可能出错:
- 磁盘分区变更后未更新 GRUB
- 双系统安装顺序错误导致 Windows 覆盖 MBR
- /boot 分区空间不足或损坏
- EFI 分区被误删或挂载点错误
- 内核更新后未生成新菜单项
- 手动编辑 grub.cfg 导致语法错误
故障表现通常为:
- 黑屏 +
grub>提示符(配置加载失败) grub rescue>提示符(无法找到 /boot 分区)- 无限重启或直接进入 BIOS
- 启动菜单缺失某些系统项
GRUB 故障修复实战
场景一:进入grub rescue>模式
这是最常见的 GRUB 故障提示。通常是因为 GRUB 找不到 /boot/grub 所在分区。
修复步骤:
- 使用
ls命令列出所有磁盘分区:
grub rescue> ls
(hd0) (hd0,msdos1) (hd0,msdos2) (hd1,gpt1) ...
- 逐个查看分区内容,寻找包含
/boot/grub的分区:
grub rescue> ls (hd0,msdos1)/
./ ../ lost+found/ etc/ boot/

grub rescue> ls (hd0,msdos1)/boot/grub/
unicode.pf2 ... grub.cfg ...
- 设置前缀和根路径:
grub rescue> set prefix=(hd0,msdos1)/boot/grub
grub rescue> set root=(hd0,msdos1)
- 加载必要模块:
grub rescue> insmod normal
grub rescue> normal
若成功,将进入正常 GRUB 菜单。进入系统后立即执行:
sudo update-grub
sudo grub-install /dev/sda
场景二:双系统后 Windows 启动项丢失
在安装 Windows 后,其引导程序常会覆盖 MBR,导致 Linux 无法启动。修复方法:
- 使用 Live USB 启动 Linux。
- 挂载原系统根分区:
sudo mount /dev/sda2 /mnt          # 假设 sda2 是根分区
sudo mount /dev/sda1 /mnt/boot     # 若有独立 /boot 分区
- 挂载必要虚拟文件系统:
sudo mount --bind /dev /mnt/dev
sudo mount --bind /proc /mnt/proc
sudo mount --bind /sys /mnt/sys
- chroot 进入原系统:
sudo chroot /mnt
- 重新安装并更新 GRUB:
grub-install /dev/sda
update-grub
- 退出并重启:
exit
sudo reboot
场景三:UEFI 系统下 GRUB 丢失
在 UEFI 系统中,GRUB 安装于 EFI 分区。若该分区被格式化或引导项被删除,需重建:
- 启动 Live USB,挂载 EFI 分区和根分区:
sudo mount /dev/nvme0n1p1 /mnt/boot/efi   # EFI 分区
sudo mount /dev/nvme0n1p2 /mnt            # 根分区
- chroot 并重装 GRUB:
sudo mount --bind /dev /mnt/dev
sudo mount --bind /proc /mnt/proc
sudo mount --bind /sys /mnt/sys
sudo chroot /mnt

grub-install --target=x86_64-efi --efi-directory=/boot/efi --bootloader-id=GRUB
update-grub
- 如有必要,使用
efibootmgr重建启动项:
efibootmgr -c -d /dev/nvme0n1 -p 1 -L "GRUB" -l \\EFI\\GRUB\\grubx64.efi
GRUB 配置生成流程图解
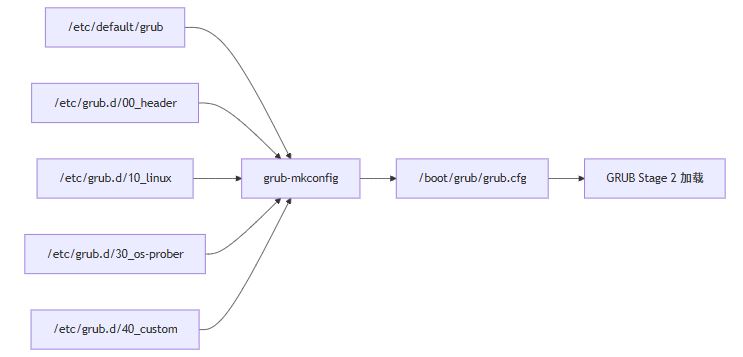
此图展示了 update-grub 命令背后的工作机制:它组合多个脚本和配置模板,最终输出一个完整的 grub.cfg。每个 /etc/grub.d/ 下的脚本负责生成特定部分(如 Linux 内核项、Windows 项、自定义项等)。
GRUB 主题与美化
GRUB 支持自定义主题,包括背景图、字体、颜色等。主题文件通常位于 /boot/grub/themes/。
示例:创建简单主题
- 创建主题目录:
sudo mkdir -p /boot/grub/themes/mytheme
- 编写
theme.txt:
title-text: "My Linux System"
title-color: "#ffffff"
message-color: "#ffcc00"
desktop-image: "background.png"
desktop-color: "#000000"
terminal-font: "DejaVu Sans 14"
- 放置背景图片(PNG 格式)到同一目录。
- 在
/etc/default/grub中启用主题:
GRUB_THEME="/boot/grub/themes/mytheme/theme.txt"
- 更新配置:
sudo update-grub
重启即可看到效果。
Java 示例:GRUB 菜单项生成器
下面是一个 Java 类,用于根据模板动态生成 GRUB 菜单项。可用于自动化部署或 CI/CD 流程中动态注入启动项。
import java.util.Map;
import java.util.HashMap;
public class GrubMenuGenerator {
    private static final String MENU_TEMPLATE =
        "menuentry '%s' --class %s {\n" +
        "    set root='%s'\n" +
        "    linux %s %s\n" +
        "    initrd %s\n" +
        "}\n";
    public static String generateLinuxEntry(
        String title,
        String cssClass,
        String rootDevice,
        String kernelPath,
        String kernelParams,
        String initrdPath
    ) {
        return String.format(MENU_TEMPLATE,
            title, cssClass, rootDevice, kernelPath, kernelParams, initrdPath);
    }
    public static void main(String[] args) {
        String entry = generateLinuxEntry(
            "Custom Ubuntu Kernel",
            "gnu-linux",
            "(hd0,msdos2)",
            "/vmlinuz-5.15.0-custom",
            "root=/dev/sda2 ro quiet splash",
            "/initrd.img-5.15.0-custom"
        );
        System.out.println("Generated GRUB Menu Entry:\n");
        System.out.println(entry);
        // 输出可用于追加到 /etc/grub.d/40_custom
    }
}应用场景:
- 自动化构建定制内核后的引导项注入
- 多环境(开发/测试/生产)引导配置管理
- 云镜像构建时动态生成启动菜单
GRUB 与 Secure Boot 兼容性
在启用了 Secure Boot 的 UEFI 系统中,GRUB 必须使用签名的引导加载程序。多数主流发行版(如 Ubuntu、Fedora)已提供微软签名的 shim + GRUB 组合。
若自行编译 GRUB 或使用非官方内核,可能遇到 Secure Boot 阻止启动的问题。解决方法:
- 禁用 Secure Boot(不推荐,降低安全性)
- 使用已签名的 shim 引导自定义 GRUB
- 将自定义密钥加入固件信任列表(高级用户)
Ubuntu 提供了 mokutil 工具管理 Machine Owner Keys:
sudo mokutil --import mykey.der
重启后按提示注册密钥。
GRUB 模块机制剖析
GRUB 2 采用模块化设计,核心仅加载必要功能,其余按需动态加载。模块文件位于 /boot/grub/x86_64-efi/ 或 /boot/grub/i386-pc/。
常用模块:
normal.mod:正常启动模式linux.mod:加载 Linux 内核ext2.mod:支持 ext2/3/4 文件系统part_msdos.mod:MBR 分区表支持part_gpt.mod:GPT 分区表支持gfxterm.mod:图形终端支持
可通过 insmod 命令在 GRUB 命令行中手动加载模块:
grub> insmod ext2
grub> insmod part_gpt
grub> insmod gfxterm
Java 示例:GRUB 模块依赖分析器
下面的 Java 程序模拟分析 GRUB 模块之间的依赖关系,使用图结构表示,并输出拓扑排序结果。虽然实际 GRUB 不使用 Java,但此类工具可用于教学或构建依赖可视化工具。
import java.util.*;
public class GrubModuleDependencyAnalyzer {
    private Map<String, Set<String>> dependencies;
    public GrubModuleDependencyAnalyzer() {
        this.dependencies = new HashMap<>();
    }
    public void addModule(String module, String... deps) {
        dependencies.putIfAbsent(module, new HashSet<>());
        if (deps != null) {
            dependencies.get(module).addAll(Arrays.asList(deps));
        }
    }
    public List<String> getLoadOrder() {
        Map<String, Integer> inDegree = new HashMap<>();
        Queue<String> queue = new LinkedList<>();
        List<String> result = new ArrayList<>();
        // 初始化入度
        for (String mod : dependencies.keySet()) {
            inDegree.putIfAbsent(mod, 0);
            for (String dep : dependencies.get(mod)) {
                inDegree.put(dep, inDegree.getOrDefault(dep, 0) + 1);
            }
        }
        // 入度为0的模块先加载
        for (String mod : inDegree.keySet()) {
            if (inDegree.get(mod) == 0) {
                queue.offer(mod);
            }
        }
        // 拓扑排序
        while (!queue.isEmpty()) {
            String current = queue.poll();
            result.add(current);
            for (String next : dependencies.getOrDefault(current, new HashSet<>())) {
                inDegree.put(next, inDegree.get(next) - 1);
                if (inDegree.get(next) == 0) {
                    queue.offer(next);
                }
            }
        }
        if (result.size() != dependencies.size()) {
            throw new RuntimeException("Circular dependency detected!");
        }
        return result;
    }
    public static void main(String[] args) {
        GrubModuleDependencyAnalyzer analyzer = new GrubModuleDependencyAnalyzer();
        analyzer.addModule("normal", "ext2", "part_gpt");
        analyzer.addModule("linux", "normal");
        analyzer.addModule("ext2");
        analyzer.addModule("part_gpt");
        analyzer.addModule("gfxterm", "ext2");
        System.out.println("Recommended GRUB Module Load Order:");
        List<String> order = analyzer.getLoadOrder();
        for (int i = 0; i < order.size(); i++) {
            System.out.println((i + 1) + ". " + order.get(i));
        }
        // 输出示例:
        // 1. ext2
        // 2. part_gpt
        // 3. normal
        // 4. linux
        // 5. gfxterm
    }
}用途:
- 教学演示模块依赖
- 构建最小化 GRUB 镜像时确定必需模块
- 自动化测试不同模块组合的兼容性
GRUB 网络引导(PXE)
GRUB 2 支持通过网络加载内核,适用于无盘工作站或批量部署场景。需配合 DHCP、TFTP 服务器使用。
基本流程:
- 客户机从网卡 PXE 启动
- 获取 IP 和 TFTP 服务器地址
- 下载
grubx64.efi或grub.i386-pc - GRUB 从网络加载
grub.cfg和内核
配置示例(grub.cfg):
set timeout=10
menuentry 'Network Boot Ubuntu' {
    linux (tftp)/vmlinuz ip=dhcp root=/dev/nfs nfsroot=192.168.1.100:/srv/nfs/ubuntu
    initrd (tftp)/initrd.img
}
实用 GRUB 命令行技巧
即使不出现故障,掌握 GRUB 命令行也有助于调试和高级操作:
| 命令 | 作用 |
|---|---|
ls | 列出设备和分区 |
cat (hd0,msdos1)/etc/issue | 查看文件内容 |
set | 显示或设置变量 |
insmod <module> | 加载模块 |
linux /vmlinuz root=/dev/sda1 | 指定内核 |
initrd /initrd.img | 指定 initrd |
boot | 启动系统 |
例如,手动启动系统:
grub> set root=(hd0,msdos2)
grub> linux /boot/vmlinuz-5.4.0-42-generic root=/dev/sda2 ro
grub> initrd /boot/initrd.img-5.4.0-42-generic
grub> boot
Java 示例:GRUB 命令行模拟器(简化版)
下面是一个极简的 GRUB 命令行模拟器,支持 set、echo、boot 等基础命令。可用于教学或嵌入式系统原型。
import java.util.HashMap;
import java.util.Map;
import java.util.Scanner;
public class SimpleGrubShell {
    private Map<String, String> variables;
    private boolean bootRequested;
    public SimpleGrubShell() {
        this.variables = new HashMap<>();
        this.bootRequested = false;
        variables.put("prefix", "(hd0,msdos1)/boot/grub");
        variables.put("root", "(hd0,msdos1)");
    }
    public void start() {
        Scanner scanner = new Scanner(System.in);
        System.out.println("Welcome to Simple GRUB Shell v0.1");
        System.out.println("Type 'help' for available commands.");
        while (!bootRequested) {
            System.out.print("grub> ");
            String input = scanner.nextLine().trim();
            if (input.isEmpty()) continue;
            processCommand(input);
        }
        System.out.println("Booting system...");
        // 模拟启动延迟
        try { Thread.sleep(2000); } catch (InterruptedException e) {}
        System.out.println("Kernel loaded. Handing over control.");
    }
    private void processCommand(String cmd) {
        String[] parts = cmd.split("\\s+", 2);
        String command = parts[0];
        switch (command) {
            case "help":
                printHelp();
                break;
            case "set":
                handleSet(parts.length > 1 ? parts[1] : "");
                break;
            case "echo":
                handleEcho(parts.length > 1 ? parts[1] : "");
                break;
            case "ls":
                System.out.println("(hd0) (hd0,msdos1) (hd0,msdos2)");
                break;
            case "boot":
                bootRequested = true;
                break;
            case "exit":
                System.out.println("Exiting shell.");
                bootRequested = true; // 为简化,exit 也触发退出循环
                break;
            default:
                System.out.println("Unknown command: " + command);
        }
    }
    private void handleSet(String arg) {
        if (arg.isEmpty()) {
            variables.forEach((k, v) -> System.out.println(k + "=" + v));
        } else {
            int eq = arg.indexOf('=');
            if (eq > 0) {
                String key = arg.substring(0, eq).trim();
                String value = arg.substring(eq + 1).trim();
                variables.put(key, value);
                System.out.println("Set " + key + " = " + value);
            } else {
                String value = variables.get(arg);
                if (value != null) {
                    System.out.println(arg + " = " + value);
                } else {
                    System.out.println("Variable not found: " + arg);
                }
            }
        }
    }
    private void handleEcho(String arg) {
        if (arg.startsWith("$")) {
            String varName = arg.substring(1);
            String value = variables.getOrDefault(varName, "");
            System.out.println(value);
        } else {
            System.out.println(arg);
        }
    }
    private void printHelp() {
        System.out.println("Available commands:");
        System.out.println("  set [VAR[=VALUE]] - Set or display variable");
        System.out.println("  echo [TEXT|$VAR]  - Print text or variable");
        System.out.println("  ls               - List devices");
        System.out.println("  boot             - Start booting");
        System.out.println("  exit             - Exit shell");
        System.out.println("  help             - Show this help");
    }
    public static void main(String[] args) {
        new SimpleGrubShell().start();
    }
}教育价值:
- 帮助学生理解 GRUB 交互式命令行
- 可扩展为更复杂的模拟器,支持模块加载、文件系统浏览等
- 作为嵌入式系统或教学工具的基础框架
总结与最佳实践
GRUB 作为 Linux 系统的“守门人”,其稳定性和灵活性至关重要。掌握其配置与修复技能,不仅能解决启动故障,还能实现高级定制(如多内核选择、远程引导、安全启动等)。
最佳实践清单:
- 定期备份
/boot/grub/grub.cfg和/etc/default/grub - 修改配置后务必运行
sudo update-grub - 重要操作前使用 Live USB 准备救援环境
- UEFI 系统确保 EFI 分区 ≥ 100MB 且 FAT32 格式
- 双系统用户建议先装 Windows 再装 Linux
- 生产环境谨慎使用自定义内核或未签名模块
- 学习 GRUB 命令行基础,关键时刻能救命
结语
GRUB 虽然只是系统启动过程中的短暂一环,但其重要性不言而喻。无论是桌面用户、系统管理员还是嵌入式开发者,理解 GRUB 的工作原理和修复方法,都是提升 Linux 技能树的关键一步。
本文结合理论讲解、实战修复、Java 代码示例和可视化图表,力求为你构建完整的 GRUB 知识体系。希望你在未来的 Linux 之旅中,面对任何引导问题都能从容应对,游刃有余!
以上就是Linux GRUB引导程序配置与修复指南的详细内容,更多关于Linux GRUB程序配置与修复的资料请关注脚本之家其它相关文章!