
Nginx 配置跨域的实现及常见问题解决
作者:颇有几分姿色
本文主要介绍了Nginx 配置跨域的实现及常见问题解决,文中通过示例代码介绍的非常详细,对大家的学习或者工作具有一定的参考学习价值,需要的朋友们下面随着小编来一起学习学习吧
1. 跨域
1.1 同源策略
同源策略(Same-Origin Policy)是浏览器的一种安全机制,它限制了不同源之间的资源共享。两个 URL 被认为是同源的,必须满足以下三个条件:
- 协议相同(如 http 或 https)
- 域名相同
- 端口相同
例如:
- 同源:
- http://example.com:8080 和 http://example.com:8080
- 跨域:
- http://example.com:8080 和 http://example.com:3000(端口不同)
- http://example.com 和 https://example.com(协议不同)
- http://example.com 和 http://api.example.com(域名不同)
1.2 跨域资源共享(CORS)
CORS 是一种机制,通过设置特定的 HTTP 响应头,允许浏览器访问跨域资源。CORS 头主要包括:
- **Access-Control-Allow-Origin**:指定允许访问的源。
- **Access-Control-Allow-Methods**:指定允许的 HTTP 方法(如 GET, POST)。
- **Access-Control-Allow-Headers**:指定允许的请求头(如 Content-Type, Authorization)。
- **Access-Control-Allow-Credentials**:是否允许携带 Cookie 或其他凭证。
- **Access-Control-Max-Age**:预检请求的缓存时间。
2. Nginx 配置跨域的场景
2.1 场景 1:简单跨域请求
如果前端发送的是 简单请求(如 GET 或 POST,且没有自定义请求头),Nginx 只需要在响应中添加跨域头即可。
2.2 场景 2:复杂跨域请求
如果前端发送的是 复杂请求(如 POST 请求包含 Content-Type: application/json 或自定义头 Authorization 等),浏览器会先发起 预检请求(OPTIONS),询问服务器是否允许跨域。
Nginx 必须正确处理 OPTIONS 请求,并返回所有必要的跨域头。
3. Nginx 配置跨域的完整实现
3.1 基础跨域配置
基础的 Nginx 跨域配置示例:
server {
  listen 8081;
  server_name localhost;

  # 根目录(H5 前端文件)
  root /usr/share/nginx/html/applet/dist/build/h5/;

  # 跨域配置
  location /api/ {
    # 添加跨域头
    add_header 'Access-Control-Allow-Origin' '*' always;
    add_header 'Access-Control-Allow-Methods' 'GET, POST, OPTIONS, PUT, DELETE' always;
    add_header 'Access-Control-Allow-Headers' 'Content-Type, Authorization, X-Requested-With' always;
    add_header 'Access-Control-Allow-Credentials' 'true' always;

    # 如果是预检请求 (OPTIONS),直接返回成功
    if ($request_method = 'OPTIONS') {
      add_header 'Access-Control-Allow-Origin' '*' always;
      add_header 'Access-Control-Allow-Methods' 'GET, POST, OPTIONS, PUT, DELETE';
      add_header 'Access-Control-Allow-Headers' 'Content-Type, Authorization, X-Requested-With';
      add_header 'Access-Control-Max-Age' 1800;
      add_header 'Content-Length' 0;
      add_header 'Content-Type' 'text/plain';
      return 204;
    }

    # 反向代理到后端服务
    proxy_pass url; # 替换为后端服务地址
    proxy_set_header Host $host;
    proxy_set_header X-Real-IP $remote_addr;
    proxy_set_header X-Forwarded-For $proxy_add_x_forwarded_for;
  }
}
3.2 配置解析
- Access-Control-Allow-Origin:允许的跨域来源。如果后端需要支持多个来源,可以动态设置该值;或者使用 * 表示允许所有来源。
- Access-Control-Allow-Methods:声明支持的 HTTP 方法。
- Access-Control-Allow-Headers:声明允许的自定义请求头。如果前端发送了 Authorization 或其他自定义头,必须在这里明确声明。
- Access-Control-Max-Age:指定预检请求的缓存时间,单位为秒(如 1800 表示缓存 30 分钟)。
- if ($request_method = 'OPTIONS'):单独处理预检请求,直接返回 204,避免请求被转发到后端。
- 在 if 判断中直接返回响应(如 return 204)的情况下,add_header** 需要在同一个 if 块内声明**,否则不会被应用到响应中。这里主要是nginx的响应流程和作用域特性。
3.3 动态配置跨域来源
3.3.1 常规配置
如果后端需要允许多个特定来源,可以通过 $http_origin 动态设置 Access-Control-Allow-Origin:
location /api/ {
  # 动态设置跨域来源
  set $cors "";
  if ($http_origin ~* (http://ip:port|http://example.com)) {
    set $cors $http_origin;
  }

  add_header 'Access-Control-Allow-Origin' $cors always;
  add_header 'Access-Control-Allow-Methods' 'GET, POST, OPTIONS, PUT, DELETE' always;
  add_header 'Access-Control-Allow-Headers' 'Content-Type, Authorization, X-Requested-With' always;
  add_header 'Access-Control-Allow-Credentials' 'true' always;

  # 如果是预检请求 (OPTIONS),直接返回成功
  if ($request_method = 'OPTIONS') {
    add_header 'Access-Control-Allow-Origin' $cors always;
    add_header 'Access-Control-Allow-Methods' 'GET, POST, OPTIONS, PUT, DELETE';
    add_header 'Access-Control-Allow-Headers' 'Content-Type, Authorization, X-Requested-With';
    add_header 'Access-Control-Max-Age' 1800;
    add_header 'Content-Length' 0;
    add_header 'Content-Type' 'text/plain';
    return 204;
  }

  proxy_pass bakcendurl;
}
3.3.2 进阶配置
Nginx 提供了 map指令,可用于根据请求条件动态设置变量。利用map指令提前设置变量,避免 if 指令的复杂嵌套,更安全地实现动态跨域逻辑。
# 动态设置允许的跨域来源
map $http_origin $cors_origin {
    default "";
    "~^https?://trusteddomain1\.com$" $http_origin;
    "~^https?://trusteddomain2\.com$" $http_origin;
}

# 动态设置缓存时间
map $http_origin $cors_max_age {
    default "0";
    "~^https?://trusteddomain1\.com$" "86400"; # 1 天
    "~^https?://trusteddomain2\.com$" "3600";  # 1 小时
}

server {
    listen 8081;
    server_name localhost;

    location ~* ^/(url|url1|……) {
        add_header 'Access-Control-Allow-Origin' "$cors_origin" always;
        add_header 'Vary' 'Origin' always;
       	add_header 'Access-Control-Allow-Methods' 'GET, POST, PUT, DELETE, OPTIONS' always;
       	add_header 'Access-Control-Allow-Headers' 'Content-Type, Authorization, X-Requested-With' always;
		add_header 'Access-Control-Max-Age' "$cors_max_age" always;

        # 特殊处理 OPTIONS 预检请求
        if ($request_method = 'OPTIONS') {
			# 设置 CORS 响应头
       		add_header 'Access-Control-Allow-Origin' "$cors_origin" always;
       		add_header 'Vary' 'Origin' always;
       		add_header 'Access-Control-Allow-Methods' 'GET, POST, PUT, DELETE, OPTIONS' always;
       		add_header 'Access-Control-Allow-Headers' 'Content-Type, Authorization, X-Requested-With' always;
			add_header 'Access-Control-Max-Age' "$cors_max_age" always;

            add_header 'Content-Length' '0' always;
            add_header 'Content-Type' 'text/plain' always;
            return 204;
        }

        # 其他请求正常代理到后端服务
        proxy_pass backendurl;
        proxy_set_header Upgrade $http_upgrade;
        proxy_set_header Connection "upgrade";
        proxy_set_header X-Real-IP $remote_addr;
        proxy_set_header X-Forwarded-For $proxy_add_x_forwarded_for;
        client_max_body_size 1024m;
        proxy_buffer_size 1024k;
        proxy_buffers 16 1024k;
        proxy_busy_buffers_size 2048k;
        proxy_temp_file_write_size 2048k;
    }
}
测试命令:
curl -X OPTIONS http://localhost:8081/api/test \
-H "Content-Type: application/json" \
-H "Origin: https://trusteddomain1.com" \
-H "Authorization: Bearer null" \
-I
结果:
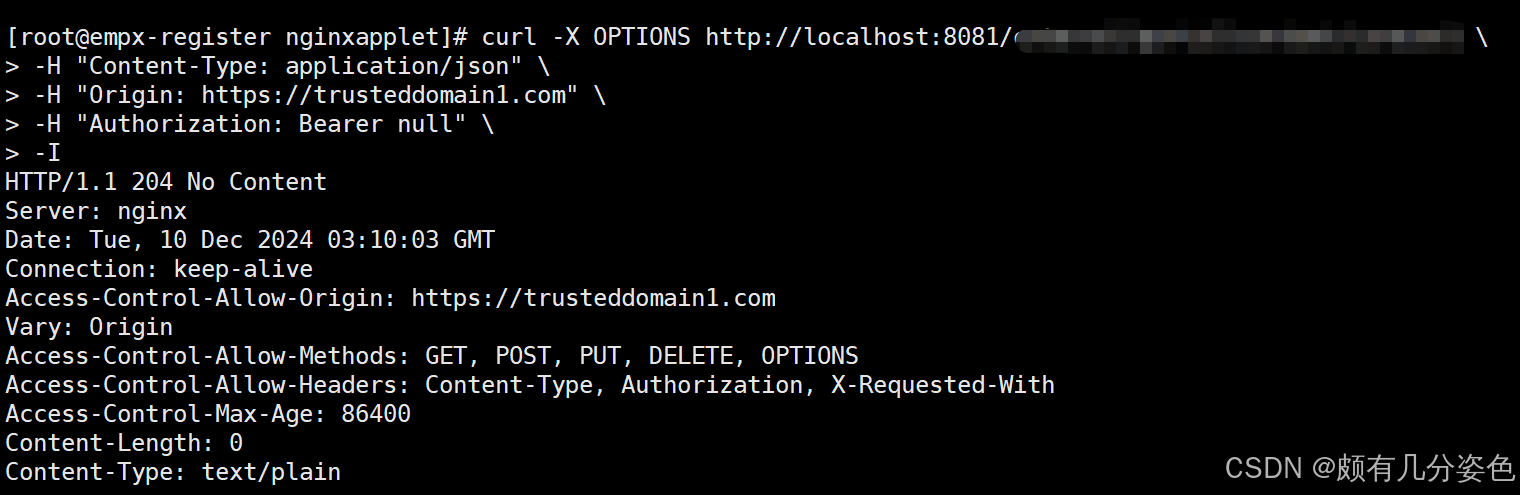
改为第二个域名,输出结果:
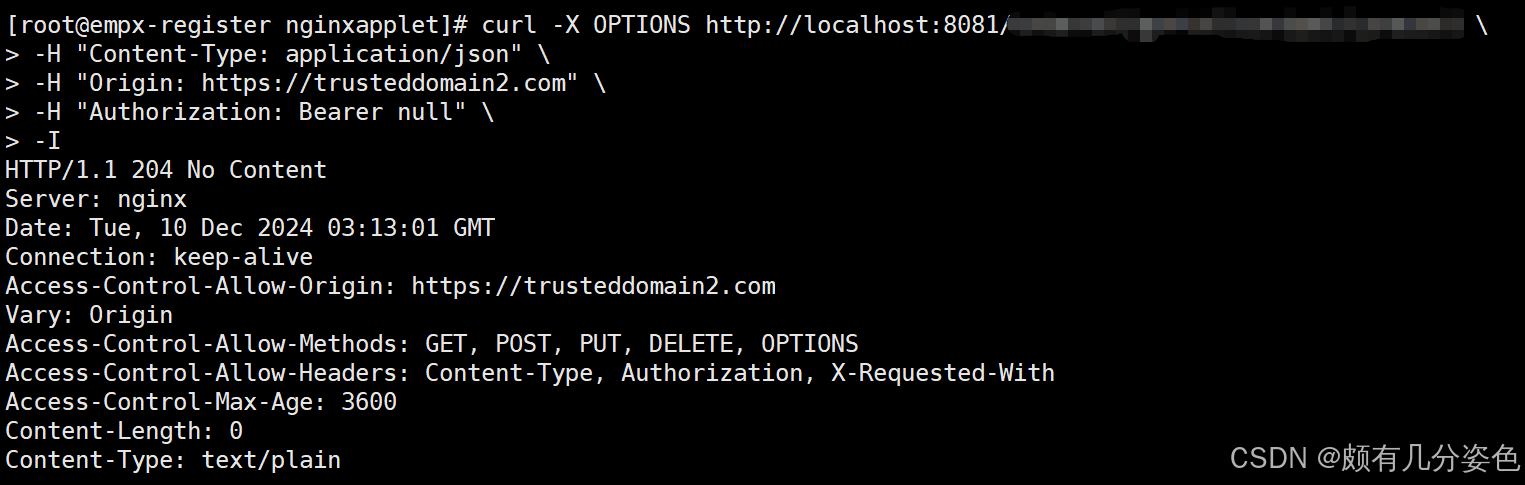
配置成功。
4. 验证跨域配置是否生效
4.1 使用 curl 验证
预检请求
运行以下命令,检查 OPTIONS 请求的响应头是否包含正确的跨域头:
curl -X OPTIONS http://localhost:8081/api/test-endpoint \
-H "Origin: yoururl" \
-H "Access-Control-Request-Method: POST" \
-H "Access-Control-Request-Headers: Content-Type, Authorization" -I
实际请求
运行以下命令,检查实际请求的跨域头:
curl -X POST http://localhost:8081/api/test-endpoint \
-H "Origin: yoururl" \
-H "Content-Type: application/json" \
-H "Authorization: Bearer YOUR_TOKEN" \
-d '{"key":"value"}' -I
将Origin的值替换即可。
5. 常见问题及解决方法
5.1 No 'Access-Control-Allow-Origin' header is present on the requested resource
- 原因:后端未返回 Access-Control-Allow-Origin。
- 解决:检查 Nginx 或后端服务是否返回了正确的跨域头。
5.2 Request header field <header_name> is not allowed by Access-Control-Allow-Headers
- 原因:前端发送了未被允许的自定义请求头。
- 解决:在 Access-Control-Allow-Headers 中添加该头(如 Authorization, channel 等)。
5.3 OPTIONS 请求返回 404 或 405
- 原因:Nginx 或后端未正确处理 OPTIONS 请求。
- 解决:在 Nginx 配置中使用 if ($request_method = 'OPTIONS') 单独处理预检请求。
6. 注意事项
(1) 不建议长期使用通配符 *
- 如果前端需要发送 Authorization 或 Cookie,不能使用通配符 *,需要指定具体的跨域来源:
add_header 'Access-Control-Allow-Origin' 'http://ip:port' always;
add_header 'Access-Control-Allow-Credentials' 'true' always;
(2) 确保前端请求头与后端配置匹配
- 如果前端发送了自定义头(如 channel),后端的 Access-Control-Allow-Headers 必须包含这些头。
(3) 确保后端不会覆盖 Nginx 的跨域头
- 如果后端服务也返回了跨域头,可能会覆盖 Nginx 的配置。可以通过 proxy_hide_header 移除后端返回的头:
proxy_hide_header Access-Control-Allow-Origin;
proxy_hide_header Access-Control-Allow-Methods;
proxy_hide_header Access-Control-Allow-Headers;
7. 总结
- CORS 的核心在于配置正确的跨域头(Access-Control-Allow-*)。
- Nginx 配置跨域的关键点:
- 处理预检请求(OPTIONS)。
- 添加必要的跨域头(Access-Control-Allow-Origin, Access-Control-Allow-Headers 等)。
- 确保跨域头在所有响应中生效(使用 always 参数)。
- 使用工具(如 curl 或浏览器开发者工具)验证跨域配置是否正确。
到此这篇关于Nginx 配置跨域的实现及常见问题解决的文章就介绍到这了,更多相关Nginx 配置跨域内容请搜索脚本之家以前的文章或继续浏览下面的相关文章希望大家以后多多支持脚本之家!