
深入理解tomcat中的BIO、NIO、AIO、ARP
作者:isyues
tomcat作为springboot中默认的web容器,了解tomcat的运转可以帮助我们更好的去调整tomcat的参数达到更好的性能
1. 前置知识
- I/O就是Input/Output,收别人的数据到本机叫Input,本级发数据出去叫Output
- 网络I/O请求会先到网卡然后到内核态再到用户态
- CPU比内存快、内存比硬盘、网卡等外设快
- 所有I/O操作需要被加载到用户态内存,用户态程序才能直接操作
- 想要效果高,必须让所有的资源都不闲置
- tomcat不处理请求,会接受请求,转发到具体的容器中
- 一个socket连接代表一个客户端,一个socket可以发送多份请求不断开
2. scoket测试工具
启动程序是jar包,必须要有jre环境
链接:https://sockettest.sourceforge.net

3. BIO 同步阻塞IO
每一个socket连接后,tomcat都会有一个线程去全程去陪伴,把请求转发到具体的容器中后,这个线程还在阻塞,等待容器返回数据,只有socket连接断开了,才会回收这个线程。tomcat7或以下默认,比较简单、稳定,适合连接数比较少的
模拟代码如下:
public class BioServer {
    static ExecutorService executorService = Executors.newCachedThreadPool();
    public static void main(String[] args) {
        try {
            // 启动服务,绑定8080端口
            ServerSocket serverSocket = new ServerSocket();
            serverSocket.bind(new InetSocketAddress(8080));
            System.out.println("开启服务");
            while (true){
                System.out.println("等待客户端建立连接");
                // 监听8080端口,获取客户端连接
                Socket socket = serverSocket.accept(); //阻塞
                System.out.println("建立连接:"+socket);
                executorService.submit(()->{
                    //业务处理
                    try {
                        handler(socket);
                    } catch (IOException e) {
                        e.printStackTrace();
                    }
                });
            }
        } catch (IOException e) {
            e.printStackTrace();
        } finally {
            //TODO 资源回收
        }
    }
    private static void handler(Socket socket) throws IOException {
        byte[] bytes = new byte[1024];
        System.out.println("等待读取数据");
        int read = socket.getInputStream().read(bytes); // 阻塞
        if(read !=-1) {
            System.out.println("读取客户端发送的数据:" +
                    new String(bytes, 0, read));
        }
    }
}
4. NIO 同步非阻塞
一个socket连接过来,会经历以下步骤
- LimitLatch:连接控制器,负责维护连接数计算,连接数默认是 8192,达到这个阀值后,就会拒绝连接请求。如果要调整修改配置文件server.tomcat.max-connections属性
- Acceptor:Acceptor 跑在一个单独的线程里,它在一个死循环里调用 accept 方法来接收新连接,一旦有新的连接请求到来,accept 方法返回一个 Channel 对象,接着把 Channel 对象交给 Poller 去处理
- Poller:Poller 的本质是一个 Selector,也跑在单独线程里。Poller 在内部维护一个 Channel 数组,它在一个死循环里不断检测 Channel 的数据就绪状态,一旦有 Channel 可读,就生成一个 SocketProcessor 任务对象扔给Executor 去处理
- Executor: Executor 就是线程池,负责运行 SocketProcessor 任务类,SocketProcessor 的 run 方法会调用Http11Processor 来读取和解析请求数据。Http11Processor 是应用层协议的封装,它会调用容器获得响应,再把响应通过 Channel 写出

tomcat8及以上默认, springboot2.3.12.RELEASE内嵌tomcat是9.0.46版本默认也是这个
模拟代码:
public class NioServer {
    public static void main(String[] args)  {
        List<SocketChannel> list = new ArrayList<>();  // 缓存所有的socket
        ByteBuffer byteBuffer = ByteBuffer.allocate(1024); // 缓存区的大小
        try {
            ServerSocketChannel serverSocketChannel = ServerSocketChannel.open();
            // 监听8080
            serverSocketChannel.bind(new InetSocketAddress(8080));
            // channel非阻塞
            serverSocketChannel.configureBlocking(false);
            System.out.println("NioServer 启动....");
            while (true){
                // 非阻塞
                SocketChannel socketChannel = serverSocketChannel.accept();
                Thread.sleep(1000);
                if(socketChannel == null){
                    System.out.println("没有新的客户端建立连接");
                }else {
                    System.out.println("新的客户端建立连接");
                    // channel非阻塞
                    socketChannel.configureBlocking(false);
                    // 将新的socket添加到 list
                    list.add(socketChannel);
                }
                //遍历所有的socket
                for(SocketChannel channel:list){
                    //非阻塞
                    int read = channel.read(byteBuffer);
                    if(read >0) {
                        //读模式
                        byteBuffer.flip();
                        System.out.println("读取客户端发送的数据:" +new String(byteBuffer.array(),0,read));
                        byteBuffer.clear();
                    }
                }
            }
        } catch (Exception e) {
            e.printStackTrace();
        }
    }
}
5. AIO异步非阻塞
NIO 和 AIO(NIO2) 最大的区别是,一个是同步一个是异步。异步最大的特点是,应用程序不需要自己去触发数据从内核空间到用户空间的拷贝。
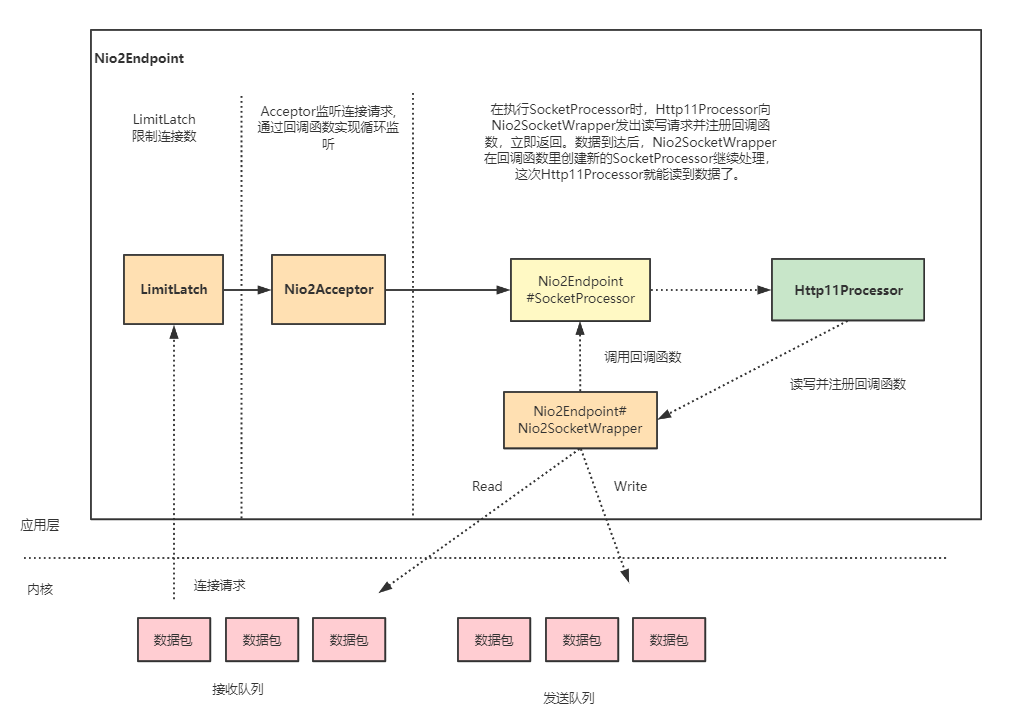
没有 Poller 组件,也就是没有 Selector。在异步 I/O 模式下,Selector 的工作交给
内核来做了。
Linux 内核没有很完善地支持异步 I/O 模型,因此 JVM 并没有采用原生的 Linux 异步 I/O,而是在应用层面通过 epoll 模拟了异步 I/O 模型。因此在 Linux 平台上,Java NIO 和 Java NIO2 底层都是通过 epoll 来实现的,但是 Java NIO 更加简单高效。如果你的 Tomcat 跑在 Linux 平台上,建议不使用NIO2
模拟代码:
public class AioServer {
    public AsynchronousServerSocketChannel serverSocketChannel;
    public static void main(String[] args) throws Exception {
        new AioServer().listen();
        Thread.sleep(Integer.MAX_VALUE);
    }
    private void listen() throws IOException {
        //1. 创建一个线程池
        ExecutorService es = Executors.newCachedThreadPool();
        //2. 创建异步通道群组
        AsynchronousChannelGroup acg = AsynchronousChannelGroup.withCachedThreadPool(es, 1);
        //3. 创建服务端异步通道
        serverSocketChannel = AsynchronousServerSocketChannel.open(acg);
        //4. 绑定监听端口
        serverSocketChannel.bind(new InetSocketAddress(8080));
        System.out.println("AioServer 启动....");
        //5. 监听连接,传入回调类处理连接请求
        serverSocketChannel.accept(this, new CompletionHandler<AsynchronousSocketChannel, AioServer>() {
            //
            //            //具体处理连接请求的就是completed方法,它有两个参数:第一个是异步通道,第二个就是上面传入的AioServer对象
            @Override
            public void completed(AsynchronousSocketChannel socketChannel, AioServer attachment) {
                try {
                    if (socketChannel.isOpen()) {
                        System.out.println("接收到新的客户端的连接,地址:"
                                + socketChannel.getRemoteAddress());
                        final ByteBuffer byteBuffer = ByteBuffer.allocate(1024);
                        //调用 read 函数读取客户端发送的数据
                        socketChannel.read(byteBuffer, socketChannel,
                                        new CompletionHandler<Integer, AsynchronousSocketChannel>() {
                                            @Override
                            public void completed(Integer result, AsynchronousSocketChannel attachment) {
                                try {
                                    //读取请求,处理客户端发送的数据
                                    byteBuffer.flip();
                                    String content = Charset.defaultCharset()
                                            .newDecoder().decode(byteBuffer).toString();
                                    System.out.println("服务端接受到客户端发来的数据:" + content);
                                } catch (CharacterCodingException e) {
                                    e.printStackTrace();
                                }
                            }
                            @Override
                            public void failed(Throwable exc, AsynchronousSocketChannel attachment) {
                                exc.printStackTrace();
                                try {
                                    attachment.close();
                                } catch (IOException e) {
                                    e.printStackTrace();
                                }
                            }
                        });
                    }
                } catch (IOException e) {
                    e.printStackTrace();
                }finally {
                    //当有新的客户端接入的时候,直接调用accept的方法
                    attachment.serverSocketChannel.accept(attachment, this);
                }
            }
            @Override
            public void failed(Throwable exc, AioServer attachment) {
                exc.printStackTrace();
            }
        });
    }
}
6. APR异步非阻塞
APR方式全名叫Apache Portable Runtime,需要额外去下载安装配置,NIO2是调用java库去实现异步的,而ARP是直接通过JNI (Java Native Interface)去操作系统是实现异步,APR 能够使用高级 IO 功能 (如sendfile, epoll, OpenSSL),sendfile主要是对静态文件提升很大,换APR也主要是这个原因其他的提升也不是特别大
附上对比图

springboot配置apr教程:https://www.jb51.net/program/339686ch2.htm
到此这篇关于理解tomcat中的BIO、NIO、AIO、ARP的文章就介绍到这了,更多相关tomcat BIO、NIO、AIO、ARP内容请搜索脚本之家以前的文章或继续浏览下面的相关文章希望大家以后多多支持脚本之家!