
在Linux上检查CPU和硬盘温度的方法
作者:爱写代码的小白.
为了更好地监测您的Linux系统的硬件健康状况,如CPU与硬盘温度、风扇转速等关键指标,采用lm_sensors与hddtemp这两款强大工具是明智之选,以下是关于这些工具的详尽指南,包括它们的功能介绍、安装步骤以及如何配置,需要的朋友可以参考下
引言
为了更好地监测您的Linux系统的硬件健康状况,如CPU与硬盘温度、风扇转速等关键指标,采用lm_sensors与hddtemp这两款强大工具是明智之选。以下是关于这些工具的详尽指南,包括它们的功能介绍、安装步骤以及如何配置lm_sensors,旨在为您提供一个清晰且优化的操作流程。
lm_sensors:全方位硬件监控解决方案
功能概述:lm_sensors是一个开源项目,专为Linux系统设计,用于实时监测系统内部的温度、电压、风扇转速等重要硬件状态。它通过与各种传感器芯片通信,提供精确的硬件健康数据,是维护系统稳定性的得力助手。
特色工具:
- s-tui:作为
lm_sensors的一个现代化界面补充,s-tui(Stress Terminal UI)是一个基于终端的实时监控界面,能直观展示CPU负载、温度及频率变化,同时控制风扇速度,非常适合追求高效监控体验的用户。
基本命令:
sensors:显示当前所有传感器读数。sensors -s:依据配置文件设定传感器阈值。sensors –bus-list:为配置文件生成适配的总线声明。sudo sensors-detect:自动检测并配置系统支持的传感器。
hddtemp:硬盘温度的专业守护者
功能介绍:hddtemp专注于硬盘温度监控,通过读取兼容SMART(自我监控、分析和报告技术)的硬盘驱动器信息,提供精确的硬盘温度数据。它不仅适用于IDE/SATA硬盘,还支持部分SCSI硬盘,是确保硬盘长期可靠性的理想工具。
安装指南(针对主流Linux发行版):
Fedora:
sudo dnf install lm_sensors hddtemp
Debian/Ubuntu:
sudo apt-get install lm-sensors hddtemp
或使用较新的apt命令:
sudo apt install lm-sensors hddtemp
Arch Linux及其衍生版:
sudo pacman -S lm_sensors hddtemp
RHEL/CentOS:
sudo yum install lm_sensors hddtemp
注意:CentOS 8及以上版本或RHEL 8+推荐使用dnf命令代替yum。
openSUSE Leap:
sudo zypper install lm_sensors hddtemp
配置lm_sensors:
安装完毕后,执行以下命令以自动检测并配置lm_sensors:
sudo sensors-detect
$ sudo sensors-detect

# sensors-detect revision $Revision$
# System: LENOVO 80NV [Lenovo ideapad Y700-15ISK] (laptop)
# Board: LENOVO Allsparks 5A
# Kernel: 4.19.6-1-MANJARO x86_64
# Processor: Intel(R) Core(TM) i7-6700HQ CPU @ 2.60GHz (6/94/3)

This program will help you determine which kernel modules you need
to load to use lm_sensors most effectively. It is generally safe
and recommended to accept the default answers to all questions,
unless you know what you're doing.

Some south bridges, CPUs or memory controllers contain embedded sensors.
Do you want to scan for them? This is totally safe. (YES/no): YES
Module cpuid loaded successfully.
Silicon Integrated Systems SIS5595...                       No
VIA VT82C686 Integrated Sensors...                          No
VIA VT8231 Integrated Sensors...                            No
AMD K8 thermal sensors...                                   No
AMD Family 10h thermal sensors...                           No
AMD Family 11h thermal sensors...                           No
AMD Family 12h and 14h thermal sensors...                   No
AMD Family 15h thermal sensors...                           No
AMD Family 16h thermal sensors...                           No
AMD Family 17h thermal sensors...                           No
AMD Family 15h power sensors...                             No
AMD Family 16h power sensors...                             No
Intel digital thermal sensor...                             Success!
    (driver `coretemp')
Intel AMB FB-DIMM thermal sensor...                         No
Intel 5500/5520/X58 thermal sensor...                       No
VIA C7 thermal sensor...                                    No
VIA Nano thermal sensor...                                  No

Some Super I/O chips contain embedded sensors. We have to write to
standard I/O ports to probe them. This is usually safe.
Do you want to scan for Super I/O sensors? (YES/no): YES
Probing for Super-I/O at 0x2e/0x2f
Trying family `National Semiconductor/ITE'...               No
Trying family `SMSC'...                                     No
Trying family `VIA/Winbond/Nuvoton/Fintek'...               No
Trying family `ITE'...                                      No
Probing for Super-I/O at 0x4e/0x4f
Trying family `National Semiconductor/ITE'...               Yes
Found unknown chip with ID 0x8371

Some hardware monitoring chips are accessible through the ISA I/O ports.
We have to write to arbitrary I/O ports to probe them. This is usually
safe though. Yes, you do have ISA I/O ports even if you do not have any
ISA slots! Do you want to scan the ISA I/O ports? (YES/no): YES
Probing for `National Semiconductor LM78' at 0x290...       No
Probing for `National Semiconductor LM79' at 0x290...       No
Probing for `Winbond W83781D' at 0x290...                   No
Probing for `Winbond W83782D' at 0x290...                   No

Lastly, we can probe the I2C/SMBus adapters for connected hardware
monitoring devices. This is the most risky part, and while it works
reasonably well on most systems, it has been reported to cause trouble
on some systems.
Do you want to probe the I2C/SMBus adapters now? (YES/no): YES
Using driver `i2c-i801' for device 0000:00:1f.4: Sunrise Point-H (PCH)
Module i2c-dev loaded successfully.

Next adapter: SMBus I801 adapter at 6040 (i2c-0)
Do you want to scan it? (YES/no/selectively): YES

Next adapter: i915 gmbus dpc (i2c-1)
Do you want to scan it? (yes/NO/selectively): YES

Next adapter: i915 gmbus dpb (i2c-2)
Do you want to scan it? (yes/NO/selectively): yes

Next adapter: i915 gmbus dpd (i2c-3)
Do you want to scan it? (yes/NO/selectively): yes

Next adapter: DPDDC-A (i2c-4)
Do you want to scan it? (yes/NO/selectively): yes

Next adapter: nvkm-0000:01:00.0-bus-0000 (i2c-5)
Do you want to scan it? (yes/NO/selectively): yes

Next adapter: nvkm-0000:01:00.0-bus-0001 (i2c-6)
Do you want to scan it? (yes/NO/selectively): yes

Next adapter: nvkm-0000:01:00.0-bus-0002 (i2c-7)
Do you want to scan it? (yes/NO/selectively): yes

Next adapter: nvkm-0000:01:00.0-bus-0005 (i2c-8)
Do you want to scan it? (yes/NO/selectively): yes

Next adapter: nvkm-0000:01:00.0-bus-0006 (i2c-9)
Do you want to scan it? (yes/NO/selectively): yes

Next adapter: nvkm-0000:01:00.0-bus-0007 (i2c-10)
Do you want to scan it? (yes/NO/selectively): yes

Next adapter: nvkm-0000:01:00.0-bus-0008 (i2c-11)
Do you want to scan it? (yes/NO/selectively): yes

Next adapter: nvkm-0000:01:00.0-bus-0009 (i2c-12)
Do you want to scan it? (yes/NO/selectively): yes

Next adapter: nvkm-0000:01:00.0-aux-000a (i2c-13)
Do you want to scan it? (yes/NO/selectively): yes
Client found at address 0x18
Probing for `Analog Devices ADM1021'...                     No
Probing for `Analog Devices ADM1021A/ADM1023'...            No
Probing for `Maxim MAX1617'...                              No
Probing for `Maxim MAX1617A'...                             No
Probing for `Maxim MAX1668'...                              No
Probing for `Maxim MAX1805'...                              No
Probing for `Maxim MAX1989'...                              No
.
.
Probing for `Fintek F75121R/F75122R/RG (VID+GPIO)'...       No
Probing for `Fintek F75111R/RG/N (GPIO)'...                 No
Probing for `ITE IT8201R/IT8203R/IT8206R/IT8266R'...        No
Client found at address 0x77
Probing for `Asus Mozart-2'...                              No


Now follows a summary of the probes I have just done.
Just press ENTER to continue:

Driver `coretemp':
  * Chip `Intel digital thermal sensor' (confidence: 9)

Do you want to generate /etc/conf.d/lm_sensors? (YES/no): YES
Created symlink /etc/systemd/system/multi-user.target.wants/lm_sensors.service → /usr/lib/systemd/system/lm_sensors.service.
Unloading i2c-dev... OK
Unloading cpuid... OK
执行以下命令查看CPU温度。
$ sensors

nouveau-pci-0100
Adapter: PCI adapter
GPU core:     +0.60 V  (min =  +0.60 V, max =  +1.20 V)
temp1:         -0.0°C  (high = +95.0°C, hyst =  +3.0°C)
                       (crit = +105.0°C, hyst =  +5.0°C)
                       (emerg = +135.0°C, hyst =  +5.0°C)

coretemp-isa-0000
Adapter: ISA adapter
Package id 0:  +35.0°C  (high = +100.0°C, crit = +100.0°C)
Core 0:        +33.0°C  (high = +100.0°C, crit = +100.0°C)
Core 1:        +35.0°C  (high = +100.0°C, crit = +100.0°C)
Core 2:        +33.0°C  (high = +100.0°C, crit = +100.0°C)
Core 3:        +32.0°C  (high = +100.0°C, crit = +100.0°C)
Print the temperatures in degrees Fahrenheit instead of Celsius.

$ sensors -f

nouveau-pci-0100
Adapter: PCI adapter
GPU core:     +0.60 V  (min =  +0.60 V, max =  +1.20 V)
temp1:        +32.0°F  (high = +203.0°F, hyst = +37.4°F)
                       (crit = +221.0°F, hyst = +41.0°F)
                       (emerg = +275.0°F, hyst = +41.0°F)

coretemp-isa-0000
Adapter: ISA adapter
Package id 0:  +96.8°F  (high = +212.0°F, crit = +212.0°F)
Core 0:        +95.0°F  (high = +212.0°F, crit = +212.0°F)
Core 1:        +95.0°F  (high = +212.0°F, crit = +212.0°F)
Core 2:        +91.4°F  (high = +212.0°F, crit = +212.0°F)
Core 3:        +91.4°F  (high = +212.0°F, crit = +212.0°F)
显示硬盘温度。
$ sudo hddtemp /dev/sda2 /dev/sda2:WDC WD10SPCX-24HWST1:32°C
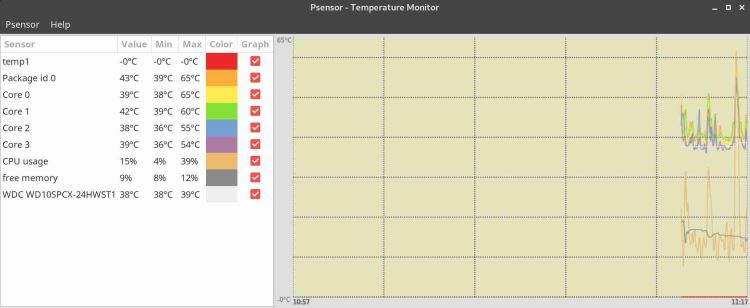
在Linux中安装Psensor
psensor是 Linux 下的图形化硬件温度监视器。该应用程序设计简单且易于使用。 CPU和内存消耗并不大。
它可以监控:
- 主板和 CPU 传感器的温度(使用 lm 传感器)。
- NVidia GPU 的温度(使用 XNVCtrl)。
- ATI/AMD GPU 的温度(在官方发行版存储库中未启用,请参阅启用其支持的说明)。
- 硬盘驱动器的温度(使用 hddtemp 或 libatasmart)。
- 风扇的转速(使用流明传感器)。
- CPU 使用率(从 0.6.2.10 开始并使用 Gtop2)。
到此这篇关于在Linux上检查CPU和硬盘温度的方法的文章就介绍到这了,更多相关Linux检查CPU和硬盘温度内容请搜索脚本之家以前的文章或继续浏览下面的相关文章希望大家以后多多支持脚本之家!