
Python+pyqt5实现一个图像变形工具
作者:努力还债的学术吗喽
效果展示
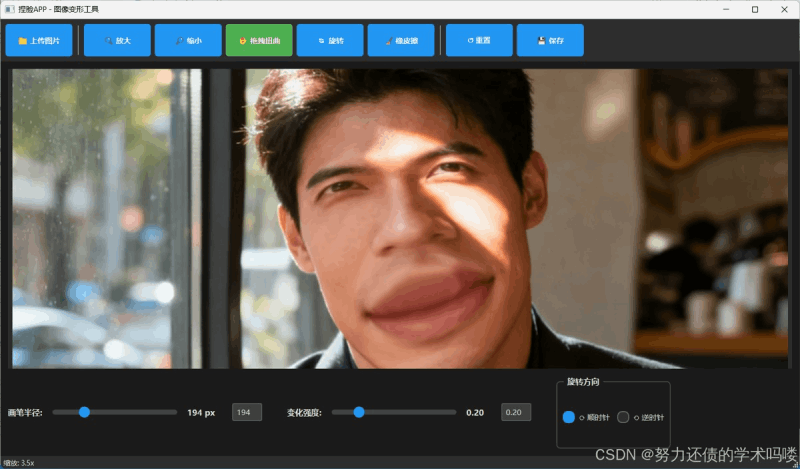

在此处插入: 整蛊后的照片
用FacePrank可以轻松实现:放大眼睛、缩小鼻子、扭曲表情、旋转漩涡等各种搞笑效果!
项目简介
FacePrank 是一个功能强大的图像变形工具,使用Python和PyQt5开发。无需复杂的PS技能,只需鼠标点击拖拽,就能对照片进行各种有趣的变形处理。无论是恶搞朋友、制作表情包,还是进行创意设计,这个工具都能满足你的需求!
核心特性
- 简单易用:纯鼠标操作,无需专业技能
- 五大工具:放大、缩小、拖拽扭曲、旋转、橡皮擦
- 拖拽上传:支持直接拖拽图片到窗口
- Ctrl+滚轮缩放:精确查看和编辑细节
- 右键拖拽视图:自由移动查看区域
- 参数可调:画笔半径、变化强度随心调节
- 中文路径支持:完美支持中文文件名和路径
- 实时预览:所见即所得的编辑体验
环境配置
方式一:使用Conda创建虚拟环境(推荐)
第一步:创建虚拟环境
conda create -n faceprank python=3.8
第二步:激活环境
conda activate faceprank
第三步:配置清华镜像源(提速)
pip config set global.index-url https://pypi.tuna.tsinghua.edu.cn/simple
第四步:安装依赖
pip install -i https://pypi.tuna.tsinghua.edu.cn/simple PyQt5>=5.15.0 opencv-python>=4.5.0 numpy>=1.19.0
或者使用requirements.txt安装:
pip install -i https://pypi.tuna.tsinghua.edu.cn/simple -r requirements.txt
方式二:使用pip直接安装
如果你不使用Conda,也可以直接用pip安装:
pip install -i https://pypi.tuna.tsinghua.edu.cn/simple PyQt5>=5.15.0 opencv-python>=4.5.0 numpy>=1.19.0
依赖说明
| 库名称 | 版本要求 | 用途 |
|---|---|---|
| PyQt5 | ≥5.15.0 | 图形界面框架 |
| opencv-python | ≥4.5.0 | 图像处理核心 |
| numpy | ≥1.19.0 | 数值计算和数组操作 |
快速启动
克隆或下载项目
# 如果你有git
git clone <项目地址>
cd FacePrank

# 或者直接下载ZIP解压
运行程序
python main.py
启动成功后,会看到一个现代化的深色主题界面,中央有提示文字:“📁 点击上传图片按钮 或 拖拽图片到此处”
使用指南
基本操作流程
上传图片
- 方法一:点击工具栏的
上传图片按钮,选择图片文件 - 方法二:直接拖拽图片文件到窗口中(推荐!更方便)
支持的格式:PNG、JPG、JPEG、BMP、GIF
选择工具
在顶部工具栏选择你需要的变形工具:
| 工具图标 | 工具名称 | 快捷说明 |
|---|---|---|
| 🔍 | 放大工具 | 点击位置向外扩展,产生凸起效果 |
| 🔎 | 缩小工具 | 点击位置向内收缩,产生凹陷效果 |
| ✋ | 拖拽扭曲 | 拖拽鼠标实现推拉扭曲效果 |
| 🔄 | 旋转工具 | 点击产生螺旋漩涡效果 |
| 🧹 | 橡皮擦 | 擦除变形,恢复原图 |
调整参数
1.画笔半径:控制影响范围(10-800像素,默认170)
- 滑块拖动或直接输入数值
- 较小半径适合精细调整
- 较大半径适合大范围变形
2.变化强度:控制变形程度(0.01-1.0,默认0.20)
- 数值越大,变形越明显
- 建议从小值开始尝试
3.旋转方向:仅旋转工具有效
- ⟳ 顺时针
- ⟲ 逆时针
查看与导航
1.Ctrl + 滚轮:放大缩小图像(0.1x - 10x)
- 鼠标位置为缩放中心
- 适合查看和编辑细节
2.右键拖拽:移动视图位置
- 按住鼠标右键拖动
- 配合缩放功能精确编辑
开始编辑
1.放大/缩小/旋转:左键点击图像位置
- 按住不放会持续累积效果
- 移动鼠标位置会跟随
2.拖拽扭曲:按住鼠标左键拖动
拖拽路径上的像素会随鼠标移动
3.橡皮擦:按住鼠标左键拖动
经过区域恢复为原始图像
保存结果
点击 保存 按钮,选择保存路径和格式(PNG或JPG)
使用技巧
- 拖拽上传最方便:直接把图片拖到窗口,有绿色高亮提示
- 放大查看细节:Ctrl+滚轮放大图像,可以看清每个像素
- 小画笔精细调整:处理眼睛、鼻子等小部位时,减小画笔半径
- 强度从小到大:先用小强度测试效果,再逐步加大
- 按住鼠标累积:需要明显效果时,按住鼠标不放
- 多次点击加强:在同一位置多次点击可以加强效果
- 局部恢复原图:用橡皮擦可以只修正某些过度变形的区域
- 一键重置:点击重置按钮恢复原图(包括缩放和偏移)
创意玩法
- 放大眼睛:使用放大工具点击眼睛位置,制作大眼萌照
- 缩小鼻子:使用缩小工具点击鼻子,打造精致小脸
- 扭曲表情:使用拖拽工具拉扯嘴角,制作搞笑表情
- 漩涡背景:使用旋转工具点击背景,营造魔幻效果
- 组合变形:多种工具配合使用,创造独特效果
五大核心工具详解
工具一:放大工具
作用原理:点击的区域像素会向外扩展挤压,产生凸起效果
适用场景:
- 放大眼睛,制作大眼萌照
- 放大嘴巴,制作夸张表情
- 突出某个特定部位
使用方法:
- 选择
放大工具 - 调整画笔半径(建议50-150)
- 左键点击要放大的位置
- 按住不放可以持续放大
效果示例:眼睛从正常大小变成圆圆的大眼睛
工具二:缩小工具
作用原理:半径内的像素向中心靠拢收缩,产生凹陷效果
适用场景:
- 缩小鼻子,打造小巧鼻梁
- 缩小脸颊,制作瓜子脸
- 减小某些突出部位
使用方法:
- 选择
缩小工具 - 调整画笔半径(建议40-120)
- 左键点击要缩小的位置
- 按住不放可以持续缩小
提示:缩小工具与放大工具效果相反,可以互相配合使用
工具三:拖拽扭曲工具
作用原理:路径上的像素会随着鼠标移动而拖拽变形
适用场景:
- 推、拉、扭曲面部特征
- 制作各种搞怪表情
- 自由变形任何区域
使用方法:
- 选择
拖拽扭曲工具 - 调整画笔半径和强度
- 按住鼠标左键拖动
- 拖拽路径会产生变形效果
技巧:这是最灵活的工具,可以实现各种创意变形
工具四:旋转工具
作用原理:周围像素会以点击点为轴进行螺旋旋转
适用场景:
- 制作漩涡特效
- 营造魔幻氛围
- 创造艺术效果
使用方法:
- 选择
旋转工具 - 选择旋转方向(⟳顺时针 或 ⟲逆时针)
- 调整画笔半径(建议100-300)
- 左键点击要旋转的位置
- 按住不放产生更强烈的旋转效果
创意玩法:在眼睛位置使用旋转工具,制作催眠效果
工具五:橡皮擦工具
作用原理:擦除变形效果,将修改的区域还原为原始图像
适用场景:
- 修正过度变形的区域
- 局部恢复原图
- 精细调整效果
使用方法:
- 选择
橡皮擦工具 - 调整画笔半径(擦除范围)
- 按住鼠标左键拖动
- 经过的区域会恢复原样
特点:
- 支持边缘羽化,过渡自然
- 只恢复经过路径和画笔范围内的像素
- 可以配合其他工具实现精细控制
核心技术实现
技术架构
FacePrank
├── 界面层 (PyQt5)
│ ├── 主窗口 (QMainWindow)
│ ├── 工具栏 (QToolBar)
│ ├── 画布组件 (QLabel)
│ └── 控制面板 (QSlider + QLineEdit)
│
├── 图像处理层 (OpenCV)
│ ├── 图像加载与保存
│ ├── 格式转换 (BGR ↔ RGB)
│ └── 重映射与插值
│
└── 算法层 (NumPy)
├── 网格映射变形
├── 距离场计算
├── 双线性插值
└── 向量化运算
变形算法原理
1. 放大/缩小算法
核心思想:基于距离的像素位移
# 计算到中心点的距离
distances = np.sqrt(dx**2 + dy**2)

# 计算影响因子(越近影响越大)
factor = 1.0 - (distances / brush_radius)
factor = factor ** 2  # 平滑过渡

# 放大:像素向内收缩
scale = 1.0 - strength * factor * mask
new_x = cx + dx * scale
new_y = cy + dy * scale

# 缩小:像素向外扩展
scale = 1.0 + strength * factor * mask
new_x = cx + dx * scale
new_y = cy + dy * scale
关键点:
- 使用平方函数实现平滑过渡
- mask确保只影响半径内像素
- strength控制变形强度
2. 旋转算法
核心思想:极坐标旋转变换
# 计算旋转角度(距离越近旋转越多)
angle = (1.0 - distances / brush_radius) * π * strength * direction

# 旋转矩阵变换
cos_angle = np.cos(angle)
sin_angle = np.sin(angle)

new_x = cx + dx * cos_angle - dy * sin_angle
new_y = cy + dx * sin_angle + dy * cos_angle
关键点:
- 使用旋转矩阵进行坐标变换
- direction参数控制顺时针/逆时针
- 角度随距离衰减,产生漩涡效果
3. 拖拽扭曲算法
核心思想:路径方向的力场扭曲
# 计算拖拽向量
drag_x = end_x - start_x
drag_y = end_y - start_y

# 计算影响因子
factor = (1.0 - distances / brush_radius) ** 2

# 应用拖拽位移
new_x = x_indices - drag_x * factor * mask * strength
new_y = y_indices - drag_y * factor * mask * strength
关键点:
- 基于鼠标移动方向计算位移向量
- 使用力场衰减实现自然过渡
- 支持连续拖拽的流畅效果
4. 橡皮擦算法(向量化优化)
核心思想:权重混合原图与变形图
# 计算距离和混合因子
distances = np.sqrt((x_coords - cx)**2 + (y_coords - cy)**2)
factor = (1.0 - distances / brush_radius) ** 0.5

# 向量化混合
blended = current_image * (1 - factor) + original_image * factor
关键点:
- 使用NumPy向量化代替双重循环,性能提升10倍以上
- 边缘羽化实现自然过渡
- 只混合mask为True的区域
双线性插值
所有变形算法最后都使用OpenCV的remap函数进行双线性插值:
new_image = cv2.remap(image,
                      new_x.astype(np.float32),
                      new_y.astype(np.float32),
                      cv2.INTER_LINEAR)
这确保了变形后图像的平滑性和视觉质量。
交互优化
Ctrl+滚轮缩放实现
def wheelEvent(self, event):
    if event.modifiers() == Qt.ControlModifier:
        # 获取鼠标位置对应的图像坐标
        old_image_pos = self.get_image_pos(event.pos())

        # 计算缩放增量
        zoom_factor = 1.1 if delta > 0 else 0.9
        self.zoom_scale *= zoom_factor

        # 调整偏移以保持鼠标位置下的图像点不变
        # ... 坐标变换计算 ...
关键点:
- 检测Ctrl键修饰符
- 以鼠标位置为中心进行缩放
- 自动调整偏移量,保持缩放中心不变
右键拖拽视图
def mouseMoveEvent(self, event):
    if self.is_panning:
        delta = event.pos() - self.pan_start_pos
        self.offset_x += delta.x()
        self.offset_y += delta.y()
        # 限制偏移范围...
持续效果实现
使用QTimer定时器实现按住鼠标持续变形:
def start_continuous_effect(self):
    self.continuous_timer = QTimer(self)
    self.continuous_timer.timeout.connect(self.apply_continuous_effect)
    self.continuous_timer.start(50)  # 每50ms应用一次
中文路径支持
使用NumPy的文件IO函数支持中文路径:
# 加载图像
image_data = np.fromfile(file_path, dtype=np.uint8)
image = cv2.imdecode(image_data, cv2.IMREAD_COLOR)

# 保存图像
_, encoded_img = cv2.imencode('.png', image)
encoded_img.tofile(file_path)
项目结构
FacePrank/
├── main.py # 主程序文件(1098行)
│ ├── ImageCanvas类 # 图像画布和交互处理
│ │ ├── 图像加载与显示
│ │ ├── 鼠标事件处理
│ │ ├── 五大变形算法
│ │ ├── 缩放和平移
│ │ └── 拖拽上传支持
│ │
│ └── FaceWarpApp类 # 主窗口和UI
│ ├── 工具栏创建
│ ├── 控制面板
│ ├── 参数调节
│ └── 文件操作
│
├── requirements.txt # Python依赖
├── README.md # 项目说明
└── face.jpg # 示例图片
完整源代码
主程序:main.py
#!/usr/bin/env python
# -*- coding: utf-8 -*-
"""
捏脸APP - 简单的图像变形工具
支持放大、缩小、拖拽扭曲、旋转等变形效果
"""
import sys
import numpy as np
from PyQt5.QtWidgets import (QApplication, QMainWindow, QWidget, QVBoxLayout,
QHBoxLayout, QPushButton, QLabel, QSlider,
QFileDialog, QToolBar, QAction, QSizePolicy)
from PyQt5.QtCore import Qt, QPoint, QRect
from PyQt5.QtGui import QImage, QPixmap, QPainter, QPen, QColor
import cv2
class ImageCanvas(QLabel):
"""图像画布类,处理图像显示和鼠标交互"""
def __init__(self, parent=None):
super().__init__(parent)
self.parent_window = parent
self.image = None
self.display_image = None
self.original_image = None
self.current_tool = None # 当前工具: 'enlarge', 'shrink', 'drag', 'rotate', 'eraser'
self.brush_radius = 170 # 默认画笔半径
self.effect_strength = 0.20 # 变化强度,范围0.01-1.0,默认0.20
self.rotate_direction = 1 # 旋转方向:1为顺时针,-1为逆时针
self.is_drawing = False
self.last_point = None
# 用于持续效果的定时器
self.continuous_timer = None
self.continuous_pos = None
# 图像缩放和平移
self.zoom_scale = 1.0 # 缩放比例
self.offset_x = 0 # X轴偏移
self.offset_y = 0 # Y轴偏移
self.is_panning = False # 是否正在拖拽视图
self.pan_start_pos = None # 拖拽起始位置
self.setMinimumSize(800, 600)
self.setAlignment(Qt.AlignCenter)
self.setStyleSheet("""
QLabel {
background-color: #2b2b2b;
color: #9E9E9E;
font-size: 24px;
font-weight: bold;
border: 3px dashed #555;
border-radius: 10px;
}
""")
self.setText('📁 点击"上传图片"按钮\n或\n拖拽图片到此处')
# 启用拖放功能
self.setAcceptDrops(True)
def load_image(self, file_path):
"""加载图像(支持中文路径)"""
try:
# 使用np.fromfile()读取文件,支持中文路径
image_data = np.fromfile(file_path, dtype=np.uint8)
self.original_image = cv2.imdecode(image_data, cv2.IMREAD_COLOR)
if self.original_image is None:
return False
# BGR转RGB
self.original_image = cv2.cvtColor(self.original_image, cv2.COLOR_BGR2RGB)
self.image = self.original_image.copy()
self.display_image = self.image.copy()
self.update_display()
return True
except Exception as e:
print(f"加载图片失败: {e}")
return False
def update_display(self):
"""更新显示的图像(支持缩放和平移)"""
if self.image is None:
return
# 图片加载后移除虚线边框
self.setStyleSheet("""
QLabel {
background-color: #2b2b2b;
}
""")
h, w, ch = self.image.shape
bytes_per_line = ch * w
q_image = QImage(self.image.data, w, h, bytes_per_line, QImage.Format_RGB888)
# 创建pixmap
pixmap = QPixmap.fromImage(q_image)
# 应用缩放
if self.zoom_scale != 1.0:
# 先按原始比例缩放到窗口
base_scaled = pixmap.scaled(self.size(), Qt.KeepAspectRatio, Qt.SmoothTransformation)
# 再应用用户缩放
new_width = int(base_scaled.width() * self.zoom_scale)
new_height = int(base_scaled.height() * self.zoom_scale)
scaled_pixmap = pixmap.scaled(new_width, new_height, Qt.KeepAspectRatio, Qt.SmoothTransformation)
else:
scaled_pixmap = pixmap.scaled(self.size(), Qt.KeepAspectRatio, Qt.SmoothTransformation)
# 如果图像大于窗口,需要裁剪并应用偏移
if scaled_pixmap.width() > self.width() or scaled_pixmap.height() > self.height():
# 计算裁剪区域
x = max(0, min(-self.offset_x, scaled_pixmap.width() - self.width()))
y = max(0, min(-self.offset_y, scaled_pixmap.height() - self.height()))
w = min(self.width(), scaled_pixmap.width())
h = min(self.height(), scaled_pixmap.height())
# 裁剪
scaled_pixmap = scaled_pixmap.copy(x, y, w, h)
self.setPixmap(scaled_pixmap)
def get_image_pos(self, widget_pos):
"""将窗口坐标转换为图像坐标(考虑缩放和偏移)"""
if self.image is None:
return None
h, w = self.image.shape[:2]
# 计算基础缩放(适应窗口)
widget_aspect = self.width() / self.height()
image_aspect = w / h
if widget_aspect > image_aspect:
base_height = self.height()
base_width = int(base_height * image_aspect)
else:
base_width = self.width()
base_height = int(base_width / image_aspect)
# 应用用户缩放
display_width = int(base_width * self.zoom_scale)
display_height = int(base_height * self.zoom_scale)
# 计算图像在widget中的位置(考虑偏移)
if display_width <= self.width():
x_offset = (self.width() - display_width) // 2
else:
x_offset = self.offset_x
if display_height <= self.height():
y_offset = (self.height() - display_height) // 2
else:
y_offset = self.offset_y
# 转换为显示图像坐标
img_x = widget_pos.x() - x_offset
img_y = widget_pos.y() - y_offset
if img_x < 0 or img_y < 0 or img_x >= display_width or img_y >= display_height:
return None
# 缩放到原始图像尺寸
scale_x = w / display_width
scale_y = h / display_height
orig_x = int(img_x * scale_x)
orig_y = int(img_y * scale_y)
# 确保在图像范围内
orig_x = max(0, min(orig_x, w - 1))
orig_y = max(0, min(orig_y, h - 1))
return QPoint(orig_x, orig_y)
def mousePressEvent(self, event):
"""鼠标按下事件"""
if event.button() == Qt.LeftButton and self.image is not None and self.current_tool:
# 左键:使用工具
self.is_drawing = True
pos = self.get_image_pos(event.pos())
if pos:
self.last_point = pos
self.continuous_pos = pos
if self.current_tool in ['enlarge', 'shrink', 'rotate']:
self.apply_effect(pos)
# 启动定时器实现持续效果
self.start_continuous_effect()
elif self.current_tool == 'eraser':
# 橡皮擦:开始擦除
self.apply_eraser(pos)
elif event.button() == Qt.RightButton and self.image is not None:
# 右键:拖拽视图
self.is_panning = True
self.pan_start_pos = event.pos()
self.setCursor(Qt.ClosedHandCursor)
def mouseMoveEvent(self, event):
"""鼠标移动事件"""
if self.is_panning and self.pan_start_pos:
# 右键拖拽视图
delta = event.pos() - self.pan_start_pos
self.offset_x += delta.x()
self.offset_y += delta.y()
# 限制偏移范围
if self.image is not None:
h, w = self.image.shape[:2]
widget_aspect = self.width() / self.height()
image_aspect = w / h
if widget_aspect > image_aspect:
base_height = self.height()
base_width = int(base_height * image_aspect)
else:
base_width = self.width()
base_height = int(base_width / image_aspect)
display_width = int(base_width * self.zoom_scale)
display_height = int(base_height * self.zoom_scale)
# 限制偏移
max_offset_x = max(0, display_width - self.width())
max_offset_y = max(0, display_height - self.height())
self.offset_x = max(-max_offset_x, min(0, self.offset_x))
self.offset_y = max(-max_offset_y, min(0, self.offset_y))
self.pan_start_pos = event.pos()
self.update_display()
elif self.is_drawing and self.image is not None and self.current_tool:
# 左键使用工具
pos = self.get_image_pos(event.pos())
if pos:
if self.current_tool == 'drag':
self.apply_drag_effect(self.last_point, pos)
self.last_point = pos
elif self.current_tool == 'eraser':
# 橡皮擦:沿路径擦除
if self.last_point:
self.apply_eraser_path(self.last_point, pos)
self.last_point = pos
elif self.current_tool in ['enlarge', 'shrink', 'rotate']:
# 移动时更新持续效果的位置
self.continuous_pos = pos
self.last_point = pos
def mouseReleaseEvent(self, event):
"""鼠标释放事件"""
if event.button() == Qt.LeftButton:
self.is_drawing = False
self.last_point = None
self.continuous_pos = None
# 停止持续效果
self.stop_continuous_effect()
elif event.button() == Qt.RightButton:
self.is_panning = False
self.pan_start_pos = None
self.setCursor(Qt.ArrowCursor)
def start_continuous_effect(self):
"""启动持续效果定时器"""
from PyQt5.QtCore import QTimer
if self.continuous_timer is None:
self.continuous_timer = QTimer(self)
self.continuous_timer.timeout.connect(self.apply_continuous_effect)
self.continuous_timer.start(50) # 每50ms应用一次效果
def stop_continuous_effect(self):
"""停止持续效果定时器"""
if self.continuous_timer is not None:
self.continuous_timer.stop()
def apply_continuous_effect(self):
"""持续应用效果"""
if self.continuous_pos and self.current_tool in ['enlarge', 'shrink', 'rotate']:
self.apply_effect(self.continuous_pos)
def apply_effect(self, center):
"""应用效果(放大、缩小、旋转)"""
if self.image is None:
return
h, w = self.image.shape[:2]
cx, cy = center.x(), center.y()
# 确保中心点在图像范围内
if cx < 0 or cy < 0 or cx >= w or cy >= h:
return
# 创建网格
y_indices, x_indices = np.mgrid[0:h, 0:w]
# 计算到中心点的距离
dx = x_indices - cx
dy = y_indices - cy
distances = np.sqrt(dx**2 + dy**2)
# 创建影响掩码(在半径内的像素)
mask = distances <= self.brush_radius
if self.current_tool == 'enlarge':
# 放大效果:像素向内收缩(修正:原来的shrink逻辑)
factor = 1.0 - (distances / self.brush_radius)
factor = np.clip(factor, 0, 1)
factor = factor ** 2 # 平滑过渡
# 使用effect_strength控制强度
scale = 1.0 - self.effect_strength * factor * mask
new_x = cx + dx * scale
new_y = cy + dy * scale
elif self.current_tool == 'shrink':
# 缩小效果:像素向外扩展(修正:原来的enlarge逻辑)
factor = 1.0 - (distances / self.brush_radius)
factor = np.clip(factor, 0, 1)
factor = factor ** 2
# 使用effect_strength控制强度
scale = 1.0 + self.effect_strength * factor * mask
new_x = cx + dx * scale
new_y = cy + dy * scale
elif self.current_tool == 'rotate':
# 旋转效果:像素螺旋旋转
# rotate_direction: 1为顺时针,-1为逆时针
angle = np.where(mask, (1.0 - distances / self.brush_radius) * np.pi * self.effect_strength * self.rotate_direction, 0)
cos_angle = np.cos(angle)
sin_angle = np.sin(angle)
new_x = cx + dx * cos_angle - dy * sin_angle
new_y = cy + dx * sin_angle + dy * cos_angle
else:
return
# 限制坐标范围
new_x = np.clip(new_x, 0, w - 1)
new_y = np.clip(new_y, 0, h - 1)
# 使用双线性插值进行重映射
new_image = cv2.remap(self.image, new_x.astype(np.float32),
new_y.astype(np.float32), cv2.INTER_LINEAR)
self.image = new_image
self.update_display()
def apply_eraser(self, center, update_display=True):
"""应用橡皮擦效果(恢复原始图像)- 使用NumPy向量化优化"""
if self.image is None or self.original_image is None:
return
h, w = self.image.shape[:2]
cx, cy = center.x(), center.y()
# 确保中心点在图像范围内
if cx < 0 or cy < 0 or cx >= w or cy >= h:
return
# 计算画笔范围
x1 = max(0, cx - self.brush_radius)
y1 = max(0, cy - self.brush_radius)
x2 = min(w, cx + self.brush_radius)
y2 = min(h, cy + self.brush_radius)
# 使用NumPy向量化操作代替双重循环
y_coords, x_coords = np.ogrid[y1:y2, x1:x2]
# 计算距离矩阵
distances = np.sqrt((x_coords - cx)**2 + (y_coords - cy)**2)
# 创建圆形遮罩
mask = distances <= self.brush_radius
if not mask.any():
return
# 计算混合因子(边缘羽化)
factor = np.zeros_like(distances)
factor[mask] = 1.0 - (distances[mask] / self.brush_radius)
factor = factor ** 0.5 # 平滑过渡曲线
# 扩展factor到3通道
factor_3d = factor[:, :, np.newaxis]
# 向量化混合操作
region = self.image[y1:y2, x1:x2]
original_region = self.original_image[y1:y2, x1:x2]
# 只混合mask为True的区域
mask_3d = mask[:, :, np.newaxis]
blended = region * (1 - factor_3d) + original_region * factor_3d
self.image[y1:y2, x1:x2] = np.where(mask_3d, blended, region).astype(np.uint8)
if update_display:
self.update_display()
def apply_eraser_path(self, start_pos, end_pos):
"""沿路径应用橡皮擦效果(优化版)"""
if self.image is None or self.original_image is None or start_pos is None:
return
# 计算路径上的点
sx, sy = start_pos.x(), start_pos.y()
ex, ey = end_pos.x(), end_pos.y()
# 计算距离和步数
dist = np.sqrt((ex - sx)**2 + (ey - sy)**2)
if dist < 1:
return
# 根据画笔半径调整步数,大画笔可以用更少的步数
step_size = max(self.brush_radius // 4, 3)
steps = max(int(dist / step_size), 1)
# 沿路径插值多个点,批量处理,不每次都刷新
for i in range(steps + 1):
t = i / steps if steps > 0 else 0
px = int(sx + (ex - sx) * t)
py = int(sy + (ey - sy) * t)
# 只在最后一个点才刷新显示
self.apply_eraser(QPoint(px, py), update_display=(i == steps))
def apply_drag_effect(self, start_pos, end_pos):
"""应用拖拽扭曲效果"""
if self.image is None or start_pos is None:
return
h, w = self.image.shape[:2]
sx, sy = start_pos.x(), start_pos.y()
ex, ey = end_pos.x(), end_pos.y()
# 计算拖拽向量
drag_x = ex - sx
drag_y = ey - sy
if drag_x == 0 and drag_y == 0:
return
# 创建网格
y_indices, x_indices = np.mgrid[0:h, 0:w]
# 计算到起始点的距离
dx = x_indices - sx
dy = y_indices - sy
distances = np.sqrt(dx**2 + dy**2)
# 创建影响掩码
mask = distances <= self.brush_radius
# 计算影响因子(距离越近影响越大)
factor = np.where(distances < self.brush_radius,
1.0 - (distances / self.brush_radius),
0)
factor = factor ** 2 # 平滑过渡
# 应用拖拽位移,使用effect_strength控制强度
new_x = x_indices - drag_x * factor * mask * self.effect_strength
new_y = y_indices - drag_y * factor * mask * self.effect_strength
# 限制坐标范围
new_x = np.clip(new_x, 0, w - 1)
new_y = np.clip(new_y, 0, h - 1)
# 重映射
new_image = cv2.remap(self.image, new_x.astype(np.float32),
new_y.astype(np.float32), cv2.INTER_LINEAR)
self.image = new_image
self.update_display()
def reset_image(self):
"""重置图像到原始状态"""
if self.original_image is not None:
self.image = self.original_image.copy()
# 重置缩放和偏移
self.zoom_scale = 1.0
self.offset_x = 0
self.offset_y = 0
self.update_display()
def wheelEvent(self, event):
"""鼠标滚轮事件(Ctrl+滚轮缩放)"""
if self.image is None:
return
# 检测Ctrl键
modifiers = QApplication.keyboardModifiers()
if modifiers == Qt.ControlModifier:
# 获取鼠标位置对应的图像坐标
mouse_pos = event.pos()
old_image_pos = self.get_image_pos(mouse_pos)
# 计算缩放增量
delta = event.angleDelta().y()
zoom_factor = 1.1 if delta > 0 else 0.9
# 更新缩放比例
old_zoom = self.zoom_scale
self.zoom_scale *= zoom_factor
# 限制缩放范围
self.zoom_scale = max(0.1, min(10.0, self.zoom_scale))
# 如果缩放真的改变了,调整偏移以保持鼠标位置下的图像点不变
if old_zoom != self.zoom_scale and old_image_pos:
# 计算新的显示尺寸
h, w = self.image.shape[:2]
widget_aspect = self.width() / self.height()
image_aspect = w / h
if widget_aspect > image_aspect:
base_height = self.height()
base_width = int(base_height * image_aspect)
else:
base_width = self.width()
base_height = int(base_width / image_aspect)
old_display_width = int(base_width * old_zoom)
old_display_height = int(base_height * old_zoom)
new_display_width = int(base_width * self.zoom_scale)
new_display_height = int(base_height * self.zoom_scale)
# 计算鼠标在显示图像中的相对位置
if old_display_width <= self.width():
old_x_offset = (self.width() - old_display_width) // 2
else:
old_x_offset = self.offset_x
if old_display_height <= self.height():
old_y_offset = (self.height() - old_display_height) // 2
else:
old_y_offset = self.offset_y
img_x_in_display = mouse_pos.x() - old_x_offset
img_y_in_display = mouse_pos.y() - old_y_offset
# 计算新的偏移以保持鼠标下的点不变
ratio_x = img_x_in_display / old_display_width if old_display_width > 0 else 0.5
ratio_y = img_y_in_display / old_display_height if old_display_height > 0 else 0.5
new_x_in_display = ratio_x * new_display_width
new_y_in_display = ratio_y * new_display_height
if new_display_width > self.width():
self.offset_x = mouse_pos.x() - new_x_in_display
else:
self.offset_x = 0
if new_display_height > self.height():
self.offset_y = mouse_pos.y() - new_y_in_display
else:
self.offset_y = 0
# 限制偏移范围
max_offset_x = max(0, new_display_width - self.width())
max_offset_y = max(0, new_display_height - self.height())
self.offset_x = max(-max_offset_x, min(0, self.offset_x))
self.offset_y = max(-max_offset_y, min(0, self.offset_y))
self.update_display()
# 更新状态栏显示缩放比例
if self.parent_window:
self.parent_window.statusBar().showMessage(f"缩放: {self.zoom_scale:.1f}x")
event.accept()
else:
event.ignore()
def dragEnterEvent(self, event):
"""拖拽进入事件"""
if event.mimeData().hasUrls():
# 检查是否是图片文件
urls = event.mimeData().urls()
if urls:
file_path = urls[0].toLocalFile()
if file_path.lower().endswith(('.png', '.jpg', '.jpeg', '.bmp', '.gif')):
event.acceptProposedAction()
# 显示拖拽提示
self.setStyleSheet("""
QLabel {
background-color: #1a4d2e;
color: #4CAF50;
font-size: 24px;
font-weight: bold;
border: 3px dashed #4CAF50;
border-radius: 10px;
}
""")
if self.image is None:
self.setText('✓ 松开鼠标即可上传图片')
def dragLeaveEvent(self, event):
"""拖拽离开事件"""
if self.image is None:
# 恢复原始样式
self.setStyleSheet("""
QLabel {
background-color: #2b2b2b;
color: #9E9E9E;
font-size: 24px;
font-weight: bold;
border: 3px dashed #555;
border-radius: 10px;
}
""")
self.setText('📁 点击"上传图片"按钮\n或\n拖拽图片到此处')
def dropEvent(self, event):
"""拖拽放下事件"""
if event.mimeData().hasUrls():
urls = event.mimeData().urls()
if urls:
file_path = urls[0].toLocalFile()
if file_path.lower().endswith(('.png', '.jpg', '.jpeg', '.bmp', '.gif')):
# 加载图片
if self.load_image(file_path):
if self.parent_window:
self.parent_window.statusBar().showMessage(f"已加载: {file_path}")
event.acceptProposedAction()
else:
if self.parent_window:
self.parent_window.statusBar().showMessage("加载图片失败!")
# 恢复提示
self.setStyleSheet("""
QLabel {
background-color: #2b2b2b;
color: #9E9E9E;
font-size: 24px;
font-weight: bold;
border: 3px dashed #555;
border-radius: 10px;
}
""")
self.setText('📁 点击"上传图片"按钮\n或\n拖拽图片到此处')
def resizeEvent(self, event):
"""窗口大小改变时重新显示图像"""
super().resizeEvent(event)
self.update_display()
class FaceWarpApp(QMainWindow):
"""捏脸APP主窗口"""
def __init__(self):
super().__init__()
self.init_ui()
def init_ui(self):
"""初始化用户界面"""
self.setWindowTitle("捏脸APP - 图像变形工具")
self.setGeometry(100, 100, 1600, 900)
self.setMinimumSize(1600, 800) # 设置最小窗口尺寸,确保所有按钮可见
# 创建中心部件
central_widget = QWidget()
self.setCentralWidget(central_widget)
# 主布局
main_layout = QVBoxLayout(central_widget)
main_layout.setSpacing(15)
main_layout.setContentsMargins(15, 15, 15, 15)
# 创建工具栏
self.create_toolbar()
# 创建图像画布
self.canvas = ImageCanvas(self)
main_layout.addWidget(self.canvas)
# 创建控制面板
control_panel = self.create_control_panel()
main_layout.addLayout(control_panel)
# 设置样式
self.setStyleSheet("""
QMainWindow {
background-color: #1a1a1a;
}
QWidget {
font-family: "Microsoft YaHei UI", "Segoe UI", Arial;
}
QPushButton {
background-color: #2196F3;
color: white;
border: none;
padding: 10px 20px;
border-radius: 6px;
font-size: 15px;
font-weight: bold;
min-width: 100px;
min-height: 42px;
}
QPushButton:hover {
background-color: #42A5F5;
}
QPushButton:pressed {
background-color: #1976D2;
}
QPushButton:checked {
background-color: #4CAF50;
}
QLabel {
color: #E0E0E0;
font-size: 16px;
font-weight: bold;
}
QSlider::groove:horizontal {
height: 10px;
background: #424242;
border-radius: 5px;
}
QSlider::handle:horizontal {
background: #2196F3;
width: 22px;
height: 22px;
margin: -6px 0;
border-radius: 11px;
}
QSlider::handle:horizontal:hover {
background: #42A5F5;
}
QToolBar {
background-color: #2d2d2d;
border: none;
spacing: 10px;
padding: 10px;
}
QToolButton {
background-color: #2196F3;
color: white;
border: none;
padding: 10px 18px;
border-radius: 6px;
font-size: 15px;
font-weight: bold;
min-width: 95px;
min-height: 42px;
}
QToolButton:hover {
background-color: #42A5F5;
}
QToolButton:pressed {
background-color: #1976D2;
}
QToolButton:checked {
background-color: #4CAF50;
}
QStatusBar {
background-color: #2d2d2d;
color: #E0E0E0;
font-size: 14px;
}
""")
def create_toolbar(self):
"""创建工具栏"""
from PyQt5.QtCore import QSize
toolbar = QToolBar()
toolbar.setMovable(False)
toolbar.setIconSize(QSize(28, 28))
toolbar.setToolButtonStyle(Qt.ToolButtonTextBesideIcon)
toolbar.setStyleSheet("""
QToolBar {
spacing: 8px;
}
""")
self.addToolBar(toolbar)
# 上传图片按钮
upload_action = QAction("📁 上传图片", self)
upload_action.triggered.connect(self.load_image)
toolbar.addAction(upload_action)
toolbar.addSeparator()
# 工具按钮
self.enlarge_btn = QAction("🔍 放大", self)
self.enlarge_btn.setCheckable(True)
self.enlarge_btn.triggered.connect(lambda: self.set_tool('enlarge'))
toolbar.addAction(self.enlarge_btn)
self.shrink_btn = QAction("🔎 缩小", self)
self.shrink_btn.setCheckable(True)
self.shrink_btn.triggered.connect(lambda: self.set_tool('shrink'))
toolbar.addAction(self.shrink_btn)
self.drag_btn = QAction("✋ 拖拽扭曲", self)
self.drag_btn.setCheckable(True)
self.drag_btn.triggered.connect(lambda: self.set_tool('drag'))
toolbar.addAction(self.drag_btn)
self.rotate_btn = QAction("🔄 旋转", self)
self.rotate_btn.setCheckable(True)
self.rotate_btn.triggered.connect(lambda: self.set_tool('rotate'))
toolbar.addAction(self.rotate_btn)
self.eraser_btn = QAction("🧹 橡皮擦", self)
self.eraser_btn.setCheckable(True)
self.eraser_btn.triggered.connect(lambda: self.set_tool('eraser'))
toolbar.addAction(self.eraser_btn)
toolbar.addSeparator()
# 重置按钮
reset_action = QAction("↺ 重置", self)
reset_action.triggered.connect(self.reset_image)
toolbar.addAction(reset_action)
# 保存按钮
save_action = QAction("💾 保存", self)
save_action.triggered.connect(self.save_image)
toolbar.addAction(save_action)
self.tool_buttons = [self.enlarge_btn, self.shrink_btn, self.drag_btn, self.rotate_btn, self.eraser_btn]
def create_control_panel(self):
"""创建控制面板"""
from PyQt5.QtWidgets import QButtonGroup, QRadioButton, QGroupBox, QLineEdit
from PyQt5.QtGui import QIntValidator, QDoubleValidator
layout = QHBoxLayout()
layout.setSpacing(20)
# 画笔半径控制
radius_label = QLabel("画笔半径:")
layout.addWidget(radius_label)
self.radius_slider = QSlider(Qt.Horizontal)
self.radius_slider.setMinimum(10)
self.radius_slider.setMaximum(800) # 提高到800
self.radius_slider.setValue(170) # 默认170
self.radius_slider.setMinimumWidth(250)
self.radius_slider.valueChanged.connect(self.update_brush_radius_from_slider)
layout.addWidget(self.radius_slider)
self.radius_value_label = QLabel("170 px")
self.radius_value_label.setMinimumWidth(70)
layout.addWidget(self.radius_value_label)
# 画笔半径输入框
self.radius_input = QLineEdit()
self.radius_input.setText("170")
self.radius_input.setMaximumWidth(60)
self.radius_input.setValidator(QIntValidator(10, 800))
self.radius_input.setStyleSheet("""
QLineEdit {
background-color: #3d3d3d;
color: #E0E0E0;
border: 2px solid #555;
border-radius: 4px;
padding: 5px;
font-size: 15px;
}
QLineEdit:focus {
border: 2px solid #2196F3;
}
""")
self.radius_input.returnPressed.connect(self.update_brush_radius_from_input)
self.radius_input.editingFinished.connect(self.update_brush_radius_from_input)
layout.addWidget(self.radius_input)
layout.addSpacing(30)
# 变化强度控制
strength_label = QLabel("变化强度:")
layout.addWidget(strength_label)
self.strength_slider = QSlider(Qt.Horizontal)
self.strength_slider.setMinimum(1) # 0.01
self.strength_slider.setMaximum(100) # 1.0
self.strength_slider.setValue(20) # 默认0.20
self.strength_slider.setMinimumWidth(250)
self.strength_slider.valueChanged.connect(self.update_effect_strength_from_slider)
layout.addWidget(self.strength_slider)
self.strength_value_label = QLabel("0.20")
self.strength_value_label.setMinimumWidth(50)
layout.addWidget(self.strength_value_label)
# 变化强度输入框
self.strength_input = QLineEdit()
self.strength_input.setText("0.20")
self.strength_input.setMaximumWidth(60)
# 允许输入0.01-1.0,最多3位小数(如0.001)
strength_validator = QDoubleValidator(0.01, 1.0, 3)
strength_validator.setNotation(QDoubleValidator.StandardNotation)
self.strength_input.setValidator(strength_validator)
self.strength_input.setStyleSheet("""
QLineEdit {
background-color: #3d3d3d;
color: #E0E0E0;
border: 2px solid #555;
border-radius: 4px;
padding: 5px;
font-size: 15px;
}
QLineEdit:focus {
border: 2px solid #2196F3;
}
""")
self.strength_input.returnPressed.connect(self.update_effect_strength_from_input)
self.strength_input.editingFinished.connect(self.update_effect_strength_from_input)
layout.addWidget(self.strength_input)
layout.addSpacing(30)
# 旋转方向控制
rotate_group_box = QGroupBox("旋转方向")
rotate_group_box.setStyleSheet("""
QGroupBox {
color: #E0E0E0;
font-size: 16px;
font-weight: bold;
border: 2px solid #424242;
border-radius: 8px;
margin-top: 10px;
padding-top: 10px;
}
QGroupBox::title {
subcontrol-origin: margin;
left: 15px;
padding: 0 5px;
}
QRadioButton {
color: #E0E0E0;
font-size: 15px;
spacing: 8px;
}
QRadioButton::indicator {
width: 20px;
height: 20px;
}
QRadioButton::indicator:unchecked {
border: 2px solid #666;
border-radius: 10px;
background: #2d2d2d;
}
QRadioButton::indicator:checked {
border: 2px solid #2196F3;
border-radius: 10px;
background: #2196F3;
}
""")
rotate_layout = QHBoxLayout()
rotate_layout.setSpacing(15)
self.clockwise_radio = QRadioButton("⟳ 顺时针")
self.clockwise_radio.setChecked(True)
self.clockwise_radio.toggled.connect(lambda: self.set_rotate_direction(1))
self.counterclockwise_radio = QRadioButton("⟲ 逆时针")
self.counterclockwise_radio.toggled.connect(lambda: self.set_rotate_direction(-1))
rotate_layout.addWidget(self.clockwise_radio)
rotate_layout.addWidget(self.counterclockwise_radio)
rotate_group_box.setLayout(rotate_layout)
layout.addWidget(rotate_group_box)
layout.addStretch()
return layout
def set_tool(self, tool_name):
"""设置当前工具"""
# 取消其他工具的选中状态
for btn in self.tool_buttons:
btn.setChecked(False)
# 设置当前工具
if tool_name == 'enlarge':
self.enlarge_btn.setChecked(True)
elif tool_name == 'shrink':
self.shrink_btn.setChecked(True)
elif tool_name == 'drag':
self.drag_btn.setChecked(True)
elif tool_name == 'rotate':
self.rotate_btn.setChecked(True)
elif tool_name == 'eraser':
self.eraser_btn.setChecked(True)
self.canvas.current_tool = tool_name
def update_brush_radius_from_slider(self, value):
"""从滑块更新画笔半径"""
self.canvas.brush_radius = value
self.radius_value_label.setText(f"{value} px")
self.radius_input.setText(str(value))
def update_brush_radius_from_input(self):
"""从输入框更新画笔半径"""
try:
value = int(self.radius_input.text())
value = max(10, min(800, value)) # 限制范围
self.canvas.brush_radius = value
self.radius_slider.setValue(value)
self.radius_value_label.setText(f"{value} px")
self.radius_input.setText(str(value))
except ValueError:
# 输入无效,恢复当前值
self.radius_input.setText(str(self.canvas.brush_radius))
def update_effect_strength_from_slider(self, value):
"""从滑块更新变化强度"""
strength = value / 100.0 # 转换为0.01-1.0
self.canvas.effect_strength = strength
self.strength_value_label.setText(f"{strength:.2f}")
self.strength_input.setText(f"{strength:.2f}")
def update_effect_strength_from_input(self):
"""从输入框更新变化强度"""
try:
value = float(self.strength_input.text())
value = max(0.01, min(1.0, value)) # 限制范围
self.canvas.effect_strength = value
self.strength_slider.setValue(int(value * 100))
self.strength_value_label.setText(f"{value:.2f}")
self.strength_input.setText(f"{value:.2f}")
except ValueError:
# 输入无效,恢复当前值
self.strength_input.setText(f"{self.canvas.effect_strength:.2f}")
def set_rotate_direction(self, direction):
"""设置旋转方向"""
self.canvas.rotate_direction = direction
def load_image(self):
"""加载图像"""
file_path, _ = QFileDialog.getOpenFileName(
self, "选择图片", "",
"图片文件 (*.png *.jpg *.jpeg *.bmp);;所有文件 (*.*)"
)
if file_path:
if self.canvas.load_image(file_path):
self.statusBar().showMessage(f"已加载: {file_path}")
else:
self.statusBar().showMessage("加载图片失败!")
def reset_image(self):
"""重置图像"""
self.canvas.reset_image()
self.statusBar().showMessage("已重置图像")
def save_image(self):
"""保存图像(支持中文路径)"""
if self.canvas.image is None:
self.statusBar().showMessage("没有可保存的图像!")
return
file_path, _ = QFileDialog.getSaveFileName(
self, "保存图片", "",
"PNG文件 (*.png);;JPEG文件 (*.jpg);;所有文件 (*.*)"
)
if file_path:
try:
# RGB转BGR
image_bgr = cv2.cvtColor(self.canvas.image, cv2.COLOR_RGB2BGR)
# 使用cv2.imencode()和tofile()保存,支持中文路径
# 根据文件扩展名确定编码格式
ext = file_path.lower().split('.')[-1]
if ext in ['jpg', 'jpeg']:
encode_param = [int(cv2.IMWRITE_JPEG_QUALITY), 95]
_, encoded_img = cv2.imencode('.jpg', image_bgr, encode_param)
else:
_, encoded_img = cv2.imencode('.png', image_bgr)
encoded_img.tofile(file_path)
self.statusBar().showMessage(f"已保存: {file_path}")
except Exception as e:
self.statusBar().showMessage(f"保存失败: {str(e)}")
def main():
app = QApplication(sys.argv)
window = FaceWarpApp()
window.show()
sys.exit(app.exec_())
if __name__ == '__main__':
main()
代码亮点:
- 1098行完整代码
- 详细中文注释
- 面向对象设计
- 模块化结构
- 支持中文路径
系统要求
| 项目 | 要求 |
|---|---|
| 操作系统 | Windows / macOS / Linux |
| Python版本 | ≥ 3.6 |
| 内存 | 建议 2GB 以上 |
| 磁盘空间 | 约 500MB(含依赖库) |
| 支持格式 | PNG, JPG, JPEG, BMP, GIF |
常见问题 FAQ
Q1: 运行时提示"No module named ‘PyQt5’"
解决方案:
pip install -i https://pypi.tuna.tsinghua.edu.cn/simple PyQt5
Q2: 图片变形后画质下降怎么办?
原因:使用了过大的画笔半径和强度
建议:
- 使用较小的画笔半径(50-150)
- 降低变化强度(0.1-0.3)
- 多次小幅度变形,避免一次性大幅度变形
Q3: 支持哪些图片格式?
支持常见的图片格式:PNG、JPG、JPEG、BMP、GIF
Q4: 如何撤销操作?
目前没有逐步撤销功能,但可以:
- 使用
橡皮擦工具局部恢复原图 - 点击
重置按钮恢复到原始状态
Q5: Windows下运行报错"DLL load failed"
解决方案:
# 重新安装opencv-python
pip uninstall opencv-python
pip install -i https://pypi.tuna.tsinghua.edu.cn/simple opencv-python
Q6: 中文路径下无法加载图片?
本工具已经完美支持中文路径!使用了 np.fromfile() 和 tofile() 方法。
Q7: 能处理多大的图片?
理论上没有限制,但建议:
- 普通照片:≤ 4000×3000 像素
- 高分辨率图片:可能会变慢,建议先缩小
未来改进方向
- 撤销/重做功能:支持多步撤销
- 图层系统:支持多图层编辑
- 更多工具:添加模糊、锐化等滤镜
- 预设效果:一键应用常见变形
- 批量处理:支持批量处理多张图片
- 动画导出:导出变形过程为GIF或视频
- AI辅助:自动识别人脸关键点
- 性能优化:GPU加速处理
总结
FacePrank 是一个功能丰富、使用简单的照片整蛊工具。通过五大核心变形工具,你可以轻松制作各种搞笑照片。无论是恶搞朋友、制作表情包,还是进行创意设计,这个工具都能满足你的需求!
核心优势:
- ✅ 纯Python实现,代码简洁易懂
- ✅ 基于NumPy向量化运算,性能优秀
- ✅ 现代化UI设计,操作流畅
- ✅ 完美支持中文路径
- ✅ 开箱即用,无需复杂配置
附录:requirements.txt
PyQt5>=5.15.0
opencv-python>=4.5.0
numpy>=1.19.0
安装命令(使用清华镜像源):
pip install -i https://pypi.tuna.tsinghua.edu.cn/simple -r requirements.txt
单独安装各个包:
pip install -i https://pypi.tuna.tsinghua.edu.cn/simple PyQt5>=5.15.0
pip install -i https://pypi.tuna.tsinghua.edu.cn/simple opencv-python>=4.5.0
pip install -i https://pypi.tuna.tsinghua.edu.cn/simple numpy>=1.19.0
以上就是Python+pyqt5实现一个图像变形工具的详细内容,更多关于Python图像变形的资料请关注脚本之家其它相关文章!