
使用Python实现一个强大的文件系统结构创建器
作者:winfredzhang
本文将深入分析一个基于 wxPython 的文件系统结构创建器程序,展示如何通过 CustomTreeCtrl 组件实现文件夹和文件的可视化管理,并提供添加、删除、导入、清空以及创建文件系统结构的强大功能。这个程序不仅适合开发者快速构建文件系统原型,还为学习 wxPython 和 GUI 编程提供了绝佳案例。
程序功能概览
该程序是一个交互式的文件系统结构创建工具,核心功能包括:
- 选择目标文件夹:通过文件夹选择对话框,设置文件系统结构的输出路径。
- 导入现有文件夹结构:扫描指定文件夹,自动将文件和子文件夹显示在树状控件中。
- 手动编辑树结构:支持添加文件夹/文件节点、删除节点、编辑节点名称。
- 清空树结构:一键清空树控件,恢复初始状态。
- 创建文件系统:根据树控件中的结构,在指定路径生成实际的文件夹和文件。
这些功能通过直观的 GUI 界面实现,用户可以轻松构建、修改并生成复杂文件系统结构,适用于插件开发、项目初始化等场景。
核心技术与实现
技术栈
- wxPython:一个强大的跨平台 GUI 框架,用于构建窗口、按钮、文本框和树控件。
- wx.lib.agw.customtreectrl:扩展的树控件,支持多选、可编辑标签和自定义图标。
- Python 的 os 模块:用于文件系统操作,如扫描文件夹 (os.scandir) 和创建文件/文件夹 (os.makedirs, open)。
- 正则表达式 (re):用于验证文件名和文件夹名的合法性。
- Logging 模块:记录操作日志,便于调试和错误追踪。
界面设计
程序的界面采用 wx.Frame 作为主窗口,包含以下主要组件:
- 目标文件夹选择器:由 wx.TextCtrl(只读)和 wx.Button 组成,用于选择输出路径并显示。
- 树状控件 (CustomTreeCtrl):展示文件系统结构,支持多选、可编辑标签和图标(文件夹和文件)。
- 按钮栏:包含“导入文件夹结构”、“添加文件夹”、“添加文件”、“删除节点”、“清空树”和“创建”按钮,布局使用 wx.BoxSizer 实现弹性排列。
- 布局管理:通过 wx.BoxSizer 实现垂直布局,确保控件自适应窗口大小。
关键功能实现
1. 选择目标文件夹
on_choose_target 方法通过 wx.DirDialog 让用户选择目标文件夹,仅更新根节点名称和目标路径,保留现有树结构:
def on_choose_target(self, event):
    dlg = wx.DirDialog(self, "选择目标文件夹", style=wx.DD_DEFAULT_STYLE)
    if dlg.ShowModal() == wx.ID_OK:
        self.target_folder = dlg.GetPath()
        self.target_text.SetValue(self.target_folder)
        self.tree.SetItemText(self.root, os.path.basename(self.target_folder) or "根节点")
        logging.debug(f"Updated target folder to {self.target_folder}, root node text to {self.tree.GetItemText(self.root)}")
    dlg.Destroy()
此方法避免了清空子节点,允许用户在不同目标路径间切换而保留树结构。
2. 导入文件夹结构
on_import_folder 和 populate_tree_from_folder 方法实现从文件系统导入结构:
def on_import_folder(self, event):
dlg = wx.DirDialog(self, "选择要导入的文件夹", style=wx.DD_DEFAULT_STYLE)
if dlg.ShowModal() == wx.ID_OK:
import_folder = dlg.GetPath()
self.tree.DeleteChildren(self.root)
self.tree.SetItemText(self.root, os.path.basename(import_folder) or "根节点")
self.target_folder = import_folder
self.target_text.SetValue(self.target_folder)
self.populate_tree_from_folder(self.root, import_folder)
self.tree.Expand(self.root)
logging.debug(f"Imported folder structure from {import_folder}")
dlg.Destroy()
def populate_tree_from_folder(self, parent_item, folder_path):
try:
for entry in os.scandir(folder_path):
if entry.is_dir():
new_item = self.tree.AppendItem(parent_item, entry.name)
self.tree.SetItemImage(new_item, 0)
self.populate_tree_from_folder(new_item, entry.path)
elif entry.is_file():
new_item = self.tree.AppendItem(parent_item, f"[FILE] {entry.name}")
self.tree.SetItemImage(new_item, 1)
except Exception as e:
wx.MessageBox(f"无法读取文件夹 '{folder_path}': {e}", "错误", wx.OK | wx.ICON_ERROR)使用 os.scandir 高效遍历文件夹,递归构建树结构,并为文件夹和文件设置不同图标,提升可视化效果。
3. 清空树结构
新增的 on_clear_tree 方法清空树控件并重置状态:
def on_clear_tree(self, event):
    self.tree.DeleteChildren(self.root)
    self.tree.SetItemText(self.root, "根节点")
    self.target_folder = ""
    self.target_text.SetValue("")
    self.tree.SelectItem(self.root)
    logging.debug("Cleared tree and reset root node")
    wx.MessageBox("树已清空!", "提示", wx.OK | wx.ICON_INFORMATION)
此功能允许用户快速重置树控件,适合在需要全新开始时使用。
4. 添加和删除节点
on_add_folder 和 on_add_file 方法支持手动添加节点,结合 is_valid_name 验证名称合法性:
def is_valid_name(self, name):
    invalid_chars = r'[<>:"/\\|?*\x00-\x1F]'
    if not name or re.search(invalid_chars, name) or len(name.strip()) == 0:
        return False
    return True
on_delete_node 确保不能删除根节点,并通过确认对话框防止误操作。
5. 创建文件系统
on_create_structure 递归遍历树控件,生成实际文件和文件夹:
def create_nodes(parent_item, parent_path):
    item, cookie = self.tree.GetFirstChild(parent_item)
    while item and item.IsOk():
        node_text = self.tree.GetItemText(item)
        current_path = os.path.join(parent_path, node_text.replace("[FILE] ", ""))
        if node_text.startswith("[FILE]"):
            try:
                if os.path.exists(current_path):
                    dlg = wx.MessageDialog(self, f"文件 '{current_path}' 已存在,是否覆盖?",
                                         "警告", wx.YES_NO | wx.ICON_WARNING)
                    if dlg.ShowModal() != wx.ID_YES:
                        item, cookie = self.tree.GetNextChild(parent_item, cookie)
                        continue
                with open(current_path, 'w') as f:
                    pass
            except Exception as e:
                wx.MessageBox(f"创建文件 '{current_path}' 失败: {e}", "错误", wx.OK | wx.ICON_ERROR)
        else:
            try:
                os.makedirs(current_path, exist_ok=True)
                create_nodes(item, current_path)
            except Exception as e:
                wx.MessageBox(f"创建文件夹 '{current_path}' 失败: {e}", "错误", wx.OK | wx.ICON_ERROR)
        item, cookie = self.tree.GetNextChild(parent_item, cookie)
此方法处理文件覆盖、权限问题,并通过日志记录操作细节。
健壮性与错误处理
- 名称验证:防止非法字符(如 /, *)导致文件系统错误。
- 权限检查:在创建文件系统前验证目标文件夹的可写性。
- 节点有效性:通过 item and item.IsOk() 避免 NoneType 错误(如之前的 'lsok' 问题)。
- 日志记录:详细日志帮助开发者调试,记录每个节点的操作。
- 用户提示:通过 wx.MessageBox 提供清晰的错误信息和操作确认。
使用场景
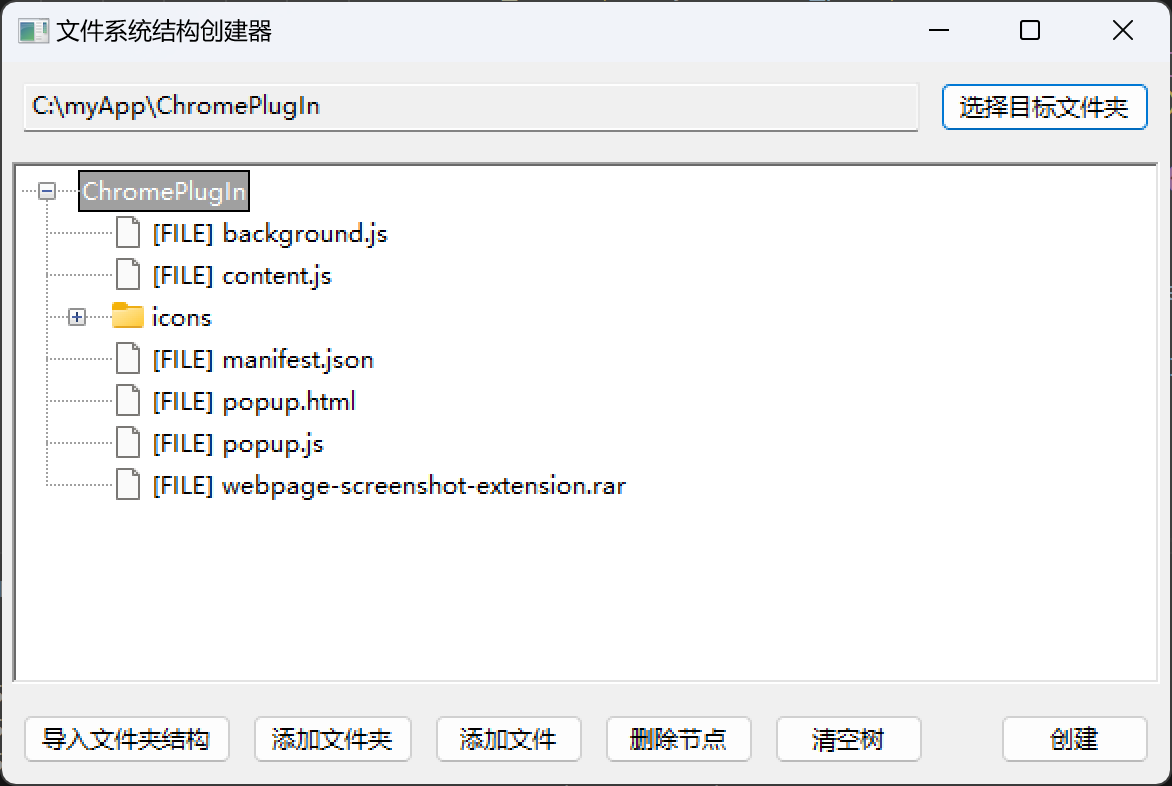
以创建 Chrome 插件目录结构为例:
点击“导入文件夹结构”,选择 C:\myApp\ChromePlugIn,树控件显示 icons 等子目录和文件。
添加或删除节点,如在 icons 下添加 [FILE] icon.png。
点击“选择目标文件夹”,选择 C:\Users\<YourUser>\Desktop\test,根节点更新为 test,但 icons 等节点保留。
点击“创建”,在 C:\Users\<YourUser>\Desktop\test 生成完整结构。
若需重新开始,点击“清空树”重置。
运行结果
到此这篇关于使用Python实现一个强大的文件系统结构创建器的文章就介绍到这了,更多相关Python文件系统结构创建器内容请搜索脚本之家以前的文章或继续浏览下面的相关文章希望大家以后多多支持脚本之家!