
基于python实现usb热插拔检测
作者:mahuifa
这篇文章主要为大家详细介绍了如何使用Python实现用于在Linux系统中监测USB设备的热插拔,文中的示例代码讲解详细,感兴趣的小伙伴可以跟随小编一起学习一下
1 概述
定义一个名为USBMonitor的类,用于在Linux系统中监测USB设备的热插拔事件。
该类利用了pyudev库来监听内核级设备事件,并且可以为USB设备的插入和移除事件注册回调函数。
主要功能特性
- 基于pyudev库监听内核级设备事件:pyudev是一个用于与Linux系统中的udev(设备管理器)交互的库,可以用来监听 设备事件。
- 支持USB设备插入/移除事件回调:用户可以通过传入回调函数来处理USB设备的插入和移除事件。
- 自动过滤非USB设备事件:类内部使用filter_by(subsystem='usb')方法,确保只监听USB子系统的事件。
- 支持设备详细信息获取:提供设备的详细信息,包括厂商ID、产品ID、序列号和名称等。
pyudev概述
pyudev 是 Linux 系统下与 udev 设备管理子系统交互的 Python 绑定库。它提供对底层硬件设备的细粒度控制能力,支持:
- 设备枚举:遍历系统中的所有设备
- 属性查询:获取设备详细信息(厂商ID、产品ID等)
- 事件监控:实时监听 设备插拔事件
- 规则管理:与 udev 规则系统集成(需配合系统配置)
类的主要方法:
- __init__:初始化监测器,设置回调函数。
- _parse_device_info:解析设备信息,将设备对象转换为包含厂商ID、产品ID等信息的字典。
- _event_handler:统一处理设备事件,根据事件类型调用相应的回调函数。
- start_monitoring:启动事件监听循环,持续监听 设备事件并调用事件处理器。
- start:在单独的线程中启动监测循环,以确保主线程不受阻塞。
- stop:安全停止监测,设置停止标志并等待监测线程结束。
环境说明
| 环境 | 版本 |
|---|---|
| python | V3.10 |
| 系统 | ubuntu22.04 |
| 依赖 | pyudev |
依赖安装
pip install pyudev
2 实现代码
import pyudev
import threading
import time


class USBMonitor:
    """
    Linux系统USB设备热插拔监测
    功能特性:
    - 基于pyudev库监听内核级设备事件
    - 支持USB设备插入/移除事件回调
    - 自动过滤非USB设备事件
    - 支持设备详细信息获取(厂商ID、产品ID等)
    """

    def __init__(self, on_device_added=None, on_device_removed=None):
        """
        初始化监测器
        :param on_device_added:   插入回调函数 func(device_info_dict)
        :param on_device_removed: 移除回调函数 func(device_info_dict)
        """
        self.context = pyudev.Context()  # 创建pyudev上下文,用于与udev交互
        self.monitor = pyudev.Monitor.from_netlink(self.context)  # 创建监测器,监听内核设备事件
        self.monitor.filter_by(subsystem='usb')  # 只监听USB子系统的事件

        self.on_device_added = on_device_added  # USB设备插入事件的回调函数
        self.on_device_removed = on_device_removed  # USB设备移除事件的回调函数
        self.monitor_thread = None  # 监测线程
        self.running = False  # 标志监测是否正在运行

    def _parse_device_info(self, device):
        """解析设备信息为字典
        :param device: 设备对象
        :return: 包含设备信息的字典
        """
        return {
            'action': device.action,  # 设备事件类型(add/remove)
            'devnode': device.device_node,  # 设备节点路径
            'vendor_id': device.get('ID_VENDOR_ID'),  # 厂商ID
            'product_id': device.get('ID_MODEL_ID'),  # 产品ID
            'serial': device.get('ID_SERIAL_SHORT'),  # 设备序列号
            'name': device.get('ID_MODEL')  # 设备名称
        }

    def _event_handler(self, device):
        """统一事件处理器
        根据设备事件类型调用相应的回调函数
        :param device: 设备对象
        """
        info = self._parse_device_info(device)  # 解析设备信息
        if device.action == 'add':  # 设备插入事件
            if callable(self.on_device_added):  # 检查回调函数是否可调用
                self.on_device_added(info)
        elif device.action == 'remove':  # 设备移除事件
            if callable(self.on_device_removed):  # 检查回调函数是否可调用
                self.on_device_removed(info)

    def start_monitoring(self):
        """启动事件监听循环
        在循环中监听 设备事件并调用事件处理器
        """
        self.running = True  # 设置运行标志
        print("[USB Monitor] 开始监测USB设备...")
        for device in iter(self.monitor.poll, None):  # 持续监听 设备事件
            if not self.running:  # 如果停止标志被设置,退出循环
                break
            self._event_handler(device)  # 调用事件处理器

    def start(self):
        """启动监测线程
        在单独的线程中运行监测循环
        """
        if not self.monitor_thread or not self.monitor_thread.is_alive():  # 检查线程是否已启动
            self.monitor_thread = threading.Thread(target=self.start_monitoring)  # 创建新线程
            self.monitor_thread.daemon = True  # 设置为守护线程
            self.monitor_thread.start()  # 启动线程

    def stop(self):
        """安全停止监测
        停止监测线程并等待其结束
        """
        self.running = False  # 设置停止标志
        if self.monitor_thread and self.monitor_thread.is_alive():  # 检查线程是否仍在运行
            self.monitor_thread.join(timeout=2)  # 等待线程结束,超时时间为2秒


# 使用示例
if __name__ == "__main__":
    def device_added_callback(device_info):
        """设备插入回调函数
        :param device_info: 包含设备信息的字典
        """
        print(f"[插入] 设备接入: {device_info['name']}")
        print(f"    厂商ID: {device_info['vendor_id']}")
        print(f"    产品ID: {device_info['product_id']}")
        print(f"    设备路径: {device_info['devnode']}")


    def device_removed_callback(device_info):
        """设备移除回调函数
        :param device_info: 包含设备信息的字典[README](USB热插拔监测.assets/README.md)
        """
        print(f"[移除] 设备断开: {device_info['name']}")
        print(f"    设备路径: {device_info['devnode']}")


    monitor = LinuxUSBMonitor(
        on_device_added=device_added_callback,  # 设置插入回调函数
        on_device_removed=device_removed_callback  # 设置移除回调函数
    )

    try:
        monitor.start()  # 启动USB监测
        print("监测运行中,按Ctrl+C停止...")
        while True:
            time.sleep(1)  # 主线程保持运行
    except KeyboardInterrupt:
        monitor.stop()  # 停止USB监测
        print("\n监测已停止")
3 演示效果

4.方法补充
下面我们来看看如何在Windows平台实现USB设备实时监控类
实现代码
import wmi
import threading
import time
import pythoncom  # 用于处理COM库的线程安全初始化


class USBMonitor:
    """
    USB设备实时监控类(Windows平台专用)
    功能特性:
    - 基于WMI实现设备热插拔事件监听
    - 支持设备插入/移除的双向回调机制
    - 使用独立监控线程避免阻塞主程序
    - 自动处理COM库线程初始化问题
    """

    def __init__(self, on_device_added=None, on_device_removed=None):
        """
        初始化监控实例
        :param on_device_added:   设备插入回调函数,格式 func(device_obj)
        :param on_device_removed: 设备移除回调函数,格式 func(device_obj)
        """
        self.on_device_added = on_device_added
        self.on_device_removed = on_device_removed
        self.monitor_thread = threading.Thread(target=self.start_monitoring)
        self.monitor_thread.daemon = True  # 设为守护线程确保主程序退出时自动终止
        self.thread_running = False  # 线程运行状态标志

    def get_all_devices(self):
        """获取当前已连接的USB设备列表(快照)"""
        c = wmi.WMI(moniker="root/cimv2")
        return c.Win32_USBControllerDevice()  # 返回Win32_USBControllerDevice对象集合

    def device_added_callback(self, new_device):
        """内部设备插入事件处理器"""
        if callable(self.on_device_added):  # 安全检查回调函数
            self.on_device_added(new_device)

    def device_removed_callback(self, removed_device):
        """内部设备移除事件处理器"""
        if callable(self.on_device_removed):
            self.on_device_removed(removed_device)

    def start_monitoring(self):
        """监控线程主循环(核心逻辑)"""
        pythoncom.CoInitialize()  # 每个线程必须独立初始化COM库
        try:
            c = wmi.WMI(moniker="root/cimv2")
            # 配置插入事件监听器(1秒轮询间隔)
            arr_filter = c.Win32_PnPEntity.watch_for(
                notification_type="creation",
                delay_secs=1
            )
            # 配置移除事件监听器
            rem_filter = c.Win32_PnPEntity.watch_for(
                notification_type="deletion",
                delay_secs=1
            )

            self.thread_running = True
            print("[监控系统] USB设备监控服务启动")
            while self.thread_running:
                # 非阻塞式检测插入事件(0.5秒超时)
                try:
                    new_device = arr_filter(0.5)
                    self.device_added_callback(new_device)
                except wmi.x_wmi_timed_out:
                    pass  # 正常超时,继续循环

                # 非阻塞式检测移除事件
                try:
                    removed_device = rem_filter(0.5)
                    self.device_removed_callback(removed_device)
                except wmi.x_wmi_timed_out:
                    pass

        except KeyboardInterrupt:
            print("\n[监控系统] 用户主动终止监控")
        finally:
            pythoncom.CoUninitialize()  # 必须释放COM资源
            print("[监控系统] 监控服务已安全关闭")

    def start(self):
        """启动监控服务"""
        if not self.monitor_thread.is_alive():
            self.monitor_thread.start()

    def stop(self):
        """安全停止监控服务"""
        self.thread_running = False
        if self.monitor_thread.is_alive():
            self.monitor_thread.join(timeout=2)  # 等待线程结束


# 示例回调实现
def on_device_added(device):
    """设备插入事件处理示例"""
    print(f"[事件] 新设备接入: {device.Description}")


def on_device_removed(device):
    """设备移除事件处理示例"""
    print(f"[事件] 设备移除: {device.Description}")


# 使用示例
if __name__ == "__main__":
    # 初始化带回调的监控实例
    monitor = USBMonitor(on_device_added, on_device_removed)

    try:
        monitor.start()
        print("主程序运行中,按Ctrl+C停止监控...")
        while True:  # 主线程保持活动
            time.sleep(1)
    except KeyboardInterrupt:
        monitor.stop()
        print("程序正常退出")
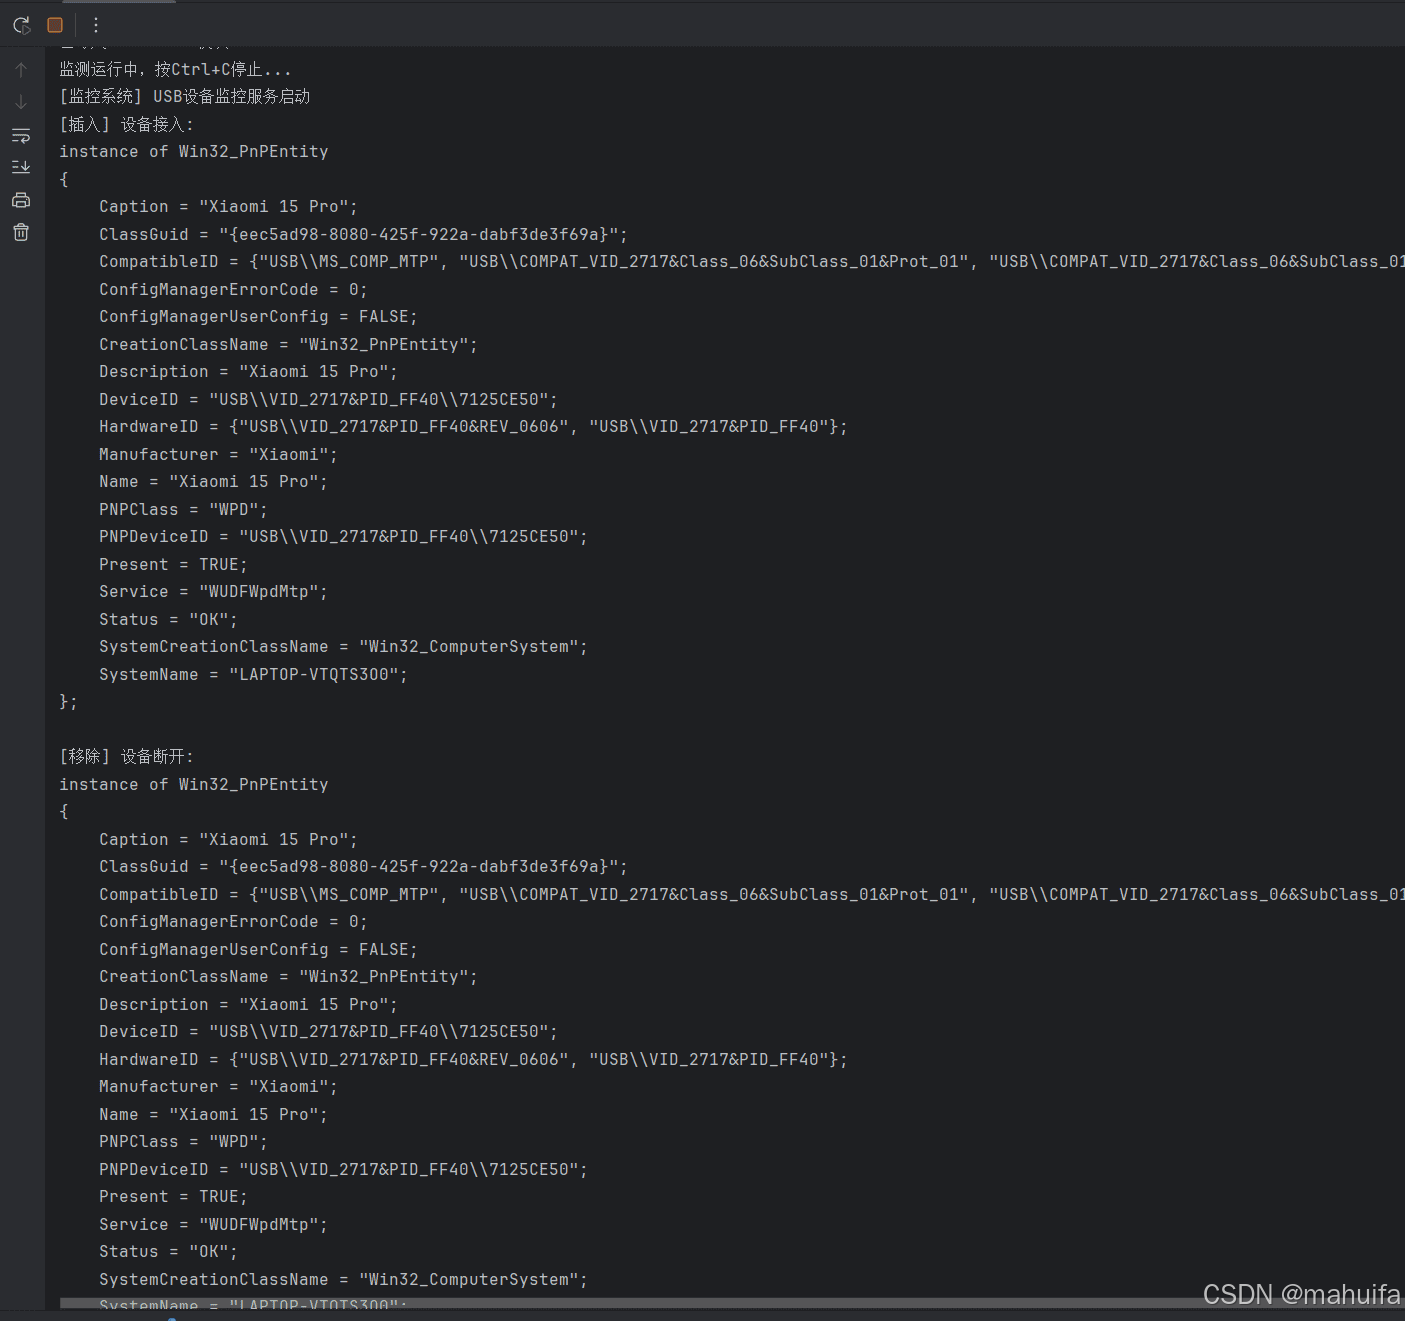
演示效果
到此这篇关于基于python实现usb热插拔检测的文章就介绍到这了,更多相关python监测usb热插拔内容请搜索脚本之家以前的文章或继续浏览下面的相关文章希望大家以后多多支持脚本之家!