
Python基于YOLOv8和OpenCV实现车道线和车辆检测功能
作者:old_power
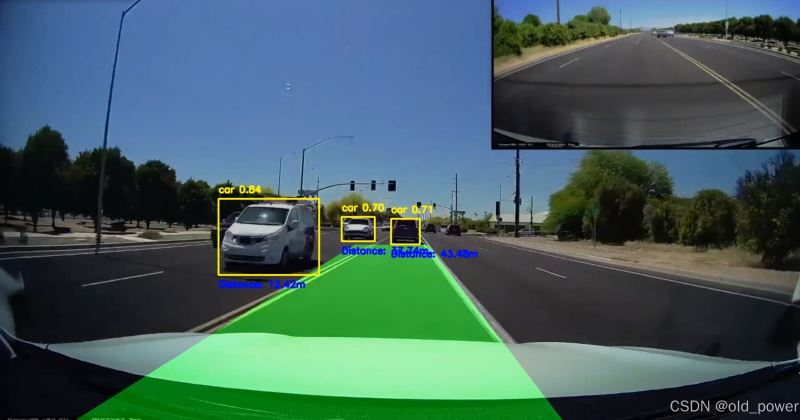
使用YOLOv8(You Only Look Once)和OpenCV实现车道线和车辆检测,目标是创建一个可以检测道路上的车道并识别车辆的系统,并估计它们与摄像头的距离,这篇文章主要介绍了Python基于YOLOv8和OpenCV实现车道线和车辆检测,需要的朋友可以参考下
使用YOLOv8(You Only Look Once)和OpenCV实现车道线和车辆检测,目标是创建一个可以检测道路上的车道并识别车辆的系统,并估计它们与摄像头的距离。该项目结合了计算机视觉技术和深度学习物体检测。
1、系统主要功能
- 车道检测:使用边缘检测和霍夫线变换检测道路车道。
- 汽车检测:使用 YOLOv8 模型识别汽车并在汽车周围绘制边界框。
- 距离估计:使用边界框大小计算检测到的汽车与摄像头的距离。
2、环境要求
- OpenCV:用于图像处理和车道检测。
- Ultralytics YOLOv8:用于车辆检测。
- NumPy:用于数组操作。
pip install opencv-python-headless numpy ultralytics
opencv-python 和 opencv-python-headless 区别是 OpenCV 的 Python 包,主要区别在于是否包含 GUI 相关的功能。
opencv-python
- 包含 GUI 功能:支持窗口显示、鼠标事件等图形界面操作。
- 依赖:需要 GUI 库(如 GTK、Qt)支持。
- 适用场景:适用于需要显示图像或与用户交互的环境,如桌面应用。
opencv-python-headless
- 不包含 GUI 功能:去除了窗口显示和用户交互功能。
- 依赖:无需 GUI 库,适合无图形界面的环境。
- 适用场景:适用于服务器或无图形界面的环境,如远程服务器、Docker 容器。
3、代码
import cv2
import numpy as np
import math
import time
from ultralytics import YOLO  # YOLOv8 module
# Function to mask out the region of interest
def region_of_interest(img, vertices):
    mask = np.zeros_like(img)
    match_mask_color = 255
    cv2.fillPoly(mask, vertices, match_mask_color)
    masked_image = cv2.bitwise_and(img, mask)
    return masked_image
# Function to draw the filled polygon between the lane lines
def draw_lane_lines(img, left_line, right_line, color=[0, 255, 0], thickness=10):
    line_img = np.zeros_like(img)
    poly_pts = np.array([[
        (left_line[0], left_line[1]),
        (left_line[2], left_line[3]),
        (right_line[2], right_line[3]),
        (right_line[0], right_line[1])
    ]], dtype=np.int32)
    # Fill the polygon between the lines
    cv2.fillPoly(line_img, poly_pts, color)
    # Overlay the polygon onto the original image
    img = cv2.addWeighted(img, 0.8, line_img, 0.5, 0.0)
    return img
# The lane detection pipeline
def pipeline(image):
    height = image.shape[0]
    width = image.shape[1]
    region_of_interest_vertices = [
        (0, height),
        (width / 2, height / 2),
        (width, height),
    ]
    # Convert to grayscale and apply Canny edge detection
    gray_image = cv2.cvtColor(image, cv2.COLOR_RGB2GRAY)
    cannyed_image = cv2.Canny(gray_image, 100, 200)
    # Mask out the region of interest
    cropped_image = region_of_interest(
        cannyed_image,
        np.array([region_of_interest_vertices], np.int32)
    )
    # Perform Hough Line Transformation to detect lines
    lines = cv2.HoughLinesP(
        cropped_image,
        rho=6,
        theta=np.pi / 60,
        threshold=160,
        lines=np.array([]),
        minLineLength=40,
        maxLineGap=25
    )
    # Separating left and right lines based on slope
    left_line_x = []
    left_line_y = []
    right_line_x = []
    right_line_y = []
    if lines is None:
        return image
    for line in lines:
        for x1, y1, x2, y2 in line:
            slope = (y2 - y1) / (x2 - x1) if (x2 - x1) != 0 else 0
            if math.fabs(slope) < 0.5:  # Ignore nearly horizontal lines
                continue
            if slope <= 0:  # Left lane
                left_line_x.extend([x1, x2])
                left_line_y.extend([y1, y2])
            else:  # Right lane
                right_line_x.extend([x1, x2])
                right_line_y.extend([y1, y2])
    # Fit a linear polynomial to the left and right lines
    min_y = int(image.shape[0] * (3 / 5))  # Slightly below the middle of the image
    max_y = image.shape[0]  # Bottom of the image
    if left_line_x and left_line_y:
        poly_left = np.poly1d(np.polyfit(left_line_y, left_line_x, deg=1))
        left_x_start = int(poly_left(max_y))
        left_x_end = int(poly_left(min_y))
    else:
        left_x_start, left_x_end = 0, 0  # Defaults if no lines detected
    if right_line_x and right_line_y:
        poly_right = np.poly1d(np.polyfit(right_line_y, right_line_x, deg=1))
        right_x_start = int(poly_right(max_y))
        right_x_end = int(poly_right(min_y))
    else:
        right_x_start, right_x_end = 0, 0  # Defaults if no lines detected
    # Create the filled polygon between the left and right lane lines
    lane_image = draw_lane_lines(
        image,
        [left_x_start, max_y, left_x_end, min_y],
        [right_x_start, max_y, right_x_end, min_y]
    )
    return lane_image
# Function to estimate distance based on bounding box size
def estimate_distance(bbox_width, bbox_height):
    # For simplicity, assume the distance is inversely proportional to the box size
    # This is a basic estimation, you may use camera calibration for more accuracy
    focal_length = 1000  # Example focal length, modify based on camera setup
    known_width = 2.0  # Approximate width of the car (in meters)
    distance = (known_width * focal_length) / bbox_width  # Basic distance estimation
    return distance
# Main function to read and process video with YOLOv8
def process_video():
    # Load the YOLOv8 model
    model = YOLO('weights/yolov8n.pt')
    # 或者加载官方模型
    # model = YOLO("yolov8n.pt")  # load an official model
    # Open the video file
    cap = cv2.VideoCapture('video/video.mp4')
    # Check if video opened successfully
    if not cap.isOpened():
        print("Error: Unable to open video file.")
        return
    # Set the desired frame rate
    target_fps = 30
    frame_time = 1.0 / target_fps  # Time per frame to maintain 30fps
    # Resize to 720p (1280x720)
    cap.set(cv2.CAP_PROP_FRAME_WIDTH, 1280)
    cap.set(cv2.CAP_PROP_FRAME_HEIGHT, 720)
    # Loop through each frame
    while cap.isOpened():
        ret, frame = cap.read()
        if not ret:
            break
        # Resize frame to 720p
        resized_frame = cv2.resize(frame, (1280, 720))
        # Run the lane detection pipeline
        lane_frame = pipeline(resized_frame)
        # Run YOLOv8 to detect cars in the current frame
        results = model(resized_frame)
        # Process the detections from YOLOv8
        for result in results:
            boxes = result.boxes
            for box in boxes:
                x1, y1, x2, y2 = map(int, box.xyxy[0])  # Bounding box coordinates
                conf = box.conf[0]  # Confidence score
                cls = int(box.cls[0])  # Class ID
                # Only draw bounding boxes for cars with confidence >= 0.5
                if model.names[cls] == 'car' and conf >= 0.5:
                    label = f'{model.names[cls]} {conf:.2f}'
                    # Draw the bounding box
                    cv2.rectangle(lane_frame, (x1, y1), (x2, y2), (0, 255, 255), 2)
                    cv2.putText(lane_frame, label, (x1, y1 - 10),
                                cv2.FONT_HERSHEY_SIMPLEX, 0.5, (0, 255, 255), 2)
                    # Estimate the distance of the car
                    bbox_width = x2 - x1
                    bbox_height = y2 - y1
                    distance = estimate_distance(bbox_width, bbox_height)
                    # Display the estimated distance
                    distance_label = f'Distance: {distance:.2f}m'
                    cv2.putText(lane_frame, distance_label, (x1, y2 + 20),
                                cv2.FONT_HERSHEY_SIMPLEX, 0.5, (255, 0, 0), 2)
        # Display the resulting frame with both lane detection and car detection
        cv2.imshow('Lane and Car Detection', lane_frame)
        # Limit the frame rate to 30fps
        time.sleep(frame_time)
        # Break the loop when 'q' is pressed
        if cv2.waitKey(1) & 0xFF == ord('q'):
            break
    # Release video capture and close windows
    cap.release()
    cv2.destroyAllWindows()
# Run the video processing function
process_video()
4、工作原理
4.1 车道线检测 Pipeline
车道线检测包括一下几个步骤:
Step 1: 屏蔽感兴趣区域(ROI)
只处理图像的下半部分(车道线通常是可见的)。
def region_of_interest(img, vertices):
    mask = np.zeros_like(img)
    match_mask_color = 255
    cv2.fillPoly(mask, vertices, match_mask_color)
    masked_image = cv2.bitwise_and(img, mask)
    return masked_image
Step 2: 使用Canny进行边缘检测
将图像转换为灰度,并应用Canny边缘检测来突出显示边缘。
gray_image = cv2.cvtColor(image, cv2.COLOR_RGB2GRAY)
cannyed_image = cv2.Canny(gray_image, 100, 200)
Step 3: 霍夫线变换
霍夫线变换用于检测当前车道的线段。
lines = cv2.HoughLinesP(
    cropped_image,
    rho=6,
    theta=np.pi / 60,
    threshold=160,
    lines=np.array([]),
    minLineLength=40,
    maxLineGap=25
)
4.2 使用YOLOv8进行车辆检测
Step 1: 加载YOLOv8模型
我们使用预训练的YOLOv8模型来检测每一帧中的汽车(或者使用官方提供的模型)。
from ultralytics import YOLO
model = YOLO('weights/yolov8n.pt')
# model = YOLO('yolov8n.pt') #官方提供的模型
Step 2: 绘制边界框
对于每一辆检测到的汽车,绘制边界框,并显示类名(汽车)和置信度分数。
for box in boxes:
    x1, y1, x2, y2 = map(int, box.xyxy[0])
    conf = box.conf[0]
    if model.names[cls] == 'car' and conf >= 0.5:
        label = f'{model.names[cls]} {conf:.2f}'
        cv2.rectangle(lane_frame, (x1, y1), (x2, y2), (0, 255, 255), 2)
        cv2.putText(lane_frame, label, (x1, y1 - 10), cv2.FONT_HERSHEY_SIMPLEX, 0.5, (0, 255, 255), 2)
Step 3:. 距离估计
根据边界框的大小估计到每辆检测到的汽车的距离。
def estimate_distance(bbox_width, bbox_height):
    focal_length = 1000  # Example focal length
    known_width = 2.0  # Approximate width of a car (in meters)
    distance = (known_width * focal_length) / bbox_width
    return distance
Step 4:. 视频处理 Pipeline
将车道检测、车辆检测和距离估计结合到一个实时视频处理pipeline中。
while cap.isOpened():
    ret, frame = cap.read()
    if not ret:
        break
    lane_frame = pipeline(resized_frame)
    results = model(resized_frame)
    for result in results:
        # Draw bounding boxes and estimate distance
    cv2.imshow('Lane and Car Detection', lane_frame)
    if cv2.waitKey(1) & 0xFF == ord('q'):
        break
5、结果
项目源码地址: https://github.com/CityIsBetter/Lane_Detection
到此这篇关于Python基于YOLOv8和OpenCV实现车道线和车辆检测的文章就介绍到这了,更多相关Python YOLOv8和OpenCV车道线检测内容请搜索脚本之家以前的文章或继续浏览下面的相关文章希望大家以后多多支持脚本之家!