
基于Python编写一个基于插件架构的图片浏览器
作者:winfredzhang
这篇文章主要为大家详细介绍了如何使用Python开发一个基于插件架构的图片浏览器,文中的示例代码讲解详细,感兴趣的小伙伴可以跟随小编一起学习一下
在本篇教程中,我将详细介绍如何使用Python开发一个基于插件架构的图片浏览器。这个项目将展示如何实现插件系统、如何处理图片显示,以及如何使用wxPython构建GUI界面。
项目概述
我们将开发一个具有以下功能的应用:
支持动态加载插件
可以浏览选择图片文件夹
以缩略图方式显示JPEG图片
使用wxPython构建友好的用户界面
项目结构
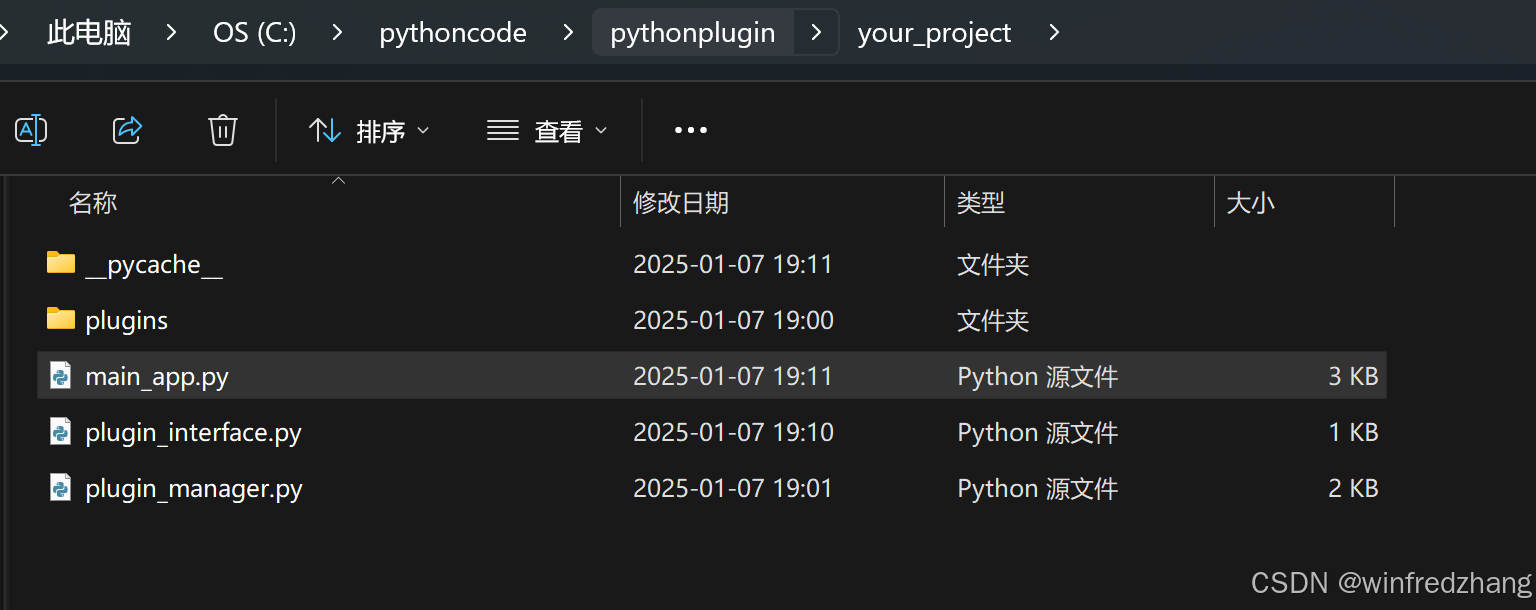
项目采用如下目录结构:
your_project/
├── main_app.py # 主程序
├── plugin_interface.py # 插件接口定义
├── plugin_manager.py # 插件管理器
└── plugins/ # 插件目录
├── __init__.py
└── example_plugin.py # 示例插件
代码实现
1. 插件接口 (plugin_interface.py)
首先定义插件接口,所有插件都需要继承这个基类:
# plugin_interface.py
class PluginInterface:
    def __init__(self):
        self.name = "Base Plugin"
        self.description = "Base plugin description"
        self.parameters = {}

    def initialize(self):
        pass

    def execute(self, parameters=None):
        pass

    def cleanup(self):
        pass
2. 插件管理器 (plugin_manager.py)
插件管理器负责加载和管理插件:
# plugin_manager.py
import os
import importlib.util
class PluginManager:
def __init__(self):
self.plugins = {}
def load_plugin(self, plugin_path):
# 获取插件文件名(不含扩展名)
plugin_name = os.path.splitext(os.path.basename(plugin_path))[0]
# 动态导入插件模块
spec = importlib.util.spec_from_file_location(plugin_name, plugin_path)
module = importlib.util.module_from_spec(spec)
spec.loader.exec_module(module)
# 寻找继承自PluginInterface的类
for attr_name in dir(module):
attr = getattr(module, attr_name)
if isinstance(attr, type) and attr.__module__ == plugin_name and hasattr(attr, 'execute'):
plugin_instance = attr()
self.plugins[plugin_name] = plugin_instance
break
def load_plugins_from_directory(self, directory):
if not os.path.exists(directory):
os.makedirs(directory)
for filename in os.listdir(directory):
if filename.endswith('.py') and not filename.startswith('__'):
plugin_path = os.path.join(directory, filename)
self.load_plugin(plugin_path)
def get_plugin(self, plugin_name):
return self.plugins.get(plugin_name)3. 图片浏览插件 (example_plugin.py)
实现图片浏览功能的插件:
# example_plugin.py
from plugin_interface import PluginInterface
import wx
import os
from PIL import Image
import io
class ThumbnailFrame(wx.Frame):
def __init__(self, parent, title, image_folder):
super().__init__(parent, title=title, size=(800, 600))
self.panel = wx.ScrolledWindow(self)
self.panel.SetScrollbars(1, 1, 1, 1)
# 创建网格布局
self.grid_sizer = wx.GridSizer(rows=0, cols=4, hgap=10, vgap=10)
self.panel.SetSizer(self.grid_sizer)
# 加载图片
self.load_images(image_folder)
def load_images(self, folder_path):
for filename in os.listdir(folder_path):
if filename.lower().endswith(('.jpg', '.jpeg')):
image_path = os.path.join(folder_path, filename)
try:
# 使用PIL打开图片并调整大小
with Image.open(image_path) as img:
# 调整图片大小为缩略图
img.thumbnail((150, 150))
# 转换为wx.Bitmap
width, height = img.size
img_data = io.BytesIO()
img.save(img_data, format='PNG')
img_data = img_data.getvalue()
wx_image = wx.Image(io.BytesIO(img_data))
bitmap = wx_image.ConvertToBitmap()
# 创建图片控件
img_button = wx.BitmapButton(self.panel, bitmap=bitmap)
img_button.SetToolTip(filename)
# 添加到网格
self.grid_sizer.Add(img_button, 0, wx.ALL, 5)
except Exception as e:
print(f"Error loading image {filename}: {str(e)}")
self.panel.Layout()
class ExamplePlugin(PluginInterface):
def __init__(self):
super().__init__()
self.name = "Image Thumbnail Plugin"
self.description = "Display thumbnails of JPEG images in a folder"
def execute(self, parameters=None):
if not parameters or 'image_folder' not in parameters:
print("No image folder specified")
return
image_folder = parameters['image_folder']
if not os.path.exists(image_folder):
print(f"Folder does not exist: {image_folder}")
return
# 创建并显示缩略图窗口
frame = ThumbnailFrame(None, "Image Thumbnails", image_folder)
frame.Show()4. 主程序 (main_app.py)
主程序创建GUI界面并协调插件的使用:
# main_app.py
import wx
from plugin_manager import PluginManager
import os
class MainFrame(wx.Frame):
def __init__(self):
super().__init__(parent=None, title='Plugin Demo', size=(400, 300))
self.plugin_manager = PluginManager()
# 加载插件
self.plugin_manager.load_plugins_from_directory("plugins")
# 创建界面
self.init_ui()
def init_ui(self):
panel = wx.Panel(self)
vbox = wx.BoxSizer(wx.VERTICAL)
# 创建插件列表
plugin_list = wx.ListBox(panel)
for plugin_name in self.plugin_manager.plugins:
plugin_list.Append(plugin_name)
# 添加文件夹选择按钮
select_folder_button = wx.Button(panel, label='Select Image Folder')
select_folder_button.Bind(wx.EVT_BUTTON, self.on_select_folder)
# 添加执行按钮
execute_button = wx.Button(panel, label='Execute Plugin')
execute_button.Bind(wx.EVT_BUTTON, self.on_execute)
vbox.Add(plugin_list, 1, wx.EXPAND | wx.ALL, 5)
vbox.Add(select_folder_button, 0, wx.EXPAND | wx.ALL, 5)
vbox.Add(execute_button, 0, wx.EXPAND | wx.ALL, 5)
panel.SetSizer(vbox)
self.plugin_list = plugin_list
self.selected_folder = None
def on_select_folder(self, event):
dlg = wx.DirDialog(self, "Choose a directory:",
style=wx.DD_DEFAULT_STYLE)
if dlg.ShowModal() == wx.ID_OK:
self.selected_folder = dlg.GetPath()
dlg.Destroy()
def on_execute(self, event):
selection = self.plugin_list.GetSelection()
if selection != wx.NOT_FOUND:
plugin_name = self.plugin_list.GetString(selection)
plugin = self.plugin_manager.get_plugin(plugin_name)
if plugin:
if not self.selected_folder:
wx.MessageBox('Please select an image folder first!',
'No Folder Selected',
wx.OK | wx.ICON_INFORMATION)
return
# 执行插件,传入文件夹路径
plugin.execute({'image_folder': self.selected_folder})
if __name__ == '__main__':
app = wx.App()
frame = MainFrame()
frame.Show()
app.MainLoop()关键技术点解析
1. 插件系统设计
本项目采用了基于接口的插件架构:
- 定义统一的插件接口(PluginInterface)
- 使用Python的动态导入机制加载插件
- 通过参数字典在主程序和插件间传递数据
2. 图片处理
图片处理使用PIL库实现:
- 读取JPEG图片
- 创建缩略图
- 转换为wxPython可用的位图格式
3. GUI实现
使用wxPython实现界面:
- 主窗口使用垂直布局
- 图片浏览窗口使用网格布局
- 实现滚动功能支持大量图片
使用方法
安装必要的库:
pip install Pillow wxPython
创建项目目录结构并复制代码文件
运行程序:
python main_app.py
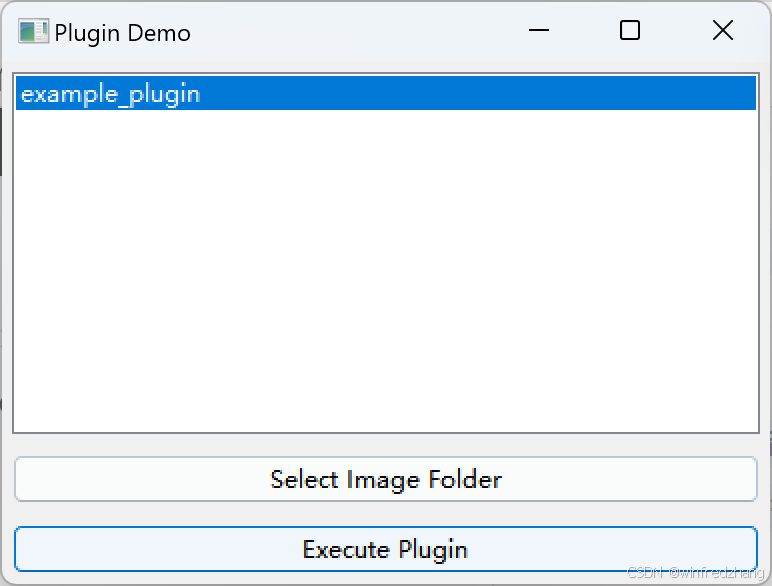
操作步骤:
- 点击"Select Image Folder"选择图片文件夹
- 在插件列表中选择"example_plugin"
- 点击"Execute Plugin"执行
运行结果
到此这篇关于基于Python编写一个基于插件架构的图片浏览器的文章就介绍到这了,更多相关Python图片浏览器内容请搜索脚本之家以前的文章或继续浏览下面的相关文章希望大家以后多多支持脚本之家!