Python中的asyncio性能分析
作者:craftsman2020
1. 工具
1.1 cProfile
一般对分析python性能的工具都会用cprofile。
但是这玩意对多线程和asyncio的支持并不友好,如果用它对asyncio分析,会发现CPU都耗费在了poll上面,无法确定到底耗费在哪些协程上。
例如:
会出现python - What is correct way to use cProfile with asyncio code? - Stack Overflow这样的问题。
用法:
python3 -m cProfile -o test.prof test2.py
运行完会生成一个test.prof文件,本文第2节介绍如何通过可视化工具查看这个文件。
也可以通过cprofilev来查看。
pip install cprofilev

cprofilev -f ./test.prof
浏览器中打开运行上方代码后生成的ip和端口号,如下:

2.1 yappi
这个工具可以测多线程、asycio等多种场景。
其实,CPython本身就自带三个调优工具,它们分别是cProfile,Profile和hotshot。
这三个工具对多线程的Python程序的性能剖析支持得都不好,开发者必须想办法分别对线程进行profile,然后再把结果合并。
而yappi的出现就是为了解决Python多线程程序的profile问题。
安装:
pip install yappi
下面先通过一个简单案例介绍使用yappi库,这是对多线程程序进行profile的代码例子。
需要注意的是,yappi.set_clock_type函数的参数,如果是cpu,代表统计的是在CPU上执行的时间,如果是wall,代表统计的是持续的时间。
import yappi
if __name__ == "__main__":
    # yappi.set_clock_type("wall")
    yappi.set_clock_type("cpu")
    yappi.start()
    for i in range(10):
        t = threading.Thread(target=sum, args=(100, i,), name="hello"+str(i))
        t.start()
    main_thread = threading.currentThread()

    for t in threading.enumerate():
        if t is not main_thread:
            t.join()
    yappi.get_func_stats().print_all()
    yappi.get_thread_stats().print_all()
你可以按上面这个例子改造你自己多线程程序,然后运行,就会得到如下的分析结果。
Clock type: CPU
Ordered by: totaltime, desc

name                                                ncall            tsub                ttot                tavg
..ns/2.7/lib/python2.7/threading.py:752 Thread.run  10               0.000137            2.428557            0.242856
..thub/Asgard/samples/yappi/yappi_sample.py:16 sum  10               0.000089            2.428420            0.242842
..ub/Asgard/samples/yappi/funcs.py:5 consumer_time  10               0.414581            2.428331            0.242833
..s/2.7/lib/python2.7/random.py:238 Random.randint  109362           0.729320            1.926393            0.000018
..2.7/lib/python2.7/random.py:175 Random.randrange  109362           0.860899            1.197073            0.000011
../2.7/lib/python2.7/threading.py:726 Thread.start  10               0.000224            0.001801            0.000180
..7/lib/python2.7/threading.py:656 Thread.__init__  10               0.000283            0.001404            0.000140
..s/2.7/lib/python2.7/threading.py:603 _Event.wait  10               0.000152            0.001217            0.000122
..7/lib/python2.7/threading.py:309 _Condition.wait  12               0.000423            0.001210            0.000101
..2.7/lib/python2.7/threading.py:866 Thread.__stop  10               0.000255            0.000956            0.000096
..s/2.7/lib/python2.7/threading.py:911 Thread.join  10               0.000257            0.000761            0.000076
..ersions/2.7/lib/python2.7/threading.py:542 Event  10               0.000068            0.000587            0.000059
../python2.7/threading.py:400 _Condition.notifyAll  10               0.000143            0.000580            0.000058
..ons/2.7/lib/python2.7/threading.py:242 Condition  20               0.000169            0.000523            0.000026
..7/lib/python2.7/threading.py:561 _Event.__init__  10               0.000153            0.000519            0.000052
..lib/python2.7/threading.py:373 _Condition.notify  10               0.000191            0.000403            0.000040
..b/python2.7/threading.py:260 _Condition.__init__  20               0.000286            0.000354            0.000018
../python2.7/threading.py:300 _Condition._is_owned  22               0.000156            0.000292            0.000013
..ib/python2.7/threading.py:709 Thread._set_daemon  10               0.000111            0.000242            0.000024
...7/lib/python2.7/threading.py:1152 currentThread  21               0.000137            0.000205            0.000010
..s/2.7/lib/python2.7/threading.py:64 Thread._note  54               0.000201            0.000201            0.000004
...7/lib/python2.7/threading.py:59 Thread.__init__  40               0.000135            0.000135            0.000003
..2.7/threading.py:297 _Condition._acquire_restore  12               0.000087            0.000130            0.000011
..hon2.7/threading.py:294 _Condition._release_save  12               0.000071            0.000108            0.000009
../2.7/lib/python2.7/threading.py:570 _Event.isSet  20               0.000061            0.000061            0.000003
..b/python2.7/threading.py:1008 _MainThread.daemon  10               0.000037            0.000037            0.000004
..ns/2.7/lib/python2.7/threading.py:1183 enumerate  1                0.000016            0.000021            0.000021

name           id     tid              ttot      scnt
Thread         3      123145399676928  0.087168  37
Thread         1      123145391263744  0.087128  138
Thread         8      123145420709888  0.087124  140
Thread         9      123145424916480  0.087121  40
Thread         2      123145395470336  0.087109  27
Thread         6      123145412296704  0.087088  92
Thread         5      123145408090112  0.087084  125
Thread         7      123145416503296  0.087072  51
Thread         4      123145403883520  0.087069  139
Thread         10     123145429123072  0.087030  132
_MainThread    0      140735541031744  0.023092  13
上半部分是函数调用统计。
- ncall: 调用次数
- tsub: 不包含子函数所占用的CPU时间
- ttot: 包含子函数所占用的CPU时间
- tavg: 包含子函数时平均占用CPU时间
下半部分是所有线程的统计结果。
- tid 线程
- idttot 线程总的CPU占用时间
- scnt 线程被调度到CPU上的次数
再看一个例子:
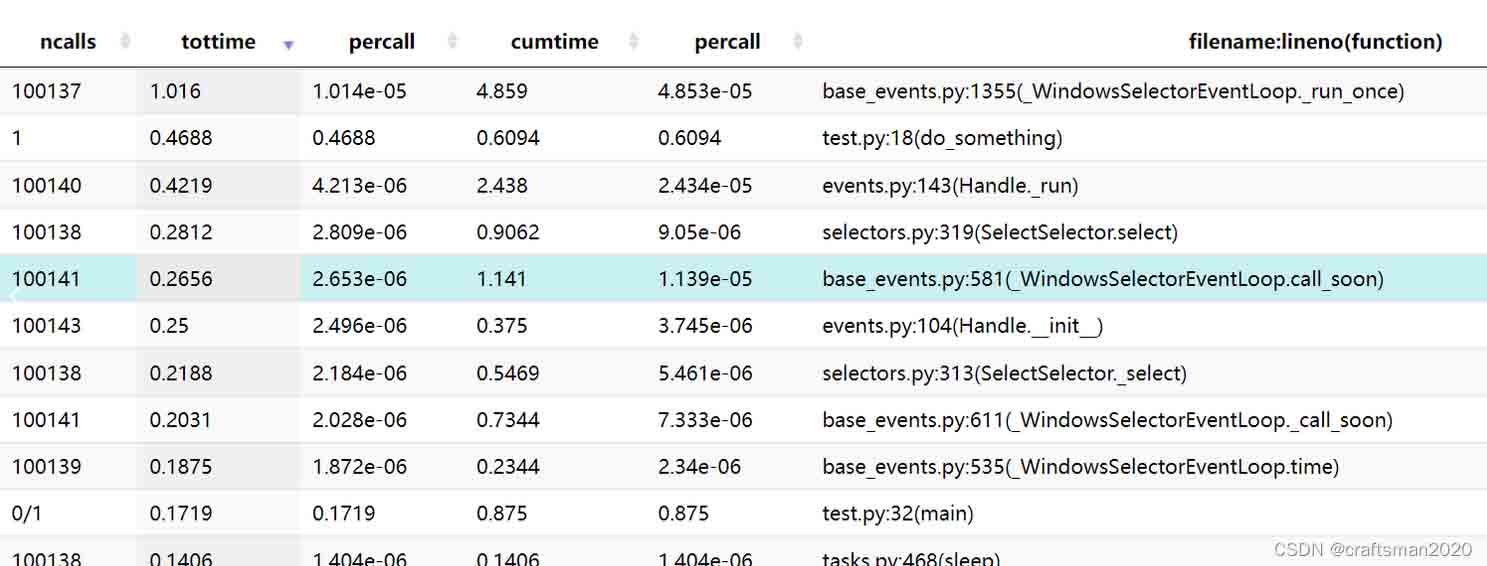
通过运行下方例子就会输出每个函数/协程所占用的时间,并生成一个test.prof文件:
import asyncio
import sys
import yappi

test_time = 5  # 测试时间


async def exit():
    await asyncio.sleep(5)
    yappi.get_func_stats().print_all()
    yappi.stop()
    stats = yappi.convert2pstats(yappi.get_func_stats())
    stats.dump_stats("test.prof")
    asyncio.get_event_loop().stop()
    sys.exit(0)


async def do_something(num):
    for i in range(num):
        i = i+1
        await asyncio.sleep(0)


async def test1():
    await do_something(10000)


async def test2():
    await do_something(100000)


async def main():
    asyncio.get_event_loop().create_task(exit())
    while True:
        await test1()
        await test2()
yappi.set_clock_type("cpu")
yappi.start()
loop = asyncio.get_event_loop()
with yappi.run():
    loop.run_until_complete(main())
输出如下图:

2. 可视化
2.1 SnakeViz
可以针对上面工具生成的prof文件进行分析,然后生成分析结果可以直观地看到cpu时间都耗费在哪里了。
使用方法:
pip install snakeviz
snakeviz test.prof
就会自动打开一个网页来展示分析的情况。


2.2 gprof2dot
gprof2dot可以将prof文件生成一个图片。
安装:
apt-get install graphviz
pip install gprof2dot
运行:
gprof2dot -f pstats test.prof | dot -Tpng -o output.png
生成的图片如下图所示

总结
以上为个人经验,希望能给大家一个参考,也希望大家多多支持脚本之家。
