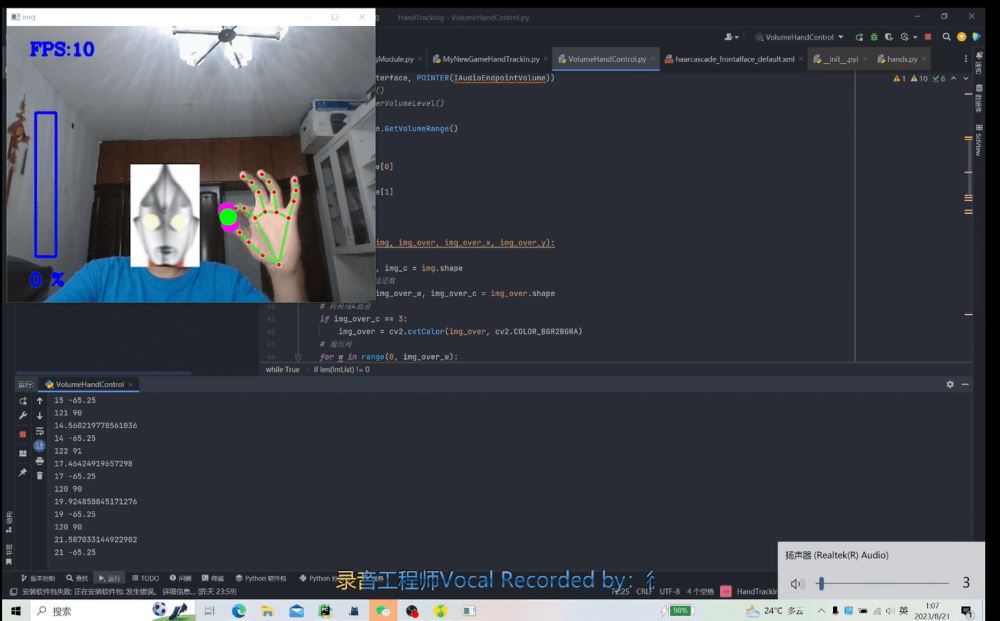
基于opencv实现手势控制音量(案例详解)
作者:计算机小混子
基于opencv的手势控制音量和ai换脸
HandTrackingModule.py
import cv2
import mediapipe as mp
import time
class handDetector():
    def __init__(self, mode = False, maxHands = 2, model_complexity = 1, detectionCon = 0.5, trackCon = 0.5):
        self.mode = mode
        self.maxHands = maxHands
        self.model_complexity = model_complexity
        self.detectionCon = detectionCon
        self.trackCon = trackCon
        self.mpHands = mp.solutions.hands
        self.hands = self.mpHands.Hands(self.mode, self.maxHands, self.model_complexity, self.detectionCon, self.trackCon)
        self.mpDraw = mp.solutions.drawing_utils
    def findHands(self, img, draw = True):
        # Hand类的对象只能使用RGB图像
        imgRGB = cv2.cvtColor(img, cv2.COLOR_BGR2RGB)
        self.results = self.hands.process(imgRGB)
        # print(results.multi_hand_landmarks)
        # 如果存在手
        if self.results.multi_hand_landmarks:
            # 如果存在多个手
            for handLms in self.results.multi_hand_landmarks:
                if draw:
                    # 设置连接线等属性
                    self.connection_drawing_spec = self.mpDraw.DrawingSpec(color=(0, 255, 0), thickness=2)
                    # 绘制
                    self.mpDraw.draw_landmarks(img, handLms, self.mpHands.HAND_CONNECTIONS, connection_drawing_spec=self.connection_drawing_spec)
        return img
    def findPosition(self, img, handNum=0, draw=True):
        lmList = []
        # 每个点的索引和它的像素比例,若知道窗口的宽度和高度可以计算位置
        if self.results.multi_hand_landmarks:
            myHand = self.results.multi_hand_landmarks[handNum]
            for id, lm in enumerate(myHand.landmark):
                # print(id, lm)
                h, w, c = img.shape
                cx, cy = int(lm.x * w), int(lm.y * h)
                # print(id, cx, cy)
                lmList.append([id, cx, cy])
                if draw:
                    cv2.circle(img, (cx, cy), 7, (255, 0, 0), cv2.FILLED)
            # 绘制每一只手
        return lmList
定义了一个名为 handDetector 的类,用于检测和跟踪手部。下面是代码的详细分析:
导入库
cv2: OpenCV 库,用于图像处理。mediapipe as mp: 用于多媒体解决方案的库,在此用于手部检测。time: 用于时间管理,但在给定的代码段中未使用。
handDetector 类
初始化方法 __init__
该方法用于初始化 handDetector 类的对象,并设置一些参数。
mode: 布尔值,控制 MediaPipe 手部解决方案的静态图像模式。默认值为False。maxHands: 最大手部数量,控制同时检测的手的数量。默认值为2。model_complexity: 模型复杂度,有 0、1、2 三个级别。默认值为1。detectionCon: 检测置信度阈值。默认值为0.5。trackCon: 跟踪置信度阈值。默认值为0.5。
此外,还创建了 MediaPipe 手部解决方案的实例,并初始化了绘图工具。
方法 findHands
该方法用于在给定图像中找到手,并根据需要绘制手部标记。
img: 输入图像。draw: 布尔值,控制是否绘制手部标记。默认值为True。
该方法首先将图像从 BGR 转换为 RGB,然后处理图像以找到手部标记。如果找到了手部标记,并且 draw 参数为 True ,则会在图像上绘制手部标记和连接线。
方法 findPosition
该方法用于在给定图像中找到手部标记的位置,并返回一个包含每个标记位置的列表。
img: 输入图像。handNum: 手的索引,用于选择多个检测到的手中的特定一只。默认值为0。draw: 布尔值,控制是否在图像上绘制每个标记的圆圈。默认值为True。
该方法遍历给定手的每个标记,并计算其在图像中的位置。如果 draw 参数为 True ,则在每个标记的位置上绘制一个圆圈。
总结
handDetector 类是一个用于检测和跟踪手部的工具。它使用了 MediaPipe 的手部解决方案,并提供了在图像上绘制手部标记和连接线的功能。通过调用这些方法,你可以在视频流或静态图像中跟踪手部,甚至找到特定手部标记的位置。
VolumeHandControl.py
import cv2
import time
import numpy as np
import HandTrackingModule as htm
import math
from ctypes import cast, POINTER
from comtypes import CLSCTX_ALL
from pycaw.pycaw import AudioUtilities, IAudioEndpointVolume
wCam, hCam = 640, 480
cap = cv2.VideoCapture(0)
# 设置摄像头的宽度
cap.set(3, wCam)
# 设置摄像头的高度
cap.set(4, hCam)
pTime = 0
tiga_img = cv2.imread("tiga.jpg", cv2.IMREAD_UNCHANGED)
detector = htm.handDetector(detectionCon=0.7)
face_Cascade = cv2.CascadeClassifier("haarcascade_frontalface_default.xml")
devices = AudioUtilities.GetSpeakers()
interface = devices.Activate(IAudioEndpointVolume._iid_, CLSCTX_ALL, None)
volume = cast(interface, POINTER(IAudioEndpointVolume))
# volume.GetMute()
# volume.GetMasterVolumeLevel()
# 音量范围
volRange = volume.GetVolumeRange()
print(volRange)
# 最小音量
minVol = volRange[0]
# 最大音量
maxVol = volRange[1]
vol = 0
volBar = 400
volPer = 0
def overlay_img(img, img_over, img_over_x, img_over_y):
    # 背景图像高宽
    img_w, img_h, img_c = img.shape
    # 覆盖图像高宽通道数
    img_over_h, img_over_w, img_over_c = img_over.shape
    # 转换成4通道
    if img_over_c == 3:
        img_over = cv2.cvtColor(img_over, cv2.COLOR_BGR2BGRA)
    # 遍历列
    for w in range(0, img_over_w):
        #遍历行
        for h in range(0, img_over_h):
            if img_over[h, w, 3] != 0:
                # 遍历三个通道
                for c in range(0, 3):
                    x = img_over_x + w
                    y = img_over_y + h
                    if x >= img_w or y >= img_h:
                        break
                    img[y-40, x, c] = img_over[h, w, c]
    return img
while True:
    success, img = cap.read()
    gray_frame = cv2.cvtColor(img, cv2.COLOR_BGR2GRAY)
    height, width, channel = img.shape
    faces = face_Cascade.detectMultiScale(gray_frame, 1.15, 5)
    for (x, y, w, h) in faces:
        gw = w
        gh = int(height * w / width)
        tiga_img = cv2.resize(tiga_img, (gw, gh+gh))
        print(gw, gh)
        if 0 <= x < img.shape[1] and 0 <= y < img.shape[0]:
            overlay_img(img, tiga_img, x, y)
    img = detector.findHands(img)
    lmList = detector.findPosition(img, draw=False)
    if len(lmList) != 0:
        # print(lmList[4], lmList[8])
        x1, y1 = lmList[4][1], lmList[4][2]
        x2, y2 = lmList[8][1], lmList[8][2]
        cv2.circle(img, (x1, y1), 15, (255, 0, 255), cv2.FILLED)
        cv2.circle(img, (x2, y2), 15, (255, 0, 255), cv2.FILLED)
        cv2.line(img, (x1, y1), (x2, y2), (255, 0, 255), 3)
        cx, cy = (x1+x2)//2, (y1+y2)//2
        cv2.circle(img, (cx, cy), 15, (255, 0, 255), cv2.FILLED)
        length = math.hypot(x2 - x1, y2 - y1)
        print(length)
        # Hand rang 130 25
        # Vomume Range -65 0
        vol = np.interp(length, [25, 175], [minVol, maxVol])
        volBar = np.interp(length, [25, 175], [400, 150])
        volPer = np.interp(length, [25, 175], [0, 100])
        print(int(length), vol)
        volume.SetMasterVolumeLevel(vol, None)
        if length<25:
            cv2.circle(img, (cx, cy), 15, (0, 255, 0), cv2.FILLED)
    cv2.rectangle(img, (50, 150), (85, 400), (255, 0, 0), 3)
    cv2.rectangle(img, (50, int(volBar)), (85, 400), (255, 0, 0), cv2.FILLED)
    cv2.putText(img, f'{int(volPer)} %', (40, 450), cv2.FONT_HERSHEY_COMPLEX, 1, (255, 0, 0), 3)
    cTime = time.time()
    fps = 1/(cTime - pTime)
    pTime = cTime
    cv2.putText(img, f'FPS:{int(fps)}', (40, 50), cv2.FONT_HERSHEY_COMPLEX, 1, (255, 0, 0), 3)
    cv2.imshow("img", img)
    cv2.waitKey(1)
1. 导入必要的库
- OpenCV (
cv2): 用于图像处理,例如读取图像、转换颜色空间、绘制形状等。 - NumPy (
np): 用于数值计算,特别是线性插值。 HandTrackingModule as htm: 导入自定义的手部检测模块。math: 提供数学功能,例如计算两点间的距离。ctypes,comtypes,pycaw.pycaw: 用于与操作系统的音量控制交互。
2. 初始化参数和对象
- 摄像头大小 (
wCam,hCam): 定义摄像头的宽度和高度。 - 摄像头 (
cap): 通过 OpenCV 初始化摄像头,并设置宽度和高度。 - 时间 (
pTime): 用于计算帧率。 - 图像叠加 (
tiga_img): 读取一个图像文件,稍后用于叠加。 - 手部检测器 (
detector): 使用自定义的手部检测模块创建检测器对象,设置检测置信度为 0.7。 - 人脸检测 (
face_Cascade): 加载 OpenCV 的 Haar 级联分类器来检测人脸。 - 音量控制 (
volume): 通过 pycaw 访问系统的音量控制,获取音量范围。
3. 定义图像叠加函数 overlay_img
该函数负责将一个图像叠加到另一个图像上的特定位置。它遍历覆盖图像的每个像素,并将非透明像素复制到背景图像的相应位置。
4. 主循环
在无限循环中,代码执行以下任务:
a. 人脸检测和图像叠加
- 读取图像: 从摄像头捕获图像。
- 灰度转换: 将图像转换为灰度,以便进行人脸检测。
- 人脸检测: 使用级联分类器检测人脸。
- 调整叠加图像: 根据人脸大小调整叠加图像的大小。
- 叠加图像: 调用
overlay_img函数将图像叠加到人脸上。
b. 手部检测和音量控制
- 检测手部: 调用
detector.findHands在图像上检测并绘制手部。 - 找到位置: 调用
detector.findPosition获取手部标记的位置。 - 计算距离: 计算手部标记 4 和 8 之间的距离。
- 绘制形状: 在这两个点上绘制圆圈,并在它们之间绘制线条。
- 音量映射: 使用 NumPy 的
np.interp函数将手的距离映射到音量范围。 - 设置音量: 调用
volume.SetMasterVolumeLevel设置系统音量。
c. 可视化
- 绘制音量条: 在图像上绘制一个表示音量级别的矩形条。
- 计算帧率: 使用当前时间和上一帧的时间计算帧率。
- 绘制帧率: 在图像上绘制帧率文本。
d. 显示结果
- 显示图像: 使用 OpenCV 的
imshow方法显示处理后的图像。 - 等待: 通过 OpenCV 的
waitKey方法等待 1 毫秒,这样可以实时更新图像。
总结
这个代码集成了多个功能:通过摄像头捕获图像,检测人脸并在人脸上叠加图像,检测手部并通过手指之间的距离控制系统音量,然后通过 OpenCV 实时显示结果。它结合了图像处理、人脸和手部检测、系统交互和实时可视化,展示了计算机视觉和人机交互的强大功能。
效果

(B站演示视频)[https://www.bilibili.com/video/BV1Xu41177Gz/?spm_id_from=333.999.0.0]
到此这篇关于基于opencv的手势控制音量的文章就介绍到这了,更多相关opencv手势控制音量内容请搜索脚本之家以前的文章或继续浏览下面的相关文章希望大家以后多多支持脚本之家!
