
Pytorch基础教程之torchserve模型部署解析
作者:山顶夕景
torchserve是基于netty网络框架实现的,底层使用EpollServerSocketChannel服务进行网络通信,通过epoll多路复用技术实现高并发网络连接处理,这篇文章主要介绍了Pytorch基础教程之torchserve模型部署和推理,需要的朋友可以参考下
note
torch-model-archiver打包模型;利用torchserve加载前面打包的模型,并以grpc和http等接口往外提供推理服务- 自定义
handler类时initialize()、preprocess()、postprocess()和handle()这四个方法都是可选的
- 自定义
- 启动模型的api服务、
curl命令发送http post请求,请求模型服务API;流程和TensorFlow serving流程大同小异 torchserve是基于netty网络框架实现的,底层使用EpollServerSocketChannel服务进行网络通信,通过epoll多路复用技术实现高并发网络连接处理。
一、torchserve和archiver模块
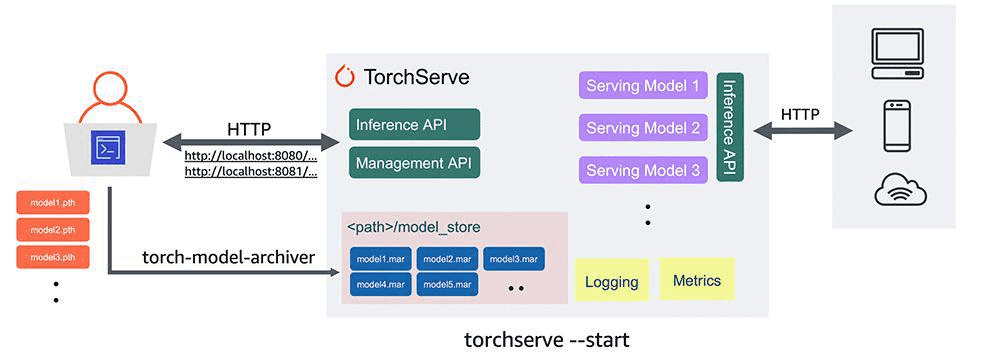
- 模型部署需要用到两个模块
- torchserve用来模型部署
- torch-model-archiver打包模型
pip:
    - torch-workflow-archiver
    - torch-model-archiver
    - torchserve
二、Speech2Text Wav2Vec2模型部署
2.1 准备模型和自定义handler
- Wav2Vec2语音转文本的模型。这里我们为了简化流程从huggingface下载对应的模型,进行本地化利用torchserve部署
hander将原始data进行转为模型输入所需的格式;nlp中很多任务可以直接用torchtext的text_classifier。
# 1. 导入huggingface模型
from transformers import AutoModelForCTC, AutoProcessor
import os
modelname = "facebook/wav2vec2-base-960h"
model = AutoModelForCTC.from_pretrained(modelname)
processor = AutoProcessor.from_pretrained(modelname)
modelpath = "model"
os.makedirs(modelpath, exist_ok=True)
model.save_pretrained(modelpath)
processor.save_pretrained(modelpath)
# 2. 自定义handler
import torch
import torchaudio
from transformers import AutoProcessor, AutoModelForCTC
import io
class Wav2VecHandler(object):
    def __init__(self):
        self._context = None
        self.initialized = False
        self.model = None
        self.processor = None
        self.device = None
        # Sampling rate for Wav2Vec model must be 16k
        self.expected_sampling_rate = 16_000
    def initialize(self, context):
        """Initialize properties and load model"""
        self._context = context
        self.initialized = True
        properties = context.system_properties
        # See https://pytorch.org/serve/custom_service.html#handling-model-execution-on-multiple-gpus
        self.device = torch.device("cuda:" + str(properties.get("gpu_id")) if torch.cuda.is_available() else "cpu")
        model_dir = properties.get("model_dir")
        self.processor = AutoProcessor.from_pretrained(model_dir)
        self.model = AutoModelForCTC.from_pretrained(model_dir)
    def handle(self, data, context):
        """Transform input to tensor, resample, run model and return transcribed text."""
        input = data[0].get("data")
        if input is None:
            input = data[0].get("body")
        # torchaudio.load accepts file like object, here `input` is bytes
        model_input, sample_rate = torchaudio.load(io.BytesIO(input), format="WAV")
        # Ensure sampling rate is the same as the trained model
        if sample_rate != self.expected_sampling_rate:
            model_input = torchaudio.functional.resample(model_input, sample_rate, self.expected_sampling_rate)
        model_input = self.processor(model_input, sampling_rate = self.expected_sampling_rate, return_tensors="pt").input_values[0]
        logits = self.model(model_input)[0]
        pred_ids = torch.argmax(logits, axis=-1)[0]
        output = self.processor.decode(pred_ids)
        return [output]
在自定义 Handler 中,需要实现以下方法:
- initialize: 用于初始化模型,加载权重等操作。
- preprocess: 用于将原始输入数据转换为 PyTorch 张量。
- inference: 用于执行模型推理。
- postprocess: 用于将模型输出转换为 API 输出格式。
2.2 打包模型和启动模型api服务
- 可以直接在linux环境的terminal进行如下相关操作(打包模型、启动模型的api服务、curl命令发送http post请求,请求模型服务API)
- curl命令发送http post请求,请求模型服务API,如果遇到报错java.lang.NoSuchMethodError: java.nio.file.Files.readString(Ljava/nio/file/Path;)Ljava/lang/String;则应该是JRE没有安装或者需要升级:sudo apt install default-jre即可。
- curl那坨后正常会返回I HAD THAT CURIOSITY BESIDE ME AT THIS MOMENT%,测试数据是一段简单的sample.wav语音文件
- Waveform Audio File Format(WAVE,又或者是因为WAV后缀而被大众所知的),它采用RIFF(Resource Interchange File Format)文件格式结构。通常用来保存PCM格式的原始音频数据,所以通常被称为无损音频
# 打包部署模型文件, 把model部署到torchserve
torch-model-archiver --model-name Wav2Vec2 --version 1.0 --serialized-file model/pytorch_model.bin --handler ./handler.py --extra-files "model/config.json,model/special_tokens_map.json,model/tokenizer_config.json,model/vocab.json,model/preprocessor_config.json" -f
mv Wav2Vec2.mar model_store
# 启动model服务, 加载前面打包的model, 并以grpc和http接口向外提供推理服务
torchserve --start --model-store model_store --models Wav2Vec2=Wav2Vec2.mar --ncs
# Once the server is running, let's try it with:
curl -X POST http://127.0.0.1:8080/predictions/Wav2Vec2 --data-binary '@./sample.wav' -H "Content-Type: audio/basic"
# 暂停torchserve serving
torchserve --stop
2.3 相关参数记录
torch-model-archiver:用来打包模型
- model-name: 设定部署的模型名称
- version: 设定部署的模型版本
- model-file: 定义模型结构的python文件
- serialized-file: 设定训练模型保存的pth文件
- export-path: 设定打包好的模型保存路径
- extra-files: 设定额外的文件,如label跟id映射的定义文件等,用于一并打包到模型压缩包中
- handler: 为一个处理器,用来指定模型推理预测前后的数据的处理问题;如 nlp模型中的文本分词和转换为id的步骤;以及分类问题中,模型预测结果映射为具体的label等数据处理功能
torch-model-archiver:用来打包模型
usage: torch-model-archiver [-h] --model-name MODEL_NAME
                            [--serialized-file SERIALIZED_FILE]
                            [--model-file MODEL_FILE] --handler HANDLER
                            [--extra-files EXTRA_FILES]
                            [--runtime {python,python2,python3}]
                            [--export-path EXPORT_PATH]
                            [--archive-format {tgz,no-archive,default}] [-f]
                            -v VERSION [-r REQUIREMENTS_FILE]
torchserve:该组件用来加载前面打包的模型,并以grpc和http等接口往外提供推理服务
- start 和 stop: 即推理服务的启动和停止;
- model-store: 打包模型存储的路径;
- models: 设定模型名称和模型文件名,如:MODEL_NAME=MODEL_PATH2 格式;
- no-config-snapshots: 即 --ncs,用来设置防止服务器存储配置快照文件;
Reference
[1] https://github.com/pytorch/serve
[2] Torch Model archiver for TorchServe
[3] https://github.com/pytorch/serve/tree/master/examples/speech2text_wav2vec2
[4] https://huggingface.co/docs/transformers/model_doc/wav2vec2
[5] https://github.com/pytorch/serve/tree/master/model-archiver
[7] cURL - 学习/实践
[8] Serving PyTorch Models Using TorchServe(by using transformer model for example)
[10] TorchServe 详解:5 步将模型部署到生产环境
[11] PyTorch最新工具torchserve用于0.部署模型
到此这篇关于Pytorch基础教程之torchserve模型部署和推理的文章就介绍到这了,更多相关torchserve模型部署内容请搜索脚本之家以前的文章或继续浏览下面的相关文章希望大家以后多多支持脚本之家!