
C++ 实现进程池:主从架构、管道通信与任务调度(示例详解)
作者:zincsweet
从进程池架构中,主进程负责任务分配与管理,子进程专注于任务处理,二者通过管道通信实现高效稳定的任务执行机制,本文详细解析了进程池的创建、任务调度及退出流程,并强调了关闭历史遗留文件描述符的重要性,感兴趣的朋友一起看看吧
主/从进程池架构
一、原理
1 个主进程(Master)+ 预先创建 N 个子进程(Worker)
主进程只管分配任务,子进程只管处理任务,
通过管道通信,实现高并发、稳定、不重复创建销毁进程。
二、三大核心角色
1. Master(主进程)
- 唯一
- 不处理业务
- 只做 4 件事:
- 创建进程池(fork 一堆子进程)
- 接收任务
- 分发任务(发给空闲子进程)
- 管理子进程(监控、重启、回收)
2. Worker(子进程 → 进程池)
- 预先创建好 N 个
- 一直活着,不退出
- 阻塞等待任务
- 收到任务 → 处理 → 继续等待
3. 管道(通信通道)
- 每个子进程一条管道
- Master 写 → 发任务
- Worker 读 → 收任务
- 阻塞等待,天然实现同步控制
三、代码
#include <cstdlib>
#include <ctime>
#include <iostream>
#include <string>
#include <unistd.h>
#include <vector>
#include <functional>
#include <sys/wait.h>
#include <sys/types.h>
#define POLL_SIZE 4
// ***********************************任务列表*********************************************
void SyncDisk() {
    std::cout << "同步磁盘..." << std::endl;
}
void DownloadFile() {
    std::cout << "下载文件..." << std::endl;
}
void PrintMessage() {
    std::cout << "打印消息..." << std::endl;
}
void UpdateDatabase() {
    std::cout << "更新数据库..." << std::endl;
}
typedef void (*task_t)();   // 定义一个函数指针类型,指向任务函数
task_t tasks[] = {SyncDisk, DownloadFile, PrintMessage, UpdateDatabase};  // 任务列表
// ***********************************进程池实现*******************************************
enum {
    OK = 0,
    PIPE_ERROR,
    FORK_ERROR
};
void Dotask(int fd) {   // 任务的入口
    while (1) {
        int task_code = 0;
        ssize_t n = read(fd, &task_code, sizeof(task_code));    // 约定好读取4字节的任务码
        if (n == -1) {
            std::cerr << "read error" << std::endl;
            break;
        }
        else if (n == 0) {
            std::cout << "没有任务了..." << std::endl;
            break; // 管道被关闭,退出循环
        }
        else {
            if (task_code < 0 || task_code >= sizeof(tasks) / sizeof(task_t)) {
                std::cerr << "Invalid task code: " << task_code << std::endl;
                continue; // 跳过无效的任务码
            }
            // 根据任务码执行对应的任务函数
            tasks[task_code]();
        }
    }
}
// typedef std::function<void (int)> cb_t;
using cb_t = std::function<void (int)>;
class ProcessPool {
private:
    // 定义一个内部Channel类,保存管道写端和子进程pid
    class Channel {
    public:
        Channel(int wfd, pid_t sub_pid)
            : _wfd(wfd), _sub_pid(sub_pid)
        {
            _sub_name = "sub_channel_" + std::to_string(sub_pid);
        }
        ~Channel()
        {
        }
        void Write(int task_index) {
            ssize_t n = write(_wfd, &task_index, sizeof(task_index));
            (void)n; // 忽略写入结果
        }
        void PrintInfo() {
            printf("Channel Info - Sub PID: %d, Sub Name: %s\n", _sub_pid, _sub_name.c_str());
        }
        std::string GetSubName() const {
            return _sub_name;
        }
        void ClosePipe() {
            std::cout << "关闭管道wfd: " << _wfd << std::endl;
            close(_wfd);
        }
        void Wait() {
            waitpid(_sub_pid, nullptr, 0);
            std::cout << "回收子进程: " << " PID: " << _sub_pid << std::endl;
        }
    private:
        int _wfd;              // 写管道文件描述符
        pid_t _sub_pid;        // 子进程pid
        std::string _sub_name; // 子进程名字
    };
public:
    ProcessPool() {
        srand((unsigned int)time(nullptr) ^ (unsigned int)getpid()); // 设置随机数种子
    }
    ~ProcessPool(){}
    void Init(cb_t cb) {
        CreatProcessChannel(cb);
    }
    void Debug() {
        for (auto& ch : channels) {
            ch.PrintInfo();
        }
    }
    void Run() {
        int cnt = 6;
        while (cnt--) {
            std::cout << "---------------------------------------------" << std::endl;
            // 1. 选择一个任务
            int itask = SelectTask();
            std::cout << "选择任务: index: " << itask << std::endl;
            // 2. 选择一个channel(管道+子进程),本质是选择一个下标
            int index = SelectChannel();
            std::cout << "选择管道: index: " << index << std::endl;
            // 3. 发送任务给指定的channel(管道+子进程)
            SendTaskToChannel(itask, index);
            std::cout << "发送任务 index " << itask << " 到管道 index " << index << std::endl;
        }
    }
    void Quit() {
        // 想要1 : 1地回收,就要改变CreateProcessChannel的实现
        // 就要在子进程中关闭历史遗留的管道写端
        // 从而实现1 : 1地回收资源。
        for (auto& ch : channels) {
            ch.ClosePipe(); // 关闭写端
            ch.Wait();
        }
        // 逆向回收资源
        // int end = channels.size() - 1;
        // for (int i = end; i >= 0; --i) {
        //     channels[i].ClosePipe(); // 关闭写端
        //     channels[i].Wait();      // 等待子进程退出
        // }
        // 1:1回收演示
        // for (auto& ch : channels) {
        //     ch.ClosePipe(); // 关闭写端
        //     ch.Wait();
        // }
        // // 1. 关闭所有管道写端,通知子进程退出
        // for (auto& ch : channels) {
        //     ch.ClosePipe(); // 关闭写端
        // }
        // // 2. 等待所有子进程退出
        // for (auto& ch : channels) {
        //     ch.Wait();
        // }
    }
private:
    int SelectChannel() {
        // 这里简单的轮询选择一个channel
        static int index = 0;
        int selected = index % channels.size();
        ++index;
        return selected;
    }
    int SelectTask() {
        // 轮询选择一个任务
        int itask = rand() % (sizeof(tasks) / sizeof(task_t));
        return itask;
    }
    void SendTaskToChannel(int itask, int index) {
        if (itask < 0 || itask >= sizeof(tasks) / sizeof(task_t)) {
            std::cerr << "Invalid task index: " << itask << std::endl;
            return;
        }
        if (index < 0 || index >= channels.size()) {
            std::cerr << "Invalid channel index: " << index << std::endl;
            return;
        }
        // 将任务索引写入管道,通知子进程执行对应的任务
        channels[index].Write(itask);
    }
    void CreatProcessChannel(cb_t cb) {
        for (int i = 0; i < POLL_SIZE; ++i) {
            int pipefd[2] = {0};
            int ret = pipe(pipefd);
            if (ret == -1) {
                std::cerr << "pipe error" << std::endl;
                exit(PIPE_ERROR);
            }
            pid_t pid = fork();
            if (pid == -1) {
                std::cerr << "fork error" << std::endl;
                exit(FORK_ERROR);
            }
            else if (pid == 0) {
                // 子进程
                if (!channels.empty()) {
                    for (auto& ch : channels) {
                        ch.ClosePipe(); // 关闭历史遗留的管道写端
                    }
                }
                close(pipefd[1]);   // 关闭写端
                cb(pipefd[0]);
                exit(OK);
            }
            else {
                // 父进程
                close(pipefd[0]);   // 关闭读端
                // 创建一个channel对象,保存管道写端和子进程pid
                channels.emplace_back(pipefd[1], pid);
                // Channel ch(pipefd[1], pid);
                // channels.emplace_back(ch);  // 将channel对象添加到容器中
                std::cout << "创建了一个管道PID: " << pid << "到管道容器中了" << std::endl;
                sleep(1);
            }
        }
    }
private:
    std::vector<Channel> channels;    // 要有未来组织所有channel的容器
};
int main() {
    // 1. 初始化一个进程池对象
    ProcessPool pool;
    pool.Init(Dotask);
    // 2. 运行进程池
    pool.Run();
    // 3. 结束进程池释放资源
    pool.Quit();
    return 0;
}
Linux 进程池(ProcessPool)源码解析
一、项目目标
实现一个简单的进程池:
- 父进程负责调度任务
- 子进程负责执行任务
- 父子进程通过匿名管道通信
- 父进程发送任务码
- 子进程根据任务码执行对应任务
二、整体架构
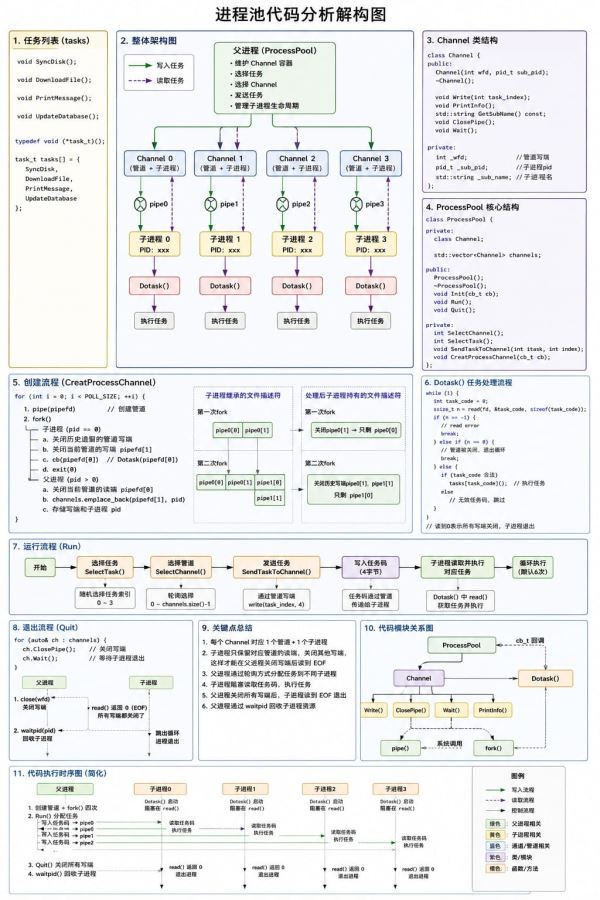
                     Parent(ProcessPool)
                              │
         ┌────────────────────┼────────────────────┐
         │                    │                    │
         │                    │                    │
      pipe0                pipe1                pipe2
         │                    │                    │
         ▼                    ▼                    ▼
      Child0               Child1               Child2
         │                    │                    │
      Dotask()             Dotask()             Dotask()
         │                    │                    │
         └────────────执行任务────────────┘
父进程:
ProcessPool
负责:
- 创建子进程
- 创建管道
- 选择任务
- 分发任务
- 回收子进程
三、任务系统
任务定义
void SyncDisk();
void DownloadFile();
void PrintMessage();
void UpdateDatabase();
任务表
typedef void (*task_t)();
task_t tasks[] =
{
    SyncDisk,
    DownloadFile,
    PrintMessage,
    UpdateDatabase
};
本质:
任务码 → 函数地址
对应关系:
| 任务码 | 任务 |
|---|---|
| 0 | SyncDisk |
| 1 | DownloadFile |
| 2 | PrintMessage |
| 3 | UpdateDatabase |
四、ProcessPool类设计
class ProcessPool
{
private:
    vector<Channel> channels;
};
保存所有:
管道 + 子进程
五、Channel设计
Channel是什么
一个Channel对应:
一个管道
+
一个子进程
类结构
class Channel
{
private:
    int _wfd;
    pid_t _sub_pid;
    string _sub_name;
};
成员说明
_wfd
int _wfd;
父进程保存:
管道写端
用于发送任务。
_sub_pid
pid_t _sub_pid;
保存:
子进程PID
用于:
waitpid()
回收资源。
_sub_name
sub_channel_xxx
用于调试。
六、进程创建流程
CreateProcessChannel()
核心代码:
pipe(pipefd);

fork();
创建过程
第一次循环
Parent
    │
    └── Child0
生成:
pipe0
第二次循环
Parent
    ├── Child0
    └── Child1
生成:
pipe1
第三次循环
Parent
    ├── Child0
    ├── Child1
    └── Child2
生成:
pipe2
最终:
Parent
│
├── Child0
├── Child1
├── Child2
└── Child3
七、为什么关闭历史遗留写端
问题
fork会继承所有打开文件描述符。
例如:
pipe0
创建Child0后:
Child0
拥有:
pipe0[0]
pipe0[1]
关闭:
close(pipe0[1]);
剩:
pipe0[0]
继续fork Child1:
Child1会继承:
pipe0[1]
pipe1[1]
此时:
Child1
持有 pipe0 写端
如果父进程关闭:
pipe0 写端
Child0仍然读不到EOF。
因为:
还有进程持有写端
解决方案
for(auto &ch : channels)
{
    ch.ClosePipe();
}
关闭历史遗留写端。
最终关系:
pipe0 → Child0
pipe1 → Child1
pipe2 → Child2
pipe3 → Child3
形成:
1 Pipe
    ↓
1 Child
八、任务执行流程
Dotask()
void Dotask(int fd)
{
    while(true)
    {
        read(fd,&task_code,sizeof(task_code));
    }
}
收到任务码
例如:
2
表示:
PrintMessage();
执行:
tasks[2]();
执行流程:
父进程
   │
write(2)
   │
   ▼
pipe
   │
   ▼
子进程
   │
read()
   │
   ▼
tasks[2]()
   │
   ▼
PrintMessage()
九、任务调度策略
SelectTask()
rand() % 4
随机任务:
0~3
SelectChannel()
static int index = 0;
selected =
index % channels.size();
执行顺序:
0
1
2
3
0
1
2
3
...
这种策略叫:
Round Robin
轮询调度
十、运行流程图
┌───────────┐
│  Run()    │
└─────┬─────┘
      │
      ▼
选择任务
      │
      ▼
选择Channel
      │
      ▼
Write(任务码)
      │
      ▼
管道传输
      │
      ▼
子进程read()
      │
      ▼
执行任务
      │
      ▼
继续等待任务
十一、退出流程
父进程
ClosePipe();
关闭所有写端。
子进程
read(...)
返回:
0
表示:
EOF
执行:
break;
退出循环。
父进程回收
waitpid(pid,nullptr,0);
流程:
Parent
    │
close(wfd)
    │
    ▼
Child
read()==0
    │
    ▼
退出
    │
    ▼
waitpid()
    │
    ▼
回收完成
十二、源码中的亮点
回调思想
using cb_t =
std::function<void(int)>;
初始化:
pool.Init(Dotask);
创建子进程后:
cb(pipefd[0]);
调用:
Dotask(pipefd[0]);
实现:
进程池框架
+
业务逻辑
解耦。
到此这篇关于C++ 实现进程池:主从架构、管道通信与任务调度(示例详解)的文章就介绍到这了,更多相关C++ 进程池主从架构内容请搜索脚本之家以前的文章或继续浏览下面的相关文章希望大家以后多多支持脚本之家!