
SpringSecurity、Shiro 和 Sa-Token怎么选,哪个更好
作者:苏三说技术
前言
今天我们来聊聊一个让很多Java开发者纠结的技术选型问题:Spring Security、Apache Shiro和Sa-Token,这3个主流安全框架到底该选哪个?
有些小伙伴在工作中可能遇到过这样的场景:新项目启动会上,架构师坚持要用Spring Security,团队里的老将却说Shiro更简单实用,而年轻的同事则力荐Sa-Token这个后起之秀。
大家各执一词,都有道理,到底该听谁的?
今天这篇文章就跟大家一起聊聊这个话题,希望对你会有所帮助。
1 我们为什么需要安全框架?
在深入对比之前,我们先要理解:为什么不能自己手写安全逻辑,而非要用框架?
想象一下,如果你要为一个电商系统实现权限控制,你需要处理:
// 手写权限控制的典型痛点
public class ManualSecurityExample {
    // 1. 每个方法都要写重复的权限校验
    public void updateProduct(Long productId, ProductDTO dto) {
        // 检查用户是否登录
        User user = getCurrentUser();
        if (user == null) {
            throw new UnauthorizedException("请先登录");
        }
        // 检查用户是否有编辑权限
        if (!user.hasPermission("product:update")) {
            throw new ForbiddenException("没有操作权限");
        }
        // 检查是否是自己的商品(数据级权限)
        Product product = productService.getById(productId);
        if (!product.getOwnerId().equals(user.getId())) {
            throw new ForbiddenException("只能修改自己的商品");
        }
        // 实际业务逻辑...
        productService.update(productId, dto);
    }
    // 2. 每个Controller都要写登录检查
    // 3. 需要自己管理Session/Token
    // 4. 密码加密、CSRF防护都要自己实现
    // 5. 审计日志、安全事件处理...
}
看到问题了吗?
安全逻辑会像“幽灵代码”一样渗透到业务的每个角落,导致:
- 代码重复率高
- 业务逻辑和安全逻辑耦合
- 难以统一维护和升级
- 容易遗漏安全防护点
安全框架的价值,就是把这些问题抽象化、标准化、自动化。
下面这个示意图展示了安全框架如何将安全关注点从业务代码中解耦出来:

理解了安全框架的价值,接下来我们深入分析这三个主流选项。
2 Spring Security:企业级的安全“瑞士军刀”
2.1 Spring Security是什么?
Spring Security是Spring官方提供的安全框架,可以说是Spring生态中的“御林军”。
它不仅仅是一个权限控制框架,更是一个全面的安全解决方案。
2.2 核心架构:过滤器链的极致运用
Spring Security的核心是过滤器链(Filter Chain)。
当一个请求到达时,它会经过一系列安全过滤器,每个过滤器负责特定的安全功能:

2.3 快速搭建一个安全的REST API
// 1. 基础配置类
@Configuration
@EnableWebSecurity
public class SpringSecurityConfig extends WebSecurityConfigurerAdapter {
    @Override
    protected void configure(HttpSecurity http) throws Exception {
        http
            // 禁用CSRF(REST API通常不需要)
            .csrf().disable()
            // 授权配置
            .authorizeRequests()
                .antMatchers("/api/public/**").permitAll()  // 公开接口
                .antMatchers("/api/admin/**").hasRole("ADMIN")  // 需要管理员角色
                .antMatchers("/api/user/**").hasAnyRole("USER", "ADMIN")  // 需要用户角色
                .anyRequest().authenticated()  // 其他所有请求需要认证
            // 表单登录配置(前后端分离时通常用不上)
            .and()
            .formLogin().disable()
            // 基础认证配置
            .httpBasic()
            // 异常处理
            .and()
            .exceptionHandling()
                .authenticationEntryPoint(restAuthenticationEntryPoint())  // 未认证处理
                .accessDeniedHandler(restAccessDeniedHandler());  // 权限不足处理
    }
    // 2. 用户详情服务(从数据库加载用户)
    @Bean
    public UserDetailsService userDetailsService() {
        return username -> {
            // 这里实际应该查询数据库
            if ("admin".equals(username)) {
                return User.withUsername("admin")
                    .password(passwordEncoder().encode("admin123"))
                    .roles("ADMIN")
                    .build();
            } else if ("user".equals(username)) {
                return User.withUsername("user")
                    .password(passwordEncoder().encode("user123"))
                    .roles("USER")
                    .build();
            }
            throw new UsernameNotFoundException("用户不存在: " + username);
        };
    }
    // 3. 密码编码器
    @Bean
    public PasswordEncoder passwordEncoder() {
        return new BCryptPasswordEncoder();
    }
    // 4. REST API认证入口点
    @Bean
    public AuthenticationEntryPoint restAuthenticationEntryPoint() {
        return (request, response, authException) -> {
            response.setContentType(MediaType.APPLICATION_JSON_VALUE);
            response.setStatus(HttpStatus.UNAUTHORIZED.value());
            response.getWriter().write(
                "{\"code\": 401, \"message\": \"未认证,请先登录\"}"
            );
        };
    }
}
// 5. 在Controller中使用安全注解
@RestController
@RequestMapping("/api")
public class ProductController {
    @GetMapping("/public/products")
    public List<Product> getPublicProducts() {
        // 公开接口,无需认证
        return productService.getAllProducts();
    }
    @GetMapping("/user/products")
    @PreAuthorize("hasRole('USER')")  // 需要USER角色
    public List<Product> getUserProducts() {
        // 获取当前认证用户
        Authentication auth = SecurityContextHolder.getContext().getAuthentication();
        String username = auth.getName();
        return productService.getProductsByOwner(username);
    }
    @PostMapping("/admin/products")
    @PreAuthorize("hasRole('ADMIN')")  // 需要ADMIN角色
    public Product createProduct(@RequestBody ProductDTO dto) {
        return productService.createProduct(dto);
    }
    @DeleteMapping("/admin/products/{id}")
    @PreAuthorize("hasPermission(#id, 'product', 'delete')")  // 方法级权限控制
    public void deleteProduct(@PathVariable Long id) {
        productService.deleteProduct(id);
    }
}
Spring Security的优势与痛点
优势:
- Spring生态原生支持:与Spring Boot、Spring Cloud无缝集成
- 功能全面:认证、授权、防护(CSRF、CORS、点击劫持等)一应俱全
- 高度可定制:几乎每个组件都可以自定义或替换
- 社区强大:Spring官方维护,文档完善,社区活跃
- 企业级特性:OAuth2、SAML、LDAP等企业级集成支持
痛点:
- 学习曲线陡峭:概念复杂,配置繁琐
- 过度设计感:简单需求也需要复杂配置
- 调试困难:过滤器链复杂,问题定位困难
- 性能开销:完整的过滤器链带来一定性能损失
适用场景:
- 大型企业级应用
- 需要与Spring生态深度集成的项目
- 需要OAuth2、LDAP等企业级认证协议的项目
- 团队有Spring Security经验的场景
有些小伙伴刚开始学Spring Security时,可能会被它复杂的概念搞晕,比如:SecurityContext、Authentication、UserDetails、GrantedAuthority等等。
但一旦掌握了它的设计哲学,你会发现它真的很强大。
3 Apache Shiro:简单直观的“轻骑兵”
3.1 Shiro是什么?
Apache Shiro是一个功能强大且易于使用的Java安全框架,它的设计哲学是:简化应用安全,让安全变得更简单。
如果说Spring Security是重型坦克,那么Shiro就是灵活机动的轻骑兵。
3.2 核心架构:四大核心概念
Shiro的架构围绕四个核心概念构建:
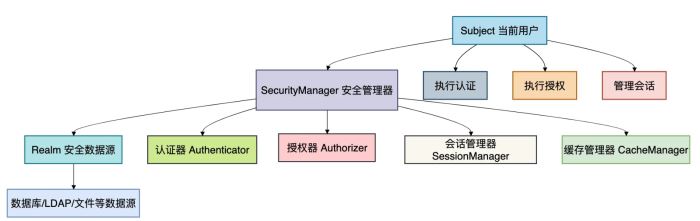
3.3 快速实现基于URL的权限控制
// 1. Shiro配置类
@Configuration
public class ShiroConfig {
    // 创建ShiroFilterFactoryBean
    @Bean
    public ShiroFilterFactoryBean shiroFilterFactoryBean(
            SecurityManager securityManager) {
        ShiroFilterFactoryBean factoryBean = new ShiroFilterFactoryBean();
        factoryBean.setSecurityManager(securityManager);
        // 设置登录页面
        factoryBean.setLoginUrl("/login");
        // 设置未授权页面
        factoryBean.setUnauthorizedUrl("/unauthorized");
        // 配置拦截规则
        Map<String, String> filterChainDefinitionMap = new LinkedHashMap<>();
        // 静态资源放行
        filterChainDefinitionMap.put("/static/**", "anon");
        filterChainDefinitionMap.put("/css/**", "anon");
        filterChainDefinitionMap.put("/js/**", "anon");
        // 公开接口
        filterChainDefinitionMap.put("/api/public/**", "anon");
        filterChainDefinitionMap.put("/login", "anon");
        // 需要认证的接口
        filterChainDefinitionMap.put("/api/user/**", "authc");
        filterChainDefinitionMap.put("/api/admin/**", "authc, roles[admin]");
        // 需要特定权限的接口
        filterChainDefinitionMap.put("/api/products/create", "authc, perms[product:create]");
        filterChainDefinitionMap.put("/api/products/delete/*", "authc, perms[product:delete]");
        // 其他所有请求需要认证
        filterChainDefinitionMap.put("/**", "authc");
        factoryBean.setFilterChainDefinitionMap(filterChainDefinitionMap);
        return factoryBean;
    }
    // 创建SecurityManager
    @Bean
    public SecurityManager securityManager() {
        DefaultWebSecurityManager securityManager = new DefaultWebSecurityManager();
        // 设置Realm
        securityManager.setRealm(customRealm());
        // 设置Session管理器
        securityManager.setSessionManager(sessionManager());
        // 设置缓存管理器
        securityManager.setCacheManager(cacheManager());
        return securityManager;
    }
    // 自定义Realm(连接安全数据源)
    @Bean
    public Realm customRealm() {
        CustomRealm realm = new CustomRealm();
        // 设置密码匹配器
        HashedCredentialsMatcher credentialsMatcher = new HashedCredentialsMatcher();
        credentialsMatcher.setHashAlgorithmName("SHA-256");
        credentialsMatcher.setHashIterations(1024);
        credentialsMatcher.setStoredCredentialsHexEncoded(false);
        realm.setCredentialsMatcher(credentialsMatcher);
        // 开启缓存
        realm.setCachingEnabled(true);
        realm.setAuthenticationCachingEnabled(true);
        realm.setAuthenticationCacheName("authenticationCache");
        realm.setAuthorizationCachingEnabled(true);
        realm.setAuthorizationCacheName("authorizationCache");
        return realm;
    }
}
// 2. 自定义Realm实现
public class CustomRealm extends AuthorizingRealm {
    @Autowired
    private UserService userService;
    // 认证逻辑:验证用户身份
    @Override
    protected AuthenticationInfo doGetAuthenticationInfo(
            AuthenticationToken token) throws AuthenticationException {
        UsernamePasswordToken upToken = (UsernamePasswordToken) token;
        String username = upToken.getUsername();
        // 从数据库查询用户
        User user = userService.findByUsername(username);
        if (user == null) {
            throw new UnknownAccountException("用户不存在");
        }
        if (!user.isEnabled()) {
            throw new DisabledAccountException("用户已被禁用");
        }
        // 返回认证信息
        return new SimpleAuthenticationInfo(
            user, // 身份 principal
            user.getPassword(), // 凭证 credentials
            getName() // realm name
        );
    }
    // 授权逻辑:获取用户的角色和权限
    @Override
    protected AuthorizationInfo doGetAuthorizationInfo(
            PrincipalCollection principals) {
        User user = (User) principals.getPrimaryPrincipal();
        SimpleAuthorizationInfo authorizationInfo = new SimpleAuthorizationInfo();
        // 添加角色
        Set<String> roles = userService.findRolesByUserId(user.getId());
        authorizationInfo.setRoles(roles);
        // 添加权限
        Set<String> permissions = userService.findPermissionsByUserId(user.getId());
        authorizationInfo.setStringPermissions(permissions);
        return authorizationInfo;
    }
}
// 3. 在Controller中使用Shiro
@RestController
@RequestMapping("/api")
public class ProductController {
    @GetMapping("/products")
    public List<Product> getProducts() {
        // 获取当前用户
        Subject currentUser = SecurityUtils.getSubject();
        // 检查是否已认证
        if (!currentUser.isAuthenticated()) {
            throw new UnauthorizedException("请先登录");
        }
        // 检查是否有权限
        if (!currentUser.isPermitted("product:view")) {
            throw new ForbiddenException("没有查看权限");
        }
        // 执行业务逻辑
        return productService.getAllProducts();
    }
    @PostMapping("/products")
    public Product createProduct(@RequestBody ProductDTO dto) {
        Subject currentUser = SecurityUtils.getSubject();
        // 使用Shiro的权限注解(需要AOP支持)
        currentUser.checkPermission("product:create");
        // 或者使用编程式检查
        // if (!currentUser.isPermitted("product:create")) {
        //     throw new ForbiddenException("没有创建权限");
        // }
        return productService.createProduct(dto);
    }
    @GetMapping("/admin/dashboard")
    public DashboardVO getAdminDashboard() {
        Subject currentUser = SecurityUtils.getSubject();
        // 检查是否具有admin角色
        currentUser.checkRole("admin");
        return dashboardService.getAdminDashboard();
    }
}
Shiro的优势与痛点
优势:
- 简单直观:API设计简洁,学习成本低
- 配置灵活:支持INI、XML、注解等多种配置方式
- 功能完整:认证、授权、会话管理、加密、缓存等一应俱全
- 不依赖容器:可以在任何Java环境中运行
- 易于集成:与Spring、Spring Boot等框架集成简单
痛点:
- Spring生态整合不够原生:需要额外配置
- 社区活跃度下降:相比Spring Security,社区维护力度减弱
- 功能扩展性有限:某些高级功能需要自己实现
- 文档相对陈旧:部分文档更新不及时
适用场景:
- 中小型项目,追求快速开发
- 非Spring项目或Spring生态不重的项目
- 团队对Spring Security不熟悉
- 需要简单权限控制的内部系统
有些小伙伴喜欢Shiro的简洁,特别是它的INI配置文件,几行配置就能搞定基本的权限控制。
但当你需要更复杂的功能时,可能会发现需要自己写不少代码。
4 Sa-Token:国产新星的“后起之秀”
4.1 Sa-Token是什么?
Sa-Token是一个轻量级Java权限认证框架,由国内开发者开发。
它的设计理念是:以最少的配置,完成最全面的权限认证功能。
在Spring Security和Shiro之外,Sa-Token提供了一种新的选择。
4.2 核心特性:简单而强大
Sa-Token的核心设计哲学可以概括为:“简单、强大、灵活”。
它通过几个核心组件实现了完整的安全控制:

4.3 5分钟搭建完整权限系统
// 1. 添加依赖(pom.xml)
// <dependency>
//     <groupId>cn.dev33</groupId>
//     <artifactId>sa-token-spring-boot-starter</artifactId>
//     <version>1.34.0</version>
// </dependency>
// 2. 配置文件(application.yml)
// sa-token:
//   token-name: satoken           # token名称
//   timeout: 2592000             # token有效期,单位秒,默认30天
//   active-timeout: -1           # token活跃有效期,-1代表不限制
//   is-concurrent: true          # 是否允许并发登录
//   is-share: true               # 在多人登录同一账号时,是否共享token
//   max-login-count: 12          # 同一账号最大登录数量
//   is-write-header: true        # 是否将token写入响应头
//   token-style: uuid            # token风格
//   is-log: false                # 是否打印操作日志
// 3. 配置类(可选)
@Configuration
public class SaTokenConfig {
    // 注册拦截器
    @Bean
    public SaInterceptor saInterceptor() {
        return new SaInterceptor()
            // 校验登录状态,不包含登录接口
            .addPathPatterns("/**")
            .excludePathPatterns("/api/user/login")
            .excludePathPatterns("/api/public/**")
            // 权限校验规则
            .check(r -> {
                // 1. 检查登录状态
                SaRouter.match("/api/**", () -> {
                    StpUtil.checkLogin();
                });
                // 2. 角色校验
                SaRouter.match("/api/admin/**", () -> {
                    StpUtil.checkRole("admin");
                });
                // 3. 权限校验
                SaRouter.match("/api/products/create", () -> {
                    StpUtil.checkPermission("product.create");
                });
                SaRouter.match("/api/products/delete/**", () -> {
                    StpUtil.checkPermission("product.delete");
                });
            });
    }
}
// 4. 登录认证Controller
@RestController
@RequestMapping("/api/user")
public class UserController {
    @PostMapping("/login")
    public ApiResult login(@RequestBody LoginDTO dto) {
        // 1. 验证用户名密码
        User user = userService.findByUsername(dto.getUsername());
        if (user == null || !passwordEncoder.matches(dto.getPassword(), user.getPassword())) {
            return ApiResult.error("用户名或密码错误");
        }
        // 2. 登录(Sa-Token会自动创建token)
        StpUtil.login(user.getId());
        // 3. 获取token信息
        String tokenValue = StpUtil.getTokenValue();
        long tokenTimeout = StpUtil.getTokenTimeout();
        // 4. 返回用户信息和token
        LoginVO vo = new LoginVO();
        vo.setUserId(user.getId());
        vo.setUsername(user.getUsername());
        vo.setToken(tokenValue);
        vo.setExpireTime(tokenTimeout);
        // 5. 可以设置一些session信息
        StpUtil.getSession().set("userInfo", user);
        return ApiResult.success("登录成功", vo);
    }
    @PostMapping("/logout")
    public ApiResult logout() {
        // 注销当前会话
        StpUtil.logout();
        return ApiResult.success("注销成功");
    }
    @GetMapping("/info")
    public ApiResult getUserInfo() {
        // 获取当前登录用户ID
        Object loginId = StpUtil.getLoginId();
        // 获取用户信息
        User user = userService.findById(Long.parseLong(loginId.toString()));
        // 获取用户权限列表
        List<String> permissionList = StpUtil.getPermissionList();
        // 获取用户角色列表
        List<String> roleList = StpUtil.getRoleList();
        UserInfoVO vo = new UserInfoVO();
        vo.setUser(user);
        vo.setPermissions(permissionList);
        vo.setRoles(roleList);
        return ApiResult.success(vo);
    }
}
// 5. 业务Controller中使用
@RestController
@RequestMapping("/api/products")
public class ProductController {
    @GetMapping("/list")
    public ApiResult getProductList() {
        // 无需手动检查登录状态,拦截器已处理
        // 获取当前登录用户ID
        long userId = StpUtil.getLoginIdAsLong();
        List<Product> products = productService.getProductsByOwner(userId);
        return ApiResult.success(products);
    }
    @PostMapping("/create")
    public ApiResult createProduct(@RequestBody ProductDTO dto) {
        // 使用注解方式检查权限
        // @SaCheckPermission("product.create") 也可以这样用
        // 编程式检查权限
        StpUtil.checkPermission("product.create");
        long userId = StpUtil.getLoginIdAsLong();
        dto.setOwnerId(userId);
        Product product = productService.createProduct(dto);
        return ApiResult.success(product);
    }
    @DeleteMapping("/{id}")
    @SaCheckPermission("product.delete")  // 注解方式权限检查
    public ApiResult deleteProduct(@PathVariable Long id) {
        // 除了权限检查,还可以检查数据权限
        Product product = productService.getById(id);
        long currentUserId = StpUtil.getLoginIdAsLong();
        if (product.getOwnerId() != currentUserId) {
            // 不是自己的商品,检查是否有管理员权限
            StpUtil.checkRole("admin");
        }
        productService.deleteProduct(id);
        return ApiResult.success("删除成功");
    }
    @GetMapping("/admin/dashboard")
    @SaCheckRole("admin")  // 注解方式角色检查
    public ApiResult getAdminDashboard() {
        DashboardVO dashboard = dashboardService.getAdminDashboard();
        return ApiResult.success(dashboard);
    }
}
// 6. 进阶功能:踢人下线、账号封禁
@Service
public class AdvancedSecurityService {
    // 强制注销(踢人下线)
    public void forceLogout(Object loginId) {
        StpUtil.logout(loginId);
    }
    // 封禁账号
    public void disableAccount(Object loginId, long disableTime) {
        // 封禁指定时间(单位:秒)
        StpUtil.disable(loginId, disableTime);
    }
    // 检查是否被封禁
    public boolean isDisabled(Object loginId) {
        return StpUtil.isDisable(loginId);
    }
    // 二级认证(敏感操作需要再次验证)
    public boolean startSecondAuth(long ttl) {
        // 开启二级认证,有效期为ttl秒
        return StpUtil.openSafe(ttl);
    }
    // 检查二级认证
    public void checkSecondAuth() {
        StpUtil.checkSafe();
    }
}
Sa-Token的优势与痛点
优势:
- API设计极其简洁:
StpUtil.xxx()几乎涵盖了所有操作 - 开箱即用:几乎零配置就能使用
- 功能丰富:除了基础认证授权,还提供踢人下线、账号封禁、二级认证等高级功能
- 国产框架:中文文档完善,符合国人使用习惯
- 轻量级:依赖少,启动快
痛点:
- 相对较新:生态不如Spring Security和Shiro成熟
- 社区规模小:遇到复杂问题可能难以找到解决方案
- 企业级特性有限:对OAuth2、LDAP等支持较弱
- 过度封装:某些场景下灵活性不足
适用场景:
- 中小型项目,追求开发效率
- 团队对Spring Security/Shiro不熟悉
- 需要快速搭建权限系统的原型或内部工具
- 偏好国产框架和中文文档的团队
有些小伙伴第一次用Sa-Token时,会被它的简洁惊艳到。几行代码就实现了其他框架需要大量配置的功能。
但对于大型复杂系统,可能需要仔细评估它的扩展性和长期维护性。
5 三大框架全方位对比
了解了每个框架的单独特点后,我们来一个全方位的对比:
5.1 详细对比表
| 维度 | Spring Security | Apache Shiro | Sa-Token |
|---|---|---|---|
| 学习曲线 | 陡峭 ⭐⭐⭐⭐⭐ | 中等 ⭐⭐⭐☆☆ | 平缓 ⭐⭐☆☆☆ |
| 配置复杂度 | 复杂 ⭐⭐⭐⭐⭐ | 中等 ⭐⭐⭐☆☆ | 简单 ⭐☆☆☆☆ |
| 功能完整性 | 全面 ⭐⭐⭐⭐⭐ | 完整 ⭐⭐⭐⭐☆ | 丰富 ⭐⭐⭐☆☆ |
| Spring生态集成 | 原生 ⭐⭐⭐⭐⭐ | 良好 ⭐⭐⭐☆☆ | 良好 ⭐⭐⭐☆☆ |
| 性能开销 | 较高 ⭐⭐⭐☆☆ | 中等 ⭐⭐⭐☆☆ | 较低 ⭐⭐☆☆☆ |
| 社区活跃度 | 活跃 ⭐⭐⭐⭐⭐ | 一般 ⭐⭐⭐☆☆ | 增长 ⭐⭐⭐☆☆ |
| 文档质量 | 优秀(英文)⭐⭐⭐⭐⭐ | 良好 ⭐⭐⭐☆☆ | 优秀(中文)⭐⭐⭐⭐⭐ |
| 扩展性 | 强大 ⭐⭐⭐⭐⭐ | 良好 ⭐⭐⭐☆☆ | 一般 ⭐⭐⭐☆☆ |
| 企业级特性 | 丰富 ⭐⭐⭐⭐⭐ | 有限 ⭐⭐☆☆☆ | 有限 ⭐⭐☆☆☆ |
5.2 技术特性详细对比
| 特性 | Spring Security | Apache Shiro | Sa-Token |
|---|---|---|---|
| 认证方式 | 表单、Basic、OAuth2、LDAP、SAML等 | 表单、Basic、CAS等 | 表单、自定义 |
| 授权模型 | RBAC、ABAC、方法级、URL级 | RBAC、URL级、方法级 | RBAC、方法级 |
| 会话管理 | 支持,与Spring Session集成 | 强大,自带会话管理 | 支持,简单易用 |
| 密码加密 | 多种加密方式支持 | 多种加密方式支持 | 支持 |
| 缓存支持 | 需要自行集成Spring Cache | 内置缓存支持 | 支持Redis等 |
| 单点登录 | 通过Spring Security OAuth2 | 需要额外模块 | 需要额外模块 |
| 微服务支持 | 优秀,与Spring Cloud GateWay集成 | 一般 | 支持 |
| 监控管理 | 与Spring Boot Actuator集成 | 需要自行实现 | 简单监控 |
6 如何做出最佳选择?
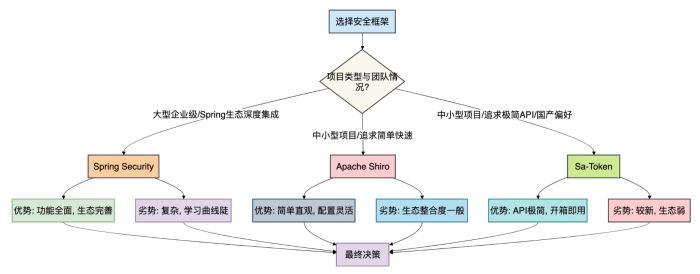
面对三个各有优劣的框架,如何做出最适合自己项目的选择?
我总结了一个决策流程图,帮助你在不同场景下做出明智决策:

6.1 具体场景建议
场景一:大型电商平台(选择Spring Security)
- 理由:需要完善的OAuth2社交登录、支付安全、风控系统
- 实施要点:
- 使用Spring Security OAuth2 Client集成第三方登录
- 自定义安全过滤器实现风控逻辑
- 与Spring Cloud Gateway整合实现统一认证
- 使用Method Security注解实现细粒度权限控制
场景二:企业内部管理系统(选择Apache Shiro)
- 理由:权限模型相对固定,需要快速开发,团队熟悉Shiro
- 实施要点:
- 使用INI配置文件快速定义URL权限规则
- 集成Ehcache缓存权限数据提升性能
- 自定义Realm连接企业LDAP/AD域
- 利用Shiro标签在页面上控制元素显示
场景三:创业公司MVP产品(选择Sa-Token)
- 理由:需要快速上线验证想法,团队规模小,追求开发效率
- 实施要点:
- 利用Sa-Token的零配置特性快速搭建
- 使用注解方式实现基本权限控制
- 集成Redis实现分布式会话
- 利用Sa-Token的踢人功能实现基础管理
场景四:微服务架构系统(混合方案)
- 理由:不同服务有不同的安全需求
- 实施要点:
- 网关层:Spring Security + OAuth2(统一认证)
- 核心业务服务:Spring Security(细粒度控制)
- 内部管理服务:Apache Shiro(简单权限)
- 工具类微服务:Sa-Token(快速开发)
6.2 如果选错了怎么办?
有些小伙伴可能会遇到这样的情况:项目初期选型不合适,随着业务发展需要迁移到其他框架。
这里提供一些迁移建议:
- 渐进式迁移:新旧框架并行,逐步替换
- 抽象隔离层:创建统一的安全接口,底层实现可替换
- 分模块迁移:按业务模块逐个迁移,降低风险
- 充分测试:特别是边缘案例和权限组合场景
// 抽象安全接口示例
public interface SecurityService {
    // 认证相关
    boolean login(String username, String password);
    void logout();
    boolean isAuthenticated();
    // 授权相关
    boolean hasPermission(String permission);
    boolean hasRole(String role);
    // 用户信息
    Object getCurrentUser();
    Long getCurrentUserId();
}
// Spring Security实现
@Service
public class SpringSecurityServiceImpl implements SecurityService {
    // 实现基于Spring Security的接口
}
// 需要迁移时,只需实现新的实现类
@Service
public class SaTokenServiceImpl implements SecurityService {
    // 实现基于Sa-Token的接口
    // 业务代码无需修改,只需切换实现
}
总结
经过深入分析,我们可以得出以下结论:
- Spring Security是企业级重型武器,功能全面但复杂,适合大型项目和有经验的团队。
- Apache Shiro是灵活实用的轻骑兵,平衡了功能与复杂度,适合大多数中小型项目。
- Sa-Token是快速开发的利器,API简洁但生态相对年轻,适合追求开发效率的场景。
实际上,没有完美的框架,只有合适的框架。
到此这篇关于SpringSecurity、Shiro 和 Sa-Token,选哪个更好?的文章就介绍到这了,更多相关SpringSecurity、Shiro 和 Sa-Token,选哪个更好?内容请搜索脚本之家以前的文章或继续浏览下面的相关文章希望大家以后多多支持脚本之家!