
SpringBoot远程调用(HTTP)实现过程
作者:tomorrow.hello
1.JDK中的HttpURLConnection
使用JDK 1.8中自带的rt.jar包中的java.net中的HttpURLConnection
public static void postTest() throws Exception{
 // 1.请求URL
   String postUrl = "";
   // 2.请求参数JSON格式
   Map<String, String> parammap = new HashMap<>();;
   String json = JSON.toJSONString(map);
   // 3.创建连接与设置连接参数
   URL urlObj = new URL(postUrl);
   HttpURLConnection httpConn = (HttpURLConnection) urlObj.openConnection();
   httpConn.setRequestMethod("POST");
   httpConn.setRequestProperty("Charset", "UTF-8");
   // POST请求且JSON数据,必须设置
   httpConn.setRequestProperty("Content-Type", "application/json");
   // 打开输出流,默认是false
   httpConn.setDoOutput(true);
   // 打开输入流,默认是true,可省略
   httpConn.setDoInput(true);
   // 4.从HttpURLConnection获取输出流和写数据
   OutputStream oStream = httpConn.getOutputStream();
   oStream.write(json.getBytes());
   oStream.flush();
   // 5.发起http调用(getInputStream触发http请求)
   if (httpConn.getResponseCode() != 200) {
       throw new Exception("调用服务端异常.");
   }
   // 6.从HttpURLConnection获取输入流和读数据
   BufferedReader br = new BufferedReader(
           new InputStreamReader(httpConn.getInputStream()));
   String resultData = br.readLine();
   System.out.println("从服务端返回结果: " + resultData);
   // 7.关闭HttpURLConnection连接
   httpConn.disconnect();
 }
2.commons-httpclient中的HttpClient
引入依赖
<dependency>
  <groupId>commons-httpclient</groupId>
  <artifactId>commons-httpclient</artifactId>
</dependency>
public static void postTest() throws Exception {
  // 1.请求URL
  String postUrl = "";
  // 2.请求参数
  Map<String, String> parammap = new HashMap<>();
  String json = JSON.toJSONString(parammap);
  // 3.创建连接与设置连接参数
  HttpClient httpClient = new HttpClient();
  PostMethod postMethod = new PostMethod(postUrl);
  postMethod.addRequestHeader("Content-Type", "application/json");
  RequestEntity entity = new StringRequestEntity(json, "application/json", "UTF-8");
  postMethod.setRequestEntity(entity);
  //解决返回值中文乱码
  postMethod.getParams().setParameter(HttpMethodParams.HTTP_CONTENT_CHARSET, "UTF-8");
  String resultData = "";
  // 4.发起请求
  int code = httpClient.executeMethod(postMethod);
  if (code != 200) {
      throw new Exception("调用服务端异常.");
  }
  // 5.接收返回值
  resultData = postMethod.getResponseBodyAsString();
  System.out.println("从服务端返回结果: " + resultData);
  // 6.关闭连接
  postMethod.releaseConnection();
 }
3.httpclient中的HttpClientBuilder
HttpClient:是apache httpClient包下的,代码复杂,需要资源回收。
引入依赖
<dependency>
  <groupId>org.apache.httpcomponents</groupId>
  <artifactId>httpclient</artifactId>
</dependency>
public static void postTest() throws Exception {
   // 1.请求URL
   String postUrl = "";
   // 2.请求参数
   Map<String, String> paramMap = new HashMap<>();
   String json = JSON.toJSONString(paramMap);
   // 3.创建连接与设置连接参数
   CloseableHttpClient httpClient = HttpClientBuilder.create().build();
   HttpPost httpPost = new HttpPost(postUrl);
   StringEntity entity = new StringEntity(json);
   entity.setContentEncoding("UTF-8");
   entity.setContentType("application/json");
   httpPost.setEntity(entity);
   // 4.发起请求与接收返回值
   HttpResponse response = httpClient.execute(httpPost);
   if (response.getStatusLine().getStatusCode() != 200) {
       throw new Exception("调用服务端异常.");
   }
   HttpEntity res = response.getEntity();
   String resultData = EntityUtils.toString(res);
   System.out.println("从服务端返回结果: " + resultData);
   // 5.关闭连接
   httpClient.close();
 }
4.okhttp中的OkHttpClient
引入依赖
<dependency>
  <groupId>com.squareup.okhttp3</groupId>
  <artifactId>okhttp</artifactId>
  <exclusions>
    <exclusion>
      <groupId>com.google.android</groupId>
      <artifactId>android</artifactId>
    </exclusion>
  </exclusions>
</dependency>
public static void postTest() throws Exception {
// 1.请求URL
String postUrl = "";
// 2.请求参数
Map<String, String> paramMap = new HashMap<>();
String json = JSON.toJSONString(paramMap);
// 3.创建连接与设置连接参数
MediaType mediaType = MediaType.parse("application/json; charset=UTF-8");
RequestBody requestBody = RequestBody.Companion.create(json, mediaType);
Request request = new Request.Builder().url(postUrl).post(requestBody).build();
OkHttpClient okHttpClient = new OkHttpClient.Builder().build();
// 4.发起请求与接收返回值
Response response = okHttpClient.newCall(request).execute();
String resultData = response.body().string();
System.out.println("从服务端返回结果: " + resultData);
}5.RestClient
官网解释: synchronous client with a fluent API.
5.RestTemplate(WebMVC推荐)
RestTemplate:RestTemplate 是 Spring 提供的一个经典同步 HTTP 客户端工具,可以用于调用 RESTful 风格的外部接口,代码简单,默认依赖jdk的HTTP连接工具,它是一个同步阻塞型客户端,官网解释:synchronous client with template method API.
RestTemplate restTemplate = new RestTemplate();

String url = "http://api.example.com/user/{id}";
Map<String, String> params = new HashMap<>();
params.put("id", "123");

User user = restTemplate.getForObject(url, User.class, params);
使用 RestTemplate并发调用:
public class RestTemplateConcurrentExample {

    private RestTemplate restTemplate = new RestTemplate();

    public void fetchMultipleUsers(String[] userIds) {
        ExecutorService executor = Executors.newFixedThreadPool(userIds.length);
        for (String userId : userIds) {
            executor.submit(() -> {
                String url = "https://api.example.com/users/" + userId;
                String response = restTemplate.getForObject(url, String.class);
                System.out.println(response);
            });
        }
        executor.shutdown();
    }
}
6.WebClient(WebFlux推荐)
WebClient 是 Spring 5 引入的一种非阻塞式、响应式的 HTTP 客户端工具,它提供了一套简洁的 API 来发送 HTTP 请求并处理响应。WebClient 基于 Reactor 提供了对响应式编程的支持,可以实现高性能的异步操作,官网解释:non-blocking, reactive client with fluent API。
1.简单使用
WebClient webClient = WebClient.create();

String url = "http://api.example.com/user/{id}";
Map<String, String> params = new HashMap<>();
params.put("id", "123");

Mono<User> result = webClient.get()
        .uri(uriBuilder -> uriBuilder.path(url).build(params))
        .retrieve()
        .bodyToMono(User.class);

result.subscribe(user -> {

    // 处理响应结果
});
webclient并发调用:
public class WebClientConcurrentExample {

    private WebClient webClient = WebClient.create();

    public Flux<String> fetchMultipleUsers(String[] userIds) {
        return Flux.fromArray(userIds)
               .flatMap(userId -> webClient.get()
                       .uri("https://api.example.com/users/" + userId)
                       .retrieve()
                       .bodyToMono(String.class));
    }
}
2.高级使用
1.配置连接池
/**
WebClient连接池
**/
@Configuration
public class WebClientConfig {

    @Bean
    public WebClient webClient() {
        // 配置HTTP连接池
        ConnectionProvider provider = ConnectionProvider.builder("custom")
                .maxConnections(500)
                .maxIdleTime(Duration.ofSeconds(20))
                .build();

        // 配置HTTP客户端
        HttpClient httpClient = HttpClient.create(provider)
                .option(ChannelOption.CONNECT_TIMEOUT_MILLIS, 5000)
                .responseTimeout(Duration.ofSeconds(5))
                .doOnConnected(conn ->
                        conn.addHandlerLast(new ReadTimeoutHandler(5))
                                .addHandlerLast(new WriteTimeoutHandler(5)));

        // 构建WebClient实例
        return WebClient.builder()
                .clientConnector(new ReactorClientHttpConnector(httpClient))
                .baseUrl("https://echo.apifox.com")
                .defaultHeader(HttpHeaders.CONTENT_TYPE, MediaType.APPLICATION_JSON_VALUE)
                .defaultHeader(HttpHeaders.ACCEPT, MediaType.APPLICATION_JSON_VALUE)
                // 添加请求日志记录功能
                .filter(ExchangeFilterFunction.ofRequestProcessor(
                        clientRequest -> {
                            log.debug("Request: {} {}",
                                    clientRequest.method(),
                                    clientRequest.url());
                            return Mono.just(clientRequest);
                        }
                ))
                // 添加响应日志记录功能
                .filter(ExchangeFilterFunction.ofResponseProcessor(
                        clientResponse -> {
                            log.debug("Response status: {}",
                                    clientResponse.statusCode());
                            return Mono.just(clientResponse);
                        }
                ))
                .build();
    }
}
2. retrieve()和exchange()区别
retrieve()
- 用途:retrieve() 方法用于简化响应处理,特别是当你只需要响应体时。
- 自动错误处理:retrieve() 会自动处理 HTTP 错误状态码(例如 4xx 和 5xx),并抛出 WebClientResponseException 及其子类。
- 返回值:通常用于直接获取响应体,例如 bodyToMono(String.class) 或 bodyToFlux(String.class)。
- 适用场景:适用于大多数常见的请求处理场景,特别是当你不需要手动处理响应状态码时。
public Mono<JSONObject> get(String q1) {
    return webClient.get()
            .uri(uriBuilder -> uriBuilder
                    .path("/get")
                    .queryParam("q1", q1)
                    .build())
            .accept(MediaType.APPLICATION_JSON)
            .retrieve()
            .bodyToMono(JSONObject.class);
}
exchange()
- 用途:exchange() 方法提供了更底层的控制,允许你手动处理响应,包括响应状态码和响应头。
- 手动错误处理:exchange() 不会自动处理 HTTP 错误状态码,你需要手动检查响应状态码并进行相应的处理。
- 返回值:返回 ClientResponse 对象,你可以从中提取响应状态码、响应头和响应体。
- 适用场景:适用于需要手动处理响应状态码或响应头的复杂场景。
public Mono<JSONObject> get(String q1) {
    return webClient.get()
            .uri(uriBuilder -> uriBuilder
                    .path("/get")
                    .queryParam("q1", q1)
                    .build())
            .accept(MediaType.APPLICATION_JSON)
            .exchangeToMono(response -> {
                if (response.statusCode().is2xxSuccessful()) {
                    return response.bodyToMono(JSONObject.class);
                } else {
                    return Mono.error(new RuntimeException("Request failed with status code: " + response.statusCode()));
                }
            });
}
3. GET,POST,PUT,DELETE请求
@Service
public class ApiService {

    @Resource
    private WebClient webClient;

    // GET请求
    public Mono<JSONObject> get(String q1) {
        return webClient.get()
                .uri(uriBuilder -> uriBuilder
                        .path("/get")
                        .queryParam("q1", q1)
                        .build())
                .accept(MediaType.APPLICATION_JSON)
                .retrieve()
                .bodyToMono(JSONObject.class);
    }

    // POST请求
    public Mono<JSONObject> post(JSONObject body) {
        return webClient.post()
                .uri("/post")
                .bodyValue(body)
                .retrieve()
                .bodyToMono(JSONObject.class);
    }

    // PUT请求
    public Mono<JSONObject> put(String q1, JSONObject JSONObject) {
        return webClient.put()
                .uri(uriBuilder -> uriBuilder
                        .path("/put")
                        .queryParam("q1", q1)
                        .build())
                .bodyValue(JSONObject)
                .retrieve()
                .bodyToMono(JSONObject.class);
    }

    // DELETE请求
    public Mono<JSONObject> delete(String q1) {
        return webClient.delete()
                .uri(uriBuilder -> uriBuilder
                        .path("/delete")
                        .queryParam("q1", q1)
                        .build())
                .retrieve()
                .bodyToMono(JSONObject.class);
    }
}
3.Mono和Flux
Mono用于表示包含 0 个或 1 个元素的异步数据流(如单个用户信息查询结果);Flux用于表示包含 0 个或多个元素的异步数据流(如列表查询结果)。
4. 创建型操作符(just)
1. Mono和Flux
just操作可直接通过传入的元素创建一个响应式流。其中,Flux 可接收多个元素(0 个或多个),Mono 则仅能接收单个元素(若传入多个会报错,示例中Mono.just("A", "B", "C")为错误示范,正确应为Mono.just("A"))。
// 创建包含3个元素的Flux流(可正常运行)
Flux<String> flux = Flux.just("A", "B", "C");
// 正确示例:创建仅包含1个元素的Mono流
Mono<String> mono = Mono.just("A");
2. fromIterable(Iterable<T>)
fromIterable、fromArray则分别将已有的Iterable类型集合(如List、Set),和数组转换为响应式流,自动遍历集合中的元素并发送到流中。适合需要处理已有数据集合的场景,避免手动逐个添加元素。
// fromIterable
List<Integer> list = Arrays.asList(1, 2, 3);
Flux<Integer> flux = Flux.fromIterable(list);
// fromArray
Integer[] arr = {10, 20, 30};
Flux<Integer> flux = Flux.fromArray(arr);
flux.subscribe(System.out::println);
3. range(int start, int count)
range则适用于快速生成一段连续的整数流来构建测试用例。其中,第一个参数为起始值,第二个参数为元素个数。
Flux.range(1, 5).subscribe(System.out::println); // 输出 1~5
4. create(FluxSink<T>)
通过FluxSink对象可手动发送元素(next)、结束信号(complete)或错误信号(error),灵活控制流的产生过程。
该API适合用于从异步回调、事件监听中获取数据等场景。
// 手动创建流,通过sink发送元素并结束
Flux.create(sink -> {
    sink.next("Hello"); // 发送第一个元素
    sink.next("WebFlux"); // 发送第二个元素
    sink.complete(); // 标记流结束(不再发送元素)
}).subscribe(System.out::println); // 输出:Hello WebFlux


        Mono<Integer> mono = Mono.create(monoSink -> {
            // 成功的信号
            //monoSink.success(111);
            // 异常的信号
            monoSink.error(new Exception("this is error"));
        });
        mono.onErrorResume(Exception.class, ex -> {
            System.out.println("error:" + ex);
            return Mono.just(12345);
        }).subscribe(rr -> {
            System.out.println("result:" + rr);
        });
5. 转换型操作符(map)
1. map(Function<T, R>)
map的操作则主要对流中的每个元素执行指定的转换操作。即输入一个元素,输出一个转换后的元素,保持流的元素数量不变。适合简单的同步转换场景。
// 对流中每个字符串执行"转大写"操作
Flux<String> flux = Flux.just("apple", "banana")
    .map(String::toUpperCase); // 调用String的toUpperCase()方法
flux.subscribe(System.out::println); // 输出:APPLE BANANA
2. flatMap(Function<T, Publisher<R>>)
与map不同,flatMap 则接收一个元素T,返回一个新的响应式流Publisher<R>(如Flux<R>或Mono<R>)。 即整个过程是 "元素→流" 的映射,会将子流 "扁平化" 合并为一个新流,输出流的元素数量可能比输入流多(或少)。
// 将每个字符串按字符拆分,转换为包含单个字符的子流,再合并
Flux<String> flux = Flux.just("hello", "world")
    .flatMap(s -> Flux.fromArray(s.split(""))); // 拆分后子流为 ["h","e","l","l","o"] 和 ["w","o","r","l","d"]
flux.subscribe(System.out::println);
// 可能输出:h w e o l r l l d(顺序不固定,因两个子流并行处理)
举个更实际的例子,如 "一个订单包含多个商品,需要根据订单 ID 查询所有商品" 的场景(1 个订单→多个商品组成的流),或需要在转换中调用异步操作可使用flatMap来进行操作。
// 模拟"根据用户ID查询多个订单"的异步操作
Flux.just(1001, 1002) // 用户ID流
    .flatMap(userId -> orderService.findOrdersByUserId(userId)) // 每个用户ID→订单流
    .subscribe(order -> System.out.println("订单:" + order));
3. concatMap(Function<T, Publisher<R>>)
与flatMap类似,concatMap则是将每个元素转换为子流后合并,但严格按照原元素的顺序处理子流(前一个子流完全处理完才会处理下一个),因此最终流的元素顺序与原元素对应的子流顺序一致。适合需要保证顺序的场景(如按顺序处理批量任务)。
// 同样拆分字符串为字符子流,但按原顺序合并
Flux<String> flux = Flux.just("hello", "world")
    .concatMap(s -> Flux.fromArray(s.split(""))); // 先处理"hello"的子流,再处理"world"的子流
flux.subscribe(System.out::println);
// 固定输出:h e l l o w o r l d(严格遵循原元素顺序)
6 过滤型操作符
1. filter(Predicate<T>)
Flux<Integer> flux = Flux.range(1, 10).filter(i -> i % 2 == 0);
flux.subscribe(System.out::println);
2. distinct()
对流中所有元素进行去重处理,保留首次出现的元素,后续重复元素会被过滤。
Flux.just(1, 2, 2, 3).distinct().subscribe(System.out::println);
3. limitRate(int rate)
控制流从上游数据源获取元素的速率,每次向上游请求 rate 个元素,处理完后再请求下一批,避免一次性加载过多数据导致内存压力(类似 “分批拉取”)。常用于流中元素数量极大的场景(如处理百万级数据),平衡内存占用与处理效率。
// 生成1~100的整数流,每次从上游获取10个元素后再继续请求
Flux.range(1, 100)
.limitRate(10).subscribe(System.out::println);
// 内部过程:先请求1~10,处理完后再请求11~20,直到所有元素处理完毕
7.异常处理
- onStatus:用于处理HTTP响应状态码,允许根据不同状态码执行特定逻辑。例如,当收到404状态码时重定向到错误页面,或根据200状态码正常处理数据。
- onErrorResume:用于处理异常情况(如超时、连接失败等),切换到一个备用的Publisher。。例如,当请求超时时返回默认数据或重试请求。
- onErrorReturn:当发生错误时,返回一个默认值。
- onErrorMap:将发生的错误转换为另一种类型的错误。
- doOnError:在发生错误时执行一些操作,但不改变流本身。
核心差异:
- 触发时机:onStatus在响应阶段触发,onErrorResume在请求阶段触发。
- 处理范围:onStatus仅处理HTTP状态码异常,onErrorResume处理所有请求异常(包括网络问题、超时等)。
- 链式操作:onErrorResume支持链式调用(如重试、返回默认值等),onStatus通常仅用于分支处理。
    // 处理错误响应
    public Mono<JSONObject> getUserWithErrorHandling(Long id) {
        return webClient.get()
                .uri("/users/{id}", id)
                .retrieve()
                .onStatus(HttpStatusCode::is4xxClientError, clientResponse -> Mono.error(new RuntimeException("客户端错误")))
                .onStatus(HttpStatusCode::is5xxServerError, clientResponse -> Mono.error(new RuntimeException("服务器错误")))
                .bodyToMono(JSONObject.class);
    }
Mono<ResponseEntity<String>> mono = WebClient.create().get().uri("http://")
.retrieve()
.toEntity(String.class)
.onErrorResume(WebClientResponseException.class, e -> {
if (e.getStatusCode().is4xxClientError()) {
return Mono.error(new HttpClientErrorException(e.getStatusCode(), e.getResponseBodyAsString()));
}
return Mono.error(e);
});8. 时间控制操作符
1. delayElements(Duration duration)
delayElements主要让流中的每个元素都延迟指定时间后再发射,相当于给每个元素的发送增加一个统一的 “等待期”。
// 生成1~3的整数流,每个元素延迟1秒后发送
Flux.range(1, 3).delayElements(Duration.ofSeconds(1))
    .subscribe(System.out::println); // 依次间隔1秒输出:1、2、3
Thread.sleep(5000); // 主线程休眠5秒,防止程序提前退出(否则看不到完整输出)
2. timeout(Duration timeout)
timeout主要为流设置超时阈值,若流在指定时间内没有发射新元素(或未完成),则会触发超时错误(TimeoutException)。适合需要限制操作响应时间的场景(如接口调用超时控制)。
// 生成1~3的整数流,每个元素延迟500毫秒发送,同时设置超时时间为300毫秒
Flux.range(1, 3)
    .delayElements(Duration.ofMillis(500)) // 元素发送间隔500ms
    .timeout(Duration.ofMillis(300)) // 超过300ms未收到新元素则超时
    .subscribe(
        System.out::println, // 正常元素处理(此处第一个元素就会超时,不会执行)
        Throwable::printStackTrace // 捕获并打印超时异常
    );
Thread.sleep(2000); // 主线程休眠,确保异常能被捕获
// 输出:TimeoutException(因第一个元素需500ms发送,超过300ms超时阈值)
9 订阅操作符
1. subscribe(Consumer<T>)
Mono的subscribe方法用于触发异步操作链的执行,其核心机制涉及发布-订阅关系链的构建与执行。
Mono.just("hello")
   .filter(t -> t.startsWith("h"))
   .map(String::toUpperCase)
   .subscribe(System.out::println);

#此代码通过subscribe触发处理链,依次执行过滤、转换操作。
2. doOnNext(Consumer<T>)
在流中的每个元素被发射到订阅者之前,触发指定的消费函数(如日志记录、数据预处理等),但不会改变元素本身或流的结构。
// 生成1~3的整数流,发射前打印提示,再将元素发送给订阅者
Flux.range(1, 3)
    .doOnNext(i -> System.out.println("Before emit: " + i)) // 发射前执行:打印提示
    .subscribe(System.out::println); // 订阅者接收并打印元素
// 输出:
// Before emit: 1 → 发射前操作
// 1 → 订阅者处理
// Before emit: 2
// 2
// Before emit: 3
// 3
3. doOnComplete(Runnable)
流正常结束(所有元素发射完毕且无错误)时,触发指定的无参任务(Runnable),可用于执行流结束后的收尾操作(如释放资源、打印完成日志等)。
// 创建包含1、2的流,完成时打印"Done",并订阅(无需处理元素,仅触发完成回调)
Flux.just(1, 2)
    .doOnComplete(() -> System.out.println("Done")) // 流正常结束时执行
    .subscribe(); // 订阅启动流
// 输出:Done(当1和2都发射完毕后,触发完成回调)
10 多个Mono的处理
1. 合并多个Mono
如果你有多个独立的Mono实例,并希望它们在同一个上下文中执行(例如,并行执行后合并结果),你可以使用Mono.zip、Mono.when或Mono.merge等方法。
#使用Mono.zip
Mono<String> mono1 = webClient.get()
    .uri("http://example.com/api/data1")
    .retrieve()
    .bodyToMono(String.class);

Mono<Integer> mono2 = webClient.get()
    .uri("http://example.com/api/data2")
    .retrieve()
    .bodyToMono(Integer.class);

Mono<Tuple2<String, Integer>> combined = Mono.zip(mono1, mono2);


#使用Mono.when
Mono<Void> mono1 = webClient.get()
    .uri("http://example.com/api/data1")
    .retrieve()
    .bodyToMono(String.class)
    .then(); // 转换为Void Mono

Mono<Void> mono2 = webClient.get()
    .uri("http://example.com/api/data2")
    .retrieve()
    .bodyToMono(Integer.class)
    .then(); // 转换为Void Mono

Mono<Void> combined = Mono.when(mono1, mono2);
2 顺序执行多个Mono
如果你需要按顺序执行多个Mono,可以使用.then或Mono.concat。
#使用Mono.flatMap
Mono<String> mono1 = webClient.get()
    .uri("http://example.com/api/data1")
    .retrieve()
    .bodyToMono(String.class);

Mono<Integer> mono2 = mono1 // 从mono1的结果继续执行
    .flatMap(result -> webClient.get()
        .uri("http://example.com/api/data2?param=" + result)
        .retrieve()
        .bodyToMono(Integer.class));

#使用Mono.concat
Flux<Object> fluxOfMonos = Flux.just(
    webClient.get().uri("http://example.com/api/data1").retrieve().bodyToMono(String.class),
    webClient.get().uri("http://example.com/api/data2").retrieve().bodyToMono(Integer.class)
);

Flux<Object> result = Flux.concat(fluxOfMonos); // 注意:这会按顺序合并结果,但保持它们为Monos,而非合并成一个结果。
3 转换多个Mono为列表或其他集合类型
如果你想要将多个Mono的结果收集到一个列表或其他集合中,可以使用Flux.fromArray或Flux.fromIterable与.collectList()或.collectMap()等操作。
Flux<Object> fluxOfMonos = Flux.fromArray(new Object[]{
    webClient.get().uri("http://example.com/api/data1").retrieve().bodyToMono(String.class),
    webClient.get().uri("http://example.com/api/data2").retrieve().bodyToMono(Integer.class)
});

Mono<List<Object>> resultList = fluxOfMonos.collectList(); // 收集为List
11. block()/blockFirst()/blockLast()
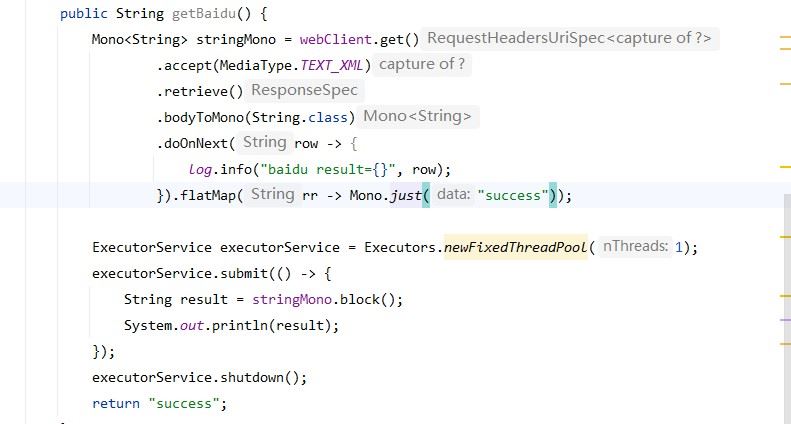
因为block是阻塞操作,所以不能在webflux框架中阻塞任务结果,因为reactor-netty属于异步非阻塞框架。在异步非阻塞中的线程中阻塞结果会报错。

正确的做法新建一个线程阻塞结果
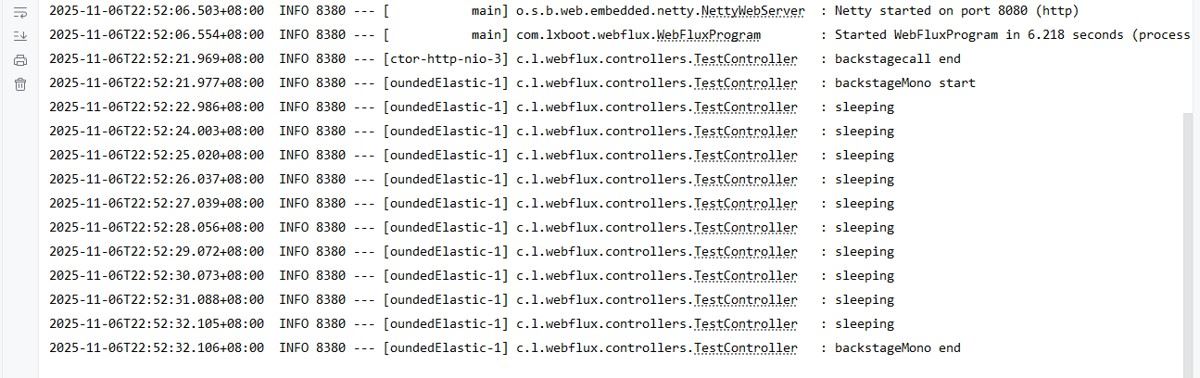
12. 使用mono后台执行
在Java中,特别是在使用Spring框架时,我们经常需要异步执行代码以避免阻塞主线程。Spring 5引入了Project Reactor,它提供了Mono和Flux等反应式类型,使得编写非阻塞代码变得非常方便。
1. Mono.fromRunnable
    @GetMapping("/backstagecall")
    public Mono<String> backstageCall() {
        Mono<String> reulst = Mono.just("backgraudCall call");
//        方法1:使用Mono.fromRunnable
        Mono.fromRunnable(() -> {
                    log.info("backstageMono start ");
                    // 耗时的代码
                    mysleep(10);
                    log.info("backstageMono end ");
                }).subscribeOn(Schedulers.boundedElastic()) // 在后台执行
                .subscribe();
        log.info("backstagecall end");
        return reulst;
    }
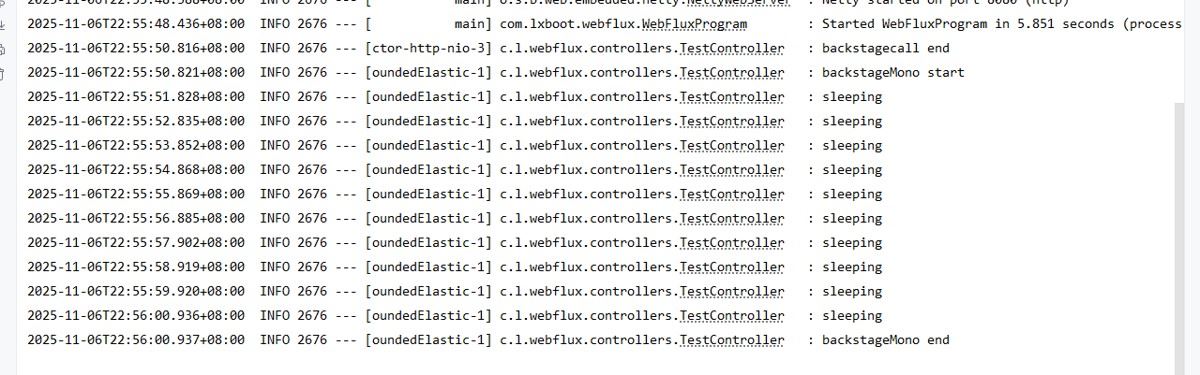
2. Mono.defer+Schedulers
    @GetMapping("/backstagecall")
    public Mono<String> backstageCall() {
        Mono<String> reulst = Mono.just("backgraudCall call");
        //        方法2:使用Mono.defer+Schedulers
        Mono.defer(() -> {
                    log.info("backstageMono start ");
                    mysleep(10);
                    log.info("backstageMono end ");
                    return Mono.empty();
                }).subscribeOn(Schedulers.boundedElastic())  // 在后台执行
                .subscribe();
        log.info("backstagecall end");
        return reulst;
    }
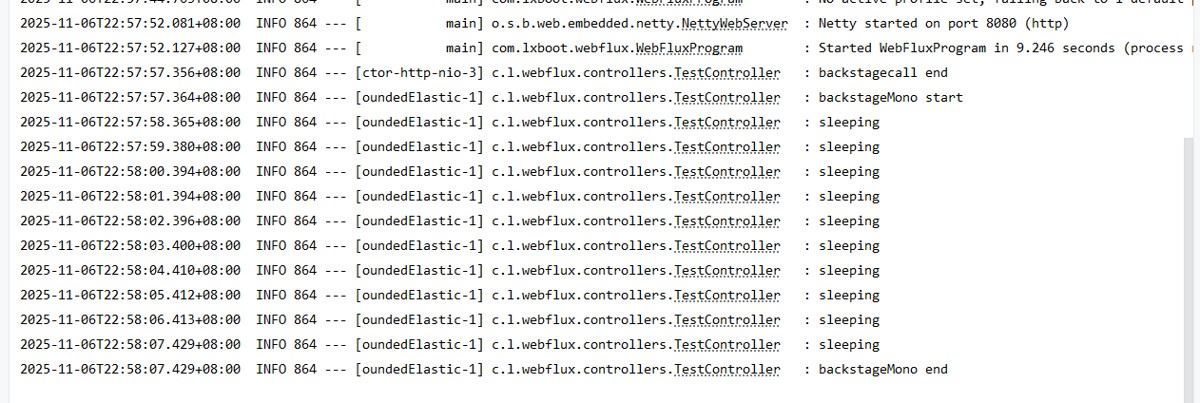
3. Mono.create
    @GetMapping("/backstagecall")
    public Mono<String> backstageCall() {
        Mono<String> reulst = Mono.just("backgraudCall call");
//        方法3:使用Mono.create
        Mono.create(sink -> {
            Schedulers.boundedElastic().schedule(() -> {
                log.info("backstageMono start ");
                mysleep(10);
                log.info("backstageMono end ");
                // 完成信号
                sink.success("111");
            });
        }).subscribe();

        log.info("backstagecall end");
        return reulst;
    }
7.OpenFeign或者Feign
Feign 是 Spring Cloud 提供的一个声明式的 HTTP 客户端工具,它基于注解和接口定义的方式,简化了外部接口调用的流程。Feign 集成了 Ribbon 负载均衡和 Hystrix 熔断器等功能,使得接口调用更加灵活可靠。
@FeignClient(name = "user-service", url = "http://api.example.com")
public interface UserFeignClient {


    @GetMapping("/user/{id}")
    User getUser(@PathVariable("id") String id);
}
总结
WebClient与RestTemplate对比
特性 | WebClient | RestTemplate |
|---|---|---|
编程模型 |
|
|
性能 | 更好 | 一般 |
资源利用 | 更高效 | 一般 |
学习曲线 | 较陡 | 平缓 |
适用场景 | 高并发、响应式系统 | 简单应用、传统系统 |
以上为个人经验,希望能给大家一个参考,也希望大家多多支持脚本之家。