
SpringCloud Config之动态配置管理与高可用治理方式
作者:小马不敲代码
引言
为什么需要配置中心?
在微服务架构中,配置管理面临分散化、多环境、动态更新三大挑战。
传统基于application.yml等配置文件的硬编码方式,导致以下问题:
- 环境差异:开发、测试、生产环境配置混杂,易引发部署错误。
- 维护成本:配置变更需重启各个服务,运维效率低下。
- 安全风险:敏感信息(如数据库密码)明文存储,存在泄露隐患。
Spring Cloud Config作为分布式配置中心,通过集中管理、动态刷新、安全加密等能力,成为微服务配置治理的核心组件。
本文将深入解析其原理,并结合生产级实践,提供高可用的配置管理方案。
一、Spring Cloud Config 核心架构与配置管理
1.1 核心组件与协作流程
核心组件:
- Config Server:配置中心服务端,提供配置存储与分发能力。
- Config Client:微服务客户端,启动时从 Config Server 拉取配置。
- Spring Cloud Bus:基于 RabbitMQ/Kafka,实现配置变更的自动广播。
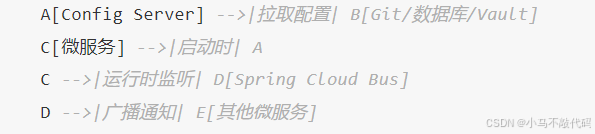
流程解析:
- 1.配置中心获取配置→ Config Server 从Git、数据库、Vault读取配置。
- 2.微服务启动时拉取配置→ 微服务(Config Client)从Config Server获取最新配置。
- 3.监听配置变更→ 运行时,微服务监听配置更新事件。
- 4.广播通知所有微服务→ 配置变更后,Spring Cloud Bus(RabbitMQ/Kafka)负责通知所有微服务,自动更新配置。
1.2 配置存储与读取流程
Git 文件目录结构示例
假设 Git 仓库config-repo目录结构如下:
config-repo/
├── user-service/
│   ├── user-service-dev.yml    # 开发环境配置
│   └── user-service-prod.yml   # 生产环境配置
├── order-service/
│   ├── order-service-dev.yml
│   └── order-service-prod.yml
└── application.yml             # 全局公共配置
配置文件命名规范
{application}-{profile}.yml   # 如 user-service-dev.yml
{application}-{profile}.properties
1.配置中心配置示例
Config Server 的 application.yml 配置
# Config Server 的 application.yml
spring:
  cloud:
    config:
      server:
        git:
          uri: https://github.com/your-repo/config-repo
          search-paths: '{application}'  # 按服务名匹配目录
2.客户端读取配置(bootstrap.yml)
# user-service 的 bootstrap.yml
spring:
  application:
    name: user-service  # 关键配置,决定 {application} 的值
  profiles:
    active: dev  # 环境标识
  cloud:
    config:
      uri: http://config-server:8888 # Config Server 地址
Config Server 的行为
当user-service向Config Server请求配置时,服务器会从 Git 仓库的user-service目录中查找对应的配置文件(即{application}替换为user-service)。
最终匹配的文件路径:
config-repo/user-service/user-service-dev.yml
搜索逻辑:
- Config Server 按以下顺序查找配置:
- user-service/user-service-dev.yml(服务级环境配置)
- application.yml(全局配置)
其他占位符支持:
除了{application},还支持以下动态占位符:
- {profile}→ 对应客户端spring.profiles.active(环境标识,如dev/prod)
- {label}→ 对应 Git 分支或标签(默认master)
示例:
# Config Server 的配置
spring:
  cloud:
    config:
      server:
        git:
          search-paths: '{application}/{profile}'  # 按服务名+环境匹配目录
3. 验证配置是否生效
启动 Config Server,确保Config Server 正确运行,并能够访问 Git 仓库。
# 请求 user-service 的 dev 环境配置
curl
 http://config-server:8888/user-service/dev
返回结果:
- 若返回user-service-dev.yml内容,则路径匹配成功 。
- 若返回404,请检查 Git 仓库目录结构与客户端spring.application.name是否一致 。
二、动态配置更新与实时刷新
2.1 手动刷新:@RefreshScope + Actuator
原理:通过@RefreshScope标记可刷新 Bean,结合Spring Boot Actuator的/actuator/refresh端点,手动触发配置重载:
- 1.调用/actuator/refresh时,@RefreshScope标注的 Bean会被销毁并重新实例化。
- 2.重新实例化过程中,从配置源(如 Spring Cloud Config Server)加载最新值。
实现步骤
步骤1:声明可刷新 Bean
@RefreshScope  // 让该 Bean 支持动态刷新
@RestController
public class UserController {

    @Value("${config.message}")  // 从配置中心获取值
    private String message;

    @GetMapping("/message")
    public String getMessage() {
        return message;
    }
}
步骤2:触发配置重载
执行 HTTP 请求更新配置:
curl -X POST http://user-service:8080/actuator/refresh
运行流程
- 1.服务启动时,从配置中心加载config.message初始值。
- 2.配置中心更新后,需显式调用/actuator/refresh端点。
- 3.框架销毁原UserController实例,重建时重新拉取最新配置。
适用场景
需动态调整的配置项:
- 数据库连接池参数
- 运行时开关(熔断策略、功能开关)
- 服务端点 URL
- 日志级别动态调整
- 依赖@Value或@ConfigurationProperties注入的配置
局限性
- 单点更新:需逐个服务调用端点,集群环境下效率低下。
- 状态丢失:Bean 重建导致其内部状态重置。
- 依赖配置中心:需确保配置服务高可用。
2.2 自动刷新:Spring Cloud Bus + Webhook
原理
通过消息中间件(如 RabbitMQ)建立广播通道。当配置中心变更时,自动向所有订阅服务推送刷新事件:
- 配置中心(Config Server)作为事件发布者,通过/actuator/bus-refresh端点触发广播。
- Spring Cloud Bus 将刷新事件同步到所有关联的微服务节点。
- 各节点自动执行@RefreshScopeBean 的重建与配置重载。
实现步骤
基础设施配置
统一配置(Config Server + Client):
# Config Server 和 Client 均需配置
spring:
  rabbitmq:
    host: localhost
    port: 5672
  cloud:
    bus:
      enabled: true
      trace:
        enabled: true  # 开启事件跟踪
触发全局刷新
向配置中心发送广播指令:
# 通过 Config Server 触发全局刷新
curl -X POST http://config-server:8888/actuator/bus-refresh
运行流程
- 1.开发者在 Git 仓库更新配置文件并提交。
- 2.配置中心通过 Webhook 感知配置变更。
- 3.管理员调用bus-refresh端点触发事件广播。
- 4.消息总线将刷新指令同步到所有微服务节点。
- 5.各节点自动重建@RefreshScopeBean 并加载最新配置。
适用场景
- 集群环境下批量配置更新。
- 需要实时同步的全局参数:
- 分布式锁配置
- 跨服务缓存策略
- 全链路降级规则
- 与 GitLab/GitHub 等代码仓库的 Webhook 深度集成。
局限性
- 强依赖中间件:消息总线的稳定性直接影响刷新成功率。
- 事件传播延迟:大规模集群可能存在毫秒级同步延迟。
- 安全风险:需严格管控bus-refresh端点权限,防止未经授权触发。
三、生产级配置治理最佳实践
3.1 安全加固:加密存储与访问控制
1. 敏感数据加密
- 场景:数据库密码、API密钥等敏感信息需避免明文存储。
- 方案:使用JCE(Java 加密扩展)+ HSM(硬件安全模块)实现多层加密。
操作步骤:
步骤1:生成高强度密钥(推荐使用HSM生成硬件级密钥)
# 使用OpenSSL生成密钥(示例,生产环境建议使用HSM)
openssl enc -aes-256-cbc -k secret -P -md sha256
# 输出:salt=xxxx key=xxxx iv=xxxx
步骤2:Config Server 配置加密
Config Server 的 bootstrap.yml
# Config Server 的 bootstrap.yml
encrypt:
  key: ${ENCRYPT_KEY}  # 从环境变量读取密钥(避免硬编码)
  hsm:
    enabled: true      # 启用HSM集成(需实现HSM适配器)
步骤3:客户端自动解密
# 微服务的 bootstrap.yml
spring:
  cloud:
    config:
      decrypt-enabled: true  # 启用自动解密
2.基于角色的访问控制(RBAC)
场景:限制不同团队对配置的访问权限。
方案:集成 Spring Security 与 OAuth2。
Config Server 安全配置
@Configuration
@EnableWebSecurity
public class SecurityConfig extends WebSecurityConfigurerAdapter {

    @Override
    protected void configure(HttpSecurity http) throws Exception {
        http
            .authorizeRequests()
                .antMatchers("/actuator/**").hasRole("ADMIN")  # 监控端点仅管理员访问
                .antMatchers("/encrypt/**").denyAll()          # 禁用加密端点公开访问
                .anyRequest().authenticated()
            .and()
            .oauth2ResourceServer()
                .jwt();  # JWT 认证
    }
}
3.2 多环境隔离:动态标签与版本锁定
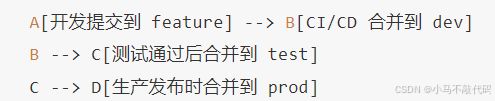
1. Git 多分支策略
- 场景:开发、测试、生产环境配置严格隔离。
- 方案:分支命名feature/、dev、test、prod
示例:
客户端动态拉取
# 微服务的 bootstrap.yml
spring:
  cloud:
    config:
      label: ${CONFIG_LABEL:master}  # 通过环境变量指定分支
自动化流程:
2. 版本锁定与回滚
- 场景:避免配置错误导致服务不可用。
- 方案:使用Git Tag 标记版本,结合Spring Cloud Bus 快速回滚。
操作流程:
版本打标发布
git tag -a v1.2.0 -m "Release stable config"
git push origin v1.2.0
回滚操作
# 回滚到指定标签
git checkout v1.1.0
curl -X POST http://config-server:8888/actuator/bus-refresh
3.3 高可用架构:Config Server 集群化
避免单点故障,提升配置中心的可用性。
方案: Config Server 注册到Eureka,客户端通过负载均衡访问。
示例如下:
Config Server 集群配置(集成到Eureka)
# Config Server 的 application.yml
eureka:
  client:
    service-url:
      defaultZone: http://eureka-server1:8761/eureka,http://eureka-server2:8761/eureka
  instance:
    appname: config-server  # 统一服务名,便于客户端发现
客户端负载均衡配置
# 微服务的 bootstrap.yml
spring:
  cloud:
    config:
      discovery:
        enabled: true
        service-id: config-server  # 从Eureka发现Config Server集群
3.4 监控与审计
1. 配置变更审计
- 场景:追踪谁在何时修改了配置
- 方案:集成Git Hooks 与ELK 日志系统。
Git 钩子示例(pre-commit):
#!/bin/sh
# 记录提交者、时间、变更内容
echo "User: $(whoami), Date: $(date), Changes: $(git diff)" >> /var/log/config-audit.log
2.实时监控看板
- Grafana仪表盘配置:
- 数据源:Prometheus
关键指标
- config_server_properties_requests:配置拉取次数
- spring_cloud_config_client_property_sources:配置加载状态
- spring_cloud_bus_events_total:配置刷新事件
告警规则(Prometheus):
groups:
- name: config-alerts
  rules:
  - alert: ConfigRefreshFailure
    expr: spring_cloud_bus_events_failed_total > 0
    labels:
      severity: critical
    annotations:
      summary: "配置刷新失败"
总结
核心重点
- 安全防护:加密存储+RBAC 访问控制,确保配置数据安全,构建零信任配置管理体系。
- 多环境治理:基于Git 多分支管理+版本锁定,实现配置精确控制,支持动态刷新与快速回滚。
- 高可用架构:通过Config Server 集群化+负载均衡,提升服务容错能力,保障配置中心的稳定性。
以上为个人经验,希望能给大家一个参考,也希望大家多多支持脚本之家。