
IntelliJ IDEA 中配置 Spring MVC 环境的详细步骤及问题解决
作者:yuren_xia
以下是在 IntelliJ IDEA 中配置 Spring MVC 环境的详细步骤:
步骤 1:创建 Maven Web 项目
新建项目
File -> New -> Project→ 选择 Maven → 勾选 Create from archetype → 选择maven-archetype-webapp。- 输入
GroupId(如com.example)、ArtifactId(如spring-mvc-demo) → 点击Next→ 完成项目创建。
项目结构
确保项目包含以下目录:
src/main/
  ├── java/         # Java 代码
  ├── resources/    # 配置文件
  		└── applicationContext.xml
  └── webapp/       # Web 资源
      ├── WEB-INF/
      │   └── web.xml
      └── index.jsp
步骤 2:添加 Spring MVC 依赖
在 pom.xml 中添加以下依赖(Spring 5.x + Servlet 4.x):
<dependencies>
    <!-- Spring MVC -->
   <dependency>
      <groupId>org.springframework</groupId>
      <artifactId>spring-webmvc</artifactId>
      <version>5.3.30</version>
    </dependency>
</dependencies>
1、保存后执行
– 在 Maven 工具窗口中,展开项目 -> Lifecycle。
– 双击 clean → 等待清理完成。
– 双击 install → 等待依赖下载和构建完成。
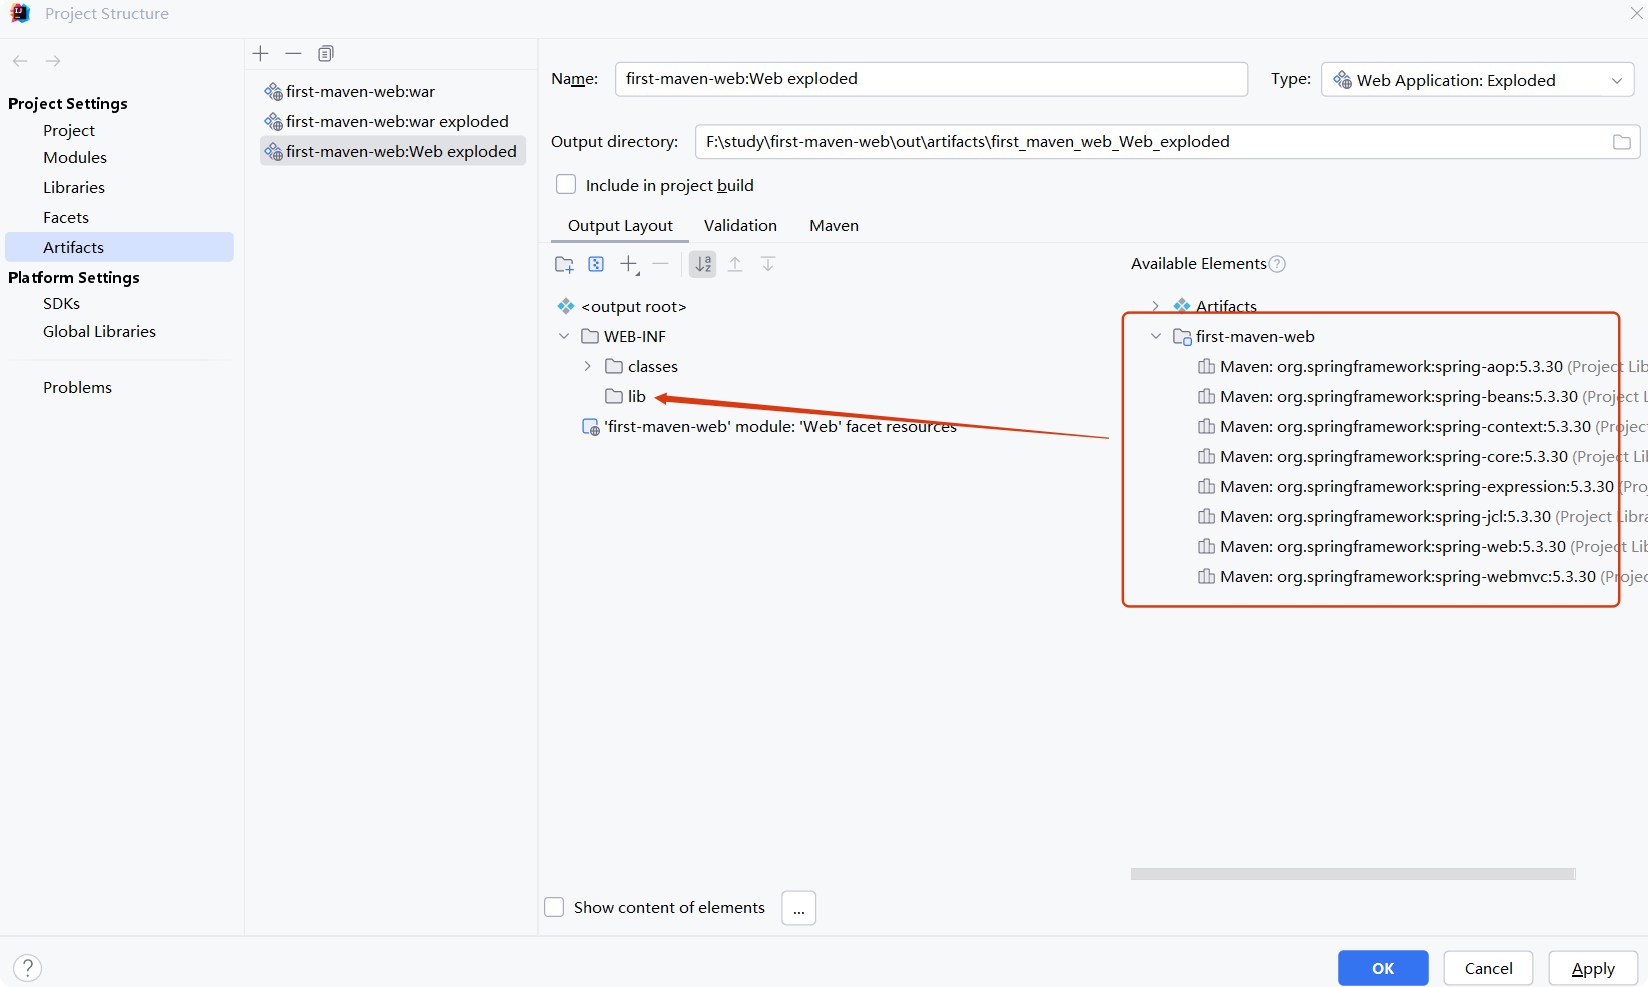
2、将新的依赖加入到发布目录中
– 点击Edite Configurations–>选中当前Server–>右侧选择Deployment–>选中当前发布项目,点击编辑按钮,将新加入的依赖添加到左侧(选中依赖,右键“Put into WEB-INF/lib”)
– 如下图
步骤 3:配置 DispatcherServlet
方式 1:通过 web.xml 配置
配置web.xml 文件
<web-app xmlns="https://jakarta.ee/xml/ns/jakartaee"
         xmlns:xsi="http://www.w3.org/2001/XMLSchema-instance"
         xsi:schemaLocation="https://jakarta.ee/xml/ns/jakartaee
         https://jakarta.ee/xml/ns/jakartaee/web-app_6_0.xsd"
         version="6.0">
  <servlet>
     <servlet-name>springmvc</servlet-name>
     <!--配置DispatcherServlet    -->
     <servlet-class>org.springframework.web.servlet.DispatcherServlet</servlet-class>
     <init-param>
         <param-name>contextConfigLocation</param-name>
         <param-value>classpath:applicationContext.xml</param-value>
     </init-param>
     <!--设置web应用启动时自动创建spring ioc容器并初始化DispatcherServlet-->
     <load-on-startup>0</load-on-startup>
 </servlet>
 <servlet-mapping>
     <servlet-name>springmvc</servlet-name>
     <!--拦截所有对象-->
     <url-pattern>/</url-pattern>
 </servlet-mapping>
</web-app>
配置applicationContext.xml
在 src/main/resource/ 下新建 applicationContext.xml:
<?xml version="1.0" encoding="UTF-8"?>
<beans xmlns="http://www.springframework.org/schema/beans"
     xmlns:xsi="http://www.w3.org/2001/XMLSchema-instance"
     xmlns:mvc="http://www.springframework.org/schema/mvc"
     xmlns:context="http://www.springframework.org/schema/context"
     xsi:schemaLocation="
     http://www.springframework.org/schema/beans
     http://www.springframework.org/schema/beans/spring-beans.xsd
     http://www.springframework.org/schema/mvc
     http://www.springframework.org/schema/mvc/spring-mvc.xsd
     http://www.springframework.org/schema/context
     http://www.springframework.org/schema/context/spring-context.xsd
">
  <!--在spring ioc初始化过程中,自动创建并管理com.hirain及其子包中拥有如下注解的对象:
  @Repository
  @Service
  @Controller
  @Component
  -->
  <context:component-scan base-package="com.hirain"/>
  <!--启用mvc注解开发模式-->
  <mvc:annotation-driven/>
  <!--将图片、css、js等静态资源排除在外,可提高执行效率-->
  <mvc:default-servlet-handler/>
</beans>
方式 2:纯 Java 配置(推荐)
创建配置类 src/main/java/com/example/config/WebConfig.java:
package com.example.config;
import org.springframework.context.annotation.ComponentScan;
import org.springframework.context.annotation.Configuration;
import org.springframework.web.servlet.config.annotation.EnableWebMvc;
import org.springframework.web.servlet.config.annotation.ViewResolverRegistry;
import org.springframework.web.servlet.config.annotation.WebMvcConfigurer;
@Configuration
@EnableWebMvc
@ComponentScan(basePackages = "com.example.controller")
public class WebConfig implements WebMvcConfigurer {
    @Override
    public void configureViewResolvers(ViewResolverRegistry registry) {
        registry.jsp("/WEB-INF/views/", ".jsp");
    }
}
修改 web.xml 使用 AnnotationConfigServletWebServerApplicationContext:
<context-param>
    <param-name>contextClass</param-name>
    <param-value>org.springframework.web.context.support.AnnotationConfigWebApplicationContext</param-value>
</context-param>
<context-param>
    <param-name>contextConfigLocation</param-name>
    <param-value>com.example.config.WebConfig</param-value>
</context-param>
步骤 4:创建 Controller 和视图
Controller 类
在 src/main/java/com/example/controller 下新建 HelloController.java:
package com.example.controller;
import org.springframework.stereotype.Controller;
import org.springframework.web.bind.annotation.GetMapping;
@Controller
public class HelloController {
    @GetMapping("/hello")
    public String hello() {
        return "hello"; // 对应 /WEB-INF/views/hello.jsp
    }
}
JSP 视图
在 src/main/webapp/WEB-INF/views 下新建 hello.jsp:
<%@ page contentType="text/html;charset=UTF-8" language="java" %>
<html>
<head>
    <title>Hello Spring MVC</title>
</head>
<body>
    <h1>Hello, Spring MVC!</h1>
</body>
</html>
步骤 5:配置 Tomcat 并运行
添加 Tomcat 服务器
- 点击右上角
Add Configuration→+→Tomcat Server -> Local。 - 指定 Tomcat 安装路径(若未配置,需先下载 Tomcat)。
部署项目
- 在
Deployment标签页 → 点击+→ 选择Artifact→ 选择spring-mvc-demo:war exploded。 - 设置上下文路径(如
/demo)。
启动服务器
- 点击绿色三角按钮 → 访问
http://localhost:8080/demo/hello,看到页面显示 “Hello, Spring MVC!” 即成功。
常见问题解决
404 错误
- 检查
@Controller和@GetMapping注解是否生效。 - 确保
web.xml中的DispatcherServlet映射正确(如/或*.do)。
JSP 无法解析
- 确认视图解析器的
prefix和suffix配置正确。 - 确保 JSP 文件位于
WEB-INF/views/目录下。
依赖冲突
- 执行
mvn dependency:tree检查依赖版本是否兼容。
扩展配置
静态资源处理
- 在
spring-mvc-servlet.xml中添加:
<mvc:resources mapping="/static/**" location="/static/"/>
- 静态文件存放在
src/main/webapp/static/目录下。
启用注解驱动
- 确保
<mvc:annotation-driven/>或@EnableWebMvc已配置。
完成以上步骤后,Spring MVC 环境即可正常运行。如果遇到问题,优先检查控制台日志和依赖树。
到此这篇关于IntelliJ IDEA 中配置 Spring MVC 环境的详细步骤的文章就介绍到这了,更多相关idea配置spring mvc环境内容请搜索脚本之家以前的文章或继续浏览下面的相关文章希望大家以后多多支持脚本之家!