
C#使用System.Net库实现自动发送邮件功能
作者:我爱喝伊利
在C#编程环境中,实现邮件发送功能是一项常见的需求,无论是Web应用程序还是Windows窗体应用程序,下面小编就来为大家讲讲如何使用System.Net库实现这一功能吧
一、基本概念
在C#编程环境中,实现邮件发送功能是一项常见的需求,无论是Web应用程序还是Windows窗体应用程序,邮件服务都能帮助用户进行信息的传递和沟通。使用C#中的System.Net库,来实现自动发送邮件的功能。
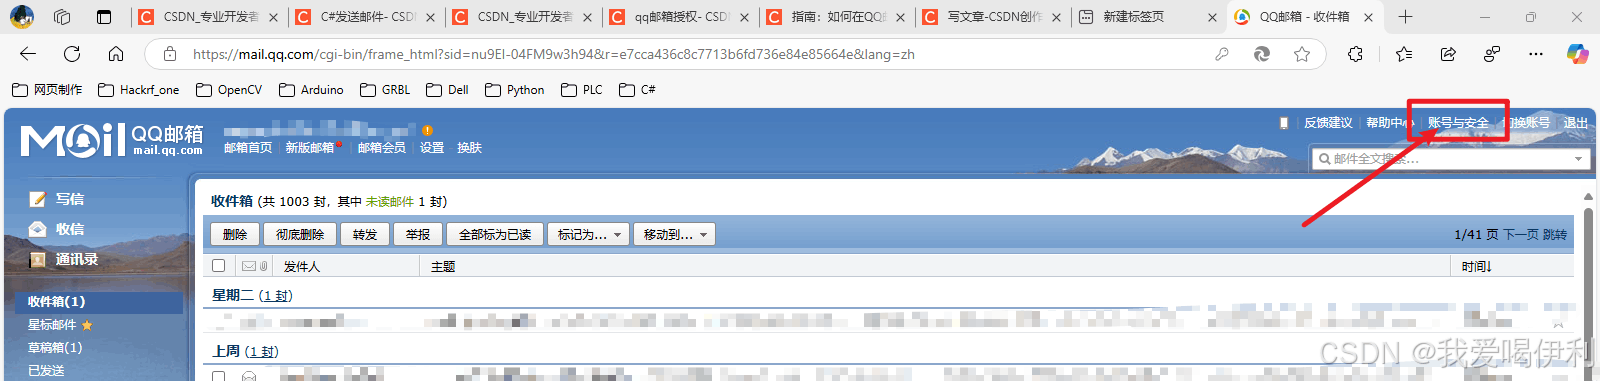
二、邮箱授权
下面进行邮箱的授权,本篇文章使用QQ邮箱作为案列进行示范。
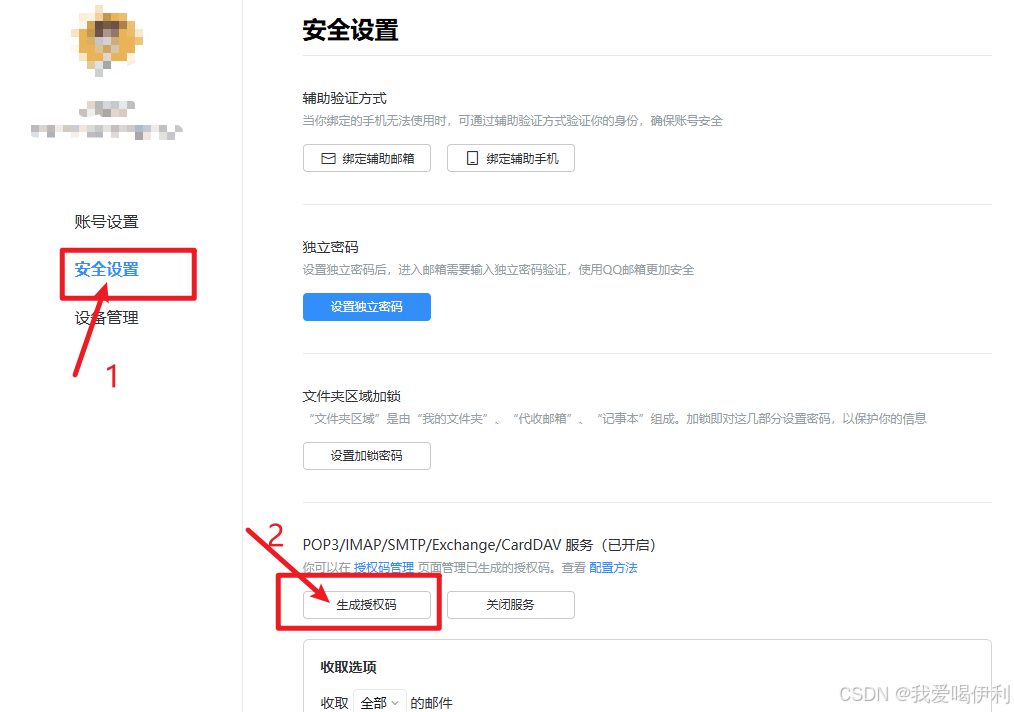
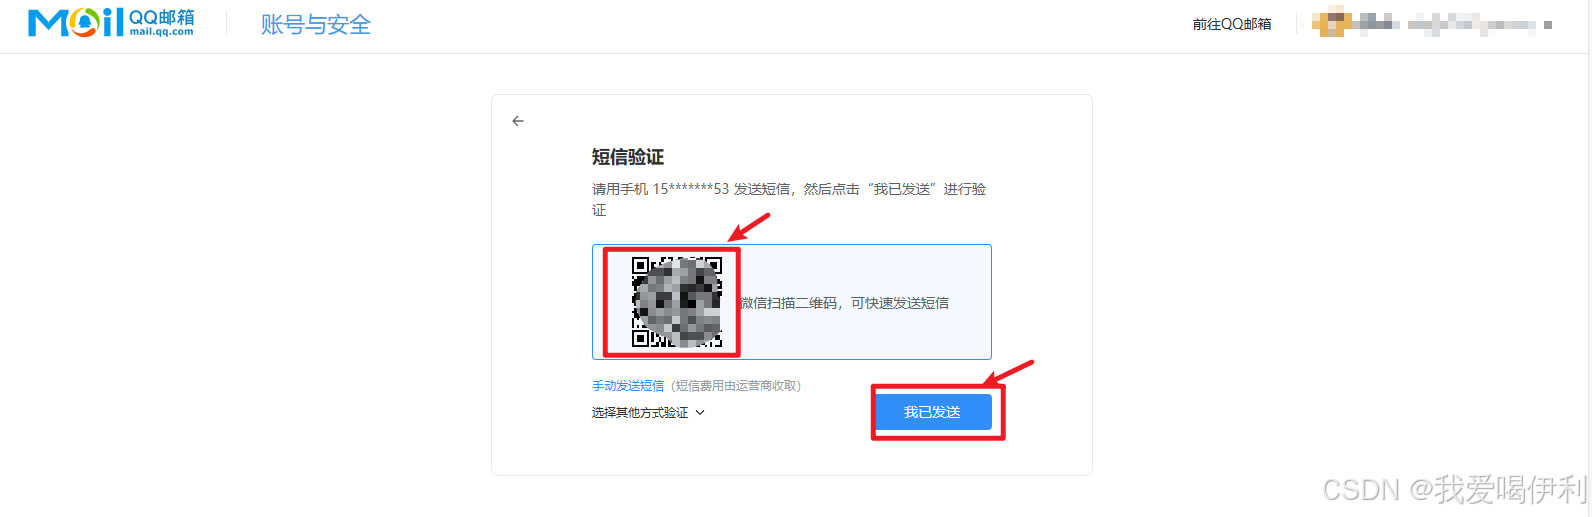
发送完成按照指引将会获得一串授权码。将授权码填入下面代码的指定位置。
三、示例代码
使用System.Net.Mail发送一封简单的文本邮件:
using System;
using System.Net;
using System.Net.Mail;

class EmailSender
{
    public static void Main()
    {
        try
        {
            // 配置SMTP服务器信息(以QQ邮箱为例)
            string smtpServer = "smtp.qq.com";      //此处修改发送邮箱的服务器地址
            int smtpPort = 587;
            bool enableSsl = true;
            string fromEmail = "your_email@qq.com";//使用的邮箱
            string password = "your_password_or_auth_code"; // 此处填写刚刚获得的授权码

            // 创建邮件客户端
            using SmtpClient client = new SmtpClient(smtpServer)
            {
                Port = smtpPort,
                Credentials = new NetworkCredential(fromEmail, password),
                EnableSsl = enableSsl
            };

            // 创建邮件内容
            MailMessage message = new MailMessage
            {
                From = new MailAddress(fromEmail),
                Subject = "测试邮件",
                Body = "这是一封来自C#程序的测试邮件",
                IsBodyHtml = false // 设置为true发送HTML邮件
            };

            // 添加收件人
            message.To.Add("recipient@example.com");          //填入接受邮件的邮箱地址

            // 发送邮件
            client.Send(message);
            Console.WriteLine("邮件发送成功!");
        }
        catch (Exception ex)
        {
            Console.WriteLine($"邮件发送失败:{ex.Message}");
        }
    }
}
常见邮箱服务器配置
| 邮箱服务商 | SMTP服务器地址 | 端口 | SSL要求 |
|---|---|---|---|
| QQ邮箱 | smtp.qq.com | 587 | 是 |
| 163邮箱 | smtp.163.com | 465 | 是 |
| Gmail | smtp.gmail.com | 587 | 是 |
| Outlook | smtp.office365.com | 587 | 是 |
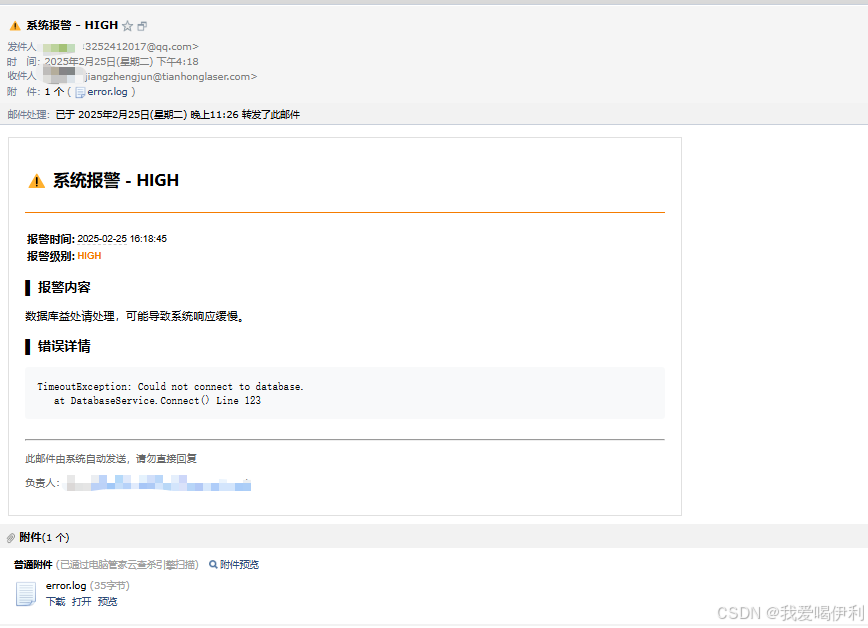
四、制作一个报错提醒功能的函数
制作一个报错提醒功能的函数,当现成的程序出现了问题,自动发送邮件提醒程序员进行远程处理。打工的牛马制作一个鞭子抽自己起来干活。实现效果如下
using System;
using System.Diagnostics;
using System.Net;
using System.Net.Mail;
using System.Security.Cryptography;
using System.Text;

class EmailSender
{

    // ======== 配置信息 ========
    static string  smtpServer = "smtp.qq.com";
    static int smtpPort = 587;
    static bool enableSsl = true;
    static string fromEmail = "填入发送的邮箱"; //发送邮箱
    static string password = "邮箱授权码"; // QQ邮箱需要授权码
    static string incomingEmail = "接受邮件的邮箱地址";//收件邮箱地址

    private static readonly object fileLock = new object();
    private const string LogDirectory = "EmailSendLogs";

    /// <summary>
    /// 报警信息发送至邮箱
    /// </summary>
    /// <param name="alertLevel">报警级别支持:
    ///                         CRITICAL:严重问题(红色)
    ///                         HIGH:高级别问题(橙色)
    ///                         MEDIUM:中等问题(黄色)
    ///                         LOW:低级别通知(绿色)
    ///                         </param>
    /// <param name="alertContent">报警内容</param>
    /// <param name="errorDetails">错误详情</param>
    /// <param name="attachmentPaths">附件</param>
    public static void SendToEmail(string alertLevel, string alertContent, string errorDetails = null, string[] attachmentPaths = null)
    {
        try
        {
            //1和2是会在程序运行的文件夹中生成一个日志文件,当同一个报错今天已经发送过了,将会                            //不再发送,防止报错一直触发然后一直给自己发送邮件,这样子抽牛马干活打在自己身上就太痛了

            // ===== 1. 生成错误唯一标识 =====
            string errorHash = GenerateErrorHash(alertContent, errorDetails);

            // ===== 2. 检查是否已发送过 =====
            if (IsAlreadySentToday(errorHash))
            {
                Console.WriteLine("相同错误今日已发送过,不再重复发送");
                return;
            }


            // ======== 创建邮件客户端 ========
            using SmtpClient client = new SmtpClient(smtpServer)
            {
                Port = smtpPort,
                Credentials = new NetworkCredential(fromEmail, password),
                EnableSsl = enableSsl
            };

            // ======== 报警级别颜色映射 ========
            var alertLevelInfo = new Dictionary<string, (string color, string emoji)>
            {
                { "CRITICAL", ("#d32f2f", "🔥") },  // 红色
                { "HIGH",     ("#f57c00", "⚠️") },  // 橙色
                { "MEDIUM",  ("#ffa000", "❗") },  // 黄色
                { "LOW",     ("#4caf50", "ℹ️") }   // 绿色
            };

            // 获取当前报警级别的颜色和表情符号
            var (color, emoji) = alertLevelInfo.ContainsKey(alertLevel)
                ? alertLevelInfo[alertLevel]
                : ("#666666", "🔔");

            // ======== 构建邮件内容 ========
            string htmlBody = $@"
            <!DOCTYPE html>
            <html>
            <head>
                <style>
                    .card {{
                        border: 1px solid #e0e0e0;
                        padding: 20px;
                        max-width: 800px;
                        font-family: 'Segoe UI', Tahoma, Geneva, Verdana, sans-serif;
                    }}
                    .header {{
                        border-bottom: 2px solid {color};
                        padding-bottom: 10px;
                        margin-bottom: 20px;
                    }}
                    .alert-level {{
                        color: {color};
                        font-weight: bold;
                    }}
                    pre {{
                        background: #f8f9fa;
                        padding: 15px;
                        border-radius: 4px;
                        overflow-x: auto;
                    }}
                </style>
            </head>
            <body>
                <div class='card'>
                    <div class='header'>
                        <h2>{emoji} 系统报警 - {alertLevel}</h2>
                    </div>
                    <table>
                        <tr><th>报警时间:</th><td>{DateTime.Now:yyyy-MM-dd HH:mm:ss}</td></tr>
                        <tr><th>报警级别:</th><td class='alert-level'>{alertLevel}</td></tr>
                    </table>
                    <h3>▌ 报警内容</h3>
                    <p>{alertContent}</p>
                    {(errorDetails != null ? $@"
                    <h3>▌ 错误详情</h3>
                    <pre>{errorDetails}</pre>
                    " : "")}
                    <div style='margin-top: 25px; color: #666; font-size: 0.9em;'>
                        <hr>
                        <p>此邮件由系统自动发送,请勿直接回复</p>
                        <p>负责人:牛马程序员 (123456@niuma.com)</p>
                    </div>
                </div>
            </body>
            </html>";

            // ======== 创建邮件消息 ========
            MailMessage message = new MailMessage
            {
                From = new MailAddress(fromEmail),
                Subject = $"{emoji} 系统报警 - {alertLevel}",
                Body = htmlBody,
                IsBodyHtml = true
            };

            // 添加收件人
            message.To.Add(incomingEmail);

            // 添加附件
            if (attachmentPaths != null)
            {
                foreach (var path in attachmentPaths)
                {
                    if (File.Exists(path))
                    {
                        message.Attachments.Add(new Attachment(path));
                    }
                }
            }

            // ======== 发送邮件 ========
            client.Send(message);
            // ===== 4. 记录发送日志 =====
            LogError(errorHash, alertLevel, alertContent, errorDetails);
            Console.WriteLine("邮件发送成功!");
        }
        catch (Exception ex)
        {
            Console.WriteLine($"邮件发送失败:{ex.Message}");
        }
    }

    /// <summary>
    /// 创建唯一加密标识符号
    /// </summary>
    /// <param name="content"></param>
    /// <param name="details"></param>
    /// <returns></returns>
    private static string GenerateErrorHash(string content, string details)
    {
        using MD5 md5 = MD5.Create();
        string rawData = $"{content}|{details}";
        byte[] hashBytes = md5.ComputeHash(Encoding.UTF8.GetBytes(rawData));
        return BitConverter.ToString(hashBytes).Replace("-", "");
    }

    /// <summary>
    /// 检查是否已经发送过
    /// </summary>
    /// <param name="errorHash"></param>
    /// <returns></returns>
    private static bool IsAlreadySentToday(string errorHash)
    {
        string todayLogFile = GetTodayLogFilePath();

        lock (fileLock)
        {
            if (!File.Exists(todayLogFile)) return false;

            foreach (string line in File.ReadAllLines(todayLogFile))
            {
                if (line.StartsWith(errorHash))
                {
                    return true;
                }
            }
        }
        return false;
    }
    //记录报警内容
    private static void LogError(string errorHash, string level,
                        string content, string details)
    {
        string logEntry = $"{errorHash}|{DateTime.Now:yyyy-MM-dd HH:mm:ss}|" +
                         $"{level}|{content}|{details}\n";

        lock (fileLock)
        {
            EnsureLogDirectoryExists();
            File.AppendAllText(GetTodayLogFilePath(), logEntry);
        }
    }

    //获取报警日志地址
    private static string GetTodayLogFilePath()
    {
        return Path.Combine(LogDirectory,
                          $"SnedErrorLog_{DateTime.Now:yyyyMMdd}.txt");
    }
    //无文件创建文件夹
    private static void EnsureLogDirectoryExists()
    {
        if (!Directory.Exists(LogDirectory))
        {
            Directory.CreateDirectory(LogDirectory);
        }
    }


    public static  void Main()
    {
        SendToEmail(
        alertLevel: "HIGH",
        alertContent: "数据库益处请处理,可能导致系统响应缓慢。",
        errorDetails: "TimeoutException: Could not connect to database.\n   at DatabaseService.Connect() Line 123",
        attachmentPaths: new[] { "error.log" });

        SendToEmail(
     alertLevel: "HIGH",
     alertContent: "数据库连接池使用率超过90%,可能导致系统响应缓慢。",
     errorDetails: "TimeoutException: Could not connect to database.\n   at DatabaseService.Connect() Line 123",
     attachmentPaths: new[] { "error.log" });

    }
}
到此这篇关于C#使用System.Net库实现自动发送邮件功能的文章就介绍到这了,更多相关C#自动发送邮件内容请搜索脚本之家以前的文章或继续浏览下面的相关文章希望大家以后多多支持脚本之家!