
使用IDEA对SpringBoot应用进行远程调试方式
作者:不会画画的画师
情境描述
有时候,应用开发完成发布到服务器时出现异常,但本地却无法复现,也无法通过服务器上的日志定位。
此时可以通过IDEA对部署在服务器上的SpringBoot应用进行远程调试。
环境描述
- 远程服务器: CentOS 7
- 语言环境:JDK 1.8
- SpringBoot版本:2.3.4.RELEASE
- IDEA版本:2020.2
操作步骤
测试应用编写与发布
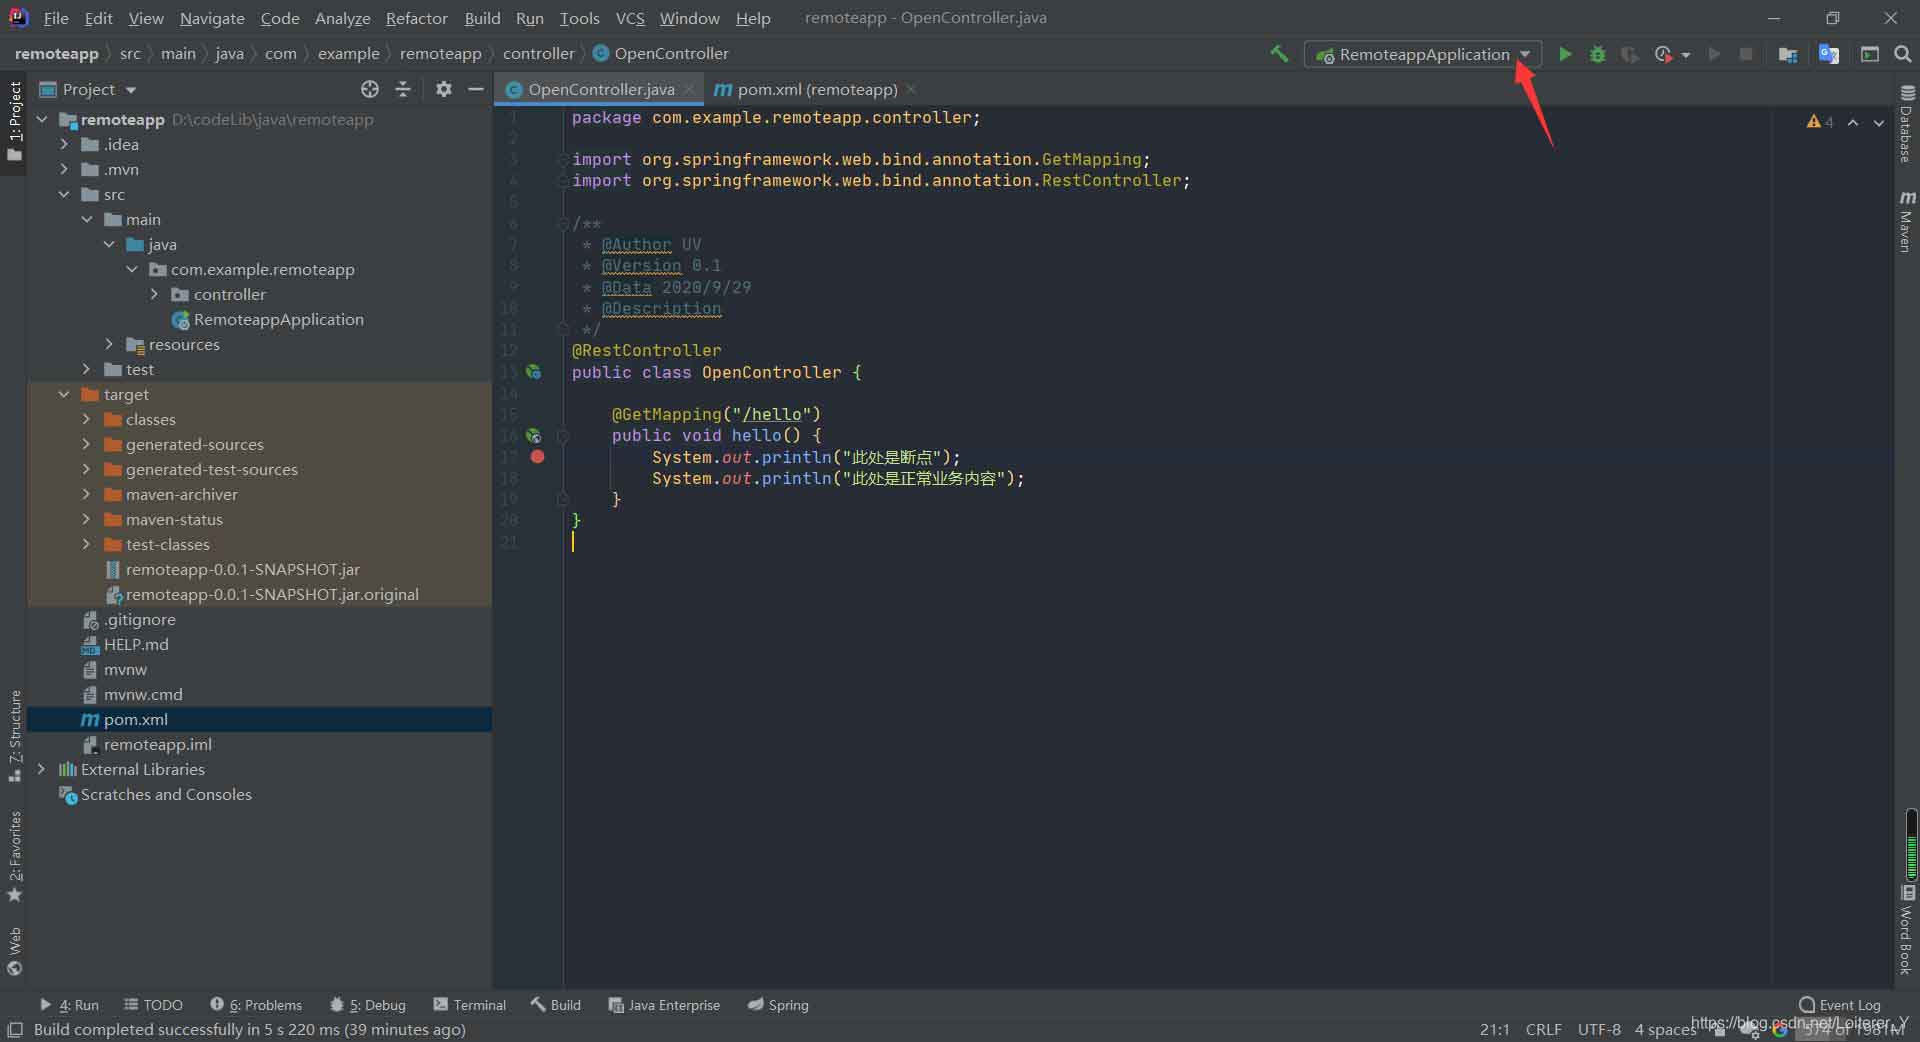
本地使用IDEA写一个简单的SpringBoot web应用,开放一个接口,代码如下:
package com.example.remoteapp.controller;

import org.springframework.web.bind.annotation.GetMapping;
import org.springframework.web.bind.annotation.RestController;

/**
 * @Author UV
 * @Version 0.1
 * @Data 2020/9/29
 * @Description
 */
@RestController
public class OpenController {

    @GetMapping("/hello")
    public void hello() {
        System.out.println("此处是断点");
        System.out.println("此处是正常业务内容");
    }
}
使用mvn install将应用打成jar包,上传到服务器上。
IDEA远程调试配置
打开项目配置
添加远程应用
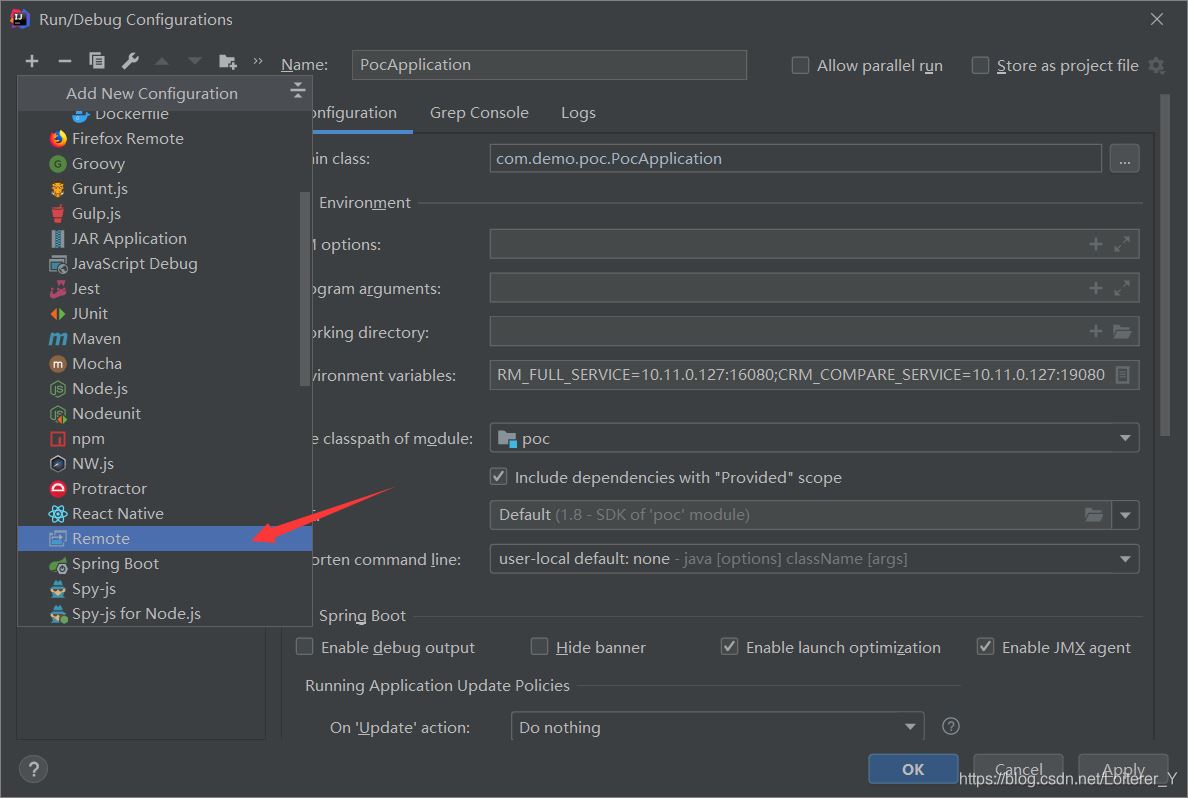
设置远程应用名、debugger模式(Debugger mode)、配置远程服务器地址(Host)、端口(Port)、应用模块(Use module classpath)
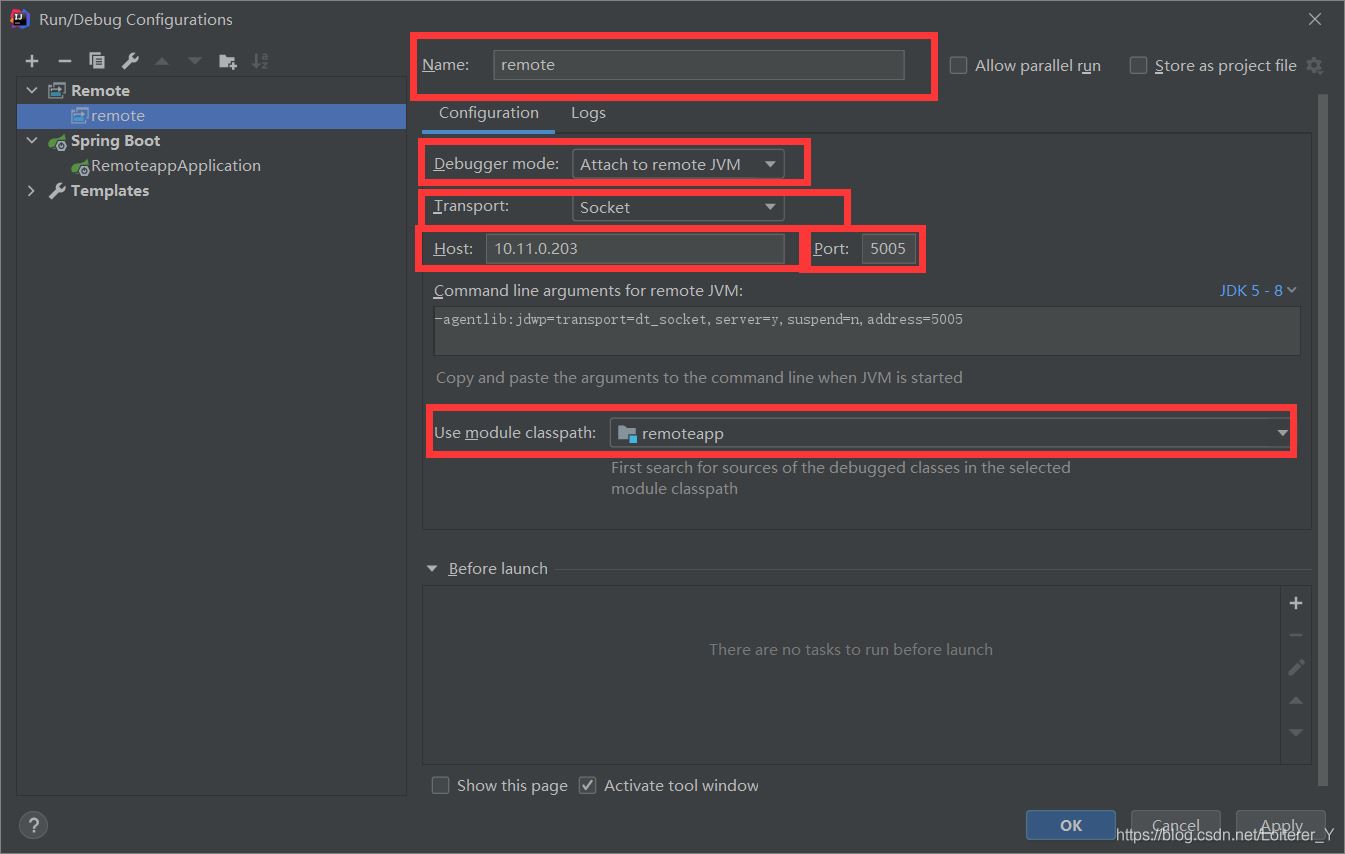
此处的Port为远程应用的远程调试端口,不是应用本身的业务访问端口。
配置完成后,复制下图中的参数,作为远程应用的启动参数

启动远程应用
登陆服务器,启动jar包
$ java -agentlib:jdwp=transport=dt_socket,server=y,suspend=n,address=5005 -jar remoteapp-0.0.1-SNAPSHOT.jar
Listening for transport dt_socket at address: 5005. ____ _ __ _ _
/\\ / ___'_ __ _ _(_)_ __ __ _ \ \ \ \
( ( )\___ | '_ | '_| | '_ \/ _` | \ \ \ \
\\/ ___)| |_)| | | | | || (_| | ) ) ) )
' |____| .__|_| |_|_| |_\__, | / / / /
=========|_|==============|___/=/_/_/_/
:: Spring Boot :: (v2.3.4.RELEASE)2020-09-29 02:20:47.247 INFO 798 --- [ main] c.e.remoteapp.RemoteappApplication : Starting RemoteappApplication v0.0.1-SNAPSHOT on migration-plat01.novalocal with PID 798 (/root/remoteapp-0.0.1-SNAPSHOT.jar started by root in /root)
2020-09-29 02:20:47.252 INFO 798 --- [ main] c.e.remoteapp.RemoteappApplication : No active profile set, falling back to default profiles: default
2020-09-29 02:20:49.000 INFO 798 --- [ main] o.s.b.w.embedded.tomcat.TomcatWebServer : Tomcat initialized with port(s): 8080 (http)
2020-09-29 02:20:49.024 INFO 798 --- [ main] o.apache.catalina.core.StandardService : Starting service [Tomcat]
2020-09-29 02:20:49.024 INFO 798 --- [ main] org.apache.catalina.core.StandardEngine : Starting Servlet engine: [Apache Tomcat/9.0.38]
2020-09-29 02:20:49.120 INFO 798 --- [ main] o.a.c.c.C.[Tomcat].[localhost].[/] : Initializing Spring embedded WebApplicationContext
2020-09-29 02:20:49.121 INFO 798 --- [ main] w.s.c.ServletWebServerApplicationContext : Root WebApplicationContext: initialization completed in 1773 ms
2020-09-29 02:20:49.428 INFO 798 --- [ main] o.s.s.concurrent.ThreadPoolTaskExecutor : Initializing ExecutorService 'applicationTaskExecutor'
2020-09-29 02:20:49.697 INFO 798 --- [ main] o.s.b.w.embedded.tomcat.TomcatWebServer : Tomcat started on port(s): 8080 (http) with context path ''
2020-09-29 02:20:49.712 INFO 798 --- [ main] c.e.remoteapp.RemoteappApplication : Started RemoteappApplication in 3.297 seconds (JVM running for 3.953)
2020-09-29 02:21:54.307 INFO 798 --- [nio-8080-exec-1] o.a.c.c.C.[Tomcat].[localhost].[/] : Initializing Spring DispatcherServlet 'dispatcherServlet'
2020-09-29 02:21:54.307 INFO 798 --- [nio-8080-exec-1] o.s.web.servlet.DispatcherServlet : Initializing Servlet 'dispatcherServlet'
2020-09-29 02:21:54.318 INFO 798 --- [nio-8080-exec-1] o.s.web.servlet.DispatcherServlet : Completed initialization in 11 ms
此处是断点
此处是正常业务内容
Listening for transport dt_socket at address: 5005
此时可以在日志第一行看到Listening for transport dt_socket at address: 5005证明远程调试接口配置成功。
本地使用IDEA对远程应用进行调试
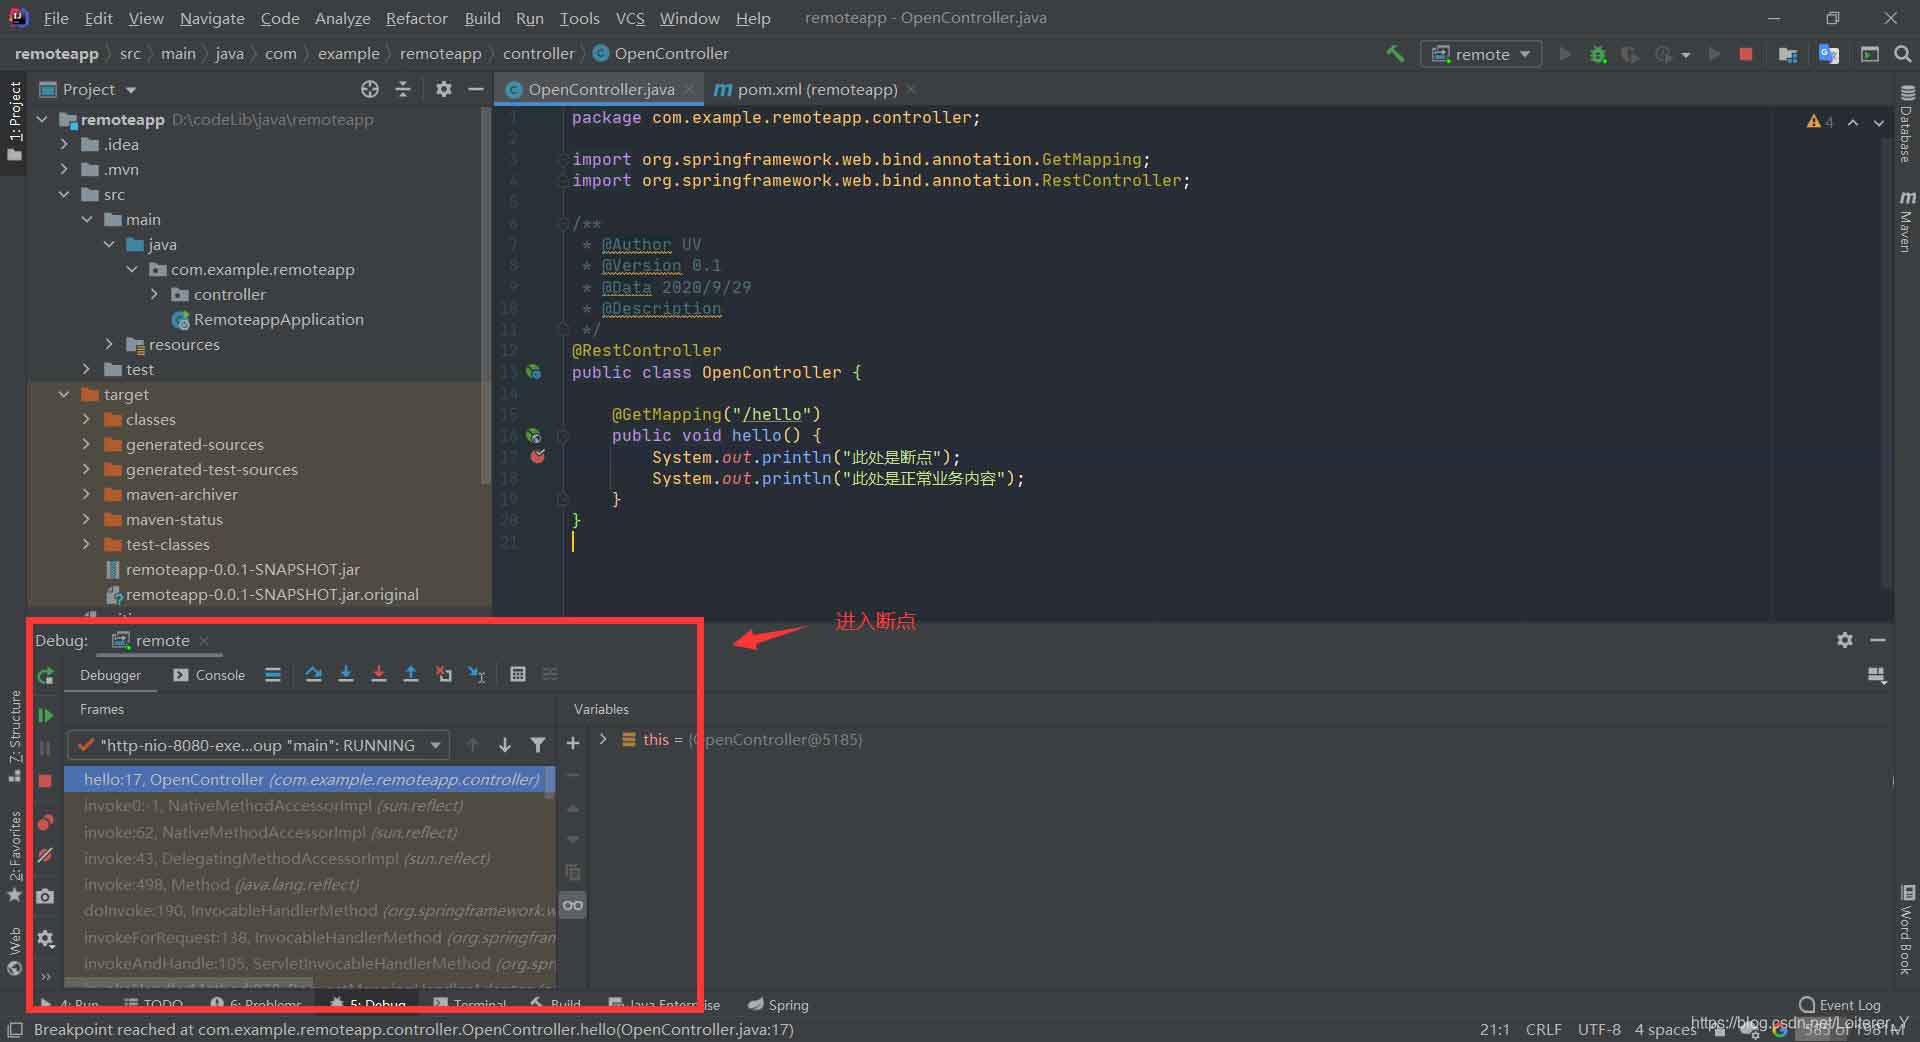
在IDEA中打一个断点,开启debug
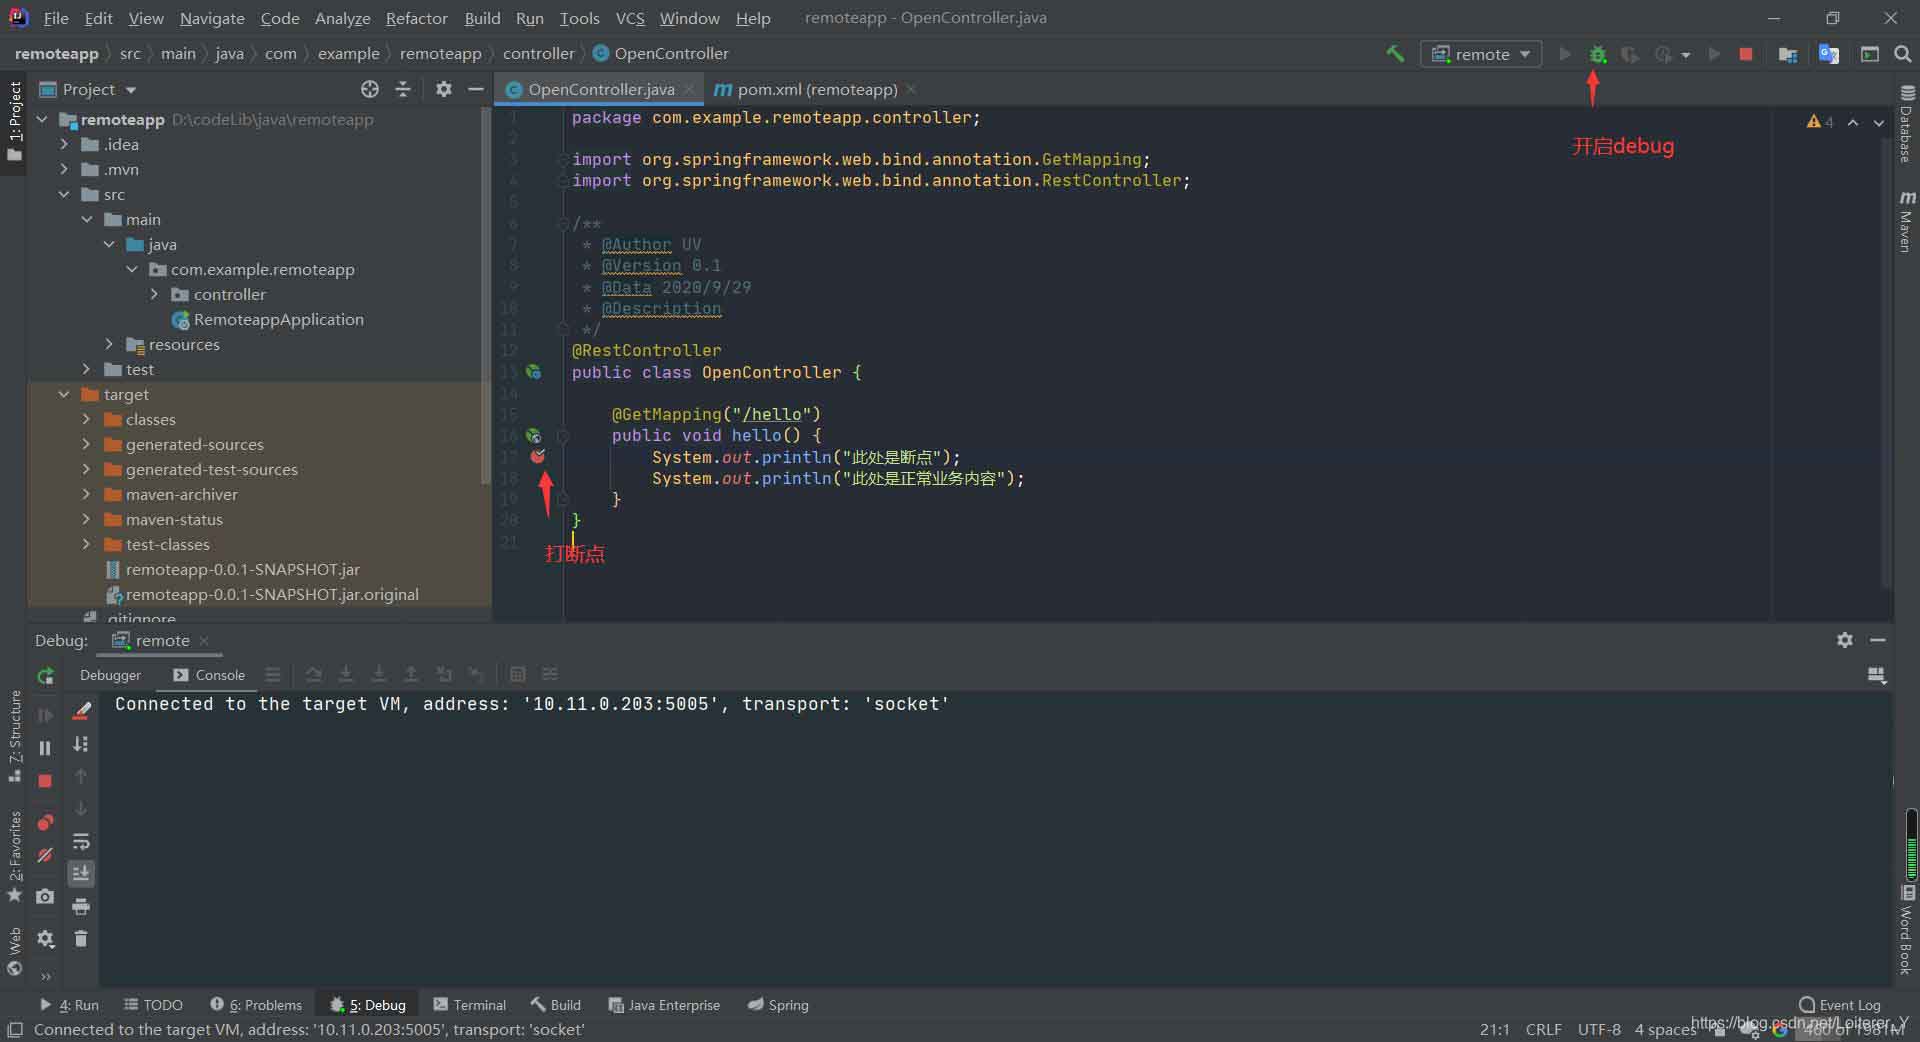
访问远程测试接口
注意点
- 远程调试端口一定要跟应用的业务端口不一致,否则会因为端口冲突导致应用无法启动
- 本地代码要与远程代码一致,否则调试过程会出现异常
总结
以上为个人经验,希望能给大家一个参考,也希望大家多多支持脚本之家。