
如何用Java实现.env文件读取敏感数据
作者:S-X-S
这篇文章主要介绍了如何用Java实现.env文件读取敏感数据,并提供了一个自动配置类EnvAutoConfiguration,common-env-starter-demo模块展示了如何配置和启动一个简单的Spring Boot应用程序,需要的朋友可以参考下
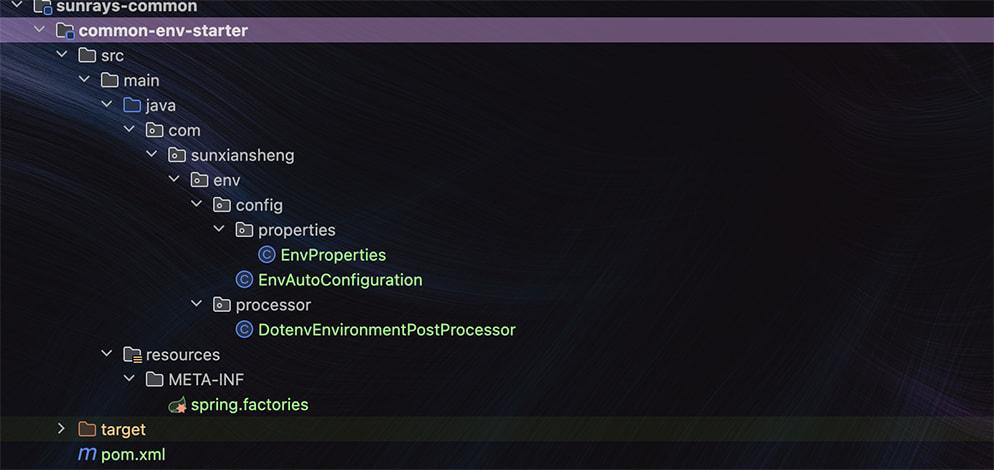
1.common-env-starter模块
1.目录结构
2.DotenvEnvironmentPostProcessor.java 在${xxx}解析之前执行,提前读取配置
package com.sunxiansheng.env.processor;

import io.github.cdimascio.dotenv.Dotenv;
import org.springframework.boot.SpringApplication;
import org.springframework.boot.env.EnvironmentPostProcessor;
import org.springframework.core.env.ConfigurableEnvironment;

/**
 * Description: 在${xxx}解析之前执行,可以读取xxx,设置到环境中,在后续的解析时就会进行替换了
 *
 * @Author sun
 * @Create 2025/1/10 19:40
 * @Version 1.0
 */
public class DotenvEnvironmentPostProcessor implements EnvironmentPostProcessor{

    @Override
    public void postProcessEnvironment(ConfigurableEnvironment environment, SpringApplication application) {
        // 从 Spring 的配置中获取 sun-rays.env.path
        String dotenvPath = environment.getProperty("sun-rays.env.path");

        if (dotenvPath != null) {
            // 加载 .env 文件
            Dotenv dotenv = Dotenv.configure()
                    .directory(dotenvPath)
                    .filename(".env")
                    .load();

            // 将 .env 中的值注入到系统属性中,确保占位符解析时可用
            dotenv.entries().forEach(entry ->
                    environment.getSystemProperties().put(entry.getKey(), entry.getValue())
            );

            System.out.println("Loaded .env from path: " + dotenvPath);
        } else {
            System.err.println("sun-rays.env.path not configured!");
        }
    }
}
3.EnvProperties.java 这里的path只是为了代码提示
package com.sunxiansheng.env.config.properties;

import lombok.Data;
import org.springframework.boot.context.properties.ConfigurationProperties;

/**
 * Description: 这里的path只是为了代码提示,实际上DotenvEnvironmentPostProcessor.java不从这里获取配置
 *
 * @Author sun
 * @Create 2025/1/10 20:04
 * @Version 1.0
 */
@ConfigurationProperties(prefix = "sun-rays.env")
@Data
public class EnvProperties {

    /**
     * .env文件的绝对路径
     */
    private String path;
}
4.EnvAutoConfiguration.java Env模块自动配置类
package com.sunxiansheng.env.config;

import com.sunxiansheng.env.config.properties.EnvProperties;
import lombok.extern.slf4j.Slf4j;
import org.springframework.boot.context.properties.EnableConfigurationProperties;
import org.springframework.context.annotation.Configuration;

import javax.annotation.PostConstruct;

/**
 * Description: Env模块自动配置类
 *
 * @Author sun
 * @Create 2025/1/10 19:57
 * @Version 1.0
 */
@Configuration
@EnableConfigurationProperties({EnvProperties.class}) // 启用配置类
@Slf4j
public class EnvAutoConfiguration {

    /**
     * 自动配置成功日志
     */
    @PostConstruct
    public void logConfigSuccess() {
        log.info("EnvAutoConfiguration has been loaded successfully!");
    }
}
5.spring.factories 自动配置和注册EnvironmentPostProcessor
org.springframework.boot.autoconfigure.EnableAutoConfiguration=\
com.sunxiansheng.env.config.EnvAutoConfiguration
org.springframework.boot.env.EnvironmentPostProcessor=\
com.sunxiansheng.env.processor.DotenvEnvironmentPostProcessor
6.pom.xml
<?xml version="1.0" encoding="UTF-8"?>
<project xmlns="http://maven.apache.org/POM/4.0.0"
         xmlns:xsi="http://www.w3.org/2001/XMLSchema-instance"
         xsi:schemaLocation="http://maven.apache.org/POM/4.0.0 http://maven.apache.org/xsd/maven-4.0.0.xsd">
    <modelVersion>4.0.0</modelVersion>
    <parent>
        <groupId>com.sunxiansheng</groupId>
        <artifactId>sunrays-common</artifactId>
        <version>2.0.0</version>
    </parent>

    <artifactId>common-env-starter</artifactId>

    <dependencies>
        <!-- 可以使用.env文件提前加载配置,确保数据安全 -->
        <dependency>
            <groupId>io.github.cdimascio</groupId>
            <artifactId>java-dotenv</artifactId>
        </dependency>
    </dependencies>
</project>
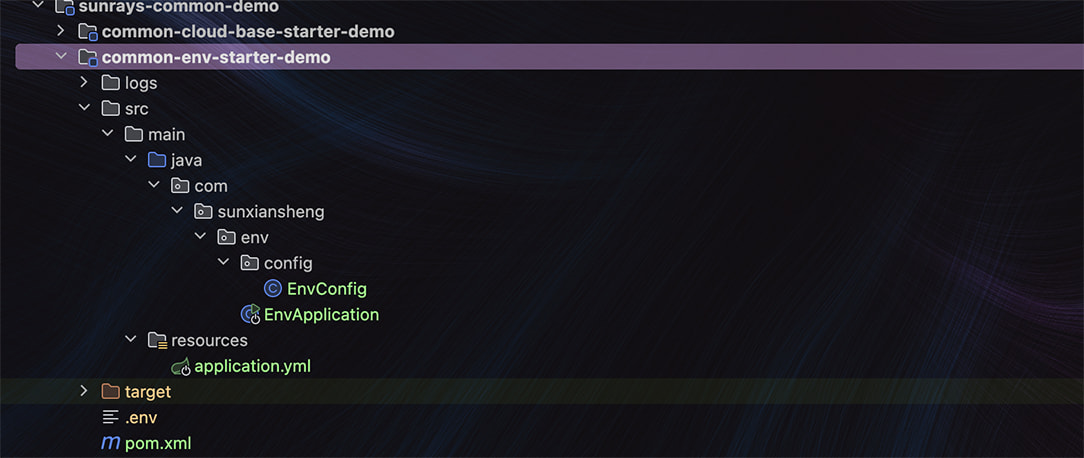
2.common-env-starter-demo模块
1.目录结构
2.pom.xml
<?xml version="1.0" encoding="UTF-8"?>
<project xmlns="http://maven.apache.org/POM/4.0.0"
         xmlns:xsi="http://www.w3.org/2001/XMLSchema-instance"
         xsi:schemaLocation="http://maven.apache.org/POM/4.0.0 http://maven.apache.org/xsd/maven-4.0.0.xsd">
    <modelVersion>4.0.0</modelVersion>
    <parent>
        <groupId>com.sunxiansheng</groupId>
        <artifactId>sunrays-common-demo</artifactId>
        <version>2.0.0</version>
    </parent>

    <artifactId>common-env-starter-demo</artifactId>

    <dependencies>
        <!-- common-env-starter -->
        <dependency>
            <groupId>com.sunxiansheng</groupId>
            <artifactId>common-env-starter</artifactId>
            <version>2.0.0</version>
        </dependency>
    </dependencies>
</project>
3.application.yml 配置测试的数据
sun-rays:
  log4j2:
    home: /Users/sunxiansheng/IdeaProjects/sunrays-framework/sunrays-common-demo/common-env-starter-demo/logs # 日志根目录(默认./logs)
    module: sunrays-common-demo/common-env-starter-demo # 模块根目录从仓库根目录开始(默认defaultModule)
  env:
    path: /Users/sunxiansheng/IdeaProjects/sunrays-framework/sunrays-common-demo/common-env-starter-demo # .env文件的绝对路径
env:
  test: ${ENV_TEST}
4.EnvConfig.java
package com.sunxiansheng.env.config;
import lombok.extern.slf4j.Slf4j;
import org.springframework.beans.factory.annotation.Value;
import org.springframework.context.annotation.Configuration;
import javax.annotation.PostConstruct;
/**
* Description: Env配置类,测试读取数据
*
* @Author sun
* @Create 2025/1/10 20:55
* @Version 1.0
*/
@Configuration
@Slf4j
public class EnvConfig {
@Value("${env.test}")
private String test;
@PostConstruct
public void init() {
// 测试读取
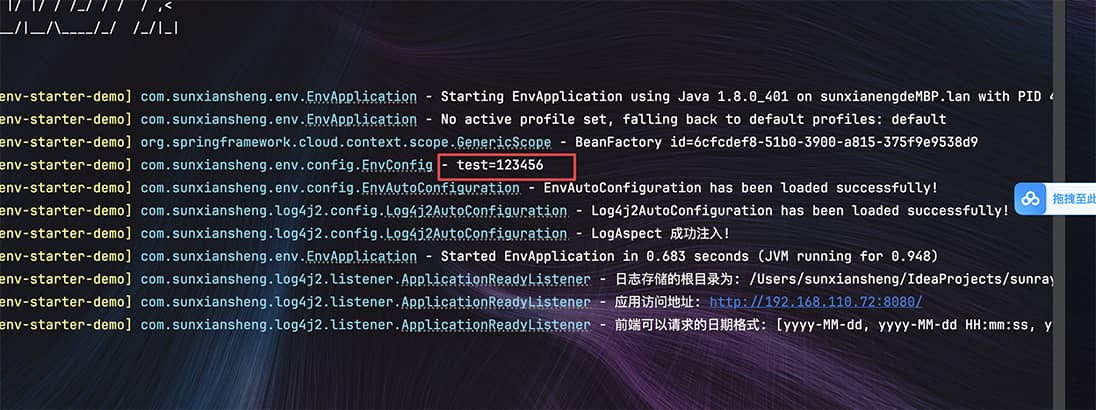
log.info("test={}", test);
}
}
5.EnvApplication.java 启动类
package com.sunxiansheng.env;

import org.springframework.boot.SpringApplication;
import org.springframework.boot.autoconfigure.SpringBootApplication;

/**
 * Description: Env
 *
 * @Author sun
 * @Create 2025/1/10 20:53
 * @Version 1.0
 */
@SpringBootApplication
public class EnvApplication {

    public static void main(String[] args) {
        SpringApplication.run(EnvApplication.class, args);
    }
}
6.测试

总结
到此这篇关于Java实现.env文件读取敏感数据的文章就介绍到这了,更多相关Java .env文件读取敏感数据内容请搜索脚本之家以前的文章或继续浏览下面的相关文章希望大家以后多多支持脚本之家!