
springboot集成screw反向生成数据库说明文档
作者:肥仔哥哥1930
screw是一个一键式生成数据库文档的开源工具包,目前screw可以生成word、md和html格式类的文档,本文主要来讲讲如何通过screw反向生成数据库说明文档,感兴趣的可以了解下
一、screw介绍
不是大厂写的,是个人写的,但是不得不说,好使啊, 为爱发电。
二、使用步骤
1.新建一个空的springboot项目
这个使用idea,选择springboot,下一步下一步就行。
我这里是maven项目,pom文件引入jar包。
我这里的整个pom.xml内容
<?xml version="1.0" encoding="UTF-8"?>
<project xmlns="http://maven.apache.org/POM/4.0.0" xmlns:xsi="http://www.w3.org/2001/XMLSchema-instance"
	xsi:schemaLocation="http://maven.apache.org/POM/4.0.0 https://maven.apache.org/xsd/maven-4.0.0.xsd">
	<modelVersion>4.0.0</modelVersion>
	<parent>
		<groupId>org.springframework.boot</groupId>
		<artifactId>spring-boot-starter-parent</artifactId>
		<version>3.3.3</version>
		<relativePath/> <!-- lookup parent from repository -->
	</parent>
	<groupId>com.easylinkin</groupId>
	<artifactId>my-screw</artifactId>
	<version>0.0.1-SNAPSHOT</version>
	<name>my-screw</name>
	<description>my-screw</description>
	<url/>
	<licenses>
		<license/>
	</licenses>
	<developers>
		<developer/>
	</developers>
	<scm>
		<connection/>
		<developerConnection/>
		<tag/>
		<url/>
	</scm>
	<properties>
		<java.version>17</java.version>
	</properties>
	<dependencies>
		<dependency>
			<groupId>org.springframework.boot</groupId>
			<artifactId>spring-boot-starter</artifactId>
		</dependency>

		<dependency>
			<groupId>org.springframework.boot</groupId>
			<artifactId>spring-boot-starter-test</artifactId>
			<scope>test</scope>
		</dependency>

		<dependency>
			<groupId>org.springframework.boot</groupId>
			<artifactId>spring-boot-starter-web</artifactId>
		</dependency>
		<dependency>
			<groupId>cn.smallbun.screw</groupId>
			<artifactId>screw-core</artifactId>
			<version>1.0.5</version>
		</dependency>
		<dependency>
			<groupId>com.mysql</groupId>
			<artifactId>mysql-connector-j</artifactId>
		</dependency>
		<dependency>
			<groupId>com.zaxxer</groupId>
			<artifactId>HikariCP</artifactId>
		</dependency>
		<dependency>
			<groupId>org.projectlombok</groupId>
			<artifactId>lombok</artifactId>
		</dependency>
	</dependencies>

	<build>
		<plugins>
			<plugin>
				<groupId>org.springframework.boot</groupId>
				<artifactId>spring-boot-maven-plugin</artifactId>
			</plugin>
		</plugins>
	</build>

</project>
2.生成文档的测试类
package com.easylinkin.myscrew;

import cn.smallbun.screw.core.Configuration;
import cn.smallbun.screw.core.engine.EngineConfig;
import cn.smallbun.screw.core.engine.EngineFileType;
import cn.smallbun.screw.core.engine.EngineTemplateType;
import cn.smallbun.screw.core.execute.DocumentationExecute;
import cn.smallbun.screw.core.process.ProcessConfig;
import com.zaxxer.hikari.HikariDataSource;
import lombok.extern.slf4j.Slf4j;
import org.junit.jupiter.api.Test;
import org.springframework.boot.test.context.SpringBootTest;

import java.util.ArrayList;
import java.util.Arrays;
import java.util.List;

@Slf4j
@SpringBootTest
class MyScrewApplicationTests {

	//@Test
	void contextLoads() {
	}

	/**
	 * 获取数据源配置
	 */
	@Test
	void generate() {
		log.info("开始生成数据库文档");
		String dbFilePath = "/Users/zwmac/work/ovu/数据库";
		// 生成文件配置
		EngineConfig engineConfig = EngineConfig.builder()
				// 生成文件路径,自己mac本地的地址,这里需要自己更换下路径
				.fileOutputDir(dbFilePath)
				// 打开目录
				.openOutputDir(false)
				// 文件类型 HTML/WORD/MD 三种格式
				.fileType(EngineFileType.WORD)
				// 生成模板实现
				.produceType(EngineTemplateType.freemarker).build();

		//数据库名称
		String[] dbNames = {"ovuhome"};
		for (String dbName : dbNames) {
			HikariDataSource hikariDataSource = new HikariDataSource();
			//设置数据库连接
			hikariDataSource.setJdbcUrl("jdbc:mysql://127.0.0.1:3306/" + dbName + "?characterEncoding=utf8&zeroDateTimeBehavior=convertToNull&useSSL=false&useJDBCCompliantTimezoneShift=true&useLegacyDatetimeCode=false&serverTimezone=GMT%2B8&allowMultiQueries=true&allowPublicKeyRetrieval=true");
			hikariDataSource.setUsername("root");
			hikariDataSource.setPassword("12345678");
			// 生成文档配置(包含以下自定义版本号、描述等配置连接)
			Configuration config = Configuration.builder()
					//文档版本号
					.version("1.0.1")
					//文档名称
					.description("公寓数据库设计文档")
					//数据源
					.dataSource(hikariDataSource)
					//生成引擎配置
					.engineConfig(engineConfig)
					//高级配置
					//.produceConfig(getProcessConfig())
					.build();

			// 执行生成
			new DocumentationExecute(config).execute();
		}
		log.info("生成数据库文档完成");
	}

	/**
	 * 配置想要生成的表+ 配置想要忽略的表
	 * @return 生成表配置
	 */
	public static ProcessConfig getProcessConfig(){
		// 忽略表名
		List<String> ignoreTableName = Arrays.asList("testa_testa","testb_testb");
		// 忽略表前缀
		List<String> ignorePrefix = Arrays.asList("testa","testb");
		// 忽略表后缀
		List<String> ignoreSuffix = Arrays.asList("_testa","_testb");
		return ProcessConfig.builder()
				//根据名称指定表生成 我需要生成所有表 这里暂时不设置
				.designatedTableName(new ArrayList<>())
				//根据表前缀生成 我需要生成所有表 这里暂时不设置
				.designatedTablePrefix(new ArrayList<>())
				//根据表后缀生成 我需要生成所有表 这里暂时不设置
				.designatedTableSuffix(new ArrayList<>())
				//忽略表名
				.ignoreTableName(ignoreTableName)
				//忽略表前缀
				.ignoreTablePrefix(ignorePrefix)
				//忽略表后缀
				.ignoreTableSuffix(ignoreSuffix).build();
	}

}
测试类运行,就不说了,自己摸索摸索。
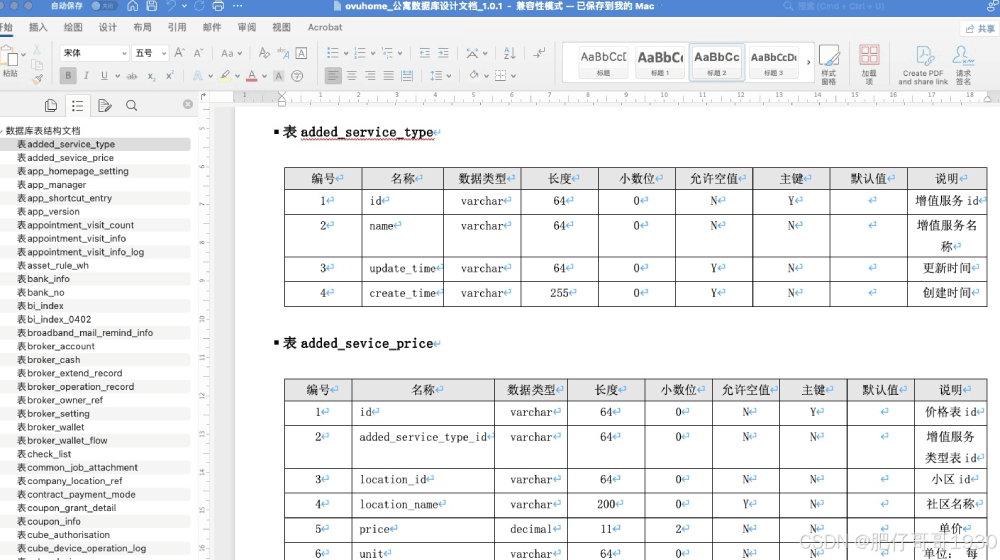
3.生成的word文档效果
到此这篇关于springboot集成screw反向生成数据库说明文档的文章就介绍到这了,更多相关springboot screw生成数据库说明文档内容请搜索脚本之家以前的文章或继续浏览下面的相关文章希望大家以后多多支持脚本之家!