
SpringBoot项目接收前端参数的11种方式
作者:袁庭新
1 搭建项目
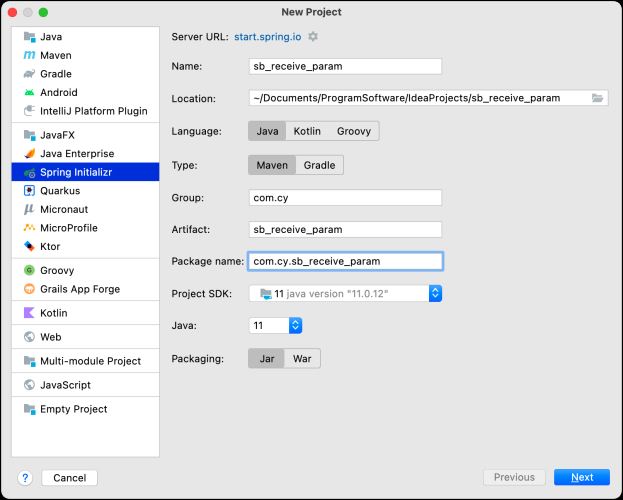
1.通过Spring Initializr选项创建一个项目名称为【sb_receive_param】的SpringBoot项目。
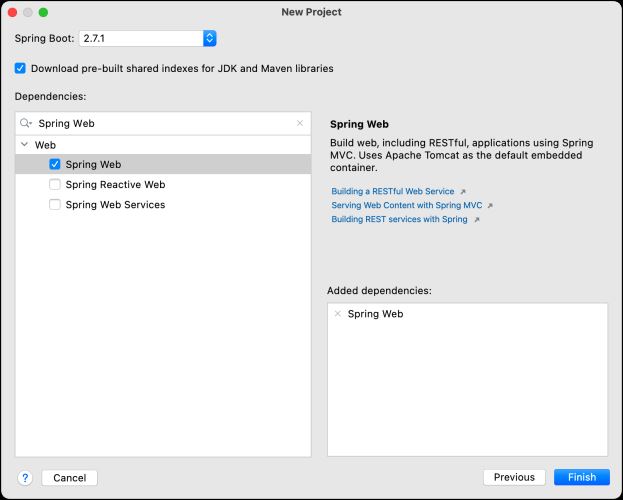
2.给项目添加Spring Web依赖。
3.在com.cy.sb_receive_param.pojo包下创建User实体类。
package com.cy.sb_receive_param.pojo;
import lombok.AllArgsConstructor;
import lombok.Data;
import lombok.NoArgsConstructor;
import java.io.Serializable;

@Data
@NoArgsConstructor
@AllArgsConstructor
public class User implements Serializable {
    private Integer id;
    private String username;
    private String password;
    private Cat cat;
    private List<Course> courses;
}
4.在com.cy.sb_receive_param.controller包下创建UserController类。
package com.cy.sb_receive_param.controller;
import org.springframework.web.bind.annotation.*;

@RequestMapping("users")
@RestController
public class UserController {

}
5.解决在前后端分离项目中的跨域问题。通过实现WebMvcConfigurer接口,并重写addCorsMappings(CorsRegistry registry)方法来实现。
package com.cy.sb_receive_param.config;
import org.springframework.context.annotation.Configuration;
import org.springframework.web.servlet.config.annotation.CorsRegistry;
import org.springframework.web.servlet.config.annotation.WebMvcConfigurer;

@Configuration
public class CrossOriginConfig implements WebMvcConfigurer {
    /**
     * addMapping("/**"):配置可以被跨域的路径,可以任意配置,可以具体到直接请求路径
     * allowedOrigins("*"):允许所有的请求域名访问我们的跨域资源,可以固定单条或者多条内容,如"http://www.yx.com",只有该域名可以访问我们的跨域资源
     * allowedHeaders("*"):允许所有的请求header访问,可以自定义设置任意请求头信息
     * allowedMethods():允许所有的请求方法访问该跨域资源服务器,如GET、POST、DELETE、PUT、OPTIONS、HEAD等
     * maxAge(3600):配置客户端可以缓存pre-flight请求的响应的时间(秒)。默认设置为1800秒(30分钟)
     */
    @Override
    public void addCorsMappings(CorsRegistry registry) {
        registry.addMapping("/**")
                .allowedOrigins("*")
                .allowedHeaders("*")
                .allowedMethods("GET", "POST", "DELETE", "PUT", "OPTIONS", "HEAD")
                .maxAge(3600);
    }
}
2 Spring Boot接收前端参数方式
2.1 传非JSON数据
2.1.1 注解介绍
@RequestParam主要用于在Spring MVC后台控制层获取参数,它有三个常用参数。
参数名 | 描述 |
defaultValue | 表示设置默认值 |
required | 表示该参数是否必传 |
value | 值表示接收传入的参数的key |
@PathVariable用于将请求URL中的模板变量映射到功能处理方法的参数上,即取出URL模板中的变量作为参数。
2.1.2 案例演示
1.方式一
1.在UserController类中添加add1()请求处理方法。前端请求参数的key需和后端控制层处理请求的方法参数名称一致。
@RequestMapping("add1")
public void add1(String username, String password) {
  System.out.println("username=" + username + ", password=" + password);
}
2.使用ApiPost工具测试(GET和POST请求都支持)。
localhost:8080/users/add1?username=tom&password=123456
3.创建param01.html页面,通过Axios发送请求。
<!DOCTYPE html>
<html>
  <head>
    <meta charset="utf-8" />
    <title>前后端参数传递</title>
    <script src="https://unpkg.com/vue@next"></script>
    <script src="https://unpkg.com/axios/dist/axios.min.js"></script>
  </head>
  <body>
    <div id="app">

    </div>

    <script>
      const app = {
        data() {
          return {
            username: '王小虎',
            password: '123456'
          }
        },
        mounted() {
          axios.get('http://localhost:8888/users/add1', {
              params: {
                username: this.username,
                password: this.password
              }
          }).then(response => {
              console.log('success', response.data);
          }).catch(error => {
              console.log('fail', error.data);
          });
        }
      }
      Vue.createApp(app).mount('#app')
    </script>
  </body>
</html>
2.方式二
1.在UserController类中添加add2()请求处理方法。如果前端请求参数的key与后端控制层处理请求的方法参数名称不一致,使用@RequestParam注解来解决。
@RequestMapping("add2")
public void add2(@RequestParam("name") String username, @RequestParam("pwd") String password) {
    System.out.println("username=" + username + ", password=" + password);
}
2.使用ApiPost工具测试(GET和POST请求都支持)。
localhost:8080/users/add2?name=tom&pwd=123456
3.创建param02.html页面,通过Axios发送请求。
<!DOCTYPE html>
<html>
  <head>
    <meta charset="utf-8" />
    <title>前后端参数传递</title>
    <script src="https://unpkg.com/vue@next"></script>
    <script src="https://unpkg.com/axios/dist/axios.min.js"></script>
  </head>
  <body>
    <div id="app">

    </div>

    <script>
      const app = {
        data() {
          return {
            username: '张小三',
            password: '654321'
          }
        },
        mounted() {
          axios.get('http://localhost:8888/users/add2', {
              params: {
                name: this.username,
                pwd: this.password
              }
          }).then(response => {
              console.log('success', response.data);
          }).catch(error => {
              console.log('fail', error.data);
          });
        }
      }
      Vue.createApp(app).mount('#app')
    </script>
  </body>
</html>
3.接收前端传数组参数
1.在UserController类中添加delete1()请求处理方法。
@DeleteMapping("batch_delete1")
public void delete1(@RequestParam(name = "ids") List<Integer> ids) {
  for (Integer id : ids) {
    System.out.println(id);
  }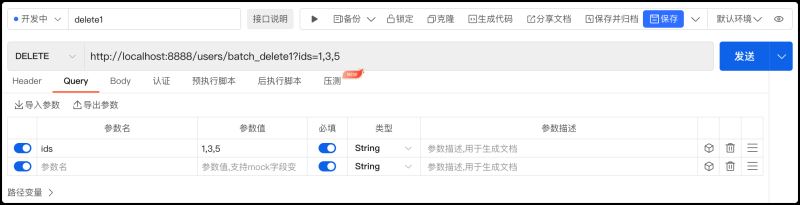
}2.使用ApiPost工具测试,在【Query】选项下添加ids参数,参数值设置为1,3,5。
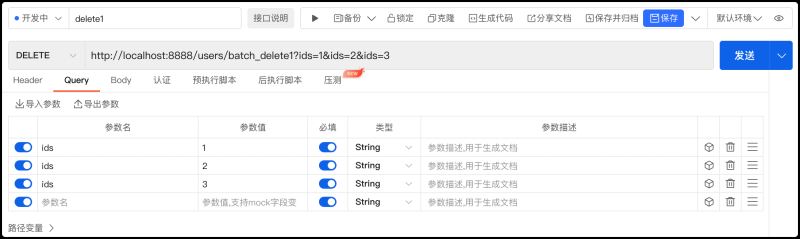
3.使用ApiPost工具测试,在【Query】选项下添加ids参数,将参数的值单独一个个进行添加。
4.创建param03.html页面,通过Axios发送请求。
<!DOCTYPE html>
<html>
	<head>
		<meta charset="utf-8" />
		<title>前后端参数传递</title>
		<script src="https://unpkg.com/vue@next"></script>
		<script src="https://unpkg.com/axios/dist/axios.min.js"></script>
	</head>
	<body>
		<div id="app">

		</div>

		<script>
		  const app = {
		    data() {
		      return {
		        ids: [1, 3, 5]
		      }
		    },
		    mounted() {
          axios.delete('http://localhost:8888/users/batch_delete1', {
            params: {
              ids: this.ids.join(',')
            }
          }).then(response => {
              console.log('success', response.data);
          }).catch(error => {
              console.log('fail', error.data);
          });
		    }
		  }

		  Vue.createApp(app).mount('#app')
		</script>
	</body>
</html>
4.方式四
1.在UserController类中添加add3()请求处理方法。前端请求参数的key需和后端控制层处理请求方法的参数pojo实体类的属性名称一致。
@RequestMapping("add3")
public void add3(User user) {
  System.out.println(user);
}
2.使用ApiPost工具测试(GET和POST请求都支持)。
localhost:8080/users/add3?id=1&username=tom&password=123
3.创建param04.html页面,通过Axios发送请求。
<!DOCTYPE html>
<html>
	<head>
		<meta charset="utf-8" />
		<title>前后端参数传递</title>
		<script src="https://unpkg.com/vue@next"></script>
		<script src="https://unpkg.com/axios/dist/axios.min.js"></script>
	</head>
	<body>
		<div id="app">

		</div>

		<script>
		  const app = {
		    data() {
		      return {
            id: 1,
            username: '王小明',
            password: '123456'
		      }
		    },
		    mounted() {
          axios.get('http://localhost:8888/users/add3', {
            params: {
              id: this.id,
              username: this.username,
              password: this.password
            }
          })
          .then(response => {
             console.log('success', response.data);
          }).catch(error => {
             console.log('fail', error.data);
          });
		    }
		  }

		  Vue.createApp(app).mount('#app')
		</script>
	</body>
</html>
5.方式五
1.在UserController类中添加add4()请求处理方法。使用@PathVariable注解将请求URL中的模板变量映射到功能处理方法的参数上,如果模板变量名称和方法的参数名称不同需要在@PathVariable注解上显示的指定映射关系。
@RequestMapping("add4/{username}/{pwd}")
public void add4(@PathVariable String username, @PathVariable("pwd") String password) {
  System.out.println("username=" + username + ", password=" + password);
}
2.使用ApiPost工具测试(GET和POST请求都支持)。
localhost:8080/users/add4/tom/123456
3.创建param05.html页面,通过Axios发送请求。
<!DOCTYPE html>
<html>
	<head>
		<meta charset="utf-8" />
		<title>前后端参数传递</title>
		<script src="https://unpkg.com/vue@next"></script>
		<script src="https://unpkg.com/axios/dist/axios.min.js"></script>
	</head>
	<body>
		<div id="app">

		</div>

		<script>
		  const app = {
		    data() {
		      return {
            username: '袁庭新',
            password: '123456'
		      }
		    },
		    mounted() {
          axios.post(`http://localhost:8888/users/add4/${this.username}/${this.password}`)
          .then(response => {
            console.log('success', response.data);
          }).catch(error => {
            console.log('fail', error.data);
          });
		    }
		  }

		  Vue.createApp(app).mount('#app')
		</script>
	</body>
</html>
6.方式六
1.在UserController类中添加add5()请求处理方法。通过HttpServletRequest对象获取数据,前端请求参数的key需和getParameter(String name)方法传递的参数名称一致。
@RequestMapping("add5")
public void add5(HttpServletRequest request) {
  String username = request.getParameter("username");
  String password = request.getParameter("password");
  System.out.println("username=" + username + ", password=" + password);
}
2.使用ApiPost工具测试(GET和POST请求都支持)。
localhost:8080/users/add5?username=tom&password=123
3.创建param06.html页面,通过Axios发送请求。
<!DOCTYPE html>
<html>
	<head>
		<meta charset="utf-8" />
		<title>前后端参数传递</title>
		<script src="https://unpkg.com/vue@next"></script>
		<script src="https://unpkg.com/axios/dist/axios.min.js"></script>
	</head>
	<body>
		<div id="app">

		</div>

		<script>
		  const app = {
		    data() {
		      return {
            username: '袁庭新',
            password: '123456'
		      }
		    },
		    mounted() {
          axios.post('http://localhost:8888/users/add5', null, {
            params: {
              username: this.username,
              password: this.password
            }
          })
          .then(response => {
             console.log('success', response.data);
          }).catch(error => {
             console.log('fail', error.data);
          });
		    }
		  }

		  Vue.createApp(app).mount('#app')
		</script>
	</body>
</html>
2.2 传JSON数据
2.2.1 注解介绍
@RequestBody该注解会把接收到的参数转为JSON格式。如果前端通过application/json类型提交JSON格式的数据给后端控制层处理请求的方法,方法的参数必须使用@RequestBody注解进行修饰,才能接收来自前端提交的JSON数据。
2.2.2 案例演示
1.接收前端传数组参数
1.在UserController类中添加delete2()请求处理方法。
@DeleteMapping("batch_delete2")
public void delete2(@RequestBody ArrayList<Integer> ids) {
  for (Integer id : ids) {
    System.out.println(id);
  }
}
2.使用ApiPost工具测试,在【Body】选项选项下发送JSON格式数据[1, 3, 5]给后台。

3.创建param07.html页面,通过Axios发送请求。
<!DOCTYPE html>
<html>
	<head>
		<meta charset="utf-8" />
		<title>前后端参数传递</title>
		<script src="https://unpkg.com/vue@next"></script>
		<script src="https://unpkg.com/axios/dist/axios.min.js"></script>
	</head>
	<body>
		<div id="app">

		</div>

		<script>
		  const app = {
		    data() {
		      return {
		        ids: [1, 3, 5]
		      }
		    },
		    mounted() {
          axios.post('http://localhost:8888/users/batch_delete2', this.ids)
            .then(response => {
              console.log('success', response.data);
            })
            .catch(error => {
              console.log('fail', error.data);
            });
		    }
		  }

		  Vue.createApp(app).mount('#app')
		</script>
	</body>
</html>
2.单个实体接收参数
1.在UserController类中添加add6()请求处理方法。
@RequestMapping("add6")
public User add6(@RequestBody User user) {
  System.out.println(user);
  return user;
}
2.使用ApiPost工具测试,需将提交的数据类型设置为application/json格式(GET和POST请求都支持)。
{
  "id": 1,
  "username": "tom",
  "password": "123456"
}
3.创建param08.html页面,通过Axios发送请求。
<!DOCTYPE html>
<html>
	<head>
		<meta charset="utf-8" />
		<title>前后端参数传递</title>
		<script src="https://unpkg.com/vue@next"></script>
		<script src="https://unpkg.com/axios/dist/axios.min.js"></script>
	</head>
	<body>
		<div id="app">

		</div>

		<script>
		  const app = {
		    data() {
		      return {
		        user: {
              username: '袁庭新',
              password: '123456'
            }
		      }
		    },
		    mounted() {
          axios.post('http://localhost:8888/users/add6', this.user)
            .then(response => {
              console.log('success', response.data);
            })
            .catch(error => {
              console.log('fail', error.data);
            });
		    }
		  }

		  Vue.createApp(app).mount('#app')
		</script>
	</body>
</html>
3.实体嵌套实体接收参数
1.在pojo包下创建Cat实体类。
package com.cy.sb_receive_param.pojo;
import lombok.AllArgsConstructor;
import lombok.Data;
import lombok.NoArgsConstructor;

@Data
@NoArgsConstructor
@AllArgsConstructor
public class Cat {
    private Integer id;
    private String breed;
    private String name;
}
2.在pojo包下的User实体类中声明Cat类型的属性。
package com.cy.sb_receive_param.pojo;
import lombok.Data;
import lombok.ToString;

@Data
@ToString
public class User {
  private Integer id;
  private String username;
  private String password;
  private Cat cat;
}
3.在UserController类中添加add7()请求处理方法。
@RequestMapping("add7")
public User add7(@RequestBody User user) {
  System.out.println(user);
  return user;
}
4.使用ApiPost工具测试,需将提交的数据类型设置为application/json格式(GET和POST请求都支持)。
{
  "id": 1,
  "username": "袁庭新",
  "password": "123456",
  "cat": {
    "id": 1,
    "breed": "蓝白",
    "name": "花花"
  }
}
5.创建param09.html页面,通过Axios发送请求。
<!DOCTYPE html>
<html>
	<head>
		<meta charset="utf-8" />
		<title>前后端参数传递</title>
		<script src="https://unpkg.com/vue@next"></script>
		<script src="https://unpkg.com/axios/dist/axios.min.js"></script>
	</head>
	<body>
		<div id="app">

		</div>

		<script>
		  const app = {
		    data() {
		      return {
		        user: {
              id: 1,
              username: '袁庭新',
              password: '123456',
              cat: {
                id: 1,
                breed: '蓝白',
                name: '花花'
              }
            }
		      }
		    },
		    mounted() {
          axios.post('http://localhost:8888/users/add7', this.user)
            .then(response => {
              console.log('success', response.data);
            })
            .catch(error => {
              console.log('fail', error.data);
            });
		    }
		  }

		  Vue.createApp(app).mount('#app')
		</script>
	</body>
</html>
4.实体嵌套List集合接收参数
1.在pojo包下创建Course实体类。
package com.cy.sb_receive_param.pojo;
import lombok.AllArgsConstructor;
import lombok.Data;
import lombok.NoArgsConstructor;

@Data
@NoArgsConstructor
@AllArgsConstructor
public class Course {
    private Integer id;
    private String courseName;
    private String lecturer;
}2.在pojo包下的User实体类中声明List<Course>类型的属性。
package com.cy.sb_receive_param.pojo;
import lombok.Data;
import lombok.ToString;
import java.util.List;

@Data
@ToString
public class User {
  private Integer id;
  private String username;
  private String password;
  private List<Course> courses;
}
3.在UserController类中添加add8()请求处理方法。
@RequestMapping("add8")
public User add8(@RequestBody User user) {
  System.out.println(user);
  return user;
}
4.使用ApiPost工具测试,需将提交的数据类型设置为application/json格式(GET和POST请求都支持)。
{
  "id": 1,
  "username": "tom",
  "password": "123456",
  "courses": [
    {
      "id": 1,
      "courseName": "Java",
      "lecturer": "袁庭新老师"
    },
    {
      "id": 2,
      "courseName": "Python",
      "lecturer": "李小红老师"
    }
  ]
}
5.创建param10.html页面,通过Axios发送请求。
<!DOCTYPE html>
<html>
	<head>
		<meta charset="utf-8" />
		<title>前后端参数传递</title>
		<script src="https://unpkg.com/vue@next"></script>
		<script src="https://unpkg.com/axios/dist/axios.min.js"></script>
	</head>
	<body>
		<div id="app">

		</div>

		<script>
		  const app = {
		    data() {
		      return {
		        user: {
              id: 1,
              username: 'tom',
              password: '123456',
              cat: {
                id: 1,
                breed: '蓝白',
                name: '花花'
              },
              courses: [
                {
                  id: 1,
                  courseName: "Java",
                  lecturer: "袁庭新老师"
                },
                {
                  id: 2,
                  courseName: "Python",
                  lecturer: "张晓东老师"
                }
              ]
            }
		      }
		    },
		    mounted() {
          axios.post('http://localhost:8888/users/add8', this.user)
            .then(response => {
              console.log('success', response.data);
            })
            .catch(error => {
              console.log('fail', error.data);
            });
		    }
		  }

		  Vue.createApp(app).mount('#app')
		</script>
	</body>
</html>
5.Map集合接收参数
1.在UserController类中添加add9()请求处理方法。
@RequestMapping("add9")
public Map<String, Object> add9(@RequestBody Map<String, Object> map) {
  String username = (String) map.get("username");
  System.out.println("username : " + username);

  Map<String, Object> catMap = (Map<String, Object>) map.get("cat");
  Set<Map.Entry<String, Object>> catSet = catMap.entrySet();
  for (Map.Entry<String, Object> entry : catSet) {
    String key = entry.getKey();
    Object value = entry.getValue();
    System.out.println(key + " : " + value);
  }

  List<Map<String, Object>> courseMapList = (List<Map<String, Object>>) map.get("courses");
  for (Map<String, Object> courseMap : courseMapList) {
    Set<Map.Entry<String, Object>> courseSet = courseMap.entrySet();
    for (Map.Entry<String, Object> entry : courseSet) {
      String key = entry.getKey();
      Object value = entry.getValue();
      System.out.println(key + " : " + value);
    }
  }
  return map;
}
2.使用ApiPost工具测试,需将提交的数据类型设置为application/json格式(GET和POST请求都支持)。
{
  "id": 1,
  "username": "tom",
  "password": "123456",
  "courses": [
    {
      "id": 1,
      "courseName": "Java",
      "lecturer": "袁庭新老师"
    },
    {
      "id": 2,
      "courseName": "Python",
      "lecturer": "李小红老师"
    }
  ]
}
3.创建param11.html页面,通过Axios发送请求。
<!DOCTYPE html>
<html>
	<head>
		<meta charset="utf-8" />
		<title>前后端参数传递</title>
		<script src="https://unpkg.com/vue@next"></script>
		<script src="https://unpkg.com/axios/dist/axios.min.js"></script>
	</head>
	<body>
		<div id="app">

		</div>

		<script>
		  const app = {
		    data() {
		      return {
		        user: {
              id: 1,
              username: 'tom',
              password: '123456',
              cat: {
                id: 1,
                breed: '蓝白',
                name: '花花'
              },
              courses: [
                {
                  id: 1,
                  courseName: "Java",
                  lecturer: "袁庭新老师"
                },
                {
                  id: 2,
                  courseName: "Python",
                  lecturer: "张晓东老师"
                }
              ]
            }
		      }
		    },
		    mounted() {
          axios.post('http://localhost:8888/users/add9', this.user)
            .then(response => {
              console.log('success', response.data);
            })
            .catch(error => {
              console.log('fail', error.data);
            });
		    }
		  }

		  Vue.createApp(app).mount('#app')
		</script>
	</body>
</html>
3 总结
本文介绍了在Spring Boot项目中接收前端数据的多种方式。通过创建Spring Boot项目、配置Web依赖和跨域问题,展示了如何使用@RequestParam、@PathVariable、@RequestBody等注解接收不同类型的参数,包括基本类型、数组、复杂对象及嵌套结构。通过实例演示了如何在Controller中处理GET、POST等请求,并通过前端页面发送请求验证后端接收逻辑。
以上就是SpringBoot项目接收前端参数的11种方式的详细内容,更多关于SpringBoot接收前端参数的资料请关注脚本之家其它相关文章!