SpringBoot接入ftp/ftps并上传文件和配置的代码指南
作者:天河归来
接入ftp服务器,在springboot上实现起来也不算复杂,本文主要讲下如何在springboot下接入ftp服务上传文件,并对出现的问题做一些记录,ftp服务的参数配置等,需要的朋友可以参考下
1. 整体描述
接入ftp服务器,在springboot上实现起来也不算复杂,本文主要讲下如何在springboot下接入ftp服务上传文件,并对出现的问题做一些记录,ftp服务的参数配置等
2. 具体实现
2.1 引入pom
在springboot的配置文件引入:
        <dependency>
            <groupId>commons-net</groupId>
            <artifactId>commons-net</artifactId>
            <version>3.8.0</version>
        </dependency>
apache的包,其中有ftp相关的类
2.2 创建ftps连接
其中使用FTPClient创建的是FTP连接,FTPSClient创建的是FTPS连接,我这里创建了FTPS连接
    /**
     * 打开FTP连接
     *
     * @param hostname hostname
     * @param port     port
     * @param username username
     * @param password password
     */
    public static FTPSClient openFTP(String hostname, int port, String username, String password) {
        // 显示方式传false,隐式方式传true
        FTPSClient ftpsClient = new FTPSClient(true);
        ftpsClient.setControlEncoding("UTF-8");
        try {
            System.out.println("ftpsClient connect");
            ftpsClient.connect(hostname, port);
            boolean flag = ftpsClient.login(username, password);
            // 切换到被动模式
            ftpsClient.setControlEncoding("UTF-8");
            ftpsClient.setFileType(FTPClient.BINARY_FILE_TYPE);
            ftpsClient.enterLocalPassiveMode();
            ftpsClient.setFileTransferMode(FTP.STREAM_TRANSFER_MODE);
            ftpsClient.execPROT("P");
            ftpsClient.setAuthValue("TLS");

            if (!flag) {
                System.out.println("login failed");
                return null;
            }

            String path = ftpsClient.printWorkingDirectory();
            System.out.println("path:" + path);

        } catch (Exception e) {
            e.printStackTrace();
        }
        return ftpsClient;
    }
2.3 上传文件
/**
     * 创建多层目录文件,如果有ftp服务器已存在该文件,则不创建,如果无,则创建
     *
     * @param filePath   上传文件本地路径
     * @param ftpPath    上传文件FTP路径
     * @param ftpsClient ftp客户端
     */
    public static void uploadFileToFTP(String filePath, String ftpPath, FTPSClient ftpsClient) {
        try {
            File file = new File(filePath);

            boolean changeFlag = ftpsClient.changeWorkingDirectory(ftpPath);
            System.out.println("changeFlag:" + changeFlag);
            if (!changeFlag) {
                boolean createFlag = createDirectory(ftpPath, ftpsClient);
                System.out.println("createFlag:" + createFlag);
            }

            String uploadPath = ftpsClient.printWorkingDirectory();
            System.out.println("uploadPath:" + uploadPath);

            ftpsClient.setFileType(FTPClient.BINARY_FILE_TYPE);
            boolean uploadFlag = ftpsClient.storeUniqueFile(file.getName(), new FileInputStream(file));

            System.out.println("uploadFlag:" + uploadFlag);
            System.out.println("uploadFlag:" + ftpsClient.getReplyString());
        } catch (Exception e) {
            e.printStackTrace();
        }
    }
2.4 关闭连接
    /**
     * 关闭FTP连接
     *
     * @param ftpsClient ftp客户端
     */
    public static void closeFTP(FTPSClient ftpsClient) {
        try {
            ftpsClient.logout();
            ftpsClient.disconnect();
        } catch (Exception e) {
            e.printStackTrace();
        }
    }
2.5 创建FTP目录
/**
     * 创建多层目录文件,如果有ftp服务器已存在该文件,则不创建,如果无,则创建
     *
     * @param remote     目录
     * @param ftpsClient ftp客户端
     */
    public static boolean createDirectory(String remote, FTPSClient ftpsClient) {
        String directory = remote;
        try {
            if (!remote.endsWith("/")) {
                directory = directory + "/";
            }
            // 如果远程目录不存在,则递归创建远程服务器目录
            if (!directory.equals("/") && !ftpsClient.changeWorkingDirectory(directory)) {
                int start = 0;
                int end = 0;
                if (directory.startsWith("/")) {
                    start = 1;
                } else {
                    start = 0;
                }
                end = directory.indexOf("/", start);
                String paths = "", path = "";
                while (true) {
                    String subDirectory = remote.substring(start, end);
                    path = path + "/" + subDirectory;
                    // 目录不存在就创建
                    if (!ftpsClient.changeWorkingDirectory(subDirectory)) {
                        if (ftpsClient.makeDirectory(subDirectory)) {
                            ftpsClient.changeWorkingDirectory(subDirectory);
                        }
                    }
                    paths = paths + "/" + subDirectory;
                    start = end + 1;
                    end = directory.indexOf("/", start);
                    // 检查所有目录是否创建完毕
                    if (end <= start) {
                        break;
                    }
                }
            }
            return true;
        } catch (Exception e) {
            e.printStackTrace();
        }
        return false;
    }
2.6 main方法
public static void main(String[] args) {

        // 打开ftp连接
        FTPSClient ftpsClient = openFTP("192.168.1.100", 10012, "test1", "123456");
        if (null == ftpsClient) {
            return;
        }
        // 上传文件
        uploadFileToFTP("C:\\Users\\10187\\Desktop\\ftp.txt", "/TEST/PICTURE", ftpsClient);
        // 下载文件
        downloadFileFromFTP(ftpsClient);

        // 关闭ftp连接
        closeFTP(ftpsClient);
    }
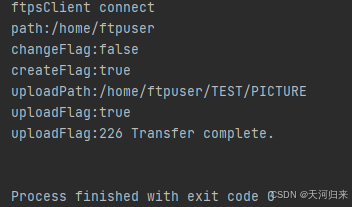
2.7 运行结果

log显示上传成功,去ftp对应目录也能看到上传的文件。
3. FTP服务器配置
服务器相关配置也需要修改一下,要不登录上传等会报错。FTP的配置文件一般在/etc/vsftpd下面,有个vsftpd.conf的文件
3.1 修改require_ssl_reuse参数
如果上传文件的时候报错:522 SSL connection failed; session reuse required: see require_ssl_reuse option in vsftpd.conf man page。
需要修改这个参数,默认是YES,需要改成NO
3.2 设置FTPS连接
第一步:创建私钥、证书
openssl req -x509 -nodes -days 3650 -newkey rsa:2048 -keyout /etc/vsftpd/vsftpd_ssl_key.pem -out /etc/vsftpd/vsftpd_ssl_cert.pem
第二步:添加以下配置到配置文件
ssl_enable=YES
ssl_tlsv1=YES
ssl_sslv2=YES
ssl_sslv3=YES
allow_anon_ssl=NO
force_local_data_ssl=YES
force_local_logins_ssl=YES
rsa_cert_file=/etc/vsftpd/vsftpd_ssl_cert.pem
rsa_private_key_file=/etc/vsftpd/vsftpd_ssl_key.pem
require_ssl_reuse=NO
第三步:重启ftp服务
systemctl restart vsftpd
3.3 设置FTPS连接为隐式连接
FTPS支持显示连接和隐式连接两种,如果需要隐式连接,修改配置文件。添加如下配置:
implicit_ssl=YES
然后重启ftp服务即可。
4. 总结
以上就是配置和连接FTP/FTPS的基本操作,当然还有一些复杂的操作和配置,就自己探索吧。
到此这篇关于SpringBoot接入ftp/ftps并上传文件和配置的代码指南的文章就介绍到这了,更多相关SpringBoot接入ftp/ftps并上传和配置内容请搜索脚本之家以前的文章或继续浏览下面的相关文章希望大家以后多多支持脚本之家!
