SpringBoot集成WebSocket实现后台向前端推送信息
作者:242030
在一次项目开发中,使用到了Netty网络应用框架,以及MQTT进行消息数据的收发,这其中需要后台来将获取到的消息主动推送给前端,所以本文记录了SpringBoot集成WebSocket实现后台向前端推送信息的操作,需要的朋友可以参考下
SpringBoot 集成 WebSocket,实现后台向前端推送信息
在一次项目开发中,使用到了Netty网络应用框架,以及MQTT进行消息数据的收发,这其中需要后台来将获取到的消息主动推送给前端,于是就使用到了MQTT,特此记录一下。
1、什么是websocket?
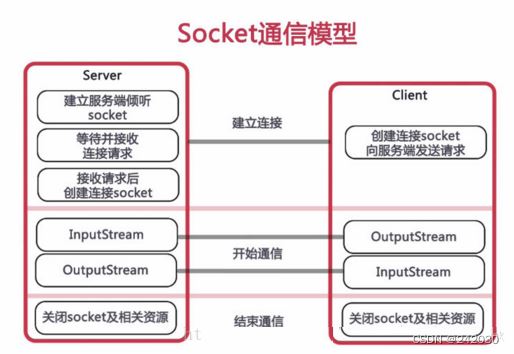
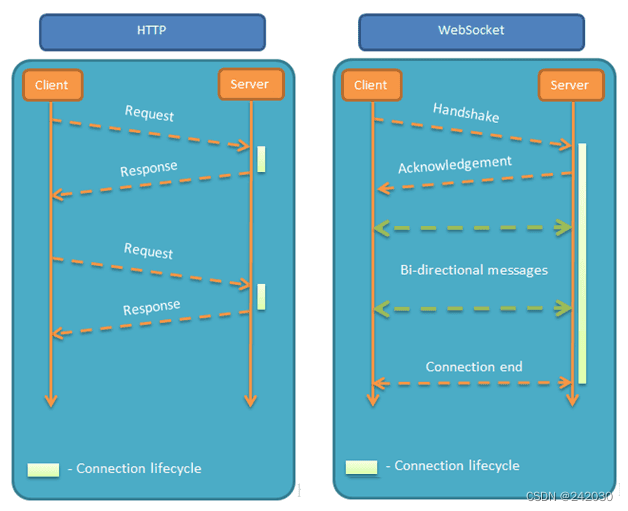
WebSocket协议是基于TCP的一种新的网络协议。它实现了客户端与服务器全双工通信,学过计算机网络都知道,既然是全双工,就说明了服务器可以主动发送信息给客户端 。这与我们的推送技术或者是多人在线聊天的功能不谋而合。

为什么不使用HTTP 协议呢?这是因为HTTP是单工通信,通信只能由客户端发起,客户端请求一下,服务器处理一下,这就太麻烦了。于是websocket应运而生。

下面我们就直接开始使用Springboot开始整合。以下案例都在我自己的电脑上测试成功,你可以根据自己的功能进行修改即可。
2、使用步骤
2.1 添加依赖
<?xml version="1.0" encoding="UTF-8"?>
<project xmlns="http://maven.apache.org/POM/4.0.0" xmlns:xsi="http://www.w3.org/2001/XMLSchema-instance"
         xsi:schemaLocation="http://maven.apache.org/POM/4.0.0 https://maven.apache.org/xsd/maven-4.0.0.xsd">
    <modelVersion>4.0.0</modelVersion>
    <parent>
        <groupId>org.springframework.boot</groupId>
        <artifactId>spring-boot-starter-parent</artifactId>
        <version>2.5.0</version>
        <relativePath/>
    </parent>

    <groupId>com.example</groupId>
    <artifactId>springboot-websocket</artifactId>
    <version>0.0.1-SNAPSHOT</version>
    <name>springboot-websocket</name>
    <description>springboot-websocket</description>

    <properties>
        <java.version>1.8</java.version>
    </properties>

    <dependencies>
        <dependency>
            <groupId>org.springframework.boot</groupId>
            <artifactId>spring-boot-starter</artifactId>
        </dependency>

        <dependency>
            <groupId>org.springframework.boot</groupId>
            <artifactId>spring-boot-starter-test</artifactId>
            <scope>test</scope>
        </dependency>

        <dependency>
            <groupId>org.springframework.boot</groupId>
            <artifactId>spring-boot-starter-websocket</artifactId>
        </dependency>

        <dependency>
            <groupId>org.projectlombok</groupId>
            <artifactId>lombok</artifactId>
            <version>1.18.10</version>
        </dependency>

        <dependency>
            <groupId>org.slf4j</groupId>
            <artifactId>slf4j-log4j12</artifactId>
            <version>1.7.25</version>
        </dependency>

    </dependencies>

    <build>
        <plugins>
            <plugin>
                <groupId>org.springframework.boot</groupId>
                <artifactId>spring-boot-maven-plugin</artifactId>
            </plugin>
        </plugins>
    </build>

</project>
2.2 启用Springboot对WebSocket的支持
package com.example.websocket;

import org.springframework.context.annotation.Bean;
import org.springframework.context.annotation.Configuration;
import org.springframework.web.socket.server.standard.ServerEndpointExporter;

/**
 * @Description: 开启WebSocket支持
 */
@Configuration
public class WebSocketConfig {

    @Bean
    public ServerEndpointExporter serverEndpointExporter() {
        return new ServerEndpointExporter();
    }
}
2.3 核心配置WebSocketServer
因为WebSocket是类似客户端服务端的形式(采用ws协议),那么这里的WebSocketServer其实就相当于一个ws协议的Controller。
- @ServerEndpoint 注解是一个类层次的注解,它的功能主要是将目前的类定义成一个websocket服务器端,注解的值将被用于监听用户连接的终端访问URL地址,客户端可以通过这个URL来连接到WebSocket服务器端。
- 新建一个ConcurrentHashMap webSocketMap 用于接收当前userId的WebSocket,方便传递之间对userId进行推送消息。
下面是具体业务代码:
package com.example.websocket;

import lombok.extern.slf4j.Slf4j;
import org.springframework.stereotype.Component;
import org.springframework.stereotype.Service;

import javax.websocket.*;
import javax.websocket.server.PathParam;
import javax.websocket.server.ServerEndpoint;
import java.io.IOException;
import java.util.concurrent.CopyOnWriteArraySet;

/**
 * @Description:
 * @ServerEndpoint 注解是一个类层次的注解,它的功能主要是将目前的类定义成一个websocket服务器端,
 * 注解的值将被用于监听用户连接的终端访问URL地址,客户端可以通过这个URL来连接到WebSocket服务器端
 */

@Component
@Slf4j
@Service
@ServerEndpoint("/api/websocket/{sid}")
public class WebSocketServer {

    // 静态变量,用来记录当前在线连接数。应该把它设计成线程安全的。
    private static int onlineCount = 0;
    //concurrent包的线程安全Set,用来存放每个客户端对应的MyWebSocket对象。
    private static CopyOnWriteArraySet<WebSocketServer> webSocketSet = new CopyOnWriteArraySet<WebSocketServer>();
    //与某个客户端的连接会话,需要通过它来给客户端发送数据
    private Session session;
    //接收sid
    private String sid = "";

    /**
     * 连接建立成功调用的方法
     */
    @OnOpen
    public void onOpen(Session session, @PathParam("sid") String sid) {
        this.session = session;
        //加入set中
        webSocketSet.add(this);
        this.sid = sid;
        //在线数加1
        addOnlineCount();
        try {
            sendMessage("conn_success");
            log.info("有新窗口开始监听:" + sid + ",当前在线人数为:" + getOnlineCount());
        } catch (IOException e) {
            log.error("websocket IO Exception");
        }
    }

    /**
     * 连接关闭调用的方法
     */
    @OnClose
    public void onClose() {
        //从set中删除
        webSocketSet.remove(this);
        //在线数减1
        subOnlineCount();
        //断开连接情况下,更新主板占用情况为释放
        log.info("释放的sid为:" + sid);
        //这里写你 释放的时候,要处理的业务
        log.info("有一连接关闭!当前在线人数为" + getOnlineCount());
    }

    /**
     * 收到客户端消息后调用的方法
     *
     * @Param message 客户端发送过来的消息
     */
    @OnMessage
    public void onMessage(String message, Session session) {
        log.info("收到来自窗口" + sid + "的信息:" + message);
        //群发消息
        for (WebSocketServer item : webSocketSet) {
            try {
                item.sendMessage(message);
            } catch (IOException e) {
                e.printStackTrace();
            }
        }
    }

    /**
     * @Param session
     * @Param error
     */
    @OnError
    public void onError(Session session, Throwable error) {
        log.error("发生错误");
        error.printStackTrace();
    }

    /**
     * 实现服务器主动推送
     */
    public void sendMessage(String message) throws IOException {
        this.session.getBasicRemote().sendText(message);
    }

    /**
     * 群发自定义消息
     */
    public static void sendInfo(String message, @PathParam("sid") String sid) throws IOException {
        log.info("推送消息到窗口" + sid + ",推送内容:" + message);
        for (WebSocketServer item : webSocketSet) {
            try {
                //这里可以设定只推送给这个sid的,为null则全部推送
                if (sid == null) {
                    // item.sendMessage(message);
                } else if (item.sid.equals(sid)) {
                    item.sendMessage(message);
                }
            } catch (IOException e) {
                continue;
            }
        }
    }

    public static synchronized int getOnlineCount() {
        return onlineCount;
    }

    public static synchronized void addOnlineCount() {
        WebSocketServer.onlineCount++;
    }

    public static synchronized void subOnlineCount() {
        WebSocketServer.onlineCount--;
    }

    public static CopyOnWriteArraySet<WebSocketServer> getWebSocketSet() {
        return webSocketSet;
    }
}
配置文件
spring.web.resources.static-locations=classpath:/static
2.4 测试Controller
package com.example.controller;

import org.springframework.stereotype.Controller;
import org.springframework.web.bind.annotation.RequestMapping;

@Controller
public class IndexController {
    @RequestMapping("/index")
    public String index() {
        return "index.html";
    }
}
2.5 启动类
package com.example;

import org.springframework.boot.SpringApplication;
import org.springframework.boot.autoconfigure.SpringBootApplication;

@SpringBootApplication
public class Application {

    public static void main(String[] args) {
        SpringApplication.run(Application.class, args);
    }

}
2.6 测试页面index.html
<!DOCTYPE html>
<html>
<head>
<meta charset="utf-8">
<title>Java后端WebSocket的Tomcat实现</title>
<script type="text/javascript" src="js/jquery.min.js"></script>
</head>
<body>
<h1>Welcome</h1>
<input id="text" type="text" />
<button onclick="send()">发送消息</button>
<hr/>
<button onclick="closeWebSocket()">关闭WebSocket连接</button>
<hr/>
<div id="message"></div>
</body>
<script type="text/javascript">
var websocket = null;
//判断当前浏览器是否支持WebSocket
if('WebSocket' in window) {
//改成你的地址
websocket = new WebSocket("ws://127.0.0.1:8080/api/websocket/100");
} else {
alert('当前浏览器 Not support websocket')
}
//连接发生错误的回调方法
websocket.onerror = function() {
setMessageInnerHTML("WebSocket连接发生错误");
};
//连接成功建立的回调方法
websocket.onopen = function() {
setMessageInnerHTML("WebSocket连接成功");
}
var U01data, Uidata, Usdata
//接收到消息的回调方法
websocket.onmessage = function(event) {
console.log(event);
setMessageInnerHTML(event);
setechart()
}
//连接关闭的回调方法
websocket.onclose = function() {
setMessageInnerHTML("WebSocket连接关闭");
}
//监听窗口关闭事件,当窗口关闭时,主动去关闭websocket连接,防止连接还没断开就关闭窗口,server端会抛异常。
window.onbeforeunload = function() {
closeWebSocket();
}
//将消息显示在网页上
function setMessageInnerHTML(innerHTML) {
document.getElementById('message').innerHTML += innerHTML + '
';
}
//关闭WebSocket连接
function closeWebSocket() {
websocket.close();
}
//发送消息
function send() {
var message = document.getElementById('text').value;
websocket.send('{"msg":"' + message + '"}');
setMessageInnerHTML(message + " ");
}
</script>
</html>
2.7 结果展示
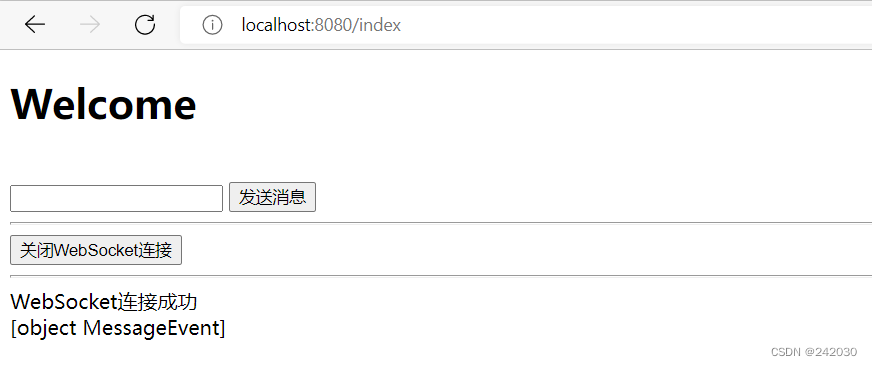
启动浏览器窗口访问:http://localhost:8080/index
后台出现:
2022-08-16 18:18:11.931 INFO 796 --- [nio-8080-exec-3] com.example.websocket.WebSocketServer : 有新窗口开始监听:100,当前在线人数为:1
多次访问:
2022-08-16 18:18:11.931  INFO 796 --- [nio-8080-exec-3] com.example.websocket.WebSocketServer    : 有新窗口开始监听:100,当前在线人数为:1
2022-08-16 18:19:27.054  INFO 796 --- [nio-8080-exec-6] com.example.websocket.WebSocketServer    : 释放的sid为:100
2022-08-16 18:19:27.055  INFO 796 --- [nio-8080-exec-6] com.example.websocket.WebSocketServer    : 有一连接关闭!当前在线人数为0
2022-08-16 18:19:27.107  INFO 796 --- [nio-8080-exec-9] com.example.websocket.WebSocketServer    : 有新窗口开始监听:100,当前在线人数为:1
2022-08-16 18:19:28.332  INFO 796 --- [io-8080-exec-10] com.example.websocket.WebSocketServer    : 释放的sid为:100
2022-08-16 18:19:28.332  INFO 796 --- [io-8080-exec-10] com.example.websocket.WebSocketServer    : 有一连接关闭!当前在线人数为0
2022-08-16 18:19:28.383  INFO 796 --- [nio-8080-exec-3] com.example.websocket.WebSocketServer    : 有新窗口开始监听:100,当前在线人数为:1
2022-08-16 18:19:29.811  INFO 796 --- [nio-8080-exec-4] com.example.websocket.WebSocketServer    : 释放的sid为:100
2022-08-16 18:19:29.811  INFO 796 --- [nio-8080-exec-4] com.example.websocket.WebSocketServer    : 有一连接关闭!当前在线人数为0
2022-08-16 18:19:29.860  INFO 796 --- [nio-8080-exec-7] com.example.websocket.WebSocketServer    : 有新窗口开始监听:100,当前在线人数为:1
前台显示:

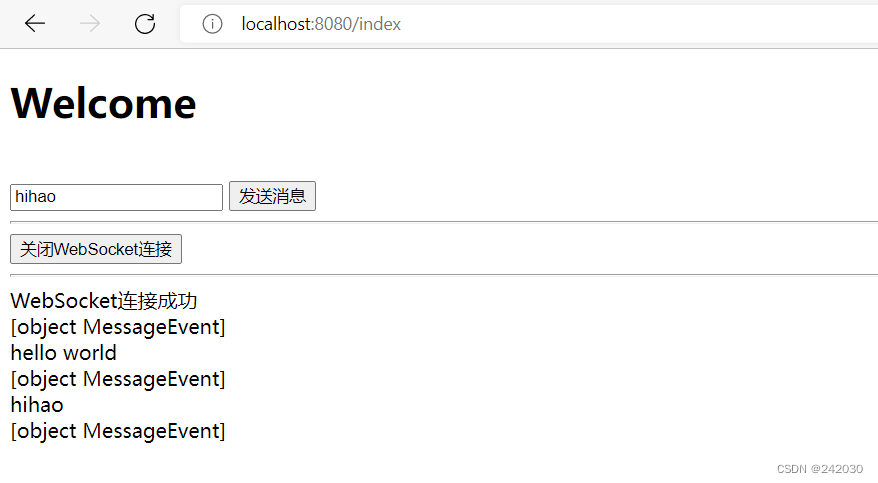
发送消息:

后台显示:
2022-08-16 18:21:58.602  INFO 796 --- [nio-8080-exec-4] com.example.websocket.WebSocketServer    : 收到来自窗口100的信息:{"msg":"hello world"}
2022-08-16 18:22:03.098  INFO 796 --- [nio-8080-exec-5] com.example.websocket.WebSocketServer    : 收到来自窗口100的信息:{"msg":"hihao"}
3、总结
这中间我遇到一个问题,就是说WebSocket启动的时候优先于spring容器,从而导致在WebSocketServer中调用业务Service会报空指针异常,所以需要在WebSocketServer中将所需要用到的service给静态初始化一下:如下所示:
@Component
@Slf4j
@Service
@ServerEndpoint("/api/websocket/{sid}")
public class WebSocketServer {
    // 静态初始化用到的Service
    public static IDetRecordService detRecordService;
}
还需要做如下配置:
@Configuration
public class WebSocketConfig {

    @Bean
    public ServerEndpointExporter serverEndpointExporter() {
        return new ServerEndpointExporter();
    }

    @Autowired
    // 提前注入Spring
    private void setRedisService(IDetRecordService iDetRecordService){
        WebSocketServer.detRecordService= iDetRecordService;
    }
}
以上就是SpringBoot集成WebSocket实现后台向前端推送信息的详细内容,更多关于SpringBoot WebSocket推送消息的资料请关注脚本之家其它相关文章!
