
利用idea生成webservice客户端超详解步骤(wsdl文件的使用)
作者:就是有缘人
这篇文章主要给大家介绍了关于利用idea生成webservice客户端超详解步骤,第一次接触webservice,从采坑到采坑,算是了解了一些,明白了一些,文中通过代码以及图文介绍的非常详细,需要的朋友可以参考下
一、idea安装webservice
1.点击左上file,选中settings

2.下载Web Service
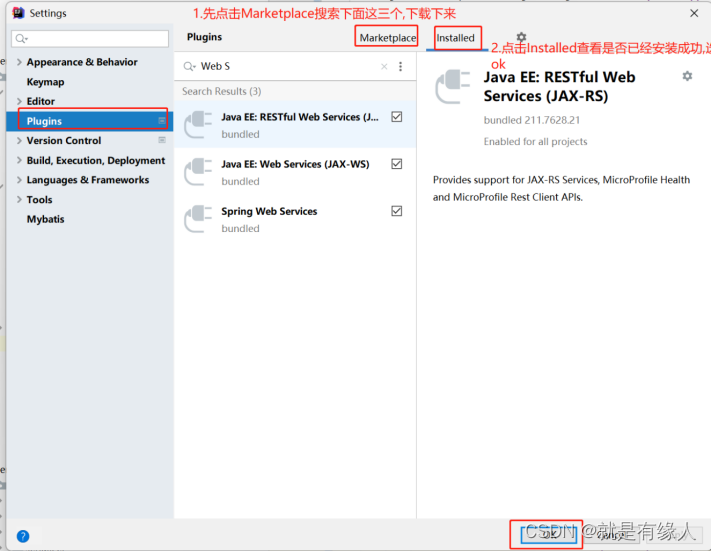
3.给此项目添加webservice


4.添加webservice的依赖
   <!--webservice的:TestCase需要的jar包-->
        <dependency>
            <groupId>junit</groupId>
            <artifactId>junit</artifactId>
            <version>4.12</version>
        </dependency>
二、利用idea根据wsdl文件自动生成webService客户端代码(然后比照着生成的测试类进行接口或方法的调用)
步骤:1.利用idea根据wsdl文件生成代码,需要先将wsdl文件下载到本地
2.下载时无必要要求,选择Apache Axis,依赖需要自行百度搜索
3.下载后需要比照着测试类代码,写调用接口或方法的代码
好处:1.入参的参数不需要自己进行封装 , 特别容易写
2.返回值都被封装好了 , 可以很容易就取到 , 不用自己写解析代码
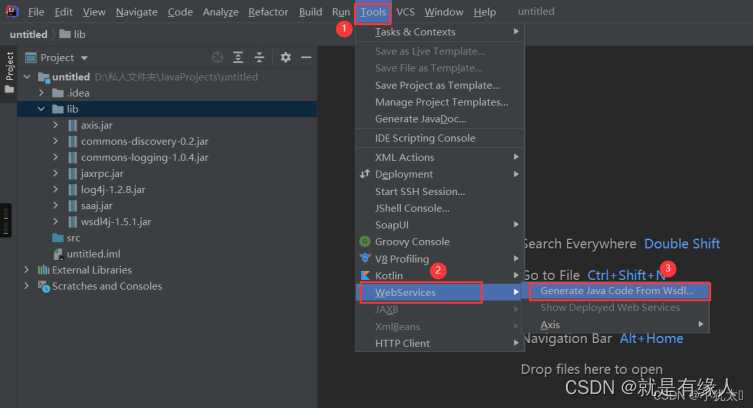
1.打开tools -> WebServices -> Generate Java Code From Wsdl,按照图中顺序进行
2.按照图中顺序进行操作,最后点击OK
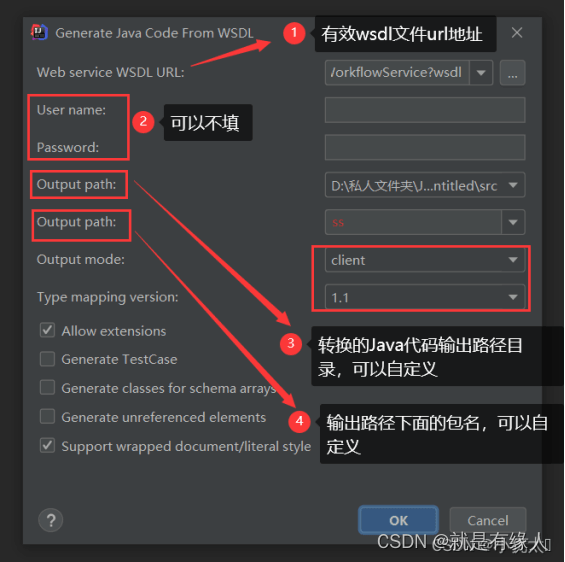
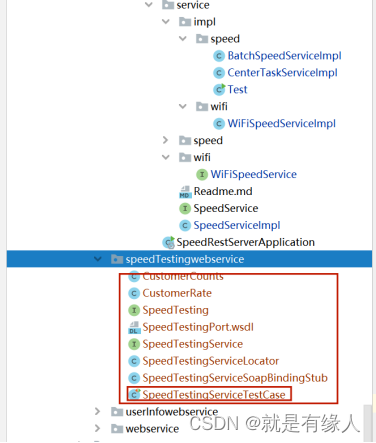
3.必须勾选Generate TestCase
(会给出调用接口的例子,照着抄就可以实现调用指定接口)
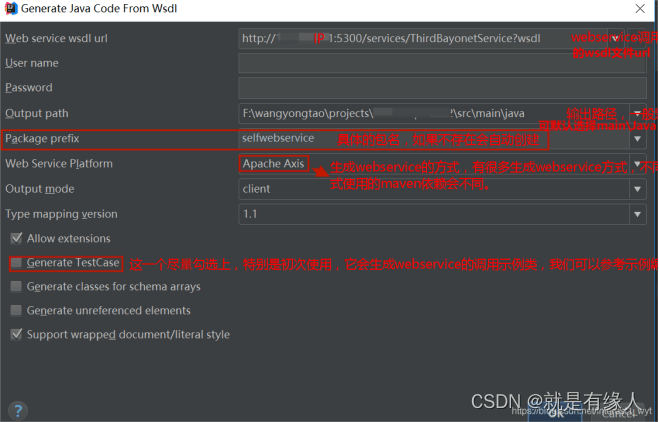
4.2点击ok报错 , 就去百度下载Axis所需的依赖 , 第一次需额外下载一个插件(直接下载完就行)
只要不是报wsdl文件出错 , 其他报错后,只要能生成代码 , 就可以使用
4.wsdl文件转换生成Java代码:成功
例子1:
例子2:

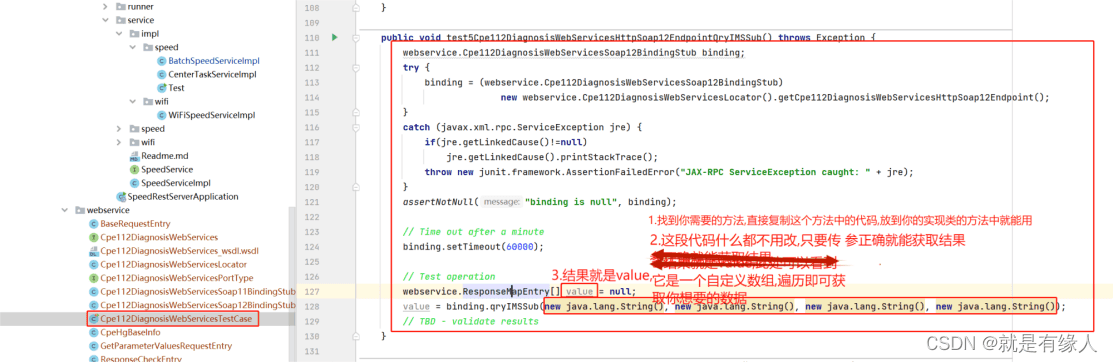
5.如何使用生成的代码
点击打开名字中带Test的这个类,找到你需要的方法,直接复制出来就能用
三、直接利用Axis2调用wsdl类型接口:
好处:不用利用idea根据wsdl自动生成webService客户端代码,然后再比照着测试类调用所需方法
坏处: 1.入参需要自己进行参数的封装 ,自己封装参数有例子也不容易
2.如果需要获取调用接口的返回值,则还不会解析返回的数据,无法得到所需的参数(没解析报文的例子,自己不会写)
Axis2 调用接口示例:
import org.apache.axiom.om.OMAbstractFactory;
import org.apache.axiom.om.OMElement;
import org.apache.axiom.om.OMFactory;
import org.apache.axiom.om.OMNamespace;
import org.apache.axis2.AxisFault;
import org.apache.axis2.addressing.EndpointReference;
import org.apache.axis2.client.Options;
import org.apache.axis2.rpc.client.RPCServiceClient;


public class Test {
    public static void test() {
        String userId = "123";
        String bindAccount = "123";
        RPCServiceClient serviceClient = null;

        OMFactory factory = OMAbstractFactory.getOMFactory();
        OMNamespace omDiag = factory.createOMNamespace("http://diagnosis.interfaces.axis2.osf.nort hbound.neal.cpehg.ums.zte.com", "diag");
        OMNamespace omXSD = factory.createOMNamespace("http://model.common.northbound.neal.cpehg. ums.zte.com/xsd", "xsd");

        try {
            serviceClient = new RPCServiceClient();
            Options options = serviceClient.getOptions();
// 指定调用WebService的URL
            EndpointReference targetEPR = new EndpointReference("http://10.46.60.200:9094/axis2/services/Cpe112Diag nosisWebServices?wsdl");
            options.setTo(targetEPR);
            options.setTimeOutInMilliSeconds(30000);
            options.setManageSession(true);

// 指定方法的参数值
            OMElement paramRequest = factory.createOMElement("request", omDiag);
            OMElement paramUserId = factory.createOMElement("userID", omXSD);

            paramUserId.setText(userId);
            OMElement paramBindAccount = factory.createOMElement("bindAccount", omXSD);
            paramBindAccount.setText(bindAccount);
            paramRequest.addChild(paramBindAccount);
            paramRequest.addChild(paramUserId);

            OMElement paramItemName = factory.createOMElement("itemName", omDiag);
            paramItemName.setText("cpehg.diagnosis.CpeBasicInfo");

            String method = "getParameterValuesFromDbAndCpeByItemName";

            OMElement data = factory.createOMElement(method, omXSD);
            data.setNamespace(omDiag);
            data.addChild(paramRequest);
            data.addChild(paramItemName);

            OMElement re = serviceClient.sendReceive(data);
// 处理返回数据

        } catch (AxisFault e) {
// 异常处理
            e.printStackTrace();
        } finally {

            try {
                if (serviceClient != null) serviceClient.cleanupTransport();
            } catch (AxisFault e) {

            }
        }
    }
}
总结
到此这篇关于利用idea生成webservice客户端的文章就介绍到这了,更多相关idea生成webservice客户端内容请搜索脚本之家以前的文章或继续浏览下面的相关文章希望大家以后多多支持脚本之家!