
springboot实现极验校验的项目实践
作者:西安未央
在系统业务中,需要想客户发送手机验证码,进行验证后,才能提交,本文主要介绍了springboot实现极验校验的项目实践,具有一定的参考价值,感兴趣的可以了解一下
概述
在系统业务中,需要想客户发送手机验证码,进行验证后,才能提交。但为了防止不正当的短信发送(攻击,恶意操作等),需要在发送短信前添加一个行为验证(这里使用的是极验)
详细
一、运行效果
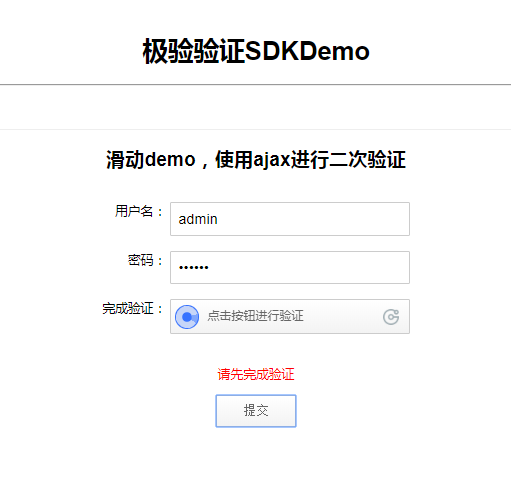
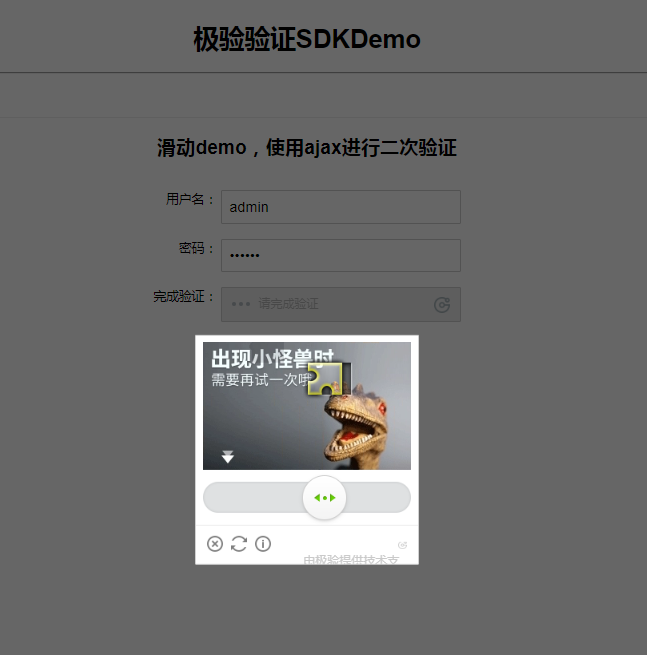
二、实现过程
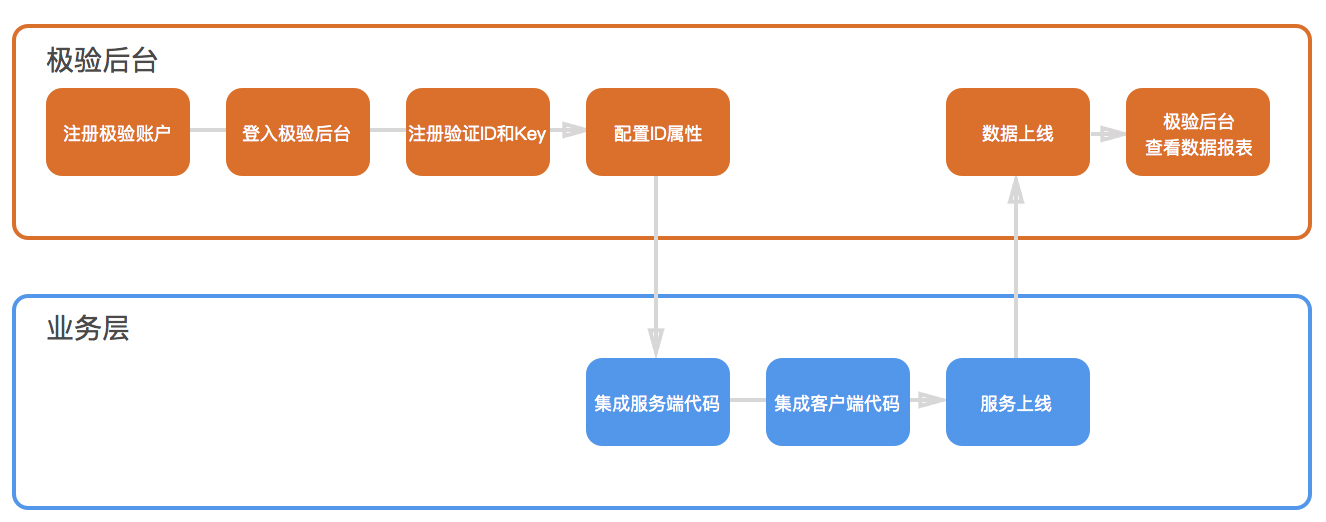
①、步骤
②、搭建geetest后台
gt3-java-sdk-master\src\sdk\GeetestLib.java 这个文件相当java中的实体类,直接放在我的domain文件下。
gt3-java-sdk-master\src\demo\demo1\GeetestConfig.java ,是geetest的配置文件,用来放我们在极验后台注册应用得到的captcha_id和private_key。
VerifyLoginServlet.java(验证) 和 StartCaptchaServlet.java(初始化),这两个文件就是两个servlet,我直接放到了我写的一个Controller里面;
package com.zxh.config;
/**
 * GeetestWeb配置文件
 *
 *
 */
public class GeetestConfig {
    // 填入自己的captcha_id和private_key
    private static final String geetest_id = "xxx";
    private static final String geetest_key = "xxxx";
    private static final boolean newfailback = true;
    public static final String getGeetest_id() {
        return geetest_id;
    }
    public static final String getGeetest_key() {
        return geetest_key;
    }
    public static final boolean isnewfailback() {
        return newfailback;
    }
}
package com.zxh.controller;
import java.io.IOException;
import java.io.PrintWriter;
import java.util.HashMap;
import java.util.Objects;
import javax.servlet.http.HttpServletRequest;
import javax.servlet.http.HttpServletResponse;
import javax.servlet.http.HttpSession;
import org.springframework.stereotype.Controller;
import org.springframework.web.bind.annotation.RequestMapping;
import org.springframework.web.bind.annotation.RequestMethod;
import org.springframework.web.bind.annotation.ResponseBody;
import com.zxh.config.GeetestConfig;
import com.zxh.sdk.GeetestLib;
import com.zxh.util.IpUtil;
@Controller
@RequestMapping("/public")
public class PublicController {
    @RequestMapping(value = "/register", method = RequestMethod.GET)
    @ResponseBody
    public void register(HttpServletRequest request, HttpServletResponse response) throws IOException {
        GeetestLib gtSdk = new GeetestLib(GeetestConfig.getGeetest_id(), GeetestConfig.getGeetest_key(),
                GeetestConfig.isnewfailback());
        String resStr = "{}";
        // 自定义userid
        HttpSession session = request.getSession();
        // User baseUser = (User) session.getAttribute("baseUser");
        // String userid = null;
        // if (Objects.nonNull(baseUser)) {
        // userid = baseUser.getUserName();
        // }
        // 自定义参数,可选择添加
        HashMap<String, String> param = new HashMap<String, String>();
        param.put("user_id", "username"); // 网站用户id
        param.put("ip_address", IpUtil.getIpAddr(request)); // 传输用户请求验证时所携带的IP
        // 进行验证预处理
        int gtServerStatus = gtSdk.preProcess(param);
        // 将服务器状态设置到session中
        request.getSession().setAttribute(gtSdk.gtServerStatusSessionKey, gtServerStatus);
        // 将userid设置到session中
        request.getSession().setAttribute("userid", "username");
        resStr = gtSdk.getResponseStr();
        PrintWriter out = response.getWriter();
        out.println(resStr);
    }
}
③、构建geetest的前端
<!DOCTYPE html>
<html>
<head>
<meta charset="UTF-8">
<meta name="viewport" content="width=device-width, initial-scale=1">
<title>springboot-jytest-demo</title>
<style>
body {
margin: 50px 0;
text-align: center;
font-family: "PingFangSC-Regular", "Open Sans", Arial, "Hiragino Sans GB", "Microsoft YaHei", "STHeiti", "WenQuanYi Micro Hei", SimSun, sans-serif;
}
.inp {
border: 1px solid #cccccc;
border-radius: 2px;
padding: 0 10px;
width: 278px;
height: 40px;
font-size: 18px;
}
.btn {
border: 1px solid #cccccc;
border-radius: 2px;
width: 100px;
height: 40px;
font-size: 16px;
color: #666;
cursor: pointer;
background: white linear-gradient(180deg, #ffffff 0%, #f3f3f3 100%);
}
.btn:hover {
background: white linear-gradient(0deg, #ffffff 0%, #f3f3f3 100%)
}
#captcha1,
#captcha2 {
width: 300px;
display: inline-block;
}
.show {
display: block;
}
.hide {
display: none;
}
#notice1,
#notice2 {
color: red;
}
label {
vertical-align: top;
display: inline-block;
width: 80px;
text-align: right;
}
#wait1, #wait2 {
text-align: left;
color: #666;
margin: 0;
}
</style>
</head>
<body>
<h1>极验验证SDKDemo</h1>
<hr>
<!-- 注意,验证码本身是不需要 jquery 库,此处使用 jquery 仅为了在 demo 使用,减少代码量 -->
<script src="http://apps.bdimg.com/libs/jquery/1.9.1/jquery.js"></script>
<!-- 引入 gt.js,既可以使用其中提供的 initGeetest 初始化函数 -->
<script src="gt.js"></script>
<br><br>
<hr>
<form>
<h2>滑动demo,使用ajax进行二次验证</h2>
<br>
<div>
<label for="username2">用户名:</label>
<input class="inp" id="username2" type="text" value="admin">
</div>
<br>
<div>
<label for="password2">密码:</label>
<input class="inp" id="password2" type="password" value="123456">
</div>
<br>
<div>
<label>完成验证:</label>
<div id="captcha2">
<p id="wait2" class="show">正在加载验证码......</p>
</div>
</div>
<br>
<p id="notice2" class="hide">请先完成验证</p>
<input class="btn" id="submit2" type="submit" value="提交">
</form>
<script>
var handler2 = function (captchaObj) {
$("#submit2").click(function (e) {
var result = captchaObj.getValidate();
if (!result) {
$("#notice2").show();
setTimeout(function () {
$("#notice2").hide();
}, 2000);
} else {
$.ajax({
url: 'login/test',
type: 'POST',
dataType: 'json',
data: {
username: $('#username2').val(),
password: $('#password2').val(),
geetest_challenge: result.geetest_challenge,
geetest_validate: result.geetest_validate,
geetest_seccode: result.geetest_seccode
},
success: function (data) {
if (data.status === 'success') {
alert('登录成功');
} else if (data.status === 'fail') {
alert('登录失败');
}
}
})
}
e.preventDefault();
});
// 将验证码加到id为captcha的元素里,同时会有三个input的值用于表单提交
captchaObj.appendTo("#captcha2");
captchaObj.onReady(function () {
$("#wait2").hide();
});
// 更多接口参考:http://www.geetest.com/install/sections/idx-client-sdk.html
};
$.ajax({
url: "public/register?t=" + (new Date()).getTime(), // 加随机数防止缓存
type: "get",
dataType: "json",
success: function (data) {
// 调用 initGeetest 初始化参数
// 参数1:配置参数
// 参数2:回调,回调的第一个参数验证码对象,之后可以使用它调用相应的接口
initGeetest({
gt: data.gt,
challenge: data.challenge,
new_captcha: data.new_captcha, // 用于宕机时表示是新验证码的宕机
offline: !data.success, // 表示用户后台检测极验服务器是否宕机,一般不需要关注
product: "popup", // 产品形式,包括:float,popup
width: "100%"
// 更多配置参数请参见:http://www.geetest.com/install/sections/idx-client-sdk.html#config
}, handler2);
}
});
</script>
</body>
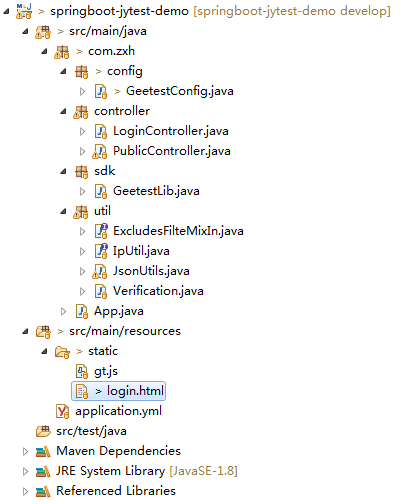
</html>三、项目结构图
四、补充
极验验证码,是用于部署在网站或移动应用的交互环节,能保障网站或移动应用的验证安全。
到此这篇关于springboot实现极验校验的项目实践的文章就介绍到这了,更多相关springboot 极验校验内容请搜索脚本之家以前的文章或继续浏览下面的相关文章希望大家以后多多支持脚本之家!