
C# wpf使用DockPanel实现制作截屏框
作者:CodeOfCC
前言
做桌面客户端的时候有时需要实现截屏功能,能够在界面上框选截屏,做一个蒙版然后中间选框透明可以移动和改变大小。这个功能是不太好实现的,需要一定的方法,其中使用DockPanel是相对简单直接的实现。
一、如何实现
我们按照如下步骤即可实现一个截屏窗口
1、设置透明窗口
首先窗口必须是无边框的透明窗口,我们这里不使用Transparency,因为对性能影响比较大。我们使用WindowChrome实现无边框透明窗口。
<Window x:Class="WpfApp4.MainWindow"
        xmlns="http://schemas.microsoft.com/winfx/2006/xaml/presentation"
        xmlns:x="http://schemas.microsoft.com/winfx/2006/xaml"
        xmlns:d="http://schemas.microsoft.com/expression/blend/2008"
        xmlns:mc="http://schemas.openxmlformats.org/markup-compatibility/2006"
        xmlns:local="clr-namespace:WpfApp4"
        mc:Ignorable="d"
        Title="MainWindow" Height="720" Width="1280"
        Background="{x:Null}"
        ResizeMode="NoResize"
        WindowStyle="None"
        WindowState="Maximized"
        >
    <WindowChrome.WindowChrome>
        <WindowChrome GlassFrameThickness="-1"   CaptionHeight="0"   />
    </WindowChrome.WindowChrome>
</Window>
2、使用DockPanel
在窗口中定义一个DockPanel控件作为父级,定义4个方位填充控件以及中间截屏框。
<DockPanel>
<Grid x:Name="leftPanel" Width="400" DockPanel.Dock="Left" Background="#80000000"></Grid>
<Grid x:Name="topPanel" Height="200" DockPanel.Dock="Top" Background="#80000000"></Grid>
<Grid x:Name="rightPanel" Width="400" DockPanel.Dock="Right" Background="#80000000"></Grid>
<Grid x:Name="bottomPanel" Height="200" DockPanel.Dock="Bottom" Background="#80000000"></Grid>
<Grid x:Name="clipRect" MouseDown="Button_MouseDown" MouseMove="Button_MouseMove" MouseUp="Button_MouseUp" Background="Transparent">
<Grid.Resources>
<Style TargetType="Thumb">
<Setter Property="Template">
<Setter.Value>
<ControlTemplate TargetType="Thumb">
<Border BorderBrush="Gray" BorderThickness="2" CornerRadius="8" Background="White"></Border>
</ControlTemplate>
</Setter.Value>
</Setter>
</Style>
</Grid.Resources>
<!--左-->
<Thumb Margin="-8,0,0,0" Width="16" Height="16" HorizontalAlignment="Left" VerticalAlignment="Center" Cursor="SizeWE" DragDelta ="Thumb_DragDelta"/>
<!--上-->
<Thumb Margin="0,-8,0,0" Width="16" Height="16" HorizontalAlignment="Center" VerticalAlignment="Top" Cursor="SizeNS" DragDelta ="Thumb_DragDelta"/>
<!--右-->
<Thumb Margin="0,0,-8,0" Width="16" Height="16" HorizontalAlignment="Right" VerticalAlignment="Center" Cursor="SizeWE" DragDelta ="Thumb_DragDelta"/>
<!--下-->
<Thumb Margin="0,0,0,-8" Width="16" Height="16" HorizontalAlignment="Center" VerticalAlignment="Bottom" Cursor="SizeNS" DragDelta ="Thumb_DragDelta"/>
<!--左上-->
<Thumb Margin="-8,-8,0,0" Width="16" Height="16" HorizontalAlignment="Left" VerticalAlignment="Top" Cursor="SizeNWSE" DragDelta ="Thumb_DragDelta"/>
<!--右上-->
<Thumb Margin="0,-8,-8,0" Width="16" Height="16" HorizontalAlignment="Right" VerticalAlignment="Top" Cursor="SizeNESW" DragDelta ="Thumb_DragDelta"/>
<!--右下-->
<Thumb Margin="0,0,-8,-8" Width="16" Height="16" HorizontalAlignment="Right" VerticalAlignment="Bottom" Cursor="SizeNWSE" DragDelta ="Thumb_DragDelta"/>
<!--左下-->
<Thumb Margin="-8,0,0,-8" Width="16" Height="16" HorizontalAlignment="Left" VerticalAlignment="Bottom" Cursor="SizeNESW" DragDelta ="Thumb_DragDelta"/>
</Grid>
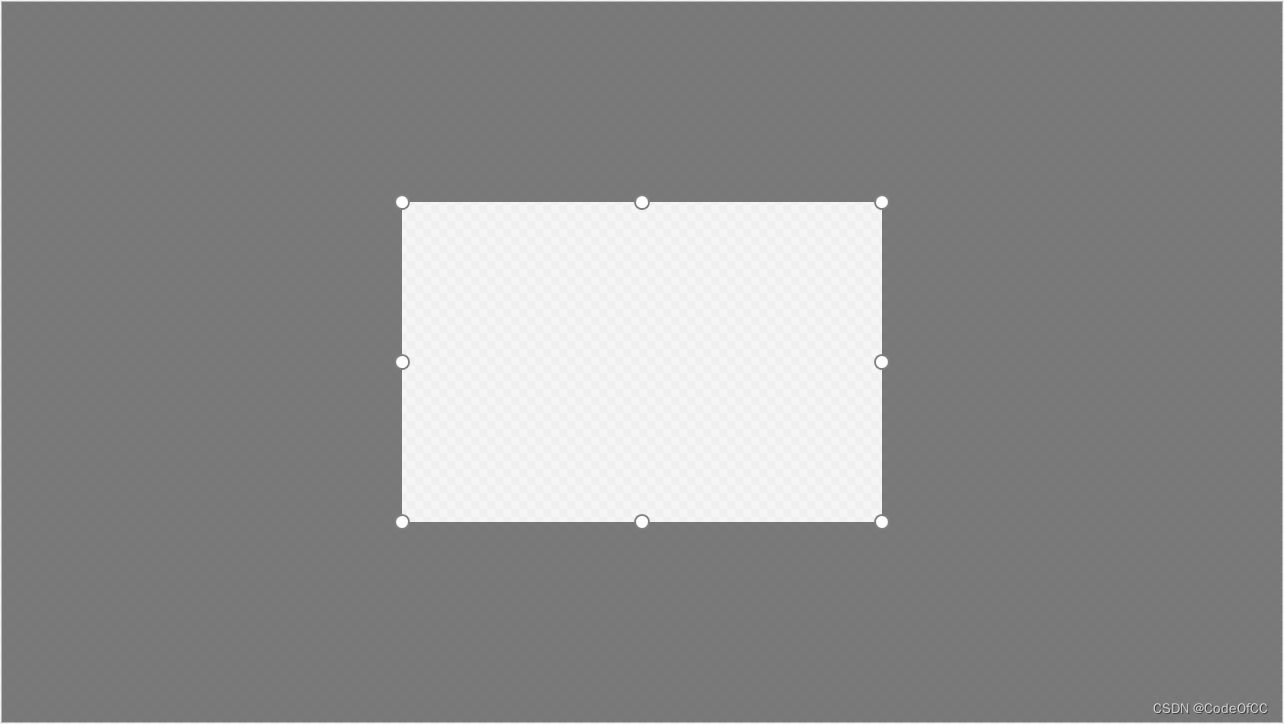
</DockPanel>效果预览
3、实现拖动逻辑
(1)注册事件
与Grid的拖动实现非常类似,4个方位的控件可以当成margin使用,上一步的截屏框注册3个鼠标事件
<Grid x:Name="clipRect" MouseDown="Button_MouseDown" MouseMove="Button_MouseMove" MouseUp="Button_MouseUp" Background="Transparent">
(2)拖动逻辑
将4个方位的控件的宽高组成一个margin,代入《C# wpf 实现Grid内控件拖动》即可,只需要注意边界处理(宽高不能为负数),此处不贴具体代码。下面是Button_MouseDown的部分代码示例,以此类推即可。
_mouseDownMargin = new Thickness(leftPanel.ActualWidth, topPanel.ActualHeight, rightPanel.ActualWidth, bottomPanel.ActualHeight);
4、实现拖动调大小逻辑
(1)注册事件
给界面中的8个Thumb注册同一个Thumb_DragDelta事件。
<Thumb Margin="-8,0,0,0" Width="16" Height="16" HorizontalAlignment="Left" VerticalAlignment="Center" Cursor="SizeWE" DragDelta ="Thumb_DragDelta"/>
(2)实现逻辑
将4个方位的控件的宽高组成一个margin,代入《C# wpf Grid中实现控件拖动调整大小》的Thumb_DragDelta即可,只需要注意边界处理(宽高不能为负数)。此处不贴具体代码。下面是Thumb_DragDelta的部分代码示例,以此类推即可。
if (thumb.HorizontalAlignment == HorizontalAlignment.Left)
{
    right = rightPanel.ActualWidth;
    left = leftPanel.ActualWidth + e.HorizontalChange;
    width = (double.IsNaN(c.Width) ? c.ActualWidth : c.Width) - e.HorizontalChange;
}
二、效果预览

三、总结
本文简单介绍截屏框的实现,曾经为了事件这个界面功能花了不少精力,尤其是计算控件宽度以及位置关系,需要仔细计算。本文实现的截屏界面效果是可以的,拖动也是流畅的,完全满足一般项目的使用。
到此这篇关于C# wpf使用DockPanel实现制作截屏框的文章就介绍到这了,更多相关C# wpf DockPanel截屏框内容请搜索脚本之家以前的文章或继续浏览下面的相关文章希望大家以后多多支持脚本之家!