springboot使用maven实现多环境运行和打包问题
作者:码农小白白
在实际开发过程中,可能需要不断进行环境的切换和打包部署,通常我们会选择在application.properties中修改不同环境对应的配置文件,这种方式不仅效率低,而且很容易发生错误,造成不必要的麻烦降低工作效率。maven提供了多环境配置,可以方便实现不同环境的配置切换和打包。
一、配置文件
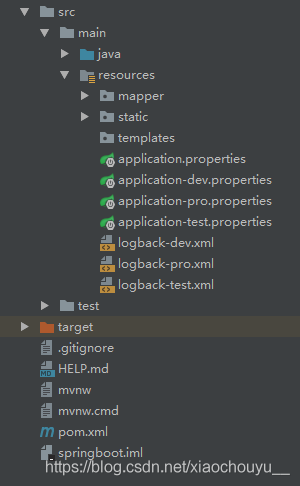
在classpath根目录(在springboot工程中,classpath为resources目录)下创建多个环境的配置文件,分别命名application-dev.properties、application-test.properties、application-pro.properties,分别对应开发环境、测试环境、生产环境。
springboot默认使用logback日志进行日志处理,如果日志配置也需要根据不同环境进行切换,则在classpath下创建logback-dev.xml、logback-test.xml、logback-pro.xml,
创建完成后,目录结构如下:

在对应环境的配置文件中,指定使用的日志配置文件,以开发环境为例其他环境的配置以此类推,在application-dev.properties文件中指定使用的日志配置文件logback-dev.xml
# 日志配置
logging.config=classpath:logback-dev.xml
二、配置pom文件
1.配置多个环境
<project>
	<!--分别设置开发,测试,生产环境-->
	<profiles>
		<!-- 开发环境 -->
		<profile>
			<id>dev</id>
			<activation>
				<activeByDefault>true</activeByDefault>
			</activation>
			<properties>
				<environment>dev</environment>
			</properties>
		</profile>
		<!-- 测试环境 -->
		<profile>
			<id>test</id>
			<activation>
				<activeByDefault>false</activeByDefault>
			</activation>
			<properties>
				<environment>test</environment>
			</properties>
		</profile>
		<!-- 生产环境 -->
		<profile>
			<id>pro</id>
			<activation>
				<activeByDefault>false</activeByDefault>
			</activation>
			<properties>
				<environment>pro</environment>
			</properties>
		</profile>
	</profiles>
</project>
<environment>标签中的名称对应配置文件的profile名称,即-后面的名称。<activeByDefault>设置为true时表示默认激活该环境。
2.在pom文件中指定resource目录和配置文件
<build>
	<resources>
		<resource>
			<!-- 指定配置文件所在的resource目录 -->
			<directory>src/main/resources</directory>
			<includes>
				<include>application.properties</include>
				<include>application-${environment}.properties</include>
				<include>logback-${environment}.xml</include>
			</includes>
			<filtering>true</filtering>
		</resource>
	</resources>
</build>
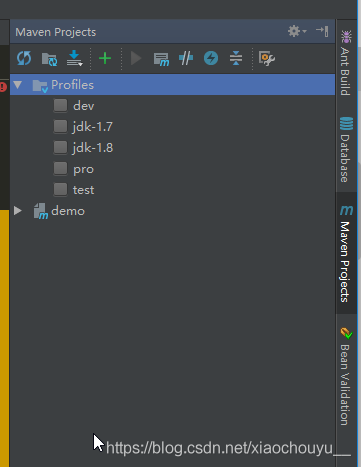
配置完成后,在Maven Projects/Profiles中会出现环境切换选项如下图所示。

三、配置动态变量
我们想要切换不同的配置文件,需要在application.properties文件中指定spring.profiles.active参数,显然该参数不是静态的,需要根据你选择的环境进行动态切换,在pom文件中使用${}读取标签配置,但是在application.properties中需使用占位符@@进行配置。
spring.profiles.active=@environment@
environment对应pom文件中的<environment>标签
四、使用及注意事项
我们在使用时,需要先指定要运行或打包的环境,在Maven Projects/Profiles中勾选对应的环境名称后再运行或打包。
通常情况下,会默认勾选pom中<activeByDefault>true</activeByDefault>设置为true的环境,当我们同时勾选多个环境时,则按pom文件中配置的先后顺序,后配置的环境将被激活。
注意事项:
如果发现pom文件中${environment}报错,说明你还没有指定需要运行或打包的环境,在Maven Projects/Profiles中勾选一个即可。

按照以上步骤就可以实现多环境的轻松切换了,下面附上完整的配置文件
1.application.properties
spring.profiles.active=@environment@
2.application-dev.properties
server.port=7000
# 数据源配置
spring.datasource.name=dev
spring.datasource.url=jdbc:mysql://127.0.0.1:3306/test
spring.datasource.username=root
spring.datasource.password=
spring.datasource.driver-class-name=com.mysql.jdbc.Driver
spring.datasource.type=com.alibaba.druid.pool.DruidDataSource
# redis配置
spring.redis.database=0
spring.redis.host=localhost
spring.redis.port=6379
spring.redis.password=
spring.redis.jedis.pool.max-active=-1
spring.redis.jedis.pool.max-wait=-1
spring.redis.jedis.pool.max-idle=-1
spring.redis.jedis.pool.min-idle=0
spring.redis.timeout=1000
spring.session.store-type=redis
# 日志配置
logging.config=classpath:logback-dev.xml
3.logback.xml
<?xml version="1.0" encoding="UTF-8"?>
<configuration>
    <!--<include resource="org/springframework/boot/logging/logback/base.xml"/>-->
    <!-- 项目的appid -->
    <property name="APP_ID" value="demo"/>
    <property name="LOG_PATH" value="log"></property>
    <appender name="STDOUT" class="ch.qos.logback.core.ConsoleAppender">
        <encoder>
            <pattern>%d{yyyy-MM-dd HH:mm:ss} %-4relative [%thread] %-5level %logger{35} - %msg %n</pattern>
        </encoder>
    </appender>
    <appender name="FILE_LOG" class="ch.qos.logback.core.rolling.RollingFileAppender">
        <filter class="ch.qos.logback.classic.filter.LevelFilter">
            <level>DEBUG</level>
        </filter>
        <file>${LOG_PATH}/${APP_ID}/access.log</file>
        <rollingPolicy class="ch.qos.logback.core.rolling.TimeBasedRollingPolicy">
            <fileNamePattern>${LOG_PATH}/${APP_ID}/access.log.%d{yyyy-MM-dd}.zip</fileNamePattern>
            <!-- maxHistory配置了日志在服务器上面只存留十个备份 -->
            <maxHistory>10</maxHistory>
        </rollingPolicy>
        <encoder>
            <pattern>%d{yyyy-MM-dd HH:mm:ss} %-4relative [%thread] %-5level %logger{35} - %msg%n</pattern>
        </encoder>
    </appender>
    <appender name="FILE_DEBUG"
              class="ch.qos.logback.core.rolling.RollingFileAppender">
        <filter class="ch.qos.logback.classic.filter.LevelFilter">
            <level>DEBUG</level>
            <onMatch>ACCEPT</onMatch>
            <onMismatch>DENY</onMismatch>
        </filter>
        <file>${LOG_PATH}/${APP_ID}/access_debug.log</file>
        <rollingPolicy class="ch.qos.logback.core.rolling.TimeBasedRollingPolicy">
            <fileNamePattern>${LOG_PATH}/${APP_ID}/access_debug.log.%d{yyyy-MM-dd}.zip</fileNamePattern>
            <!-- maxHistory配置了日志在服务器上面只存留十个备份 -->
            <maxHistory>10</maxHistory>
        </rollingPolicy>
        <encoder>
            <pattern>%d{yyyy-MM-dd HH:mm:ss} %-4relative [%thread] %-5level %logger{35} - %msg%n</pattern>
        </encoder>
    </appender>
    <appender name="FILE_INFO" class="ch.qos.logback.core.rolling.RollingFileAppender">
        <filter class="ch.qos.logback.classic.filter.LevelFilter">
            <level>INFO</level>
            <onMatch>ACCEPT</onMatch>
            <onMismatch>DENY</onMismatch>
        </filter>
        <file>${LOG_PATH}/${APP_ID}/access_info.log</file>
        <rollingPolicy class="ch.qos.logback.core.rolling.TimeBasedRollingPolicy">
            <fileNamePattern>${LOG_PATH}/${APP_ID}/access_info.log.%d{yyyy-MM-dd}.zip</fileNamePattern>
            <!-- maxHistory配置了日志在服务器上面只存留十个备份 -->
            <maxHistory>10</maxHistory>
        </rollingPolicy>
        <encoder>
            <pattern>%d{yyyy-MM-dd HH:mm:ss} %-4relative [%thread] %-5level %logger{35} - %msg%n</pattern>
        </encoder>
    </appender>
    <appender name="FILE_WARN" class="ch.qos.logback.core.rolling.RollingFileAppender">
        <filter class="ch.qos.logback.classic.filter.LevelFilter">
            <level>WARN</level>
            <onMatch>ACCEPT</onMatch>
            <onMismatch>DENY</onMismatch>
        </filter>
        <file>${LOG_PATH}/${APP_ID}/access_warn.log</file>
        <rollingPolicy class="ch.qos.logback.core.rolling.TimeBasedRollingPolicy">
            <fileNamePattern>${LOG_PATH}/${APP_ID}/access_warn.log.%d{yyyy-MM-dd}.zip</fileNamePattern>
            <!-- maxHistory配置了日志在服务器上面只存留十个备份 -->
            <maxHistory>10</maxHistory>
        </rollingPolicy>
        <encoder>
            <pattern>%d{yyyy-MM-dd HH:mm:ss} %-4relative [%thread] %-5level %logger{35} - %msg%n</pattern>
        </encoder>
    </appender>
    <appender name="FILE_ERROR" class="ch.qos.logback.core.rolling.RollingFileAppender">
        <filter class="ch.qos.logback.classic.filter.LevelFilter">
            <level>ERROR</level>
            <onMatch>ACCEPT</onMatch>
            <onMismatch>DENY</onMismatch>
        </filter>
        <file>${LOG_PATH}/${APP_ID}/access_error.log</file>
        <rollingPolicy class="ch.qos.logback.core.rolling.TimeBasedRollingPolicy">
            <fileNamePattern>${LOG_PATH}/${APP_ID}/access_error.log.%d{yyyy-MM-dd}.zip</fileNamePattern>
            <!-- maxHistory配置了日志在服务器上面只存留十个备份 -->
            <maxHistory>10</maxHistory>
        </rollingPolicy>
        <encoder>
            <pattern>%d{yyyy-MM-dd HH:mm:ss} %-4relative [%thread] %-5level %logger{35} - %msg%n</pattern>
        </encoder>
    </appender>
    <appender name="ASYNC_LOG" class="ch.qos.logback.classic.AsyncAppender">
        <!-- 不丢失日志.默认的,如果队列的80%已满,则会丢弃TRACT、DEBUG、INFO级别的日志 -->
        <discardingThreshold>0</discardingThreshold>
        <!-- 更改默认的队列的深度,该值会影响性能.默认值为256 -->
        <queueSize>512</queueSize>
        <appender-ref ref="FILE_LOG"/>
    </appender>
    <appender name="ASYNC_LOG" class="ch.qos.logback.classic.AsyncAppender">
        <!-- 不丢失日志.默认的,如果队列的80%已满,则会丢弃TRACT、DEBUG、INFO级别的日志 -->
        <discardingThreshold>0</discardingThreshold>
        <!-- 更改默认的队列的深度,该值会影响性能.默认值为256 -->
        <queueSize>512</queueSize>
        <appender-ref ref="FILE_LOG"/>
    </appender>
    <appender name="ASYNC_LOG_DEBUG" class="ch.qos.logback.classic.AsyncAppender">
        <!-- 不丢失日志.默认的,如果队列的80%已满,则会丢弃TRACT、DEBUG、INFO级别的日志 -->
        <discardingThreshold>0</discardingThreshold>
        <!-- 更改默认的队列的深度,该值会影响性能.默认值为256 -->
        <queueSize>512</queueSize>
        <appender-ref ref="FILE_DEBUG"/>
    </appender>
    <appender name="ASYNC_LOG_INFO" class="ch.qos.logback.classic.AsyncAppender">
        <!-- 不丢失日志.默认的,如果队列的80%已满,则会丢弃TRACT、DEBUG、INFO级别的日志 -->
        <discardingThreshold>0</discardingThreshold>
        <!-- 更改默认的队列的深度,该值会影响性能.默认值为256 -->
        <queueSize>512</queueSize>
        <appender-ref ref="FILE_INFO"/>
    </appender>
    <appender name="ASYNC_LOG_WARN" class="ch.qos.logback.classic.AsyncAppender">
        <!-- 不丢失日志.默认的,如果队列的80%已满,则会丢弃TRACT、DEBUG、INFO级别的日志 -->
        <discardingThreshold>0</discardingThreshold>
        <!-- 更改默认的队列的深度,该值会影响性能.默认值为256 -->
        <queueSize>512</queueSize>
        <appender-ref ref="FILE_WARN"/>
    </appender>
    <appender name="ASYNC_LOG_ERROR" class="ch.qos.logback.classic.AsyncAppender">
        <!-- 不丢失日志.默认的,如果队列的80%已满,则会丢弃TRACT、DEBUG、INFO级别的日志 -->
        <discardingThreshold>0</discardingThreshold>
        <!-- 更改默认的队列的深度,该值会影响性能.默认值为256 -->
        <queueSize>512</queueSize>
        <appender-ref ref="FILE_ERROR"/>
    </appender>
    <root level="INFO">
        <!-- appender referenced after it is defined -->
        <appender-ref ref="STDOUT"/>
        <appender-ref ref="ASYNC_LOG"/>
        <appender-ref ref="ASYNC_LOG_DEBUG"/>
        <appender-ref ref="ASYNC_LOG_INFO"/>
        <appender-ref ref="ASYNC_LOG_WARN"/>
        <appender-ref ref="ASYNC_LOG_ERROR"/>
    </root>
    <logger name="org.springframework" level="INFO"/>
</configuration>
4.pom.xml
<?xml version="1.0" encoding="UTF-8"?>
<project xmlns="http://maven.apache.org/POM/4.0.0" xmlns:xsi="http://www.w3.org/2001/XMLSchema-instance"
	xsi:schemaLocation="http://maven.apache.org/POM/4.0.0 http://maven.apache.org/xsd/maven-4.0.0.xsd">
	<modelVersion>4.0.0</modelVersion>
	<parent>
		<groupId>org.springframework.boot</groupId>
		<artifactId>spring-boot-starter-parent</artifactId>
		<version>2.1.3.RELEASE</version>
		<relativePath/> <!-- lookup parent from repository -->
	</parent>
	<groupId>com.soft.springboot</groupId>
	<artifactId>demo</artifactId>
	<version>0.0.1-SNAPSHOT</version>
	<name>demo</name>
	<description>Demo project for Spring Boot</description>
	<properties>
		<java.version>1.8</java.version>
	</properties>
	<dependencies>
		<dependency>
			<groupId>org.springframework.boot</groupId>
			<artifactId>spring-boot-starter-web</artifactId>
		</dependency>
		<dependency>
			<groupId>org.springframework.boot</groupId>
			<artifactId>spring-boot-starter-test</artifactId>
			<scope>test</scope>
		</dependency>
	</dependencies>
	<build>
		<plugins>
			<plugin>
				<groupId>org.springframework.boot</groupId>
				<artifactId>spring-boot-maven-plugin</artifactId>
				<executions>
					<execution>
						<goals>
							<goal>repackage</goal><!--可以把依赖的包都打包到生成的Jar包中 -->
						</goals>
					</execution>
				</executions>
			</plugin>
		</plugins>
		<resources>
			<resource>
				<directory>src/main/resources</directory>
				<includes>
					<include>application.properties</include>
					<include>application-${environment}.properties</include>
					<include>logback-${environment}.xml</include>
				</includes>
				<filtering>true</filtering>
			</resource>
		</resources>
	</build>
	<!--分别设置开发,测试,生产环境-->
	<profiles>
		<!-- 开发环境 -->
		<profile>
			<id>dev</id>
			<activation>
				<activeByDefault>true</activeByDefault>
			</activation>
			<properties>
				<environment>dev</environment>
			</properties>
		</profile>
		<!-- 测试环境 -->
		<profile>
			<id>test</id>
			<activation>
				<activeByDefault>false</activeByDefault>
			</activation>
			<properties>
				<environment>test</environment>
			</properties>
		</profile>
		<!-- 生产环境 -->
		<profile>
			<id>pro</id>
			<activation>
				<activeByDefault>false</activeByDefault>
			</activation>
			<properties>
				<environment>pro</environment>
			</properties>
		</profile>
	</profiles>
</project>
总结
以上为个人经验,希望能给大家一个参考,也希望大家多多支持脚本之家。
