定时任务注解@Scheduled不生效问题及解决
作者:JobsTribe
定时任务注解@Scheduled不生效
问题描述
在用@Scheduled做定时任务的注解时,发现@Scheduled注解不生效。
原因分析
用能要交给spring容器的注解
比如@Component注解。
使用@EnableScheduling
启动类里面/使用定时任务所在的类中使用@EnableScheduling 注解开启功能,自动扫描
cron表达式写法不对
正常写法:@Scheduled(cron="*/10 * * * * ?")
代表10s执行一次,每个对应的是秒 分 时 天
如果是想每天0:30执行一次,那就是:
正常写法:@Scheduled(cron=“0 30 0 * * ?”)
使用apollo添加配置后,apollo修改配置后不生效
在使用@Scheduled时,项目启动时已将时间注入Spring容器中。
相当于就算是apollo改了内容有热加载机制,值也不会生效。
如果想生效,需要重启服务。
@Scheduled实现定时任务(实现多个定时任务并发执行)
@Scheduled实现定时任务
使用@Scheduled注解需要springboot启动类上添加注解@EnableScheduling
@SpringBootApplication
@MapperScan(basePackages = {"com.xxx.*.mapper"})
@EnableScheduling
public class PictureProcessingAdminApplication{
	public static void main(String[] args) {
		SpringApplication.run(PictureProcessingAdminApplication.class, args);
	}
}
同个任务的同步执行
同步执行:等待上一次定时任务结束后才开始cron表达式时间匹配
注意:同步任务所在类必须被spring扫描所管理才行,所以需要添加@Component注解。
很多人明明在方法在添加了@Scheduled注解,但是不生效都是这个原因,定时任务所在类没有被spring管理。
@Component
public class taskTest {
    @Scheduled(cron = "0 */1 * * * ?")
    public void task1(){
        try {
            System.out.println("任务1执行:" + new SimpleDateFormat("yyyy-MM-dd HH:mm:ss").format(new Date(System.currentTimeMillis())));
            Thread.sleep(65000);
            System.out.println("任务1结束:" + new SimpleDateFormat("yyyy-MM-dd HH:mm:ss").format(new Date(System.currentTimeMillis())));
        } catch (InterruptedException e) {
            e.printStackTrace();
        }
    }
}
同个任务的并发执行
相对同步执行来说,定时任务方法头部增加@Async即可实现并发执行,也就是严格按照cron表达式进行时间匹配执行,无需等待上一次任务执行结束。
@Component
public class taskTest {
    @Async
    @Scheduled(cron = "0 */1 * * * ?")
    public void task1(){
        try {
            System.out.println("任务1执行:" + new SimpleDateFormat("yyyy-MM-dd HH:mm:ss").format(new Date(System.currentTimeMillis())));
            Thread.sleep(65000);
            System.out.println("任务1结束:" + new SimpleDateFormat("yyyy-MM-dd HH:mm:ss").format(new Date(System.currentTimeMillis())));
        } catch (InterruptedException e) {
            e.printStackTrace();
        }
    }
}
多个任务的同步执行
任务使用@Scheduled
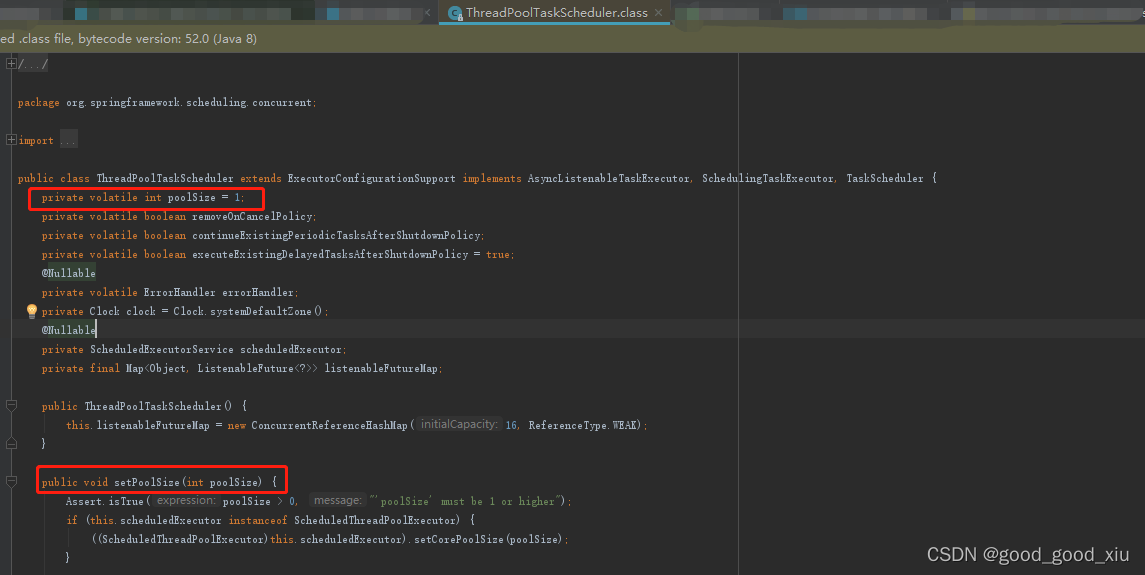
然后最重要的是,需要将springboot维护的ThreadPoolTaskScheduler定时任务线程池的长度设置为大于定时任务个数的值。然后ThreadPoolTaskScheduler默认长度为1。所以默认只有一个定时任务在跑。
源码如下:


所以,需要将ThreadPoolTaskScheduler的长度修改即可,在项目启动时,设置长度,替换原本springboot管理的bean即可。
@Component
public class TaskSchedulerConfig {
	@Bean
	public ThreadPoolTaskScheduler threadPoolTaskScheduler(){
		ThreadPoolTaskScheduler threadPoolTaskScheduler = new ThreadPoolTaskScheduler();
		threadPoolTaskScheduler.setPoolSize(10);
		return threadPoolTaskScheduler;
	}
}
总结
以上为个人经验,希望能给大家一个参考,也希望大家多多支持脚本之家。
