
Photoshop将帅哥照片转为夸张的油画漫画效果
写说说
教程的过程写得非常详细,每一个细节部分都有说明。只是教程为翻译的,界面及文字中保留大量英文。操作的时候有点难度。
制作漫画效果的教程很多,一般分为3个大的步骤:首先微调及简化图片;然后用液化滤镜变形处理,把人物表情刻画夸张;最后细化高光及暗部,并用滤镜等增加手绘纹理即可。
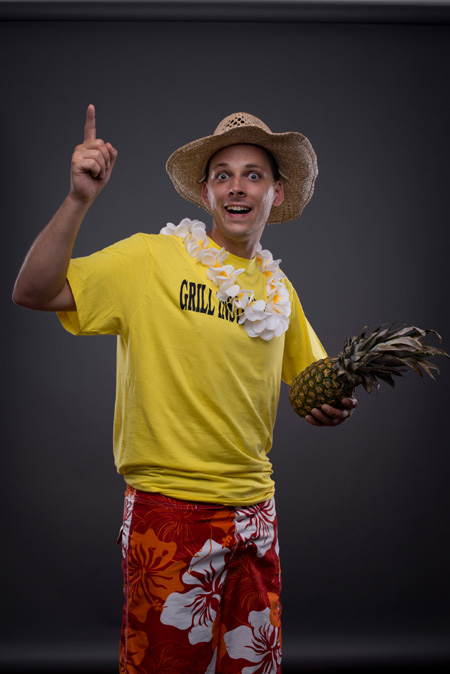
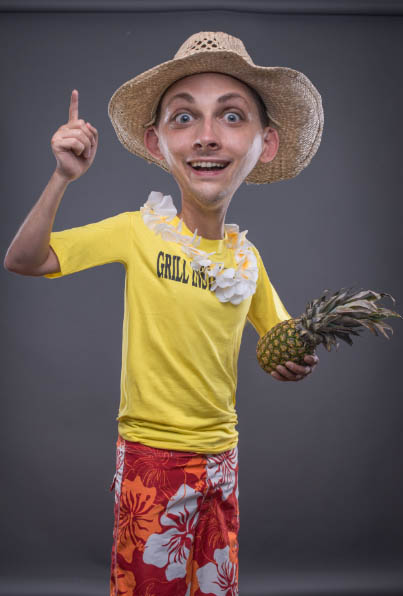
原图
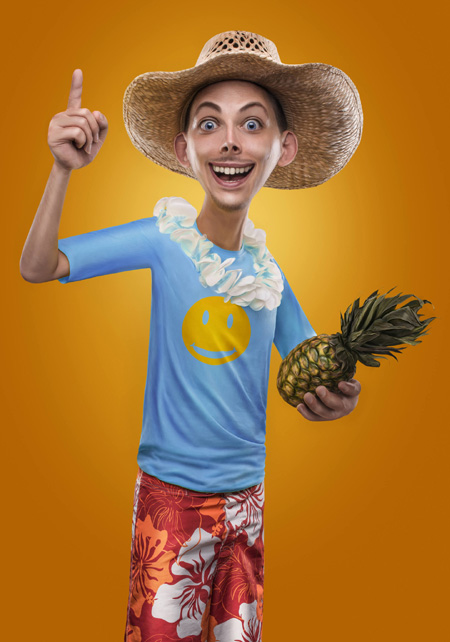
最终效果
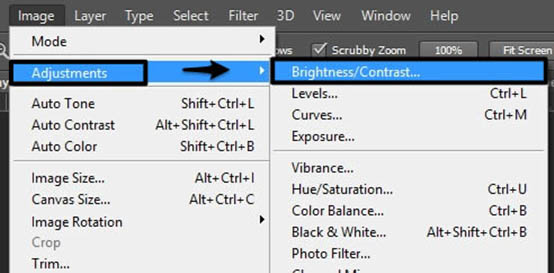
1、打开素材图片,微调一下颜色。
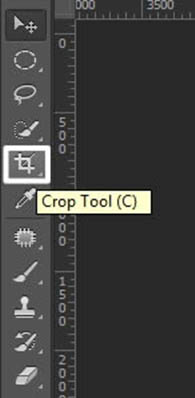
你懂的,我们最终的目的是要使整个肖像有夸张的身体和头部对比(头大身小),所以我们需要给头部腾出一些额外的空间。为了实现这一目标,请在工具栏中选择裁剪工具。
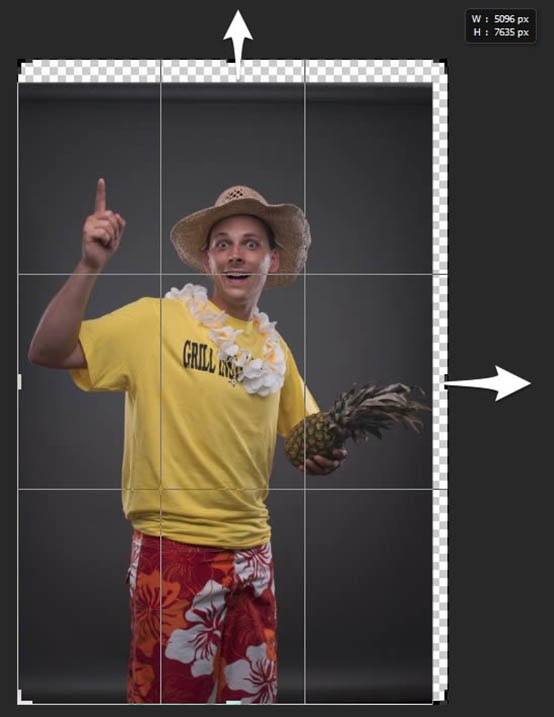
2、扩大我们的画布吧。
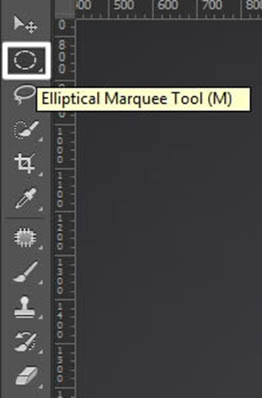
3、选中椭圆选框工具(M)。
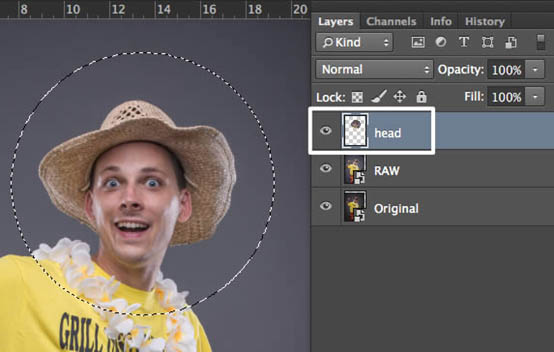
4、按下shift+alt键,从人的右眼靠鼻子一端的眼角开始选择一个大大圆形(包住人头和脖子,如下),按下ctrl+J键复制一图层,并命名为”head”。
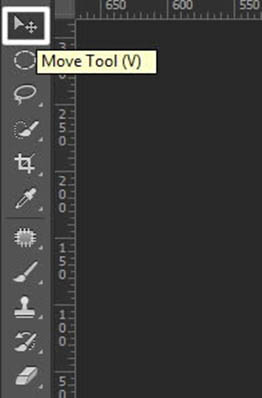
5、好戏来了!选择移动工具(V)。
6、Ctrl+T,把锚点移到脖子往下一点点衣领处,同时按住shift+alt键——把头部拉大。

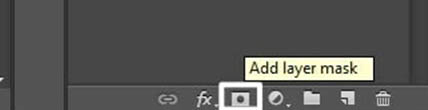
7、给该图层添加图层蒙版。
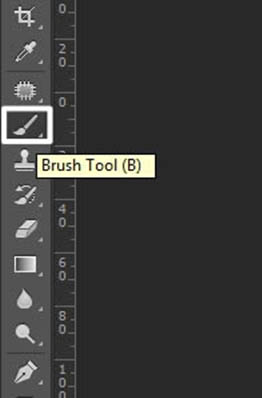
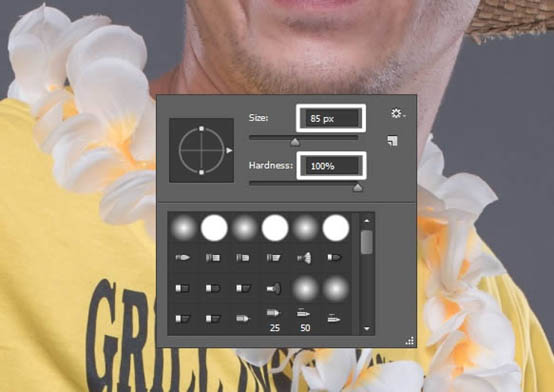
8、选择画笔工具(B),调整参数,按下D还原面板的前景色和背景色,用这支画笔擦除放大后头部周边没用的部分。
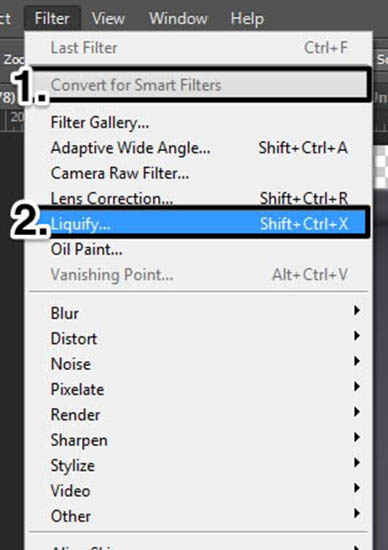
9、按下CMD/CTRL + SHIFT + ALT + E 盖印图层,执行”Filter > Convert for Smart Filters”使用智能滤镜,接着执行”Filter > Liquify” 打开液化面板。
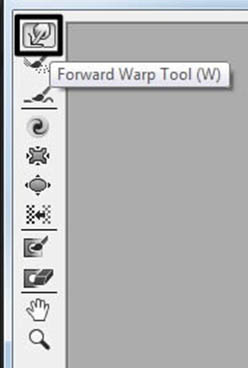
10、选择向前变形工具(W)。
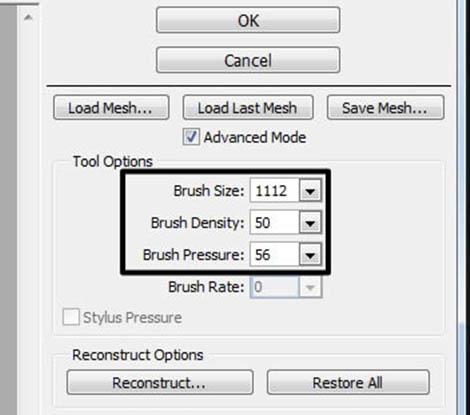
11、你可以看到在我的设置里,我用一个大的笔刷。当然使用过程中你可以通过按下”["、" ] “调整笔刷的大小。
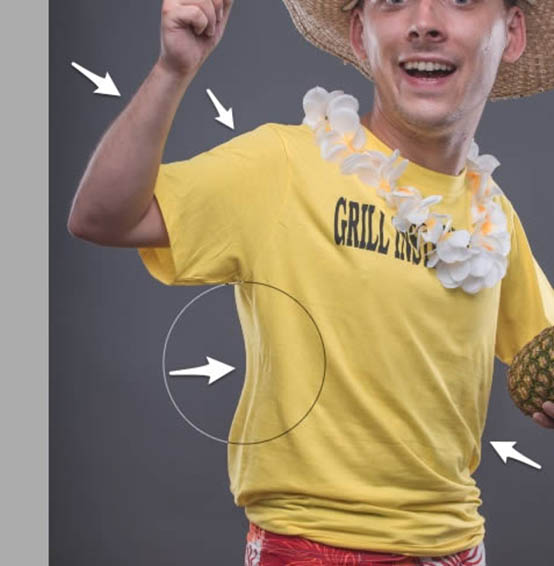
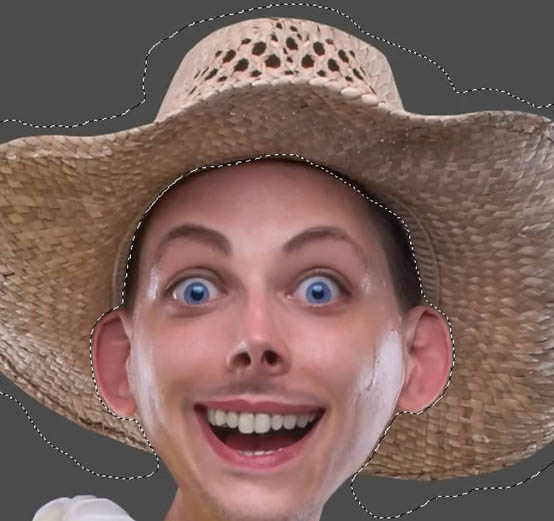
12、点击你想改变大小的区域,通过拖动画笔使人物的身体变瘦变小、头部变大、脖子变细(要么瘦要么死!)、嘴巴变大(笑得越夸张越好!)。
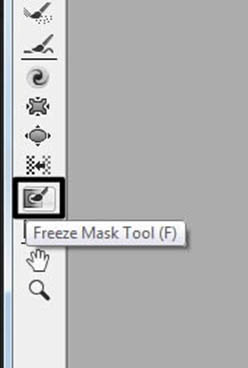
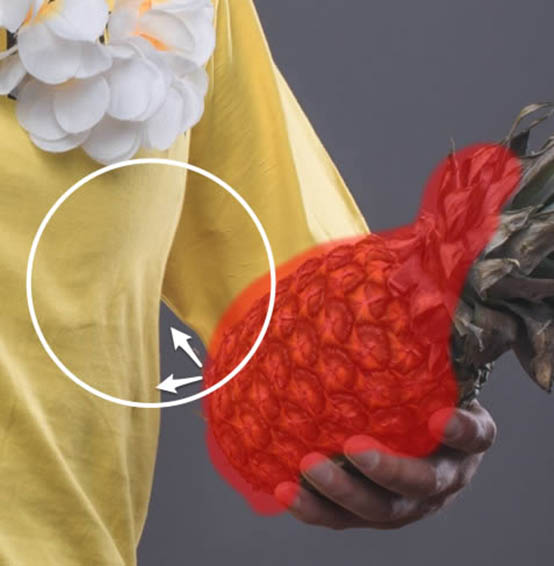
13、如果你想保护图像的某些部分不变形(比如这个美味的菠萝),那么请选择冻结蒙版工具。
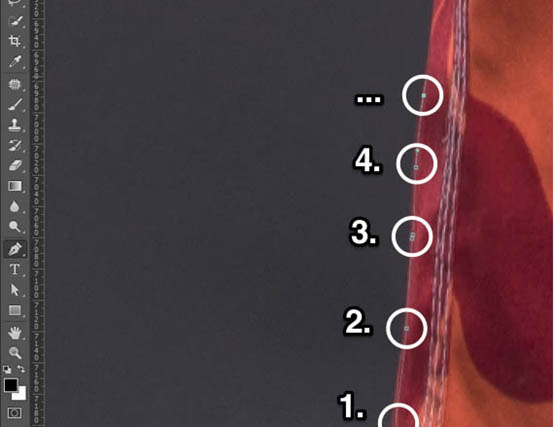
14、现在你可以给这个菠萝添加蒙版了。
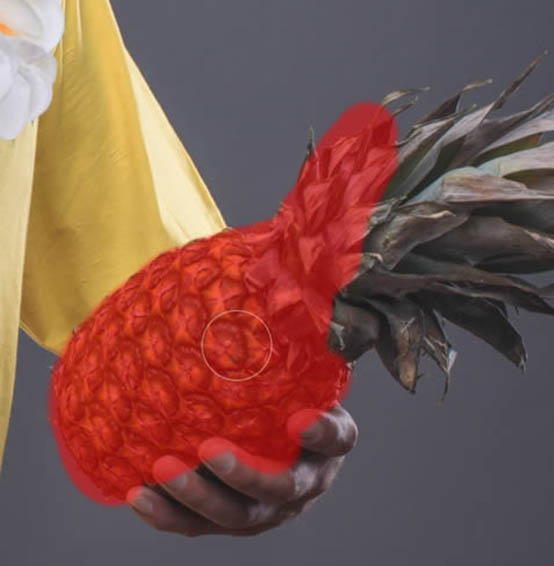
15、再次点击向前变形工具继续修改,现在这菠萝是不会变形了。
16、终于把这个人物给变成卡通小人啦。
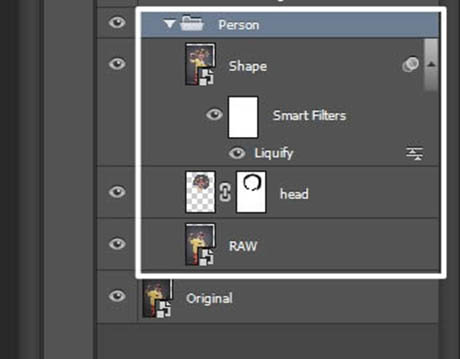
17、这图层一多啊,就得给它们编组,不然会乱了秩序哦。
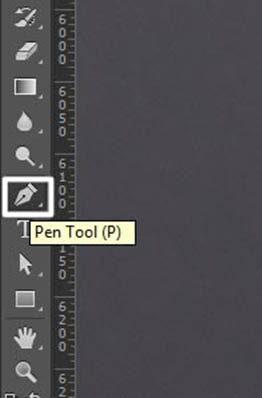
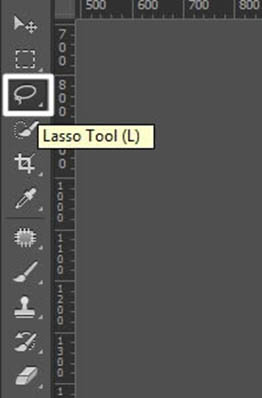
18、点击钢笔工具(P),这家伙很适合抠图撒。
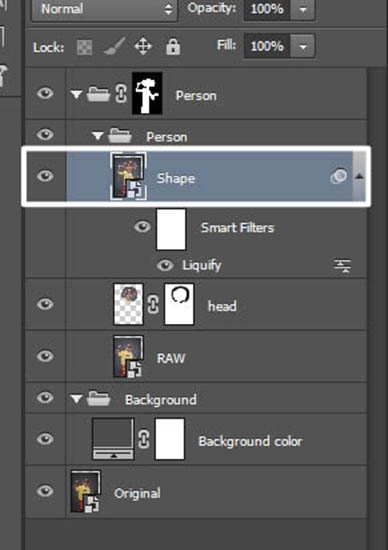
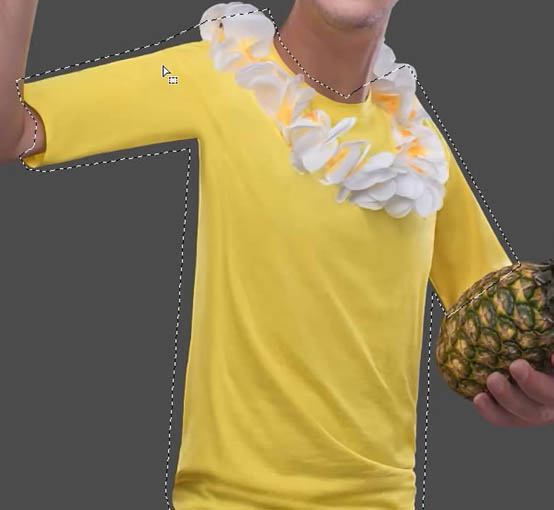
19、慢慢地、一步一步地把整个人物抠出来,或许这需要花费比较多的时间和精力,但是没有艰辛的付出哪里来巨大的收获呀。
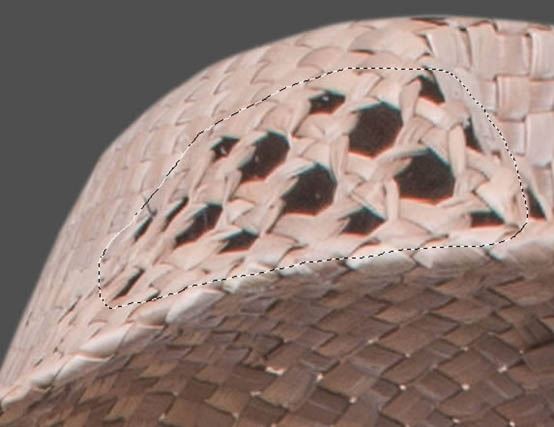
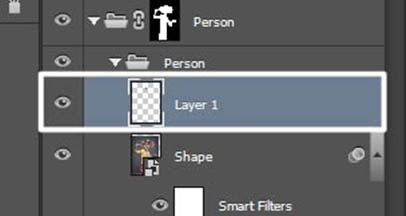
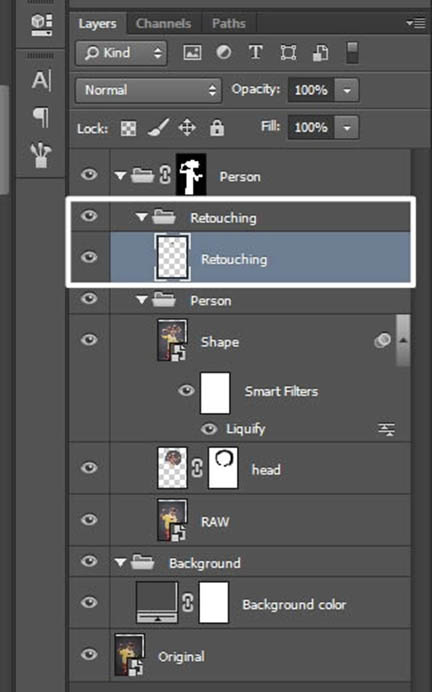
20、扣完图像,在Person编组上再次创建编组,命名为Person,回到画布,右击鼠标选择创建选区,然后点击添加蒙版按钮,出现如下图层。

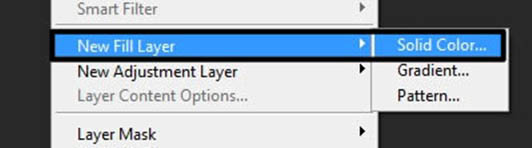
21、执行”Layer > New Fill Layer > Solid Color”。
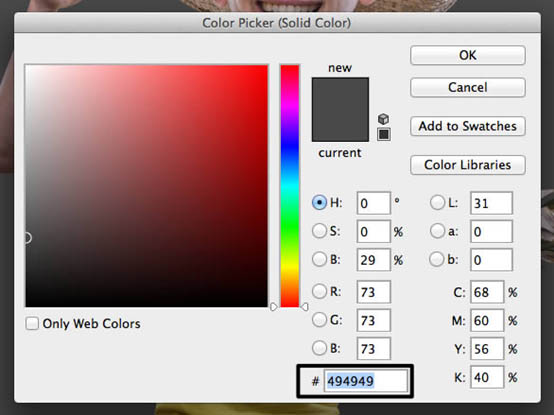
22、我这里使用灰色(#494949)填充,你也可以填充你喜欢的颜色。
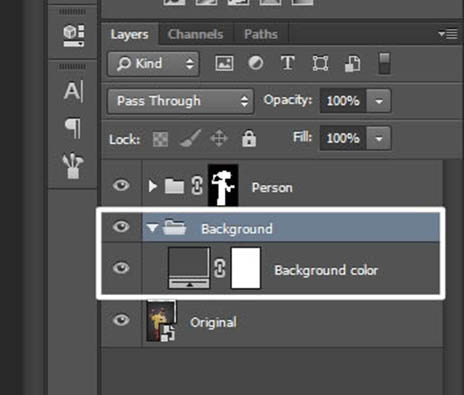
23、非常重要的一点是颜色填充图层必须在人物图层的下方,你看,编组还是有很大的好处的:)。
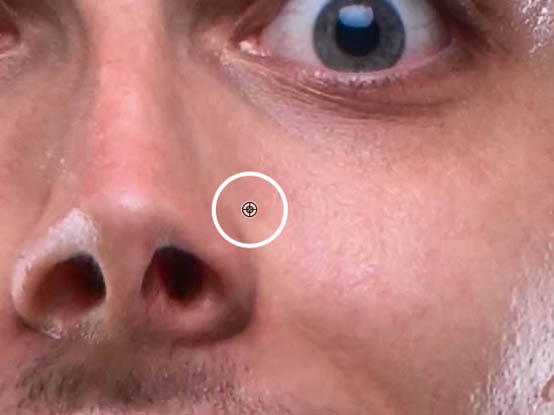
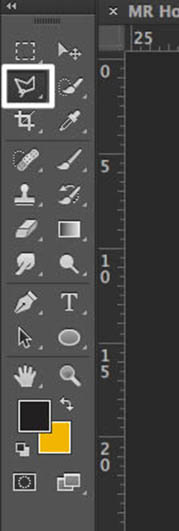
24、点击套索工具(L)。
25、选中Shape 图层。
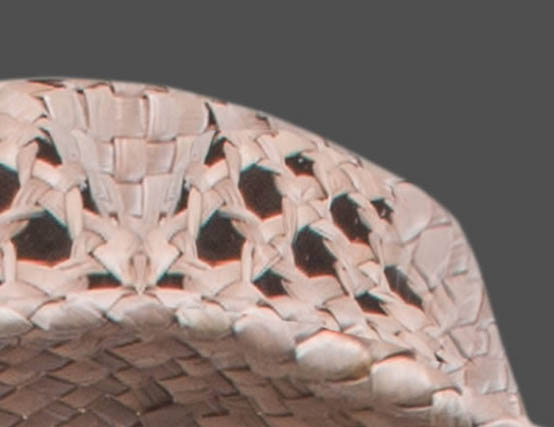
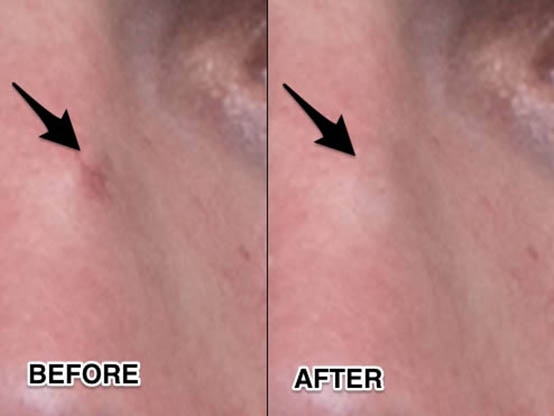
26、使用套索工具选择帽子上编织的柳条部分,按下ctrl+J复制一个新的图层。
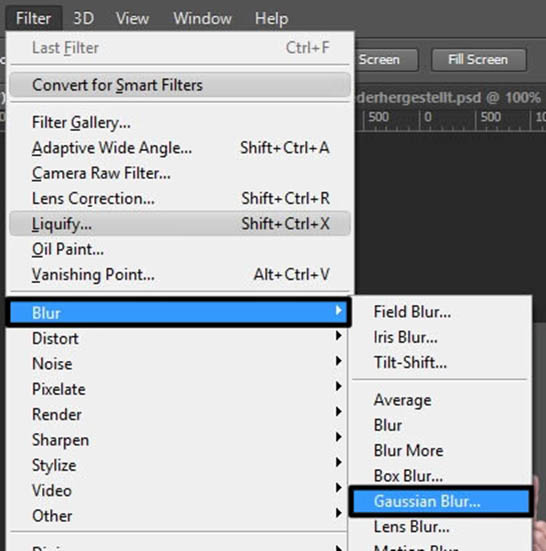
27、给它重命名为润色层吧(Retouching),要知道对图层的正确命名可以更快地找到它们。
28、选择移动工具(V)按下ctrl+T并水平翻转该图层,移动使之镜像于刚才的小洞。
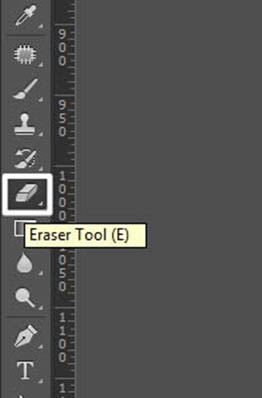
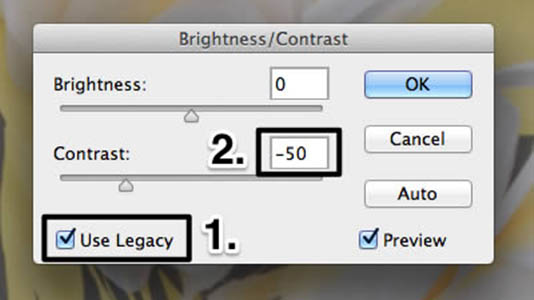
29、使用橡皮擦工具(E)擦除多余的部分使之融合于帽子。
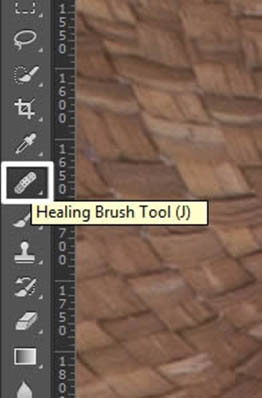
30、嘿,还没完呢!现在要给皮肤做一些润色~点击污点修复工具(J)之下的修复画笔工具Healing Brush Tool。
31、按住alt键吸取污点附近的健康肤色,然后用该柔软的画笔点掉这些污点。又是一个慢工细活的差事,要有耐心哦~如果你点了好多次都没有反应,大概是按下alt时没有吸取到润色层的颜色。所以你可以来回切换图层选中项吸取颜色然后修复。
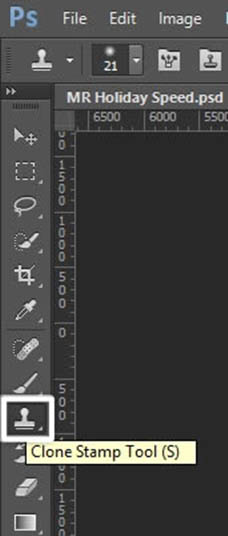
32、举个栗子 修复前vs修复后。
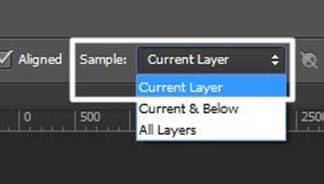
33、现在要用到 Natalia Taffarel技术了.。许多人使用它精细修复图像。 我们把图像分为两个部分: 颜色和细节(color and details). 这样子会使图像调节更精细。开始吧。
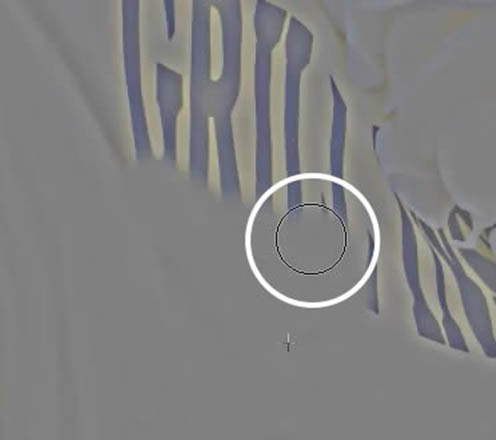
CMD/CTRL + SHIFT + ALT + E 盖印图层,命名为”Color”,CMD/CTRL + J复制一层,命名为Details。将这两个图层单独编组到”Frequency Separation”里。

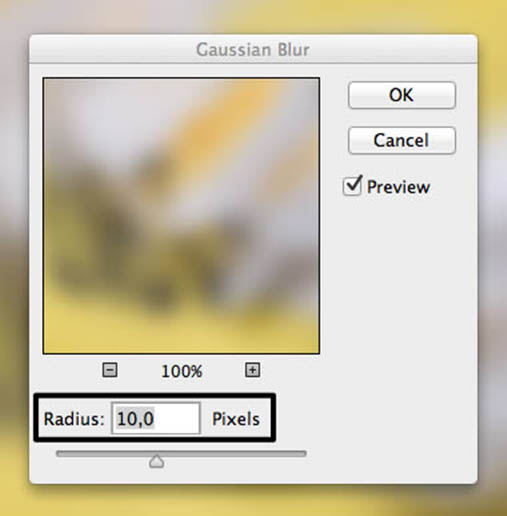
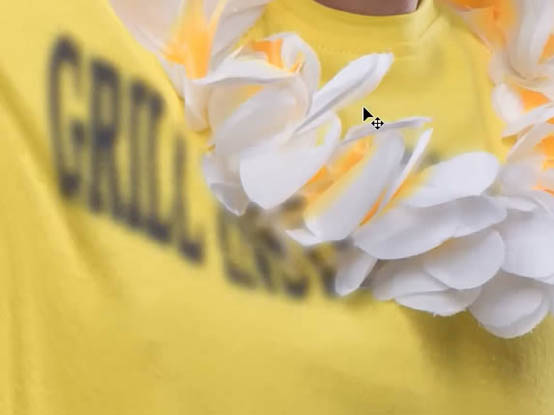
34、选择Color图层,使用高斯模糊,半径为10px。
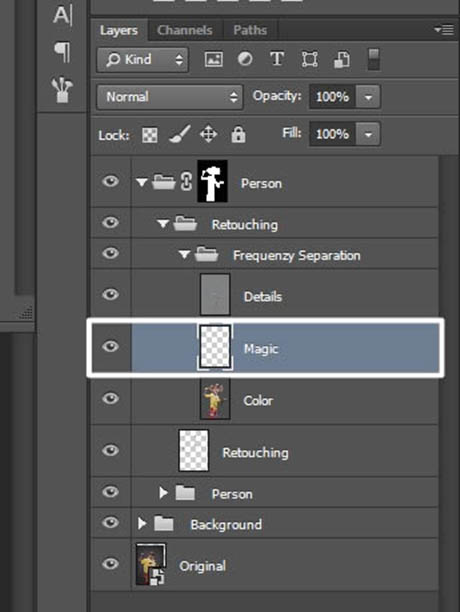
35、选中Details图层,执行”图像 > 调整 > 亮度/对比度”。
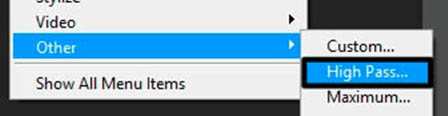
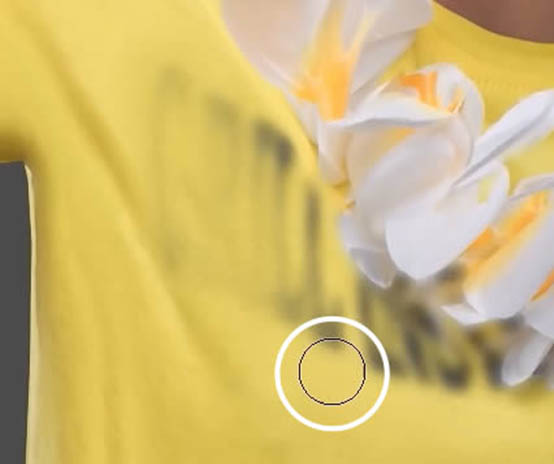
36、执行”Filter > Other > High Pass”,半径10px。
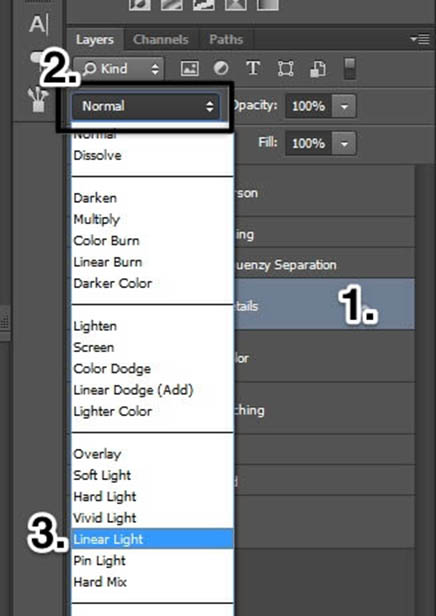
37、改变图层的叠加模式为线性光Linear Light。
38、选择仿制图章工具Clone Stamp Tool(S)。
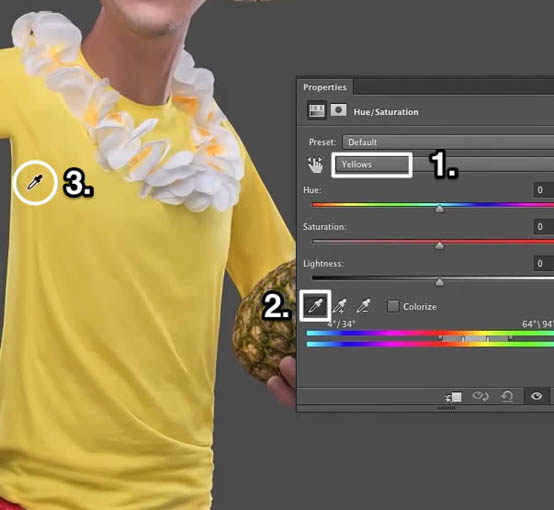
39、确保样本选项选择的是当前图层。
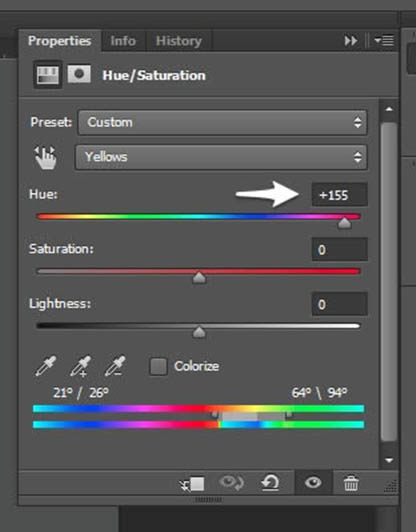
40、现在来移除T恤上的那些字体。可能需要花费一些时间。
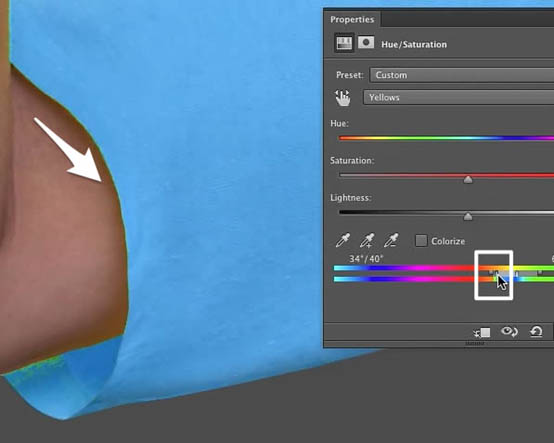
41、结果就是这样的。可能会有点模糊,但是没有关系,后面我们还要变个魔术。
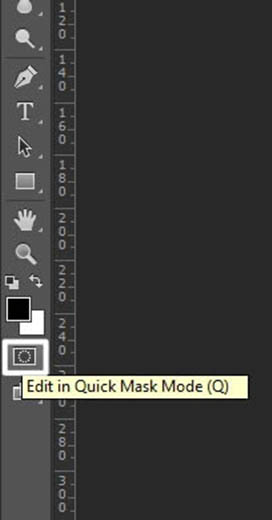
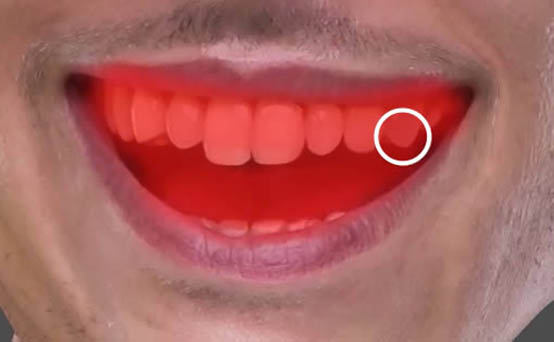
42、在Details图层和Color图层之间新建一个”Margic”图层。
43、用吸管工具吸取T恤衫上的一个黄色。接着选择画笔工具,调整不透明度为20%,在刚才移除打印字体的地方涂抹。你会发现字体不见了,被黄色取代了。而且,黄色融合于T恤衫里面。如果感觉不满意,还可以继续执行刚才防止图章工具的步骤,你也可以改变画笔的不透明度来是效果更完美。
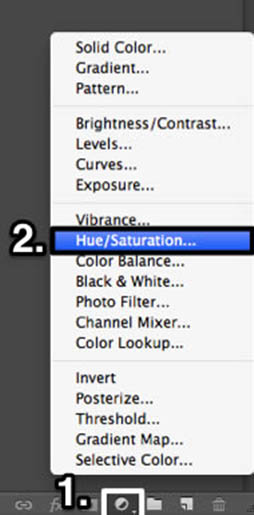
44、选择多边形套索工具Polygonal Lasso Tool。
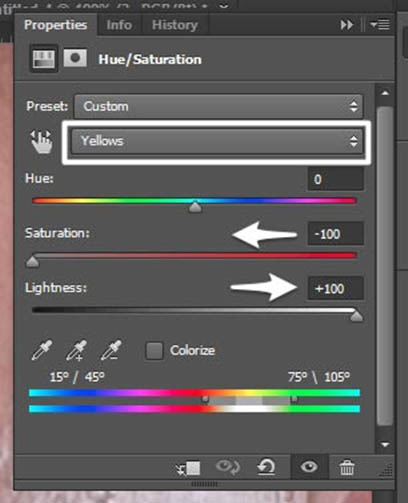
45、绕着T恤衫绕一圈。不需要太精确。
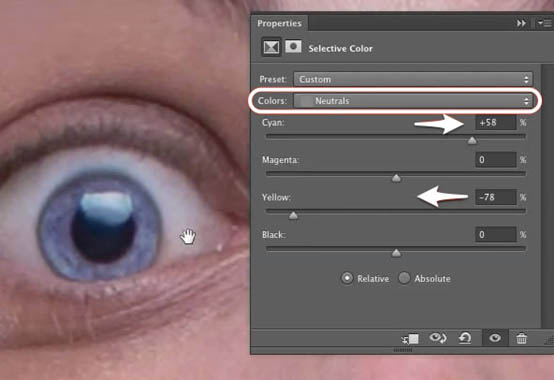
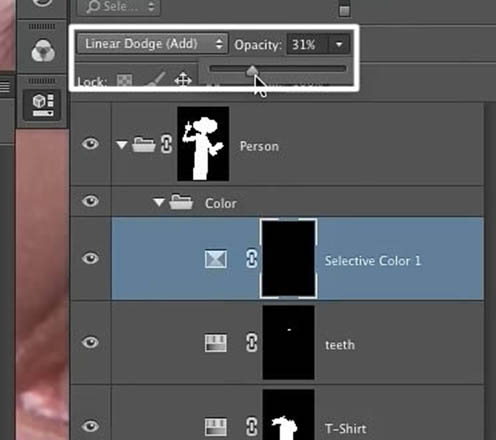
46、添加一个色相/饱和度调整图层”hue/saturation”,应用选择黄色,并选择吸管工具eyedropper tool。
47、改变色相值为155.看吧,衣服的颜色变为蓝色了。
48、或许你会在衣服的边缘看到一些琐碎的黄色。如何是好?稍微调节一下那色带上小小的指标。如果还是没办法解决,你可以用遮罩。
49、在工具栏的末尾处选择以快速蒙版模式编辑”edit in quick mask mode”,接着用画笔工具涂抹牙齿。
50、不需要太精细哦~涂抹完再次点击这个蒙版工具,嗯,牙齿被选中了。
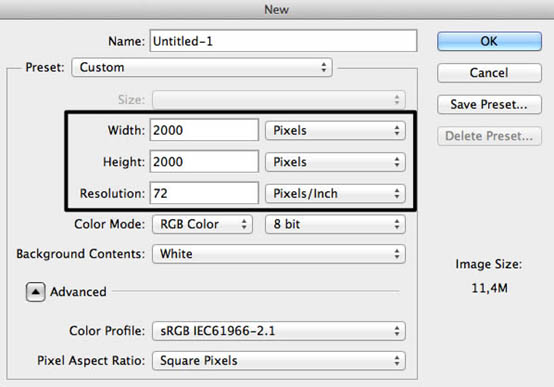
51、为了改变牙齿的颜色,我们需要再次添加色相/饱和度调整图层。
52、设置如下,嗯,牙齿变白了。
53、眼睛呢我也是使用同样的调整方式。选中瞳孔,添加Selective Color(可选颜色)调整图层,选择中性色,按照下图改变颜色。
54、为了使眼珠变亮,我们需要改变这一调整图层的叠加模式为Linear Dodge(线性减淡),不透明度改为20%~30%。
55、这一小节我们的最后一步就是给这个帽子添加”活泼的、悦动的”效果。所以选中它吧。
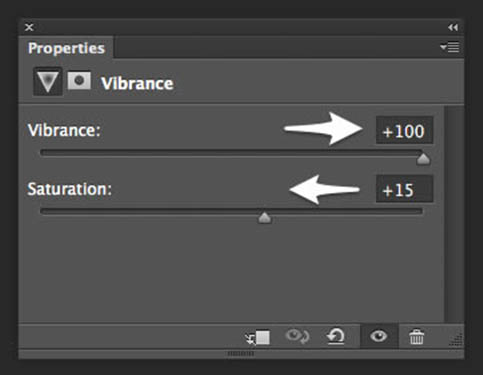
56、添加Vibrance(自然饱和度)调整图层,数据调整如下。
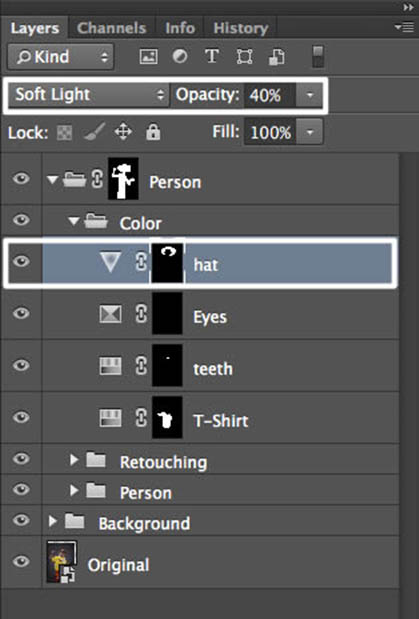
57、最后一步,调整图层的叠加模式和不透明度。
58、新建一个文件。
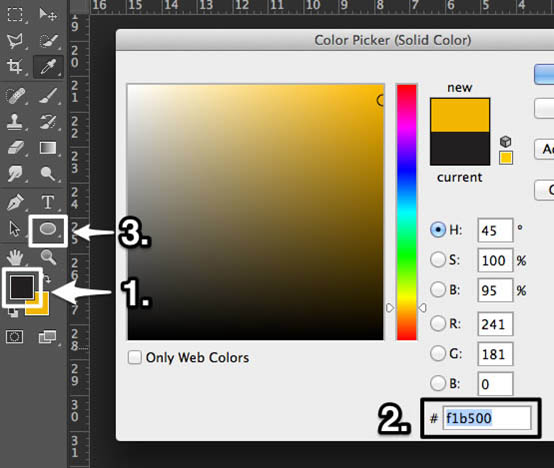
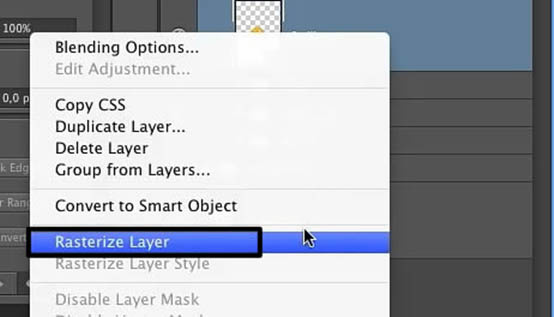
59、改变前景色为黄色。我用#f1b500,接下来选中椭圆工具。
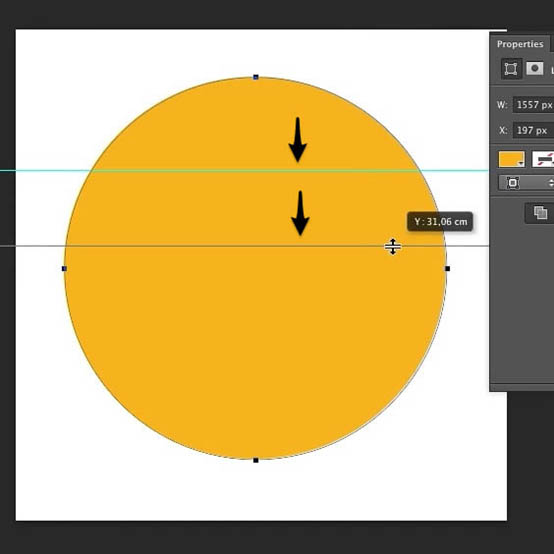
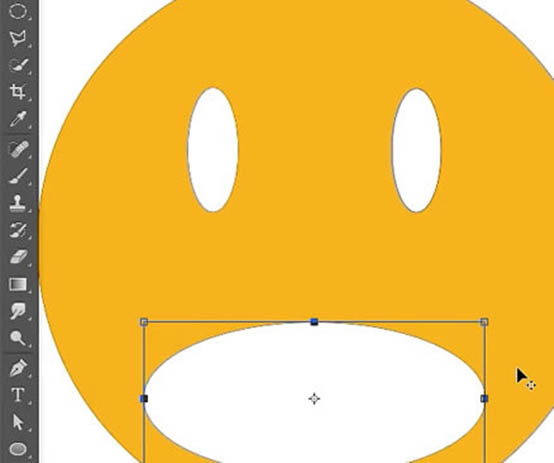
60、创建一个圆。填充黄色。无描边。对齐背景到正中央。接着CMD/CTRL + R 打开标尺,为我们的眼睛拉几条辅助线。
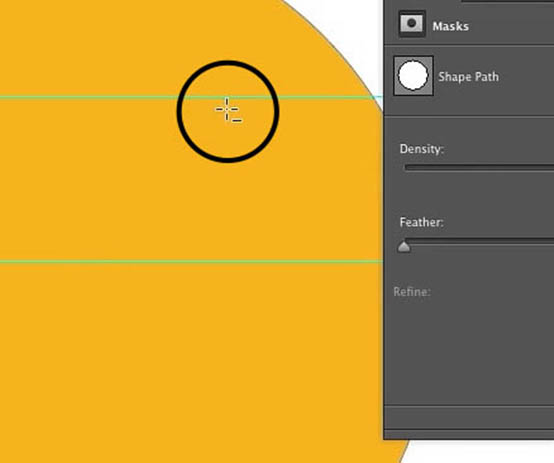
61、使用椭圆工具按住alt键移除眼睛的黄色部分。
62、还有嘴巴也是。
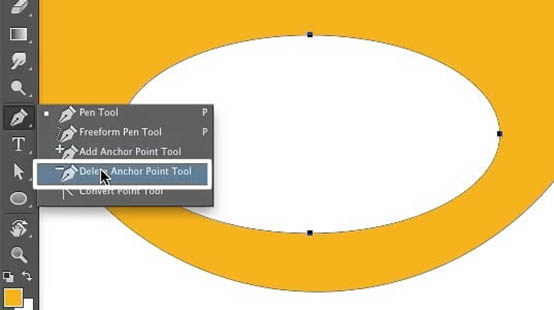
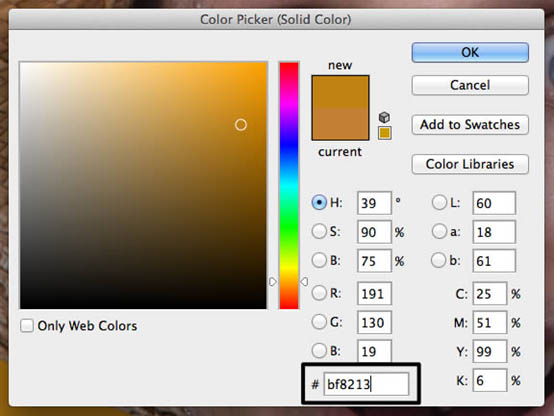
63、选择Delete Anchor Point Tool(删除锚点工具)移除嘴巴的顶点。
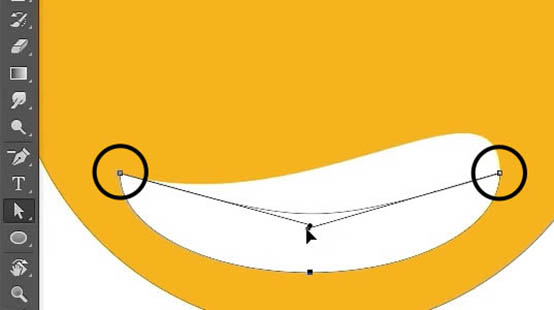
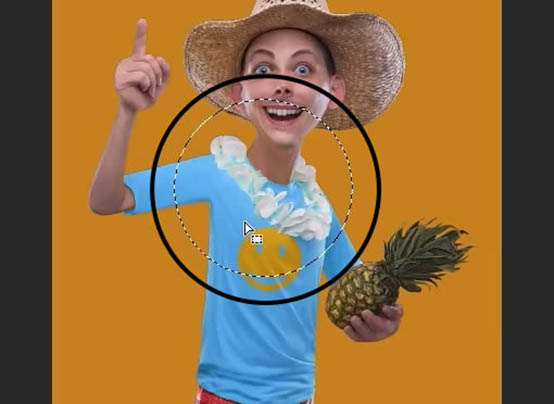
64、添加微笑的时刻来了。把左节点的上部端点移到嘴巴的中部底下,使之呈现出笑容。
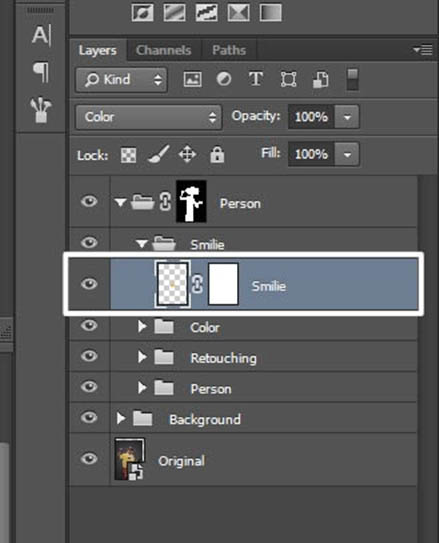
65、把笑脸移到人物的文件里。并重命名,然后单独编组。
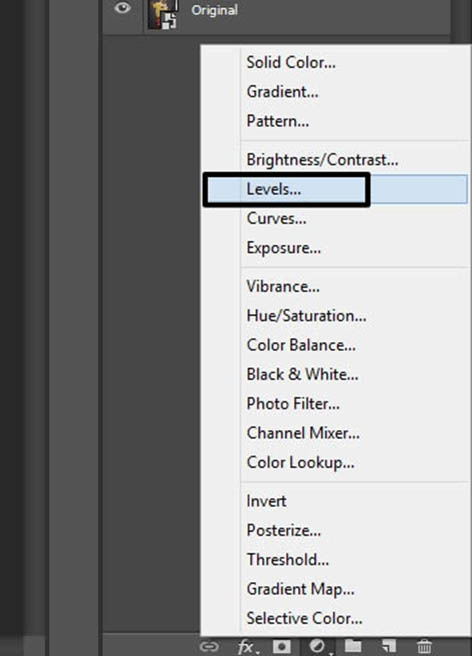
66、右击该图层,选择Rasterize Layer。
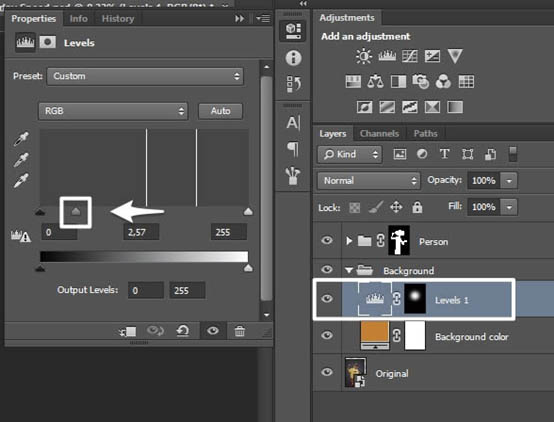
67、使用移动工具将头像移到合适的位置,并调整其大小。改变图层的叠加模式为Color。
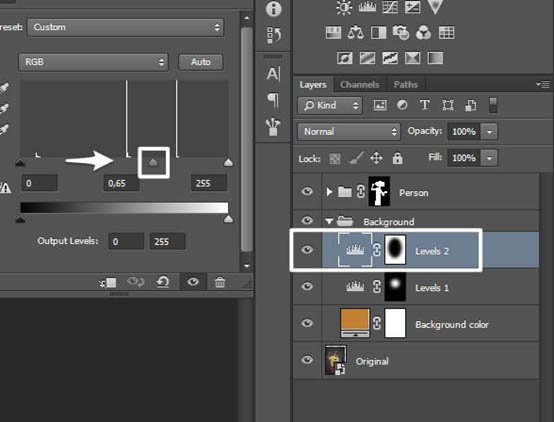
68、让我们把它修饰得更逼真一点。选择涂抹工具Smudge Tool。
69、嗯,把花朵上的黄色抹掉。

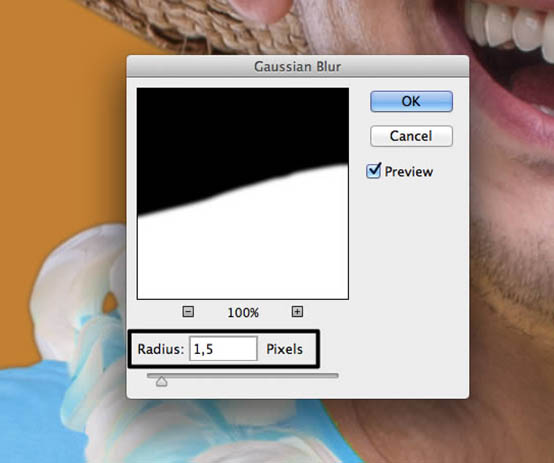
70、改变背景颜色。我使用的是#bf8213。
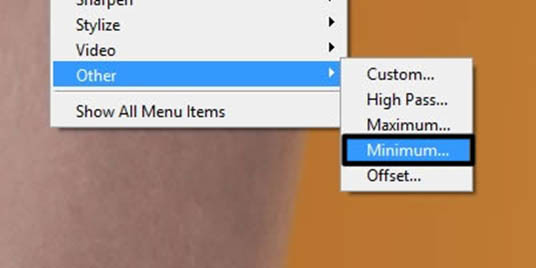
71、选择椭圆选择工具Elliptical Marquee Tool选中背景的一部分。
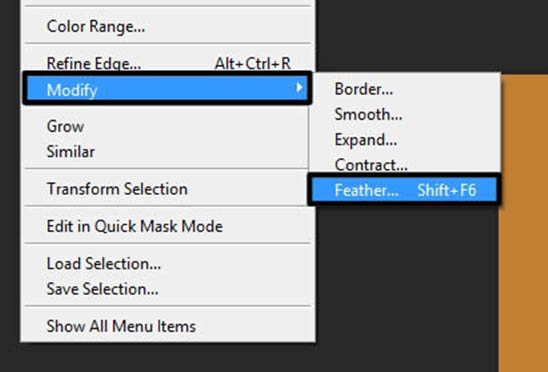
72、羽化400px。(Select > Modify > Feather)。
73、新建色阶调整图层。
74、设置如下。数值改为2.57。
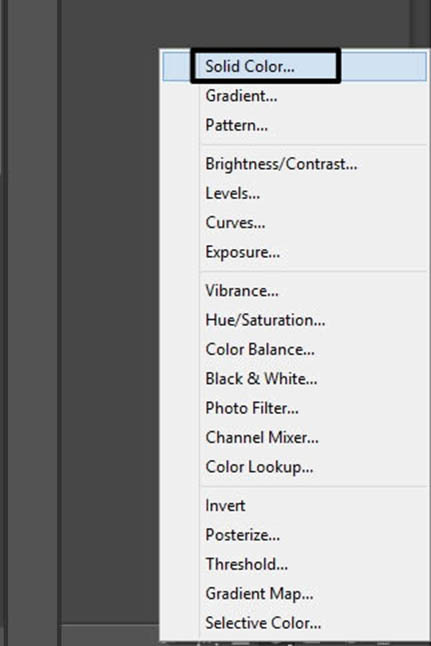
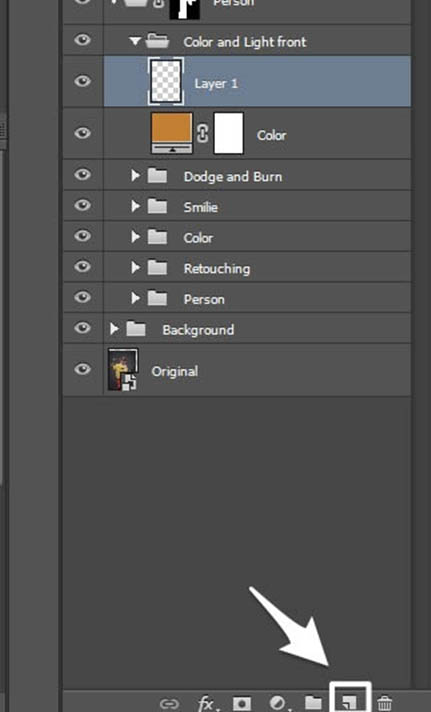
75、再次选择一长椭圆,相对刚才那个大一点点,继续羽化,数值也增大一点。我用500px。接下来CMD/CTRL + I反选之,嗯,新建调整图层levels,数值改为0.65。
76、是的,当你以100%的模式观看这幅图像时,你会发现在边缘有很多很脏的细节。So~我们必须选中人物蒙版作进一步的处理。

77、执行高斯模糊”Filter > Blur > Gaussian Blur”,半径1.5px。
78、接下来执行”Filter > Other > Minimum”,2.5px。
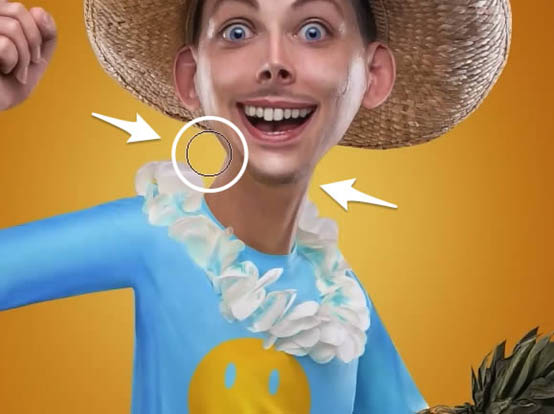
79、新建编组Dodge and Burn,执行”Layer > New > Laye”在该组下新建图层”Dodge and Burn Hard”,使用50%的叠加模式。

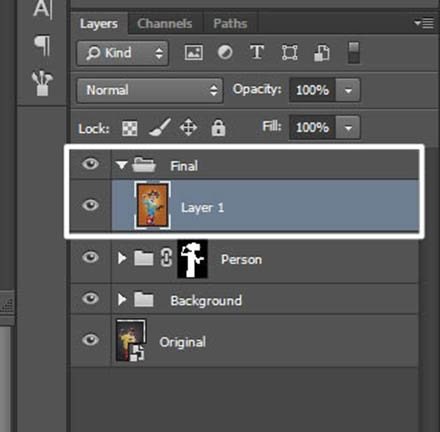
80、使用画笔工具,不透明度该为2%,前景色设置为白色。在人物的高光部分添加白色,阴影部分添加黑色:)。
81、再添加一个图层,不过叠加模式改为柔光”Soft Light”,使用画笔添加高亮部分。

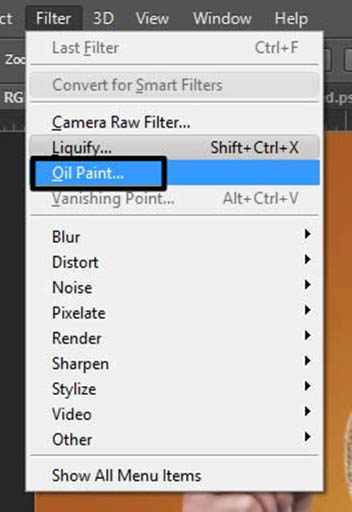
82、新建编组”Color and Light Front”,然后新建调整图层”Solid Color”。
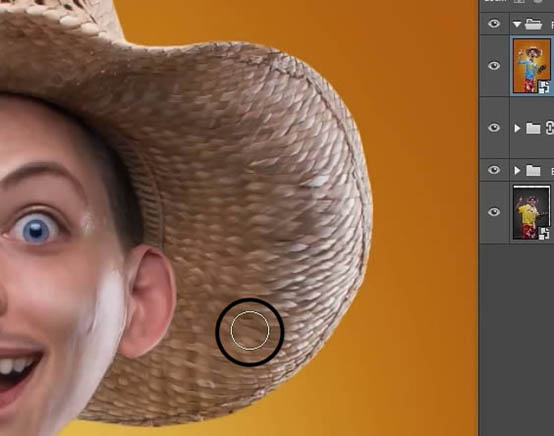
83、填充颜色 “#bf8213 ”。
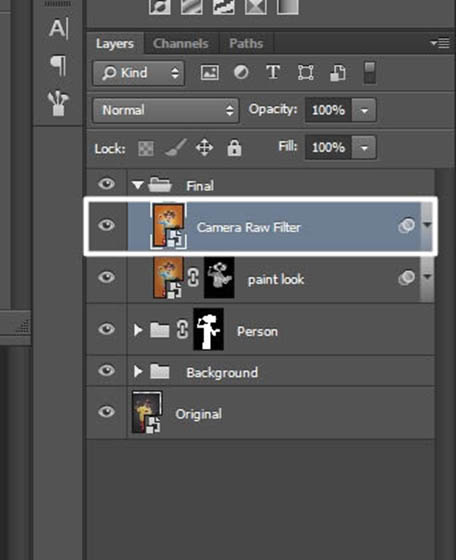
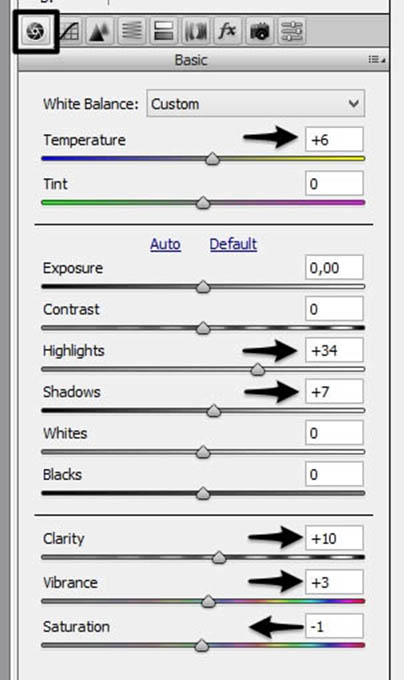
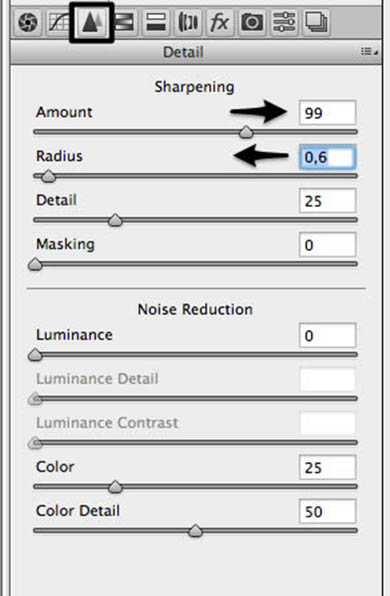
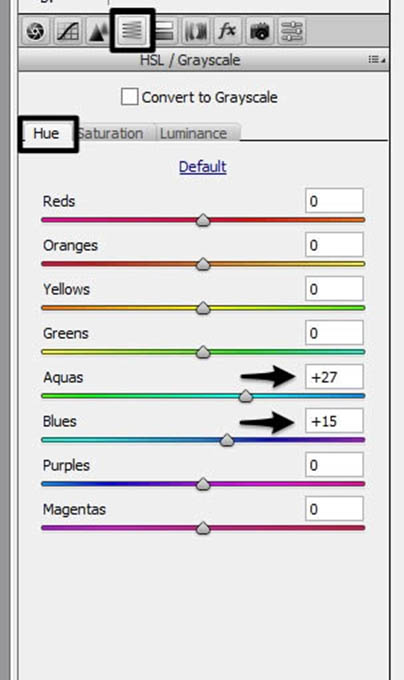
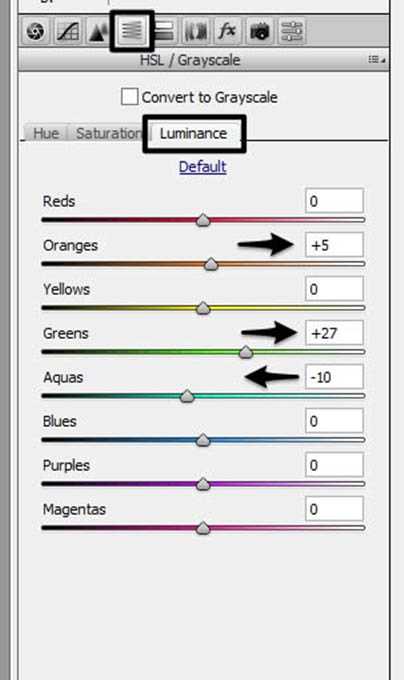
84、非常重要的一点就是人物和背景必须融为一体。所以我们把这图层的叠加模式改为”Color”,并且不透明度改为5%。

85、新建一个图层。
86、给这个图层命名为”light”,使用白色画笔工具,低不透明度(3%左右)给人物的脖子上光,创建一种光线照射的效果。
87、创建一个新组,命名为”Final”,CMD/CTRL + SHIFT + ALT + E盖印所有图层。
88、命名为其为”Paint Look”,并转换为智能对象。

89、执行”Filter > Oil Paint”(油画)滤镜。

90、添加一层蒙版然后CMD/CTRL + I转化。现在前景色改为白色,利用画笔工具涂抹角色,在适当的位置涂抹出油画的效果。改变画笔的不透明度可以调整油画效果的程度。
91、最后一节了少年:CMD/CTRL + SHIFT + ALT + E盖印所有图层!重命名为”Camera Raw Filter”!转化为智能对象(Filter > Convert for Smart Filter)。
92、执行”Filter > Camera Raw Filter”,设置如下。

最终效果:
制作漫画效果的教程很多,一般分为3个大的步骤:首先微调及简化图片;然后用液化滤镜变形处理,把人物表情刻画夸张;最后细化高光及暗部,并用滤镜等增加手绘纹理即可。
原图

最终效果

1、打开素材图片,微调一下颜色。
你懂的,我们最终的目的是要使整个肖像有夸张的身体和头部对比(头大身小),所以我们需要给头部腾出一些额外的空间。为了实现这一目标,请在工具栏中选择裁剪工具。

2、扩大我们的画布吧。

3、选中椭圆选框工具(M)。

4、按下shift+alt键,从人的右眼靠鼻子一端的眼角开始选择一个大大圆形(包住人头和脖子,如下),按下ctrl+J键复制一图层,并命名为”head”。

5、好戏来了!选择移动工具(V)。

6、Ctrl+T,把锚点移到脖子往下一点点衣领处,同时按住shift+alt键——把头部拉大。

7、给该图层添加图层蒙版。

8、选择画笔工具(B),调整参数,按下D还原面板的前景色和背景色,用这支画笔擦除放大后头部周边没用的部分。


9、按下CMD/CTRL + SHIFT + ALT + E 盖印图层,执行”Filter > Convert for Smart Filters”使用智能滤镜,接着执行”Filter > Liquify” 打开液化面板。

10、选择向前变形工具(W)。

11、你可以看到在我的设置里,我用一个大的笔刷。当然使用过程中你可以通过按下”["、" ] “调整笔刷的大小。

12、点击你想改变大小的区域,通过拖动画笔使人物的身体变瘦变小、头部变大、脖子变细(要么瘦要么死!)、嘴巴变大(笑得越夸张越好!)。

13、如果你想保护图像的某些部分不变形(比如这个美味的菠萝),那么请选择冻结蒙版工具。

14、现在你可以给这个菠萝添加蒙版了。

15、再次点击向前变形工具继续修改,现在这菠萝是不会变形了。

16、终于把这个人物给变成卡通小人啦。

17、这图层一多啊,就得给它们编组,不然会乱了秩序哦。

18、点击钢笔工具(P),这家伙很适合抠图撒。

19、慢慢地、一步一步地把整个人物抠出来,或许这需要花费比较多的时间和精力,但是没有艰辛的付出哪里来巨大的收获呀。

20、扣完图像,在Person编组上再次创建编组,命名为Person,回到画布,右击鼠标选择创建选区,然后点击添加蒙版按钮,出现如下图层。

21、执行”Layer > New Fill Layer > Solid Color”。

22、我这里使用灰色(#494949)填充,你也可以填充你喜欢的颜色。

23、非常重要的一点是颜色填充图层必须在人物图层的下方,你看,编组还是有很大的好处的:)。

24、点击套索工具(L)。

25、选中Shape 图层。

26、使用套索工具选择帽子上编织的柳条部分,按下ctrl+J复制一个新的图层。


27、给它重命名为润色层吧(Retouching),要知道对图层的正确命名可以更快地找到它们。

28、选择移动工具(V)按下ctrl+T并水平翻转该图层,移动使之镜像于刚才的小洞。

29、使用橡皮擦工具(E)擦除多余的部分使之融合于帽子。

30、嘿,还没完呢!现在要给皮肤做一些润色~点击污点修复工具(J)之下的修复画笔工具Healing Brush Tool。

31、按住alt键吸取污点附近的健康肤色,然后用该柔软的画笔点掉这些污点。又是一个慢工细活的差事,要有耐心哦~如果你点了好多次都没有反应,大概是按下alt时没有吸取到润色层的颜色。所以你可以来回切换图层选中项吸取颜色然后修复。

32、举个栗子 修复前vs修复后。

33、现在要用到 Natalia Taffarel技术了.。许多人使用它精细修复图像。 我们把图像分为两个部分: 颜色和细节(color and details). 这样子会使图像调节更精细。开始吧。
CMD/CTRL + SHIFT + ALT + E 盖印图层,命名为”Color”,CMD/CTRL + J复制一层,命名为Details。将这两个图层单独编组到”Frequency Separation”里。

34、选择Color图层,使用高斯模糊,半径为10px。


35、选中Details图层,执行”图像 > 调整 > 亮度/对比度”。


36、执行”Filter > Other > High Pass”,半径10px。

37、改变图层的叠加模式为线性光Linear Light。

38、选择仿制图章工具Clone Stamp Tool(S)。

39、确保样本选项选择的是当前图层。

40、现在来移除T恤上的那些字体。可能需要花费一些时间。

41、结果就是这样的。可能会有点模糊,但是没有关系,后面我们还要变个魔术。

42、在Details图层和Color图层之间新建一个”Margic”图层。

43、用吸管工具吸取T恤衫上的一个黄色。接着选择画笔工具,调整不透明度为20%,在刚才移除打印字体的地方涂抹。你会发现字体不见了,被黄色取代了。而且,黄色融合于T恤衫里面。如果感觉不满意,还可以继续执行刚才防止图章工具的步骤,你也可以改变画笔的不透明度来是效果更完美。

44、选择多边形套索工具Polygonal Lasso Tool。

45、绕着T恤衫绕一圈。不需要太精确。

46、添加一个色相/饱和度调整图层”hue/saturation”,应用选择黄色,并选择吸管工具eyedropper tool。

47、改变色相值为155.看吧,衣服的颜色变为蓝色了。

48、或许你会在衣服的边缘看到一些琐碎的黄色。如何是好?稍微调节一下那色带上小小的指标。如果还是没办法解决,你可以用遮罩。

49、在工具栏的末尾处选择以快速蒙版模式编辑”edit in quick mask mode”,接着用画笔工具涂抹牙齿。

50、不需要太精细哦~涂抹完再次点击这个蒙版工具,嗯,牙齿被选中了。

51、为了改变牙齿的颜色,我们需要再次添加色相/饱和度调整图层。

52、设置如下,嗯,牙齿变白了。

53、眼睛呢我也是使用同样的调整方式。选中瞳孔,添加Selective Color(可选颜色)调整图层,选择中性色,按照下图改变颜色。

54、为了使眼珠变亮,我们需要改变这一调整图层的叠加模式为Linear Dodge(线性减淡),不透明度改为20%~30%。

55、这一小节我们的最后一步就是给这个帽子添加”活泼的、悦动的”效果。所以选中它吧。

56、添加Vibrance(自然饱和度)调整图层,数据调整如下。

57、最后一步,调整图层的叠加模式和不透明度。

58、新建一个文件。

59、改变前景色为黄色。我用#f1b500,接下来选中椭圆工具。

60、创建一个圆。填充黄色。无描边。对齐背景到正中央。接着CMD/CTRL + R 打开标尺,为我们的眼睛拉几条辅助线。

61、使用椭圆工具按住alt键移除眼睛的黄色部分。

62、还有嘴巴也是。

63、选择Delete Anchor Point Tool(删除锚点工具)移除嘴巴的顶点。

64、添加微笑的时刻来了。把左节点的上部端点移到嘴巴的中部底下,使之呈现出笑容。

65、把笑脸移到人物的文件里。并重命名,然后单独编组。

66、右击该图层,选择Rasterize Layer。

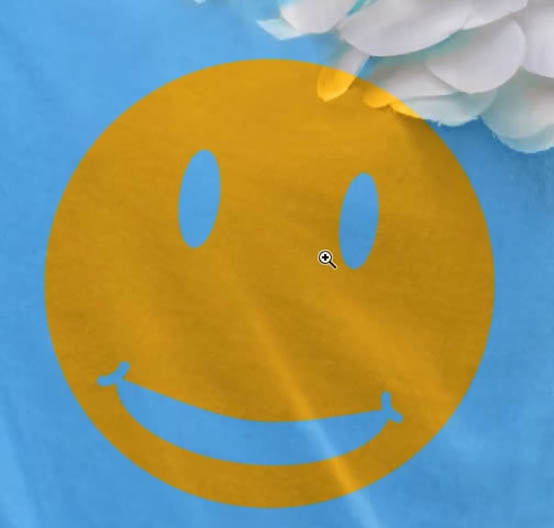
67、使用移动工具将头像移到合适的位置,并调整其大小。改变图层的叠加模式为Color。

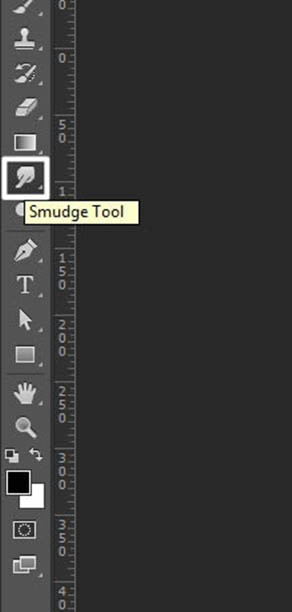
68、让我们把它修饰得更逼真一点。选择涂抹工具Smudge Tool。

69、嗯,把花朵上的黄色抹掉。

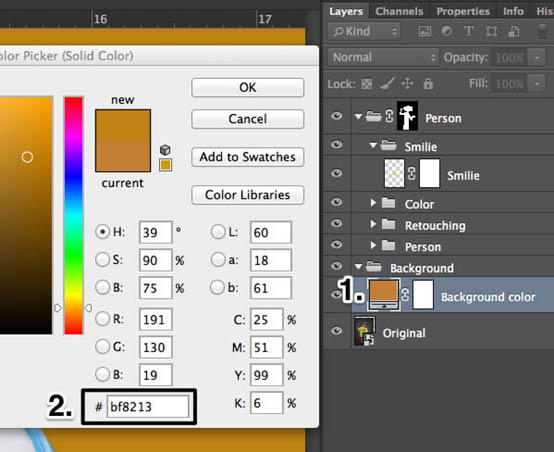
70、改变背景颜色。我使用的是#bf8213。

71、选择椭圆选择工具Elliptical Marquee Tool选中背景的一部分。

72、羽化400px。(Select > Modify > Feather)。

73、新建色阶调整图层。

74、设置如下。数值改为2.57。

75、再次选择一长椭圆,相对刚才那个大一点点,继续羽化,数值也增大一点。我用500px。接下来CMD/CTRL + I反选之,嗯,新建调整图层levels,数值改为0.65。

76、是的,当你以100%的模式观看这幅图像时,你会发现在边缘有很多很脏的细节。So~我们必须选中人物蒙版作进一步的处理。

77、执行高斯模糊”Filter > Blur > Gaussian Blur”,半径1.5px。

78、接下来执行”Filter > Other > Minimum”,2.5px。

79、新建编组Dodge and Burn,执行”Layer > New > Laye”在该组下新建图层”Dodge and Burn Hard”,使用50%的叠加模式。

80、使用画笔工具,不透明度该为2%,前景色设置为白色。在人物的高光部分添加白色,阴影部分添加黑色:)。

81、再添加一个图层,不过叠加模式改为柔光”Soft Light”,使用画笔添加高亮部分。

82、新建编组”Color and Light Front”,然后新建调整图层”Solid Color”。

83、填充颜色 “#bf8213 ”。

84、非常重要的一点就是人物和背景必须融为一体。所以我们把这图层的叠加模式改为”Color”,并且不透明度改为5%。

85、新建一个图层。

86、给这个图层命名为”light”,使用白色画笔工具,低不透明度(3%左右)给人物的脖子上光,创建一种光线照射的效果。

87、创建一个新组,命名为”Final”,CMD/CTRL + SHIFT + ALT + E盖印所有图层。

88、命名为其为”Paint Look”,并转换为智能对象。

89、执行”Filter > Oil Paint”(油画)滤镜。


90、添加一层蒙版然后CMD/CTRL + I转化。现在前景色改为白色,利用画笔工具涂抹角色,在适当的位置涂抹出油画的效果。改变画笔的不透明度可以调整油画效果的程度。

91、最后一节了少年:CMD/CTRL + SHIFT + ALT + E盖印所有图层!重命名为”Camera Raw Filter”!转化为智能对象(Filter > Convert for Smart Filter)。

92、执行”Filter > Camera Raw Filter”,设置如下。


最终效果: