
Golang实现自己的Redis数据库内存实例探究
作者:绍纳 nullbody笔记
引言
用11篇文章实现一个可用的Redis服务,姑且叫EasyRedis吧,希望通过文章将Redis掰开撕碎了呈现给大家,而不是仅仅停留在八股文的层面,并且有非常爽的感觉,欢迎持续关注学习。
[x] easyredis之TCP服务
[x] easyredis之网络请求序列化协议(RESP)
[x] easyredis之内存数据库
[ ] easyredis之过期时间 (时间轮实现)
[ ] easyredis之持久化 (AOF实现)
[ ] easyredis之发布订阅功能
[ ] easyredis之有序集合(跳表实现)
[ ] easyredis之 pipeline 客户端实现
[ ] easyredis之事务(原子性/回滚)
[ ] easyredis之连接池
[ ] easyredis之分布式集群存储
EasyRedis之内存数据库篇
上篇文章已经可以解析出Redis serialization protocol,本篇基于解析出来的命令,进行代码处理过程: 这里以5个常用命令作为本篇文章的切入口: 命令官方文档 https://redis.io/commands
# ping服务器
PING [message]
# 授权密码设置
AUTH <password>
# 选择数据库
SELECT index
# 设置key
SET key value [NX | XX]  [EX seconds | PX milliseconds]
# 获取key
GET key
ping服务器
代码路径: engine/engine.go这个功能算是小试牛刀的小功能,让大家对基本的套路有个简单的认识
// redisCommand 待执行的命令  protocal.Reply 执行结果
func (e *Engine) Exec(c *connection.KeepConnection, redisCommand [][]byte) (result protocal.Reply) {
	 //... 省略...
	commandName := strings.ToLower(string(redisCommand[0]))
	if commandName == "ping" { // https://redis.io/commands/ping/
		return Ping(redisCommand[1:])
	}
	 //... 省略...
}Exec函数就是进行命令处理的总入口函数,通过从协议中解析出来的redisCommand,我们可以提取出命令名commandName变量,然后在Ping(redisCommand[1:])函数中进行逻辑处理。
func Ping(redisArgs [][]byte) protocal.Reply {

	iflen(redisArgs) == 0 { // 不带参数
		return protocal.NewPONGReply()
	} elseiflen(redisArgs) == 1 { // 带参数1个
		return protocal.NewBulkReply(redisArgs[0])
	}
    // 否则,回复命令格式错误
	return protocal.NewArgNumErrReply("ping")
}
Ping函数的本质就是基于PING [message]这个redis命令的基本格式,进行不同的数据响应。
这里建议大家看下Ping命令的文档 https://redis.io/commands/ping/
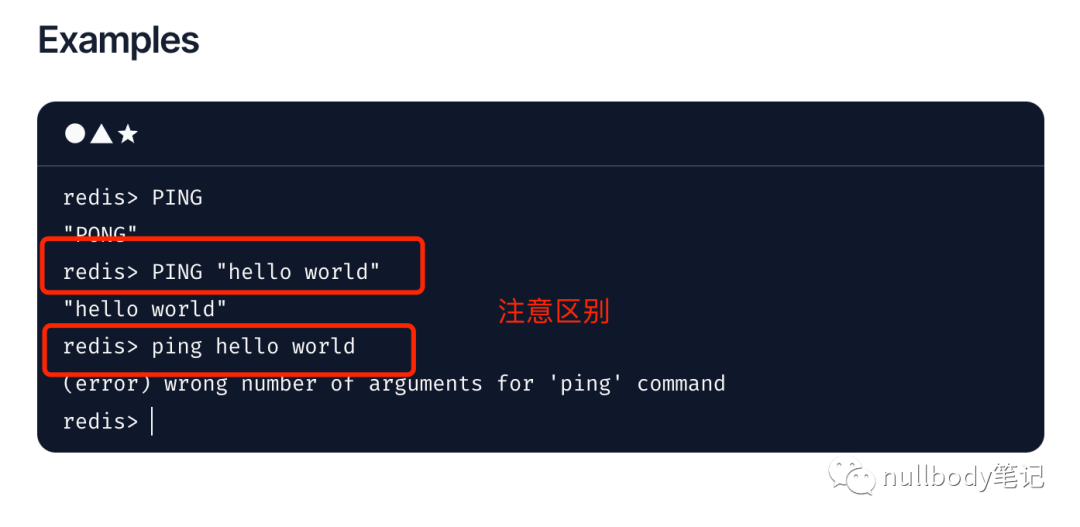
以上图为例
如果是直接的
PING命令,后面不带参数,我们要回复PONG如果带参
"Hello world",我们原样回复Hello world如果带了两个参数
hello和world,直接回复错误。
有了这个处理套路,那么其他的命令也可依葫芦画瓢了。
授权密码设置
启动redis服务的时候,如果有设定需要密码,那么客户端连接上来以后,需要先执行一次 Auth password的授权命令
// redisCommand 待执行的命令  protocal.Reply 执行结果
func (e *Engine) Exec(c *connection.KeepConnection, redisCommand [][]byte) (result protocal.Reply) {

	//... 省略...
	commandName := strings.ToLower(string(redisCommand[0]))
	if commandName == "auth" {
		return Auth(c, redisCommand[1:])
	}
	// 校验密码
	if !checkPasswd(c) {
		return protocal.NewGenericErrReply("Authentication required")
	}

	//... 省略...
}
服务器接收到命令后,依据commandName的变量值为auth,则执行 Auth(c, redisCommand[1:])函数
func Auth(c *connection.KeepConnection, redisArgs [][]byte) protocal.Reply {
	iflen(redisArgs) != 1 {
		return protocal.NewArgNumErrReply("auth")
	}

	if conf.GlobalConfig.RequirePass == "" {
		return protocal.NewGenericErrReply("No authorization is required")
	}

	password := string(redisArgs[0])
	if conf.GlobalConfig.RequirePass != password {
		return protocal.NewGenericErrReply("Auth failed, password is wrong")
	}

	c.SetPassword(password)
	return protocal.NewOkReply()
}
这里的解析过程我们是按照 AUTH <password>这个命令格式进行解析,解析出来密码以后,我们需要将密码保存在c *connection.KeepConnection对象的成员变量中。这里就类似session的原理,存储以后,当前连接接下来的命令就不需要继续带上密码了。在每次处理其他命令之前,校验下当前连接的密码是否有效:
func checkPasswd(c *connection.KeepConnection) bool {
	// 如果没有配置密码
	if conf.GlobalConfig.RequirePass == "" {
		returntrue
	}
	// 密码是否一致
	return c.GetPassword() == conf.GlobalConfig.RequirePass
}
选择数据库
这个命令虽然用的比较少,但是这个涉及到服务端结构的设计。redis的服务端是支持多个数据库,每个数据库就是一个CRUD的基本存储单元,不同的数据库(存储单元)之间的数据是不共享的。默认情况下,我们使用的都是select 0数据库。
代码结构如下图:(这个图很重要,配合代码好好理解下)
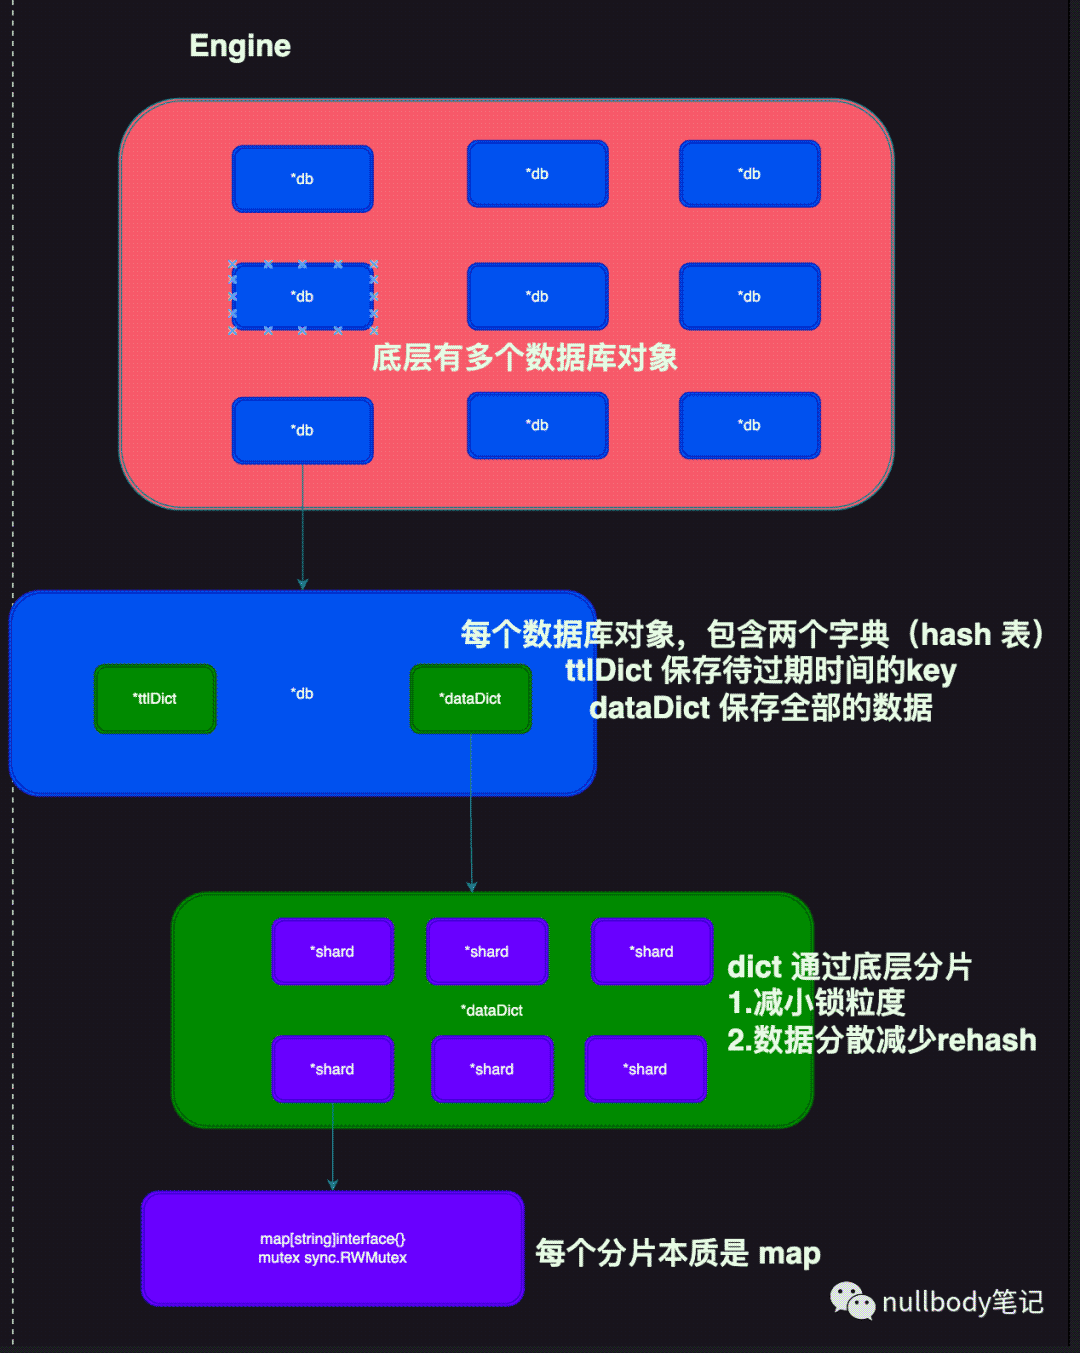
我们需要在Engine结构体中创建多个 *DB对象
func NewEngine() *Engine {
	engine := &Engine{}
	// 多个dbSet
	engine.dbSet = make([]*atomic.Value, conf.GlobalConfig.Databases)
	for i := 0; i < conf.GlobalConfig.Databases; i++ {
		// 创建 *db
		db := newDB()
		db.SetIndex(i)
		// 保存到 atomic.Value中
		dbset := &atomic.Value{}
		dbset.Store(db)
		// 赋值到 dbSet中
		engine.dbSet[i] = dbset
	}
	return engine
}
在用户端发送来 select index 命令,服务端需要记录下来当前连接选中的数据库索引
// redisCommand 待执行的命令  protocal.Reply 执行结果
func (e *Engine) Exec(c *connection.KeepConnection, redisCommand [][]byte) (result protocal.Reply) {
	//....忽略....
	// 基础命令
	switch commandName {
	case"select": // 表示当前连接,要选中哪个db https://redis.io/commands/select/
		return execSelect(c, redisCommand[1:])
	}
	//....忽略....
}
// 这里会对 选中的索引 越界的判断,如果一切都正常,就保存到 c *connection.KeepConnection 连接的成员变量 index
func execSelect(c *connection.KeepConnection, redisArgs [][]byte) protocal.Reply {
	iflen(redisArgs) != 1 {
		return protocal.NewArgNumErrReply("select")
	}
	dbIndex, err := strconv.ParseInt(string(redisArgs[0]), 10, 64)
	if err != nil {
		return protocal.NewGenericErrReply("invaild db index")
	}
	if dbIndex < 0 || dbIndex >= int64(conf.GlobalConfig.Databases) {
		return protocal.NewGenericErrReply("db index out of range")
	}
	c.SetDBIndex(int(dbIndex))
	return protocal.NewOkReply()
}
设置key
在用户要求执行 set key value命令的时候,我们需要先选中执行功能*DB对象,就是上面的select index命令要求选中的对象,默认是0号
// redisCommand 待执行的命令  protocal.Reply 执行结果
func (e *Engine) Exec(c *connection.KeepConnection, redisCommand [][]byte) (result protocal.Reply) {

	//....忽略....

	// redis 命令处理
	dbIndex := c.GetDBIndex()
	logger.Debugf("db index:%d", dbIndex)
	db, errReply := e.selectDB(dbIndex)
	if errReply != nil {
		return errReply
	}
	return db.Exec(c, redisCommand)
}
可以看到,最终代码执行execNormalCommand函数,该函数会从命令注册中心获取命令的执行函数
func (db *DB) Exec(c *connection.KeepConnection, redisCommand [][]byte) protocal.Reply {
	return db.execNormalCommand(c, redisCommand)
}
func (db *DB) execNormalCommand(c *connection.KeepConnection, redisCommand [][]byte) protocal.Reply {
	cmdName := strings.ToLower(string(redisCommand[0]))
	// 从命令注册中心,获取命令的执行函数
	command, ok := commandCenter[cmdName]
	if !ok {
		return protocal.NewGenericErrReply("unknown command '" + cmdName + "'")
	}
	fun := command.execFunc
	return fun(db, redisCommand[1:])
}
最终 set命令的实际执行函数代码路径为engine/string.go中的func cmdSet(db *DB, args [][]byte) protocal.Reply函数。代码的的本质其实还是解析字符串,按照官方文档https://redis.io/commands/set/ 要求的格式获取对应的参数,执行数据的存储db.PutEntity(key, &entity)。
func (db *DB) PutEntity(key string, entity *payload.DataEntity) int {
	return db.dataDict.Put(key, entity)
}
dataDict是*ConcurrentDict类型的并发安全的字典
// 并发安全的字典
type ConcurrentDict struct {
	shds  []*shard      // 底层shard切片
	mask  uint32// 掩码
	count *atomic.Int32 // 元素个数
}
ConcurrentDict通过分片的模式,将数据分散在不同的*shard对象中,shard的本质就是map+读写锁mu
type shard struct {
	m  map[string]interface{}
	mu sync.RWMutex
}
所以内存数据库的本质就是操作map
key就是
set命令的keyvalue我们额外包装了一个DataEntity对象,将实际的值保存在RedisObject
type DataEntity struct {
	RedisObject interface{} // 字符串 跳表 链表 quicklist 集合 etc...
}
代码中已经注释的很清晰,建议直接看代码
获取key
代码只是额外多调用了几层函数,本质就是调用db.dataDict.Get(key) 函数,其实又是*ConcurrentDict,代码可能感觉有点绕,把上面的代码结构图好好理解一下。
func cmdGet(db *DB, args [][]byte) protocal.Reply {
iflen(args) != 1 {
return protocal.NewSyntaxErrReply()
}
key := string(args[0])
bytes, reply := db.getStringObject(key)
if reply != nil {
return reply
}
return protocal.NewBulkReply(bytes)
}
// 获取底层存储对象【字节流】
func (db *DB) getStringObject(key string) ([]byte, protocal.Reply) {
payload, exist := db.GetEntity(key)
if !exist {
returnnil, protocal.NewNullBulkReply()
}
// 判断底层对象是否为【字节流】
bytes, ok := payload.RedisObject.([]byte)
if !ok {
returnnil, protocal.NewWrongTypeErrReply()
}
return bytes, nil
}
// 获取内存中的数据
func (db *DB) GetEntity(key string) (*payload.DataEntity, bool) {
// key 不存在
val, exist := db.dataDict.Get(key)
if !exist {
returnnil, false
}
dataEntity, ok := val.(*payload.DataEntity)
if !ok {
returnnil, false
}
return dataEntity, true
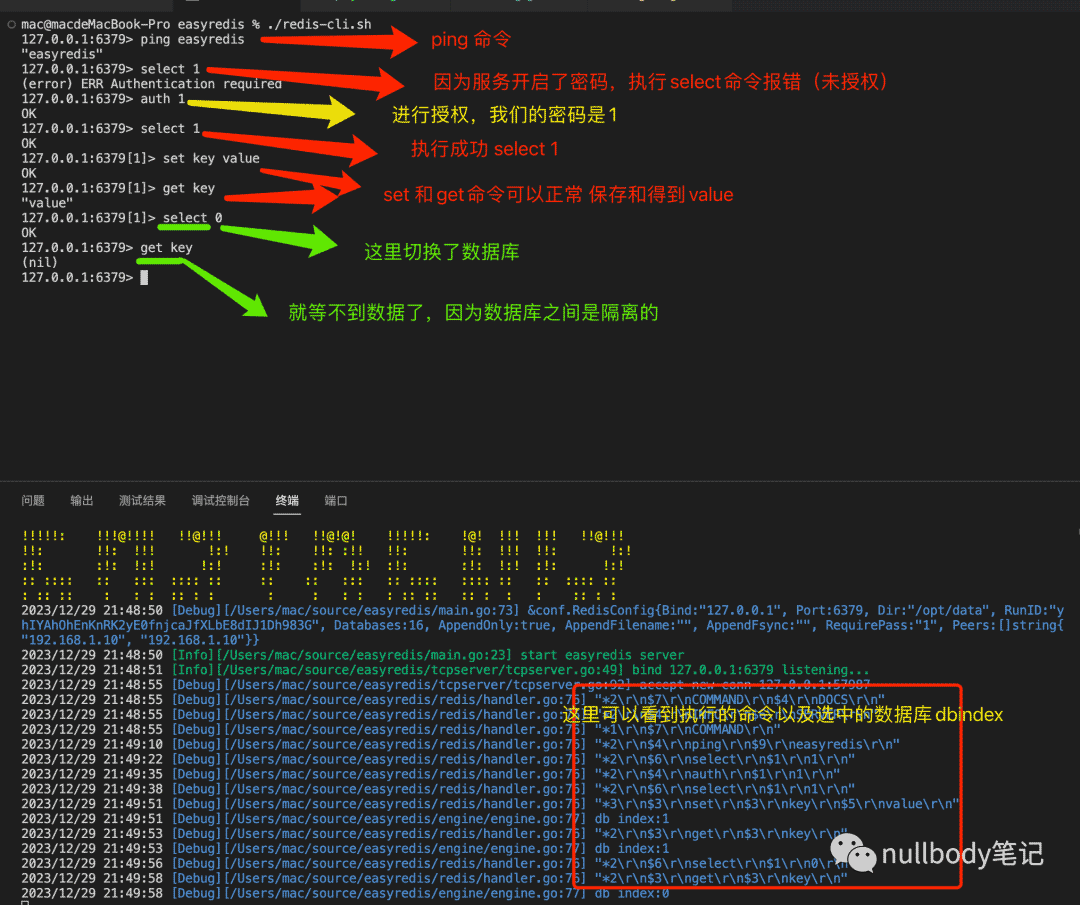
}效果演示
项目代码地址: https://github.com/gofish2020/easyredis
以上就是Golang实现自己的Redis数据库内存实例探究的详细内容,更多关于Golang Redis数据库内存的资料请关注脚本之家其它相关文章!