
基于Vue3实现一个简历生成工具
作者:khalil
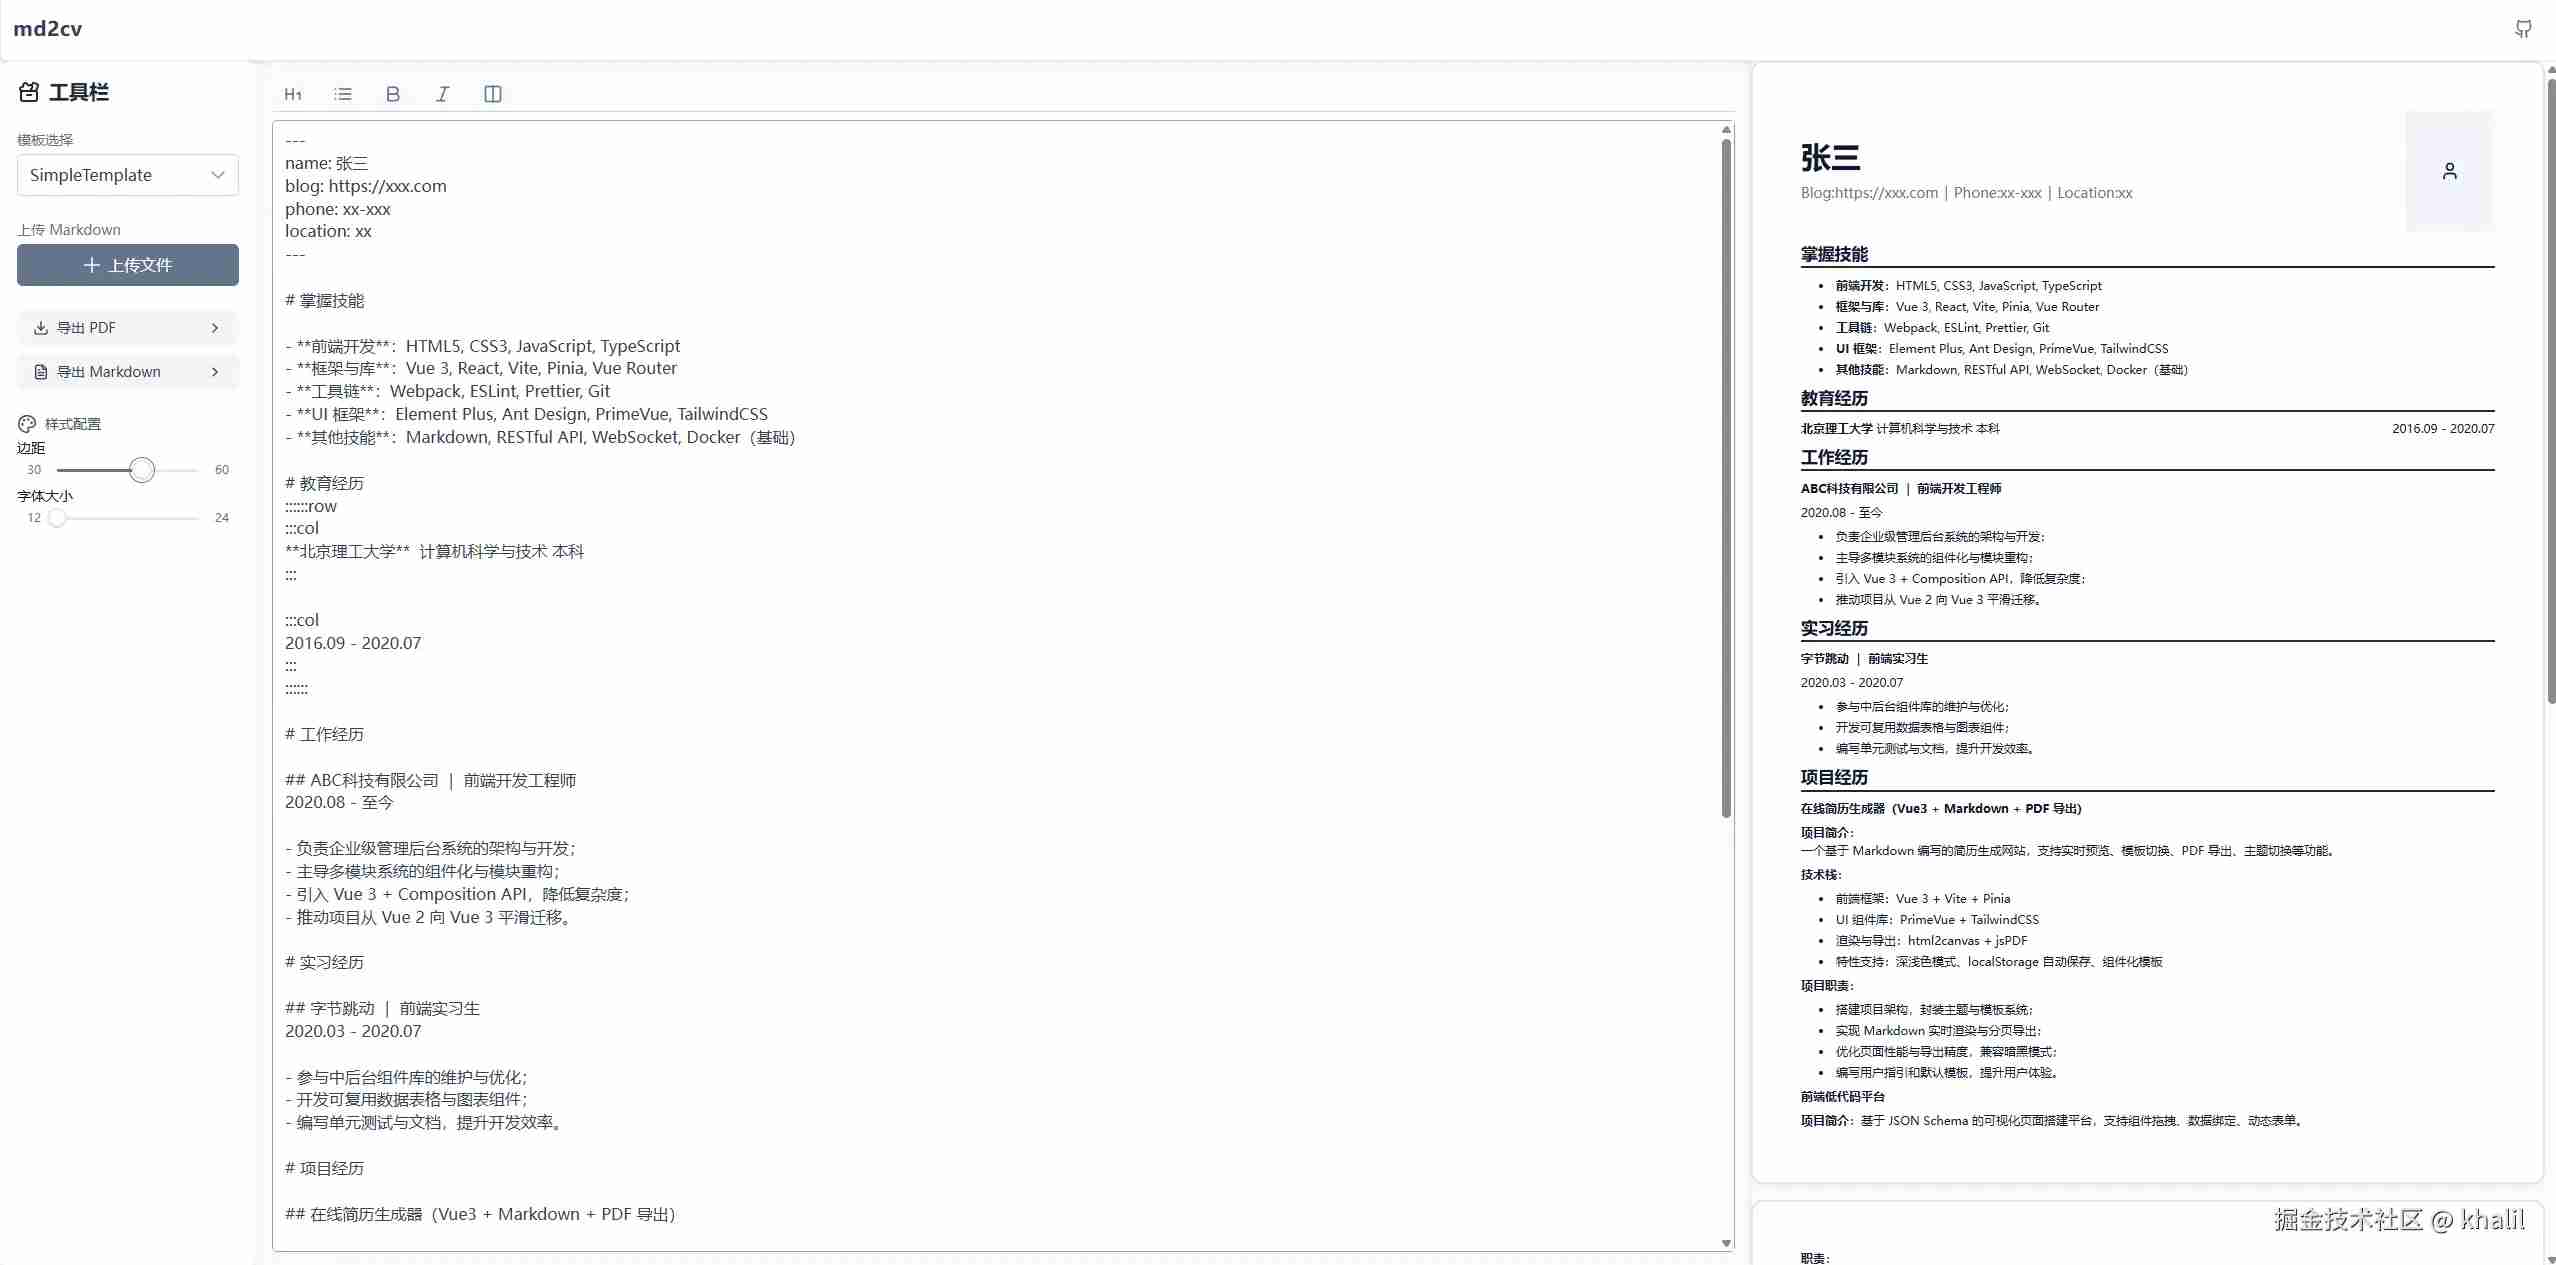
项目介绍
之前在做个人简历的时候,发现目前一些工具网站上使用起来不太方便,于是打算动手简单实现一个在线的简历工具网站,主要支持以下功能:
- 支持以markdown格式输入,渲染成简历内容
- 多模板切换
- 样式调整
- 上传导出功能
体验地址: hj-hao.github.io/md2cv/
技术选型
项目整体技术栈如下:
- 框架: Vue 3
- 构建:Vite
- 项目UI: PrimeVue + TailwindCSS
- 状态管理: Pinia
- Markdown处理:Markdown-it + gray-matter
功能实现
接下来简单介绍下具体的功能实现
Markdown解析&渲染
首先要处理的就是对输入Markdown的解析。由于需要将内容渲染在内置的模板简历中,这里就只需要MD -> HTML的能力,因此选用了Markdown-it进行实现。拿到html字符串后在vue中直接渲染即可。
<template>
    <div v-html="result"></div>
</template>

<script setup>
import { ref, computed } from 'vue'
import markdownit from 'markdown-it'
const md = markdownit({
    html: true,
})
const input = ref('')
const result = computed(() => md.render(input))
</script>
上面这段简易的代码就能支持将用户输入文本,转换成html了。
在这个基础上如果希望增加一些前置元数据的配置,类似在Vitepress中我们可以在MD前用YAML语法编写一些配置。可以使用gray-matter这个库,能通过分割符将识别解析文本字符串中的YAML格式信息。
此处用官方的例子直接展示用法, 可以看到其将输入中的YAML部分转换为对象返回,而其余部分则保持输入直接输出。
console.log(matter('---\ntitle: Front Matter\n---\nThis is content.'));

// 输出
{
  content: '\nThis is content.',
  data: {
    title: 'Front Matter'
  }
}
在这个项目中,就通过这个库将简历个人信息(YAML)和简历正本部分(MD)整合在同一个输入框中编辑了,具体的实现如下:
<template>
    <div v-html="result.content"></div>
</template>

<script setup>
import { ref, computed } from 'vue'
import matter from 'gray-matter'
import markdownit from 'markdown-it'
const md = markdownit({
    html: true,
})
const input = ref('')
const result = computed(() => {
    // 解析yaml
    const { data, content } = matter(input.value)
    return {
        data,
        content: md.render(content),
    }
})
</script>
模板功能
模板实现
之后是将上面解析后的内容渲染到简历模板上,以及可以在不同模板间直接切换实时渲染出对应的效果。
实现上每个模板都是一个单独的组件,UI由两部分组件一个是简历模板个人信息以及正文部分,除组件部分外还有模板相关的配置项跟随组件需要导出,因此这里选用JSX/TSX实现简历模板组件。构造一个基础的组件封装公共部分逻辑, 模板间的UI差异通过slot实现
import '@/style/templates/baseTemplate.css'
import { defineComponent } from 'vue'
import { storeToRefs } from 'pinia'
import { useStyleConfigStore } from '@/store/styleConfig'

// base component to reuse in other cv templates
export default defineComponent({
    name: 'BaseTemplate',
    props: {
        content: {
            type: String,
            default: '',
        },
        page: {
            type: Number,
            default: 1,
        },
        className: {
            type: String,
            default: '',
        },
    },
    setup(props, { slots }) {
        // 可支持配置的样式,在基础模板中通过注入css变量让子元素访问
        const { pagePadding, fontSize } = storeToRefs(useStyleConfigStore())
        return () => (
            <div
                class="page flex flex-col"
                style={{
                    '--page-padding': pagePadding.value + 'px',
                    '--page-font-size': fontSize.value + 'px',
                }}
            >
                {/** 渲染不同模板对应的信息模块 */}
                {props.page === 1 && (slots.header ? slots.header() : '')}
                {/** 简历正文部分 */}
                <div
                    class={`${props.className} template-content`}
                    innerHTML={props.content}
                ></div>
            </div>
        )
    },
})
其余模板组件在上面组件的基础上继续扩展,下面是其中一个组件示例
import { defineComponent, computed, type PropType } from 'vue'
import BaseTemplate from '../BaseTemplate'
import ResumeAvatar from '@/components/ResumeAvatar.vue'
import { A4_PAGE_SIZE } from '@/constants'
import '@/style/templates/simpleTemplate.css'

const defaultConfig = {
    name: 'Your Name',
    blog: 'https://yourblog.com',
    phone: '123-456-7890',
    location: 'Your Location',
}

// 模板名(组件名称)
export const name = 'SimpleTemplate'
// 模板样式 类名
const className = 'simple-template-content-box'

// 模板每页的最大高度,用于分页计算
export const getCurrentPageHeight = (page: number) => {
    if (page === 1) {
        return A4_PAGE_SIZE - 130
    }
    return A4_PAGE_SIZE
}

export default defineComponent({
    name: 'SimpleTemplate',
    components: {
        BaseTemplate,
        ResumeAvatar,
    },
    props: {
        config: {
            type: Object as PropType<{ [key: string]: any }>,
            default: () => ({ ...defaultConfig }),
        },
        content: {
            type: String,
            default: '',
        },
        page: {
            type: Number,
            default: 1,
        },
    },
    setup(props) {
        const config = computed(() => {
            return { ...defaultConfig, ...props.config }
        })
        const slots = {
            header: () => (
                <div class="flex relative gap-2.5 mb-2.5 items-center">
                    <div class="flex flex-col flex-1 gap-2">
                        <div class="text-3xl font-bold">
                            {config.value.name}
                        </div>
                        <div class="flex items-center text-sm">
                            <div class="text-gray-500 not-last:after:content-['|'] after:m-1.5">
                                <span>Blog:</span>
                                <a
                                    href="javascript:void(0)" rel="external nofollow"
                                    target="_blank"
                                    rel="noopener noreferrer"
                                >
                                    {config.value.blog}
                                </a>
                            </div>
                            <div class="text-gray-500 not-last:after:content-['|'] after:m-1.5">
                                <span>Phone:</span>
                                {config.value.phone}
                            </div>
                            <div class="text-gray-500 not-last:after:content-['|'] after:m-1.5">
                                <span>Location:</span>
                                {config.value.location}
                            </div>
                        </div>
                    </div>
                    <ResumeAvatar />
                </div>
            ),
        }
        return () => (
            <BaseTemplate
                v-slots={slots}
                page={props.page}
                content={props.content}
                className={className}
            />
        )
    },
})
/** @/style/templates/simpleTemplate.css */
.simple-template-content-box {
    h1 {
        font-size: calc(var(--page-font-size) * 1.4);
        font-weight: bold;
        border-bottom: 2px solid var(--color-zinc-800);
        margin-bottom: 0.5em;
    }


    h2 {
        font-weight: bold;
        margin-bottom: 0.5em;
    }
}
模板加载
完成不同模板组件后,项目需要能自动将这些组件加载到项目中,并将对应的组件信息注入全局。通过Vite提供的import.meta.glob可以在文件系统匹配导入对应的文件,实现一个Vue插件,就能在Vue挂载前加载对应目录下的组件,并通过provide注入。完整代码如下
// plugins/templateLoader.ts
import type { App, Component } from 'vue'

export type TemplateMeta = {
    name: string
    component: Component
    getCurrentPageHeight: (page: number) => number
}

export const TemplateProvideKey = 'Templates'

const templateLoaderPlugin = {
    install(app: App) {
        const componentModules = import.meta.glob(
            '../components/templates/**/index.tsx',
            { eager: true }
        )
        const templates: Record<string, TemplateMeta> = {}

        const getTemplateName = (path: string) => {
            const match = path.match(/templates\/([^/]+)\//)
            return match ? match?.[1] : null
        }

        // path => component Name
        for (const path in componentModules) {
            // eg: ../components/templates/simple/index.vue => simple
            const name = getTemplateName(path)
            if (name) {
                const config = (componentModules as any)[path]
                templates[name] = {
                    component: config.default,
                    name: config.name || name,
                    getCurrentPageHeight: config.getCurrentPageHeight,
                } as TemplateMeta
            }
        }

        app.provide(TemplateProvideKey, templates)
    },
}

export default templateLoaderPlugin
预览分页
有了对应的组件和内容后,就能在页面中将简历渲染出来了。但目前还存在一个问题,如果内容超长了需要分页不能直接体现用户,仅能在导出预览时候进行分页。需要补充上分页的能力,将渲染的效果和导出预览的效果对齐。
整体思路是先将组件渲染在不可见的区域,之后读取对应的dom节点,计算每个子元素的高度和,超过后当前内容最大高度后,新建一页。最后返回每页对应的html字符串,循环模板组件进行渲染。具体代码如下:
import { computed, onMounted, ref, watch, nextTick, type Ref } from 'vue'
import { useTemplateStore } from '@/store/template'
import { useStyleConfigStore } from '@/store/styleConfig'
import { useMarkdownStore } from '@/store/markdown'
import { storeToRefs } from 'pinia'

export const useSlicePage = (target: Ref<HTMLElement | null>) => {
    const { currentConfig, currentTemplate } = storeToRefs(useTemplateStore())
    const { pagePadding, fontSize } = storeToRefs(useStyleConfigStore())

    const { result } = storeToRefs(useMarkdownStore())
    const pages = ref<Element[]>()

    // 每页渲染的html字符串
    const renderList = computed(() => {
        return pages.value?.map((el) => el.innerHTML)
    })

    const pageSize = computed(() => pages.value?.length || 1)

    // 获取当前模板的内容高度,减去边距
    const getCurrentPageHeight = (page: number) => {
        return (
            currentConfig.value.getCurrentPageHeight(page) -
            pagePadding.value * 2
        )
    }

    const createPage = (children: HTMLElement[] = []) => {
        const page = document.createElement('div')
        children.forEach((item) => {
            page.appendChild(item)
        })
        return page
    }

    // getBoundingClientRect 只返回元素的宽度 需要getComputedStyle获取边距
    // 由于元素上下边距合并的特性,此处仅考虑下边距,上边距通过样式限制为0
    const getElementHeightWithBottomMargin = (el: HTMLElement): number => {
        const style = getComputedStyle(el)
        const marginBottom = parseFloat(style.marginBottom || '0')
        const height = el.getBoundingClientRect().height
        return height + marginBottom
    }

    const sliceElement = (element: Element): Element[] => {
        const children = Array.from(element.children)
        let currentPage = 1
        let currentPageElement = createPage()

        // 当前页面可渲染的高度
        let PageSize = getCurrentPageHeight(currentPage)
        // 剩余可渲染高度
        let resetPageHeight = PageSize
        // 页面dom数组
        const pages = [currentPageElement]


        while (children.length > 0) {
            const el = children.shift() as HTMLElement

            const height = getElementHeightWithBottomMargin(el)

            // 大于整页高度,如果包含子节点就直接分隔
            // 无子节点直接放入当页,然后创建新页面
            if (height > PageSize) {
                const subChildren = Array.from(el.children)
                if (subChildren.length > 0) {
                    children.unshift(...subChildren)
                } else {
                    pages.push(
                        createPage([el.cloneNode(true)] as HTMLElement[])
                    ) // Create a new page for the oversized element
                    currentPage += 1
                    PageSize = getCurrentPageHeight(currentPage)
                    resetPageHeight = PageSize
                    currentPageElement = createPage()
                    pages.push(currentPageElement) // Push the new page to the pages array
                }

                continue // Skip to the next element
            }

            // 针对高度大于300的元素且包含子元素的节点进行分隔
            // 无子元素或高度小于300直接创建新页面放入
            if (height > resetPageHeight && height > 300) {
                const subChildren = Array.from(el.children)
                if (subChildren.length > 0) {
                    children.unshift(...subChildren)
                } else {
                    currentPageElement = createPage([
                        el.cloneNode(true),
                    ] as HTMLElement[]) // Create a new page
                    currentPage += 1
                    PageSize = getCurrentPageHeight(currentPage)
                    resetPageHeight = PageSize - height
                    pages.push(currentPageElement) // Push the new page to the pages array
                }
            } else if (height > resetPageHeight && height <= 300) {
                currentPageElement = createPage([
                    el.cloneNode(true),
                ] as HTMLElement[]) // Create a new page
                currentPage += 1
                PageSize = getCurrentPageHeight(currentPage)
                resetPageHeight = PageSize - height
                pages.push(currentPageElement) // Push the new page to the pages array
            } else {
                currentPageElement.appendChild(
                    el.cloneNode(true) as HTMLElement
                )
                resetPageHeight -= height
            }
        }

        return pages
    }

    const getSlicePage = () => {
        const targetElement = target.value?.querySelector(`.template-content`)
        const newPages = sliceElement(targetElement!)
        pages.value = newPages
    }

    watch(
        () => [
            result.value,
            currentTemplate.value,
            pagePadding.value,
            fontSize.value,
        ],
        () => {
            nextTick(() => {
                getSlicePage()
            })
        }
    )

    onMounted(() => {
        nextTick(() => {
            getSlicePage()
        })
    })

    return {
        getSlicePage,
        pages,
        pageSize,
        renderList,
    }
}
<!-- 实际展示容器 -->
<div
    class="bg-white dark:bg-surface-800 rounded-lg shadow-md overflow-auto"
    ref="previewRef"
>
    <component
        v-for="(content, index) in renderList"
        :key="index"
        :is="currentComponent"
        :config="result.data"
        :content="content"
        :page="index + 1"
    />
</div>

<!-- 隐藏的容器 -->
<div ref="renderRef" class="render-area">
    <component
        :is="currentComponent"
        :config="result.data"
        :content="result.content"
    />
</div>
<script setup>
// 省略其他代码
const renderRef = ref<HTMLElement | null>(null)
const previewRef = ref<HTMLElement | null>(null)

const mdStore = useMarkdownStore()
const templateStore = useTemplateStore()

const { result, input } = storeToRefs(mdStore)
const { currentComponent } = storeToRefs(templateStore)
const { renderList } = useSlicePage(renderRef)
</script>
上面的代码目前还存在一些边界场景分页问题比如:
- 一个仅包含文本的P或者DIV节点,目前这个节点不会被分割,而是整体处理,导致可能会出现一个高度刚好超过剩余高度的节点被放置在下一页造成大块的空白
- 分割的阈值设置的比较大,而且没有针对一些特殊元素(ol, table...)做判断处理
最后
以上就是基于Vue3实现一个简历生成工具的详细内容,更多关于Vue3简历生成工具的资料请关注脚本之家其它相关文章!