
Print.Js网页打印标签详细代码示例
作者:许多宝滴IT
Print.js一个小的javascript库,可帮助您从网络上打印,这篇文章主要介绍了Print.Js网页打印标签的相关资料,文中通过代码介绍的非常详细,需要的朋友可以参考下
1、功能背景需求
后台读取数据,预览页面再打印出小标签,涉及打印机设置纸张大小,与代码编写兼容等等
2、打印机设置纸张大小:
按照下图顺序设置需要打印的纸张大小,例如50mm*50mm
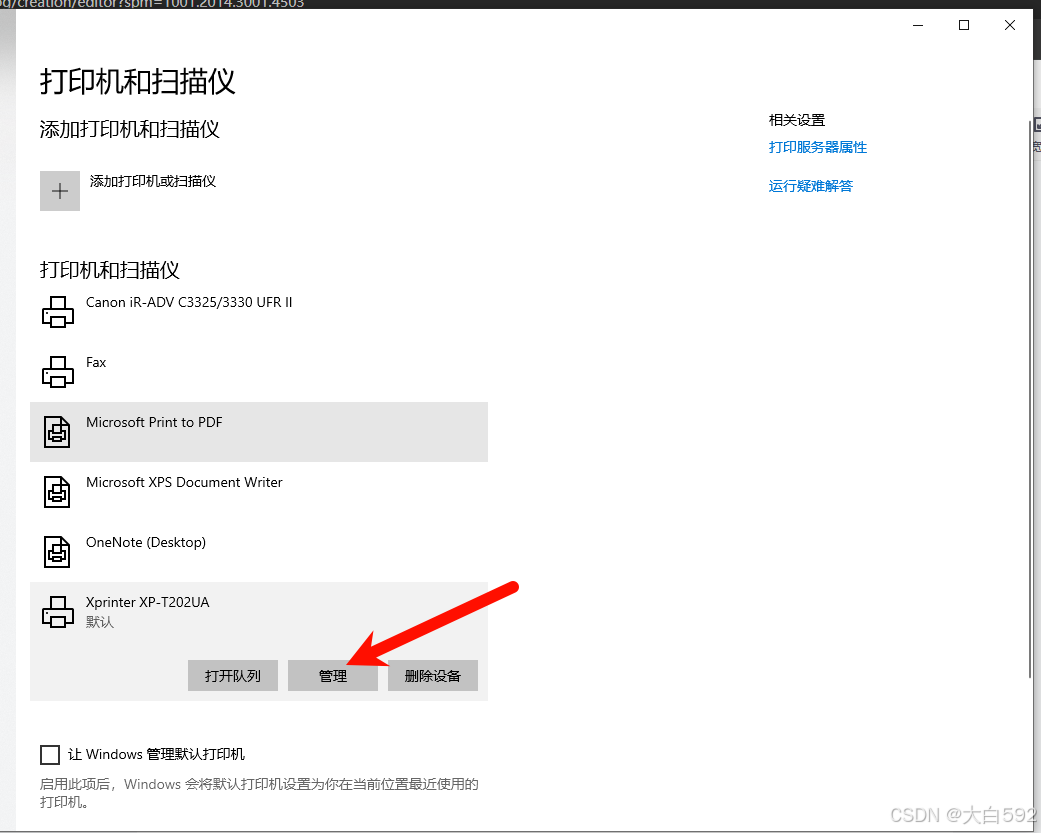
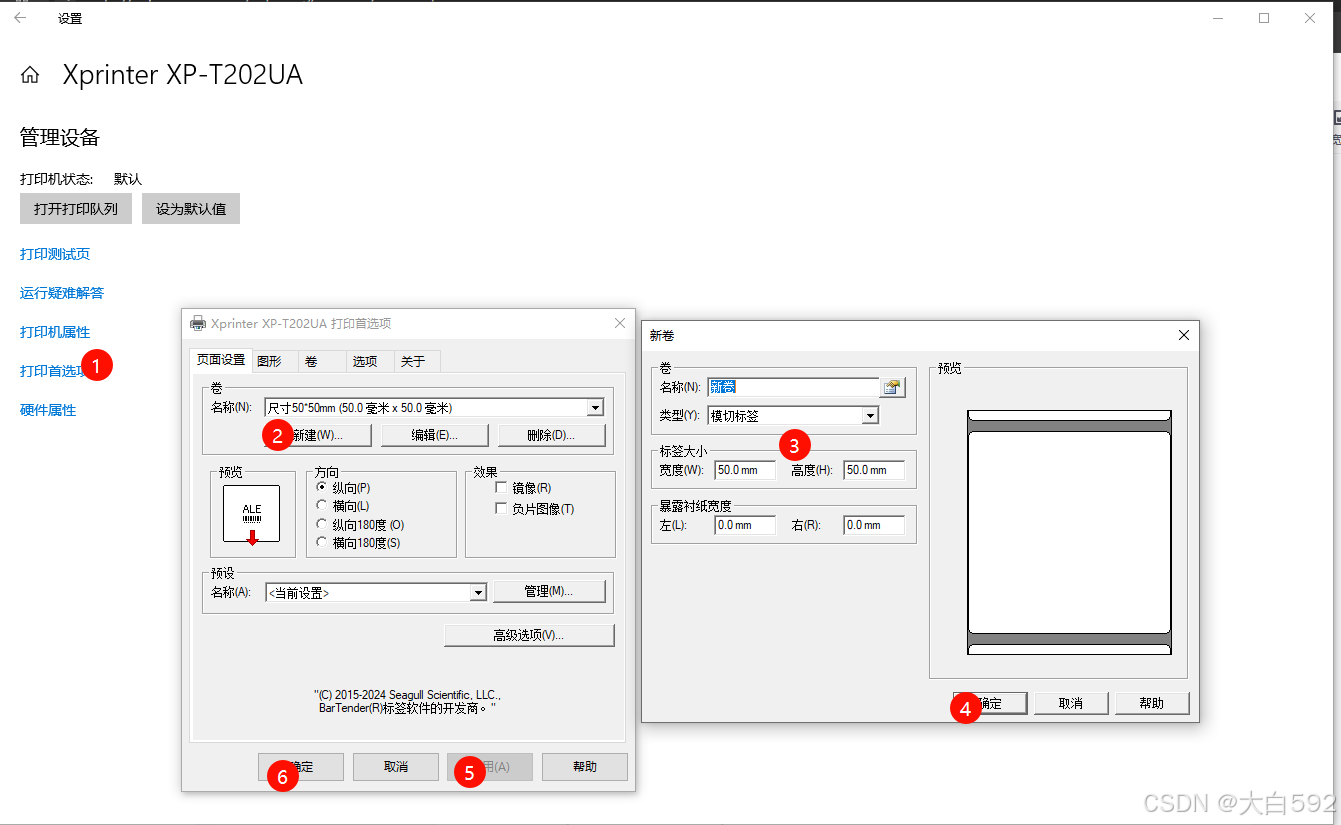
不知道,问产品打印的纸张大小是多少,再去设置!
3、相关代码(PrintJS)
代码页面要准备一个预览页面,PrintJS打印时要绑定ID去打印。
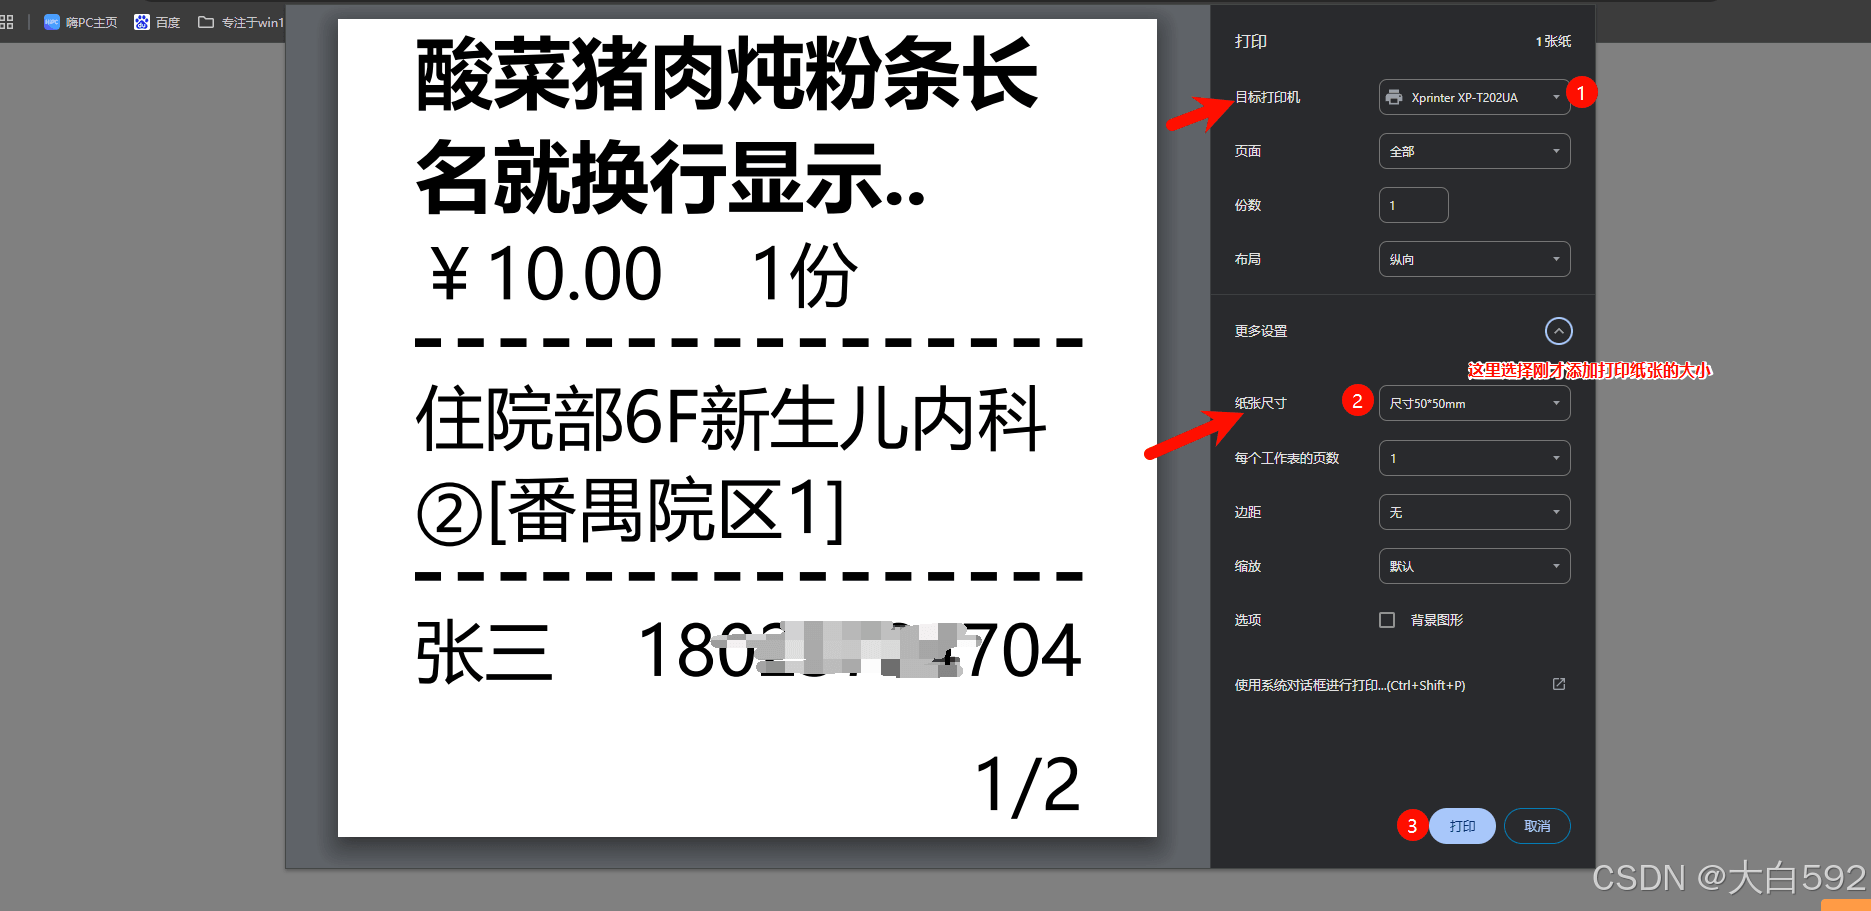
3.1预览打印效果图:
3.2相关代码:
<template>
  <!-- 网页打印小票预览页 -->
  <div class="tick">
    <div class="tick-bg">
      <div id="print-tick">
        <div class="tick-bg-content" v-for="(item, index) in 1" :key="index">
          <div class="header">
            <b class="header-title">酸菜猪肉炖粉条长名就换行显示..</b>
            <div class="header-price">
              <span>¥10.00</span>
              <span class="header-price-num">1份</span>
            </div>
          </div>
          <div class="body-address">住院部6F新生儿内科②[番禺院区1]</div>
          <div class="footer">
            <div class="footer-flex">
              <span class="userName">张三</span>
              <span>1802****704</span>
            </div>
            <div class="footer-page">{{ index+1 }}/2</div>
          </div>
        </div>
      </div>

      <el-button class="w-80 ps-origin-btn" size="mini" @click="convertToImageAndPrint">打印</el-button>
    </div>
  </div>
</template>

<script>
import print from 'print-js'

export default {
  created() {
    this.type = this.$route.query.type
    this.printList = JSON.parse(localStorage.printList)
    console.log('this.printList', this.printList)
  },
  data() {
    return {
      type: 'takeaway',
      printList: []
    }
  },
  methods: {
    // 确认打印
    convertToImageAndPrint() {
      print({
        printable: 'print-tick',
        type: 'html',
        scanStyles: false,
        // style: '@media print { body { margin: 0; padding: 0;}  .print-tick { margin: 0 auto; width: 100%;} }',
        css: 'data:text/css,' + encodeURIComponent(this.rechargeStyle())
      })
    },
    // 打印样式
    rechargeStyle() {
      return `
        @page {
          width: 100%;
          margin: 0 !important;
          padding: 0 !important;
          box-sizing: border-box !important;
        }
        *, body {
          width: 100% !important;
          margin: 0 !important;
          padding: 0 !important;
          box-sizing: border-box !important;
          font-size: 16px !important;
        }
        #print-tick .tick-bg-content{
          padding: 0 18px !important;
        }
        #print-tick .header {
          width: 100% !important;
          padding-bottom: 5px !important;
          margin-bottom: 5px !important;
          border-bottom: 2px dashed #000 !important;
        }
        #print-tick .header .header-title{
          font-weight: bold !important;
          font-size: 18px !important;
          display: -webkit-box !important;
          display: -moz-box !important;
          overflow: hidden !important;
          line-clamp: 2 !important;
          -webkit-box-orient: vertical !important;
          -webkit-line-clamp: 2 !important;
          -moz-box-orient: vertical !important;
          -moz-line-clamp: 2 !important;
        }
        #print-tick .header .header-price{
          display: flex !important;
        }
        #print-tick .header-price .header-price-num{
          display: inline-block;
          padding-left: 10px;
        }
        #print-tick .body-address{
          width: 100% !important;
          margin-bottom: 5px !important;
          display: -webkit-box !important;
          display: -moz-box !important;
          overflow: hidden !important;
          line-clamp: 2 !important;
          -webkit-box-orient: vertical !important;
          -webkit-line-clamp: 2 !important;
          -moz-box-orient: vertical !important;
          -moz-line-clamp: 2 !important;
        }
        #print-tick .footer{
          padding-top: 5px !important;
          border-top: 2px dashed #000 !important;
        }
        #print-tick .footer .footer-flex{
          width: 100% !important;
          display: flex !important;
          justify-content: space-between !important;
          align-items: center !important;
        }
        #print-tick .footer .footer-page{
          display: flex !important;
          justify-content: end !important;
          padding-top: 10px !important;
        }

        @-moz-document url-prefix() {
          *, body {
            letter-spacing: -1px !important;
            width: 100% !important;
            margin: 0 !important;
            padding: 0 !important;
            box-sizing: border-box !important;
            font-size: 16px !important;
          }
          #print-tick .tick-bg-content {
            padding:0 0 0 30px !important;
          }
          #print-tick .header .header-price{
            display: flex !important;
            margin-top: 10px !important;
          }
        }
      `
    }
  }
}
</script>

<style lang="scss" scoped>
.tick {
  &-bg {
    background-color: grey;
    min-height: 100vh;
    width: 100%;
    padding: 20px;
    display: flex;
    flex-direction: column;
    align-items: center;
    #print-tick {
      font-size: 12px;
      line-height: 16px;
      font-weight: 500;
      .tick-bg-content {
        padding: 20px;
        margin: 0 auto;
        width: 290px;
        display: flex;
        flex-direction: column;
        justify-content: space-between;
        align-items: center;
        background-color: #fff;
        margin-bottom: 20px;
        .header {
          width: 100%;
          padding-bottom: 10px;
          margin-bottom: 10px;
          border-bottom: 2px dashed #dddddd;
          .header-title {
            display: -webkit-box !important;
            display: -moz-box !important;
            overflow: hidden !important;
            line-clamp: 2 !important;
            -webkit-box-orient: vertical !important;
            -webkit-line-clamp: 2 !important;
            -moz-box-orient: vertical !important;
            -moz-line-clamp: 2 !important;
          }
          .header-price {
            // margin-top: 10px;
            // transform: translate(100%, 0);
            // width: 50%;
            // display: flex;
            // justify-content: space-between;
            // align-items: center;
          .header-price-num{
              margin-top: 10px;
              display: inline-block;
              padding-left: 50px;
            }
          }
        }
        .body-address {
          width: 100%;
          margin-bottom: 10px;
          display: -webkit-box !important;
          -webkit-box-orient: vertical !important;
          -webkit-line-clamp: 2 !important;
          line-clamp: 2 !important;
          overflow: hidden !important;
        }
        .footer {
          width: 100%;
          border-top: 2px dashed #ddd;
          padding-top: 10px !important;
          .footer-flex {
            display: flex;
            justify-content: space-between;
            align-items: center;
          }
          .footer-page {
            padding-top: 10px;
            display: flex;
            justify-content: end;
            align-items: center;
          }
        }
      }
    }
  }
}
</style>
以上关键点在于print()打印的方法,可能要注意的是打印时的样式调整,每个浏览器要处理下样式兼容问题,火狐比较特殊点,也做了打印时的样式特殊处理如下:
@-moz-document url-prefix() {
          *, body {
            letter-spacing: -1px !important;
            width: 100% !important;
            margin: 0 !important;
            padding: 0 !important;
            box-sizing: border-box !important;
            font-size: 16px !important;
          }
          #print-tick .tick-bg-content {
            padding:0 0 0 30px !important;
          }
          #print-tick .header .header-price{
            display: flex !important;
            margin-top: 10px !important;
          }
        }
3.3点击打印时,会弹出:
4、总结:
网页打印其实就是设置好打印设备,调试好机器,代码方面写一个预览页面,用插件PrintJs就好,其他有问题再慢慢调试就行。
到此这篇关于Print.Js网页打印标签的文章就介绍到这了,更多相关PrintJs网页打印标签内容请搜索脚本之家以前的文章或继续浏览下面的相关文章希望大家以后多多支持脚本之家!