
Vue中keep-alive组件的原理与缓存详解
作者:北辰alk
Vue 的 keep-alive 是一个内置组件,用于缓存不活动的组件实例,避免重复渲染,从而优化应用性能,下面就跟随小编一起来看看其核心实现原理和缓存内容吧
Vue 的 keep-alive 是一个内置组件,用于缓存不活动的组件实例,避免重复渲染,从而优化应用性能。它常用于需要保留组件状态或避免重复加载的场景(如标签页切换、路由视图缓存)。以下是其核心实现原理和缓存内容的详细解析:
一、keep-alive 的核心作用
缓存组件实例:当组件被切换时,不会销毁,而是保留在内存中
保留组件状态:保持当前组件的所有状态(data、DOM 结构等)
避免重复渲染:再次激活时直接复用缓存,跳过创建/挂载过程
二、实现原理
1. 缓存管理策略
LRU 算法(最近最少使用):当缓存数量超过 max 限制时,自动移除最久未使用的实例
缓存存储结构:使用 JavaScript 对象存储缓存实例,数组记录访问顺序
2. 核心源码解析(Vue 2.x 简化版)
export default {
  name: 'keep-alive',
  abstract: true, // 标记为抽象组件,不渲染 DOM 元素

  props: {
    include: [String, RegExp, Array], // 白名单
    exclude: [String, RegExp, Array], // 黑名单
    max: [String, Number]            // 最大缓存数
  },

  created() {
    this.cache = Object.create(null) // 缓存池 { key: VNode }
    this.keys = []                   // 缓存键的访问顺序
  },

  destroyed() {
    // 清理所有缓存
    for (const key in this.cache) {
      pruneCacheEntry(this.cache, key, this.keys)
    }
  },

  render() {
    const slot = this.$slots.default
    const vnode = getFirstComponentChild(slot) // 获取包裹的第一个组件

    const componentOptions = vnode?.componentOptions
    if (componentOptions) {
      const name = getComponentName(componentOptions)
      // 检查是否匹配 include/exclude
      if (
        (this.include && (!name || !matches(this.include, name))) ||
        (this.exclude && name && matches(this.exclude, name))
      ) {
        return vnode
      }

      const key = vnode.key == null
        ? componentOptions.Ctor.cid + (componentOptions.tag ? `::${componentOptions.tag}` : '')
        : vnode.key

      // 命中缓存
      if (this.cache[key]) {
        vnode.componentInstance = this.cache[key].componentInstance
        // 更新访问顺序
        remove(this.keys, key)
        this.keys.push(key)
      } else {
        this.cache[key] = vnode
        this.keys.push(key)
        // 清理超出 max 的旧缓存
        if (this.max && this.keys.length > parseInt(this.max)) {
          pruneCacheEntry(this.cache, this.keys[0], this.keys)
        }
      }

      vnode.data.keepAlive = true // 标记为 keep-alive 组件
    }
    return vnode
  }
}
3. 缓存生命周期
| 生命周期 | 触发时机 | 典型用途 |
|---|---|---|
| activated | 组件被激活(进入缓存视图) | 刷新数据、启动动画 |
| deactivated | 组件被停用(离开缓存视图) | 停止定时器、保存临时状态 |
三、缓存的具体内容
1. 缓存对象结构
{
  cache: {
    'component1::key1': {
      componentInstance: ComponentInstance, // 组件实例
      data: {
        keepAlive: true,        // 特殊标记
        // ...其他 VNode 信息
      },
      // ...完整 VNode 信息
    },
    'component2::key2': { ... }
  },
  keys: ['component1::key1', 'component2::key2']
}
2. 具体缓存内容
| 内容类型 | 说明 |
|---|---|
| 组件实例 | 完整的 Vue 组件实例(包含 data、methods、生命周期等) |
| DOM 结构 | 组件对应的真实 DOM 节点 |
| 状态数据 | 所有响应式数据、计算属性、观察者等 |
| 事件监听器 | 通过 v-on 或 $on 绑定的事件 |
| 插槽内容 | <slot> 中的子组件和 DOM 结构 |
四、使用示例
1. 基础用法
<template>
  <keep-alive>
    <component :is="currentComponent"></component>
  </keep-alive>
</template>
2. 配置缓存策略
<template>
  <keep-alive
    :include="['Home', 'User']"
    :exclude="['Login']"
    :max="5"
  >
    <router-view></router-view>
  </keep-alive>
</template>
五、注意事项
不要缓存过多组件:合理设置 max 防止内存泄漏
动态组件必须定义 name:用于 include/exclude 匹配
避免缓存高频变化组件:如实时数据展示组件
路由缓存需结合 key:确保相同路由不同参数的组件独立缓存
<keep-alive>
  <router-view :key="$route.fullPath"></router-view>
</keep-alive>
六、实现流程图解
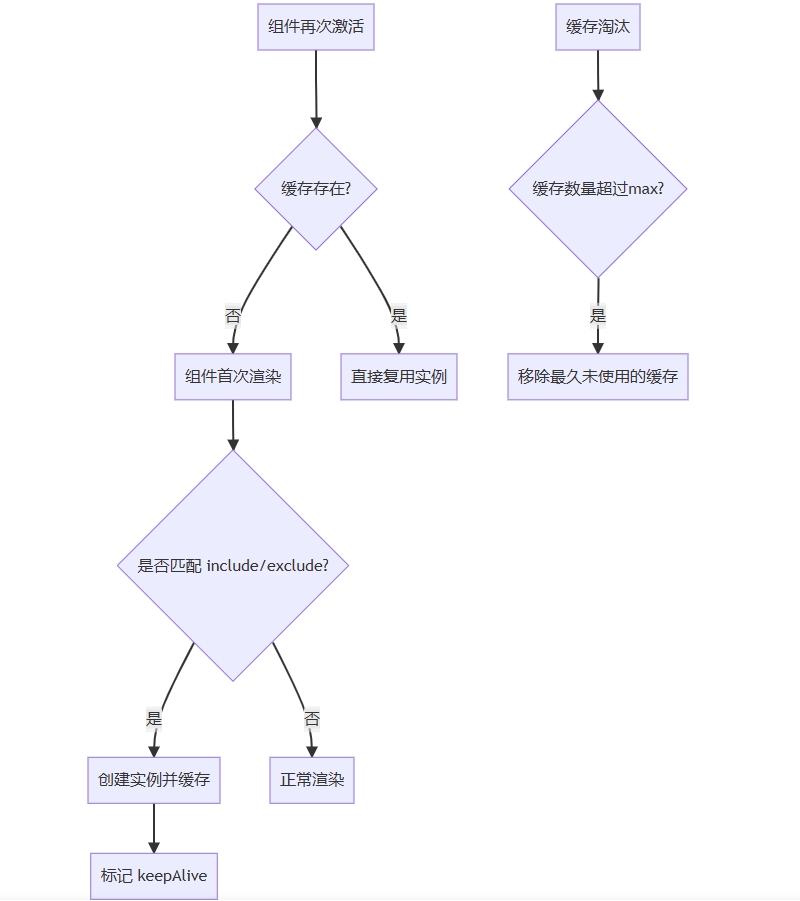
通过这种机制,keep-alive 在保证性能优化的同时,智能管理内存使用,是 Vue 性能优化体系中的重要组成部分。
以上就是Vue中keep-alive组件的原理与缓存详解的详细内容,更多关于Vue keep-alive组件的资料请关注脚本之家其它相关文章!