
Vue纯前端实现导出excel中的图片与文件超链接
作者:夜十前端
这篇文章主要为大家详细介绍了Vue如何纯前端实现导出excel中的图片与文件超链接,文中的示例代码讲解详细,感兴趣的小伙伴可以参考一下
最近公司的需求,要求Excel导出的时候将数据里的图片、文件等都带出来。
一顿沟通后,后端不做,那就只好我这个前端小白来了。上网搜索了好久,有很多大佬分享了怎么导出图片,但没有将图片按单元格级批量导出的例子,只好研究了一整天时间,实现效果如下:
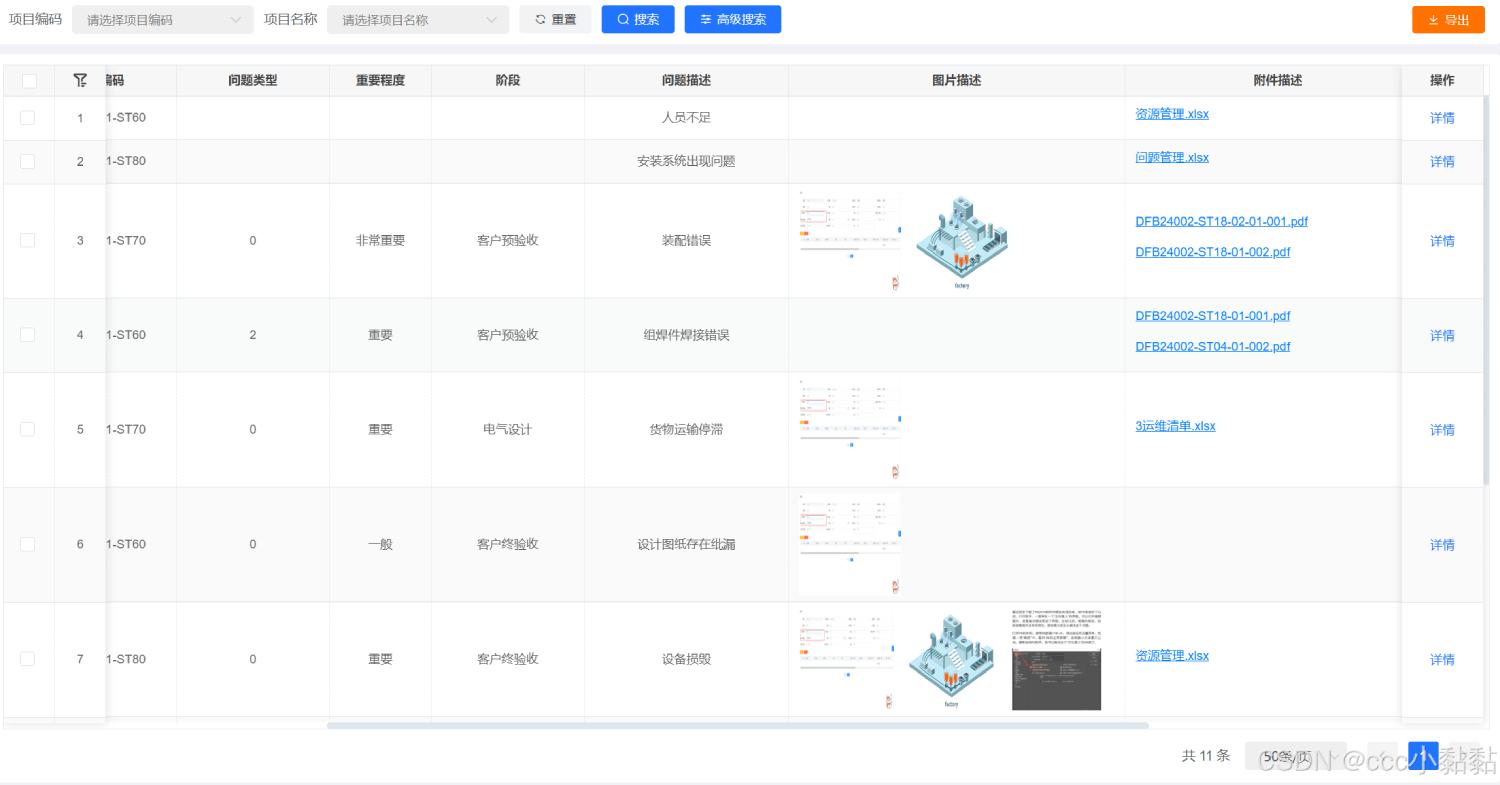
这是vue展示的样式:
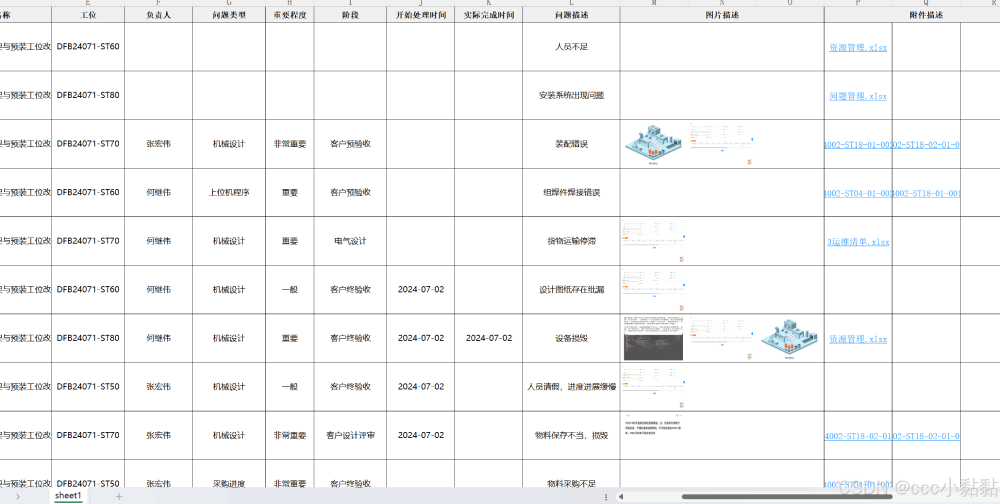
这是excel导出的样式:
下面直接上代码: 具体需要注意的部分在下面说
首先npm 安装依赖: exceljs
数据:(主要是展示el table ,顺便也可以作为excel 导出的列模版)
data() {
		return {
			tableProp: [
				{
					prop: 'creator',
					label: '提出人',
					namei18n: 'tichucreator',
					width: 100,
					align: 'center'
				},
				{
					label: '提出时间',
					prop: 'creationTime',
					namei18n: 'creationTime',
					hidden: true
				},
				{
					prop: 'projectCode',
					label: '项目编码',
					namei18n: 'projectCode',
					width: 150,
					align: 'center'
				},

				{
					prop: 'projectName',
					label: '项目名称',
					namei18n: 'projectName',
					width: 240,
					align: 'center'
				},
				{
					prop: 'stationCode',
					label: '工位',
					namei18n: 'stationCode',
					width: 150,
					align: 'center'
				},
				{
					label: '负责人',
					prop: 'handler',
					namei18n: 'handler',
					hidden: true
				},
				{
					prop: 'questionType',
					label: '问题类型',
					namei18n: 'questionType',
					width: 150,
					align: 'center'
				},
				{
					prop: 'importance',
					label: '重要程度',
					namei18n: 'importance',
					width: 100,
					align: 'center',
					options: []
				},
				{
					prop: 'stage',
					label: '阶段',
					namei18n: 'stage',
					width: 150,
					align: 'center',
					options: []
				},
				{
					label: '开始处理时间',
					prop: 'startDate',
					namei18n: 'startDate1',
					hidden: true
				},
				{
					label: '实际完成时间',
					prop: 'lastModificationTime',
					namei18n: 'lastModificationTime',
					hidden: true
				},
				{
					prop: 'questionDescribe',
					label: '问题描述',
					namei18n: 'questionDescribe',
					width: 200,
					align: 'center'
				},
				{
					prop: 'uploadPic',
					label: '图片描述',
					namei18n: 'uploadPic',
					type: 'uploadPic',
					width: 330,
					align: 'center'
				},
				{
					prop: 'uploadFile',
					label: '附件描述',
					namei18n: 'uploadFile',
					type: 'uploadFile',
					width: 300,
					align: 'center'
				},
				{
					prop: 'questionAdvise',
					label: '问题解决建议',
					namei18n: 'questionAdvise',
					width: 200,
					align: 'center'
				},
				{
					label: '补充说明',
					prop: 'bRemarks',
					namei18n: 'bRemarks',
					hidden: true
				},
				{
					label: '解决方案',
					prop: 'solution',
					namei18n: 'solution',
					hidden: true
				},
				{
					prop: 'expectedDate',
					label: '需求完成时间',
					namei18n: 'expectedDate',
					width: 160,
					align: 'center'
				},
				{
					prop: 'isOverdue',
					label: '是否逾期',
					namei18n: 'isOverdue',
					width: 100,
					align: 'center',
					options: [
						{
							value: true,
							label: '是'
						},
						{
							value: false,
							label: '否'
						}
					]
					// formatter: (val) => {
					// 	if (val) {
					// 		return '是';
					// 	} else {
					// 		return '否';
					// 	}
					// }
				},
			],

	},
方法:
	methods: {
		async exportExcel1(exportDataList) {
		        //exportDataList 就是后端返回的数据
				exportDataList = this.tableDataFormat(JSON.parse(JSON.stringify(exportDataList)));
				// 定义表头
				const columns = [];
                // this.tableProp 在上面有粘出来,主要是表格的表头配置,el-table就是用这个循环出来的
                // 解释一下这里的操作,excel并不支持同一单元格导出多个数据(也可能是我太菜)
                // 我们的项目是最多3个图 3个文件,后端返回的是3个文件路径的字符串在一个字段里
				this.tableProp.forEach((item) => {
					if (item.label != '图片描述' && item.label != '附件描述') {
						columns.push({
							header: item.label,
							key: item.prop,
							width: item.width ? item.width / 10 : 14
						});
					}
                    // 所以将 图片 和 文件变为 3项,也就是在excel里占 3个 单元格
					if (item.label === '图片描述') {
						columns.push({
							header: '',
							key: 'uploadPic1',
							width: 14
						});
						columns.push({
							header: '',
							key: 'uploadPic2',
							width: 14
						});
						columns.push({
							header: '',
							key: 'uploadPic3',
							width: 14
						});
					}
					if (item.label === '附件描述') {
						columns.push({
							header: '',
							key: 'uploadFile1',
							width: 14
						});
						columns.push({
							header: '',
							key: 'uploadFile2',
							width: 14
						});
						columns.push({
							header: '',
							key: 'uploadFile3',
							width: 14
						});
					}
				});

				const Exceljs = require('exceljs');
				// 创建工作簿
				const workbook = new Exceljs.Workbook();
				// 创建工作表
				const workSheet = workbook.addWorksheet('sheet1');
				// 工作表添加表头
				workSheet.columns = columns;
				// imgFieldList:图片字段名
				const imgFieldList = ['uploadPic1', 'uploadPic2', 'uploadPic3'];
				// fileFieldList:文件字段名
				const fileFieldList = ['uploadFile1', 'uploadFile2', 'uploadFile3'];

				// 往工作表插入数据 (插入图片后,链接也会被显示,所以把图片的数据干掉)
				workSheet.addRows(
					exportDataList.map((item) => {
						return {
							...item,
							uploadPic1: '',
							uploadPic2: '',
							uploadPic3: ''
							// uploadFile1: '',
							// uploadFile2: '',
							// uploadFile3: ''
						};
					})
				);

				// 往Excel插入图片
				for (let ri = 0; ri < exportDataList.length; ri++) {
					// 获取遍历的当前行
					const row = exportDataList[ri];
					// 过滤出当前行图片字段有值的
					const currentRowImgFieldList = imgFieldList.filter((e) => row[e]);
					// 遍历图片字段
					for (let ai = 0; ai < currentRowImgFieldList.length; ai++) {
						const imgField = currentRowImgFieldList[ai];
						// 图片字段值,一个完整的url
						const url = row[imgField];
						// 根据url把图片转换成base64编码,这里加了await, 方法名前面必须得加async,把这个imageToBase64方法变成同步方法
						const base64 = await this.imageToBase64(url);
						// 把base64编码的图片插入excel工作簿里面
						const imageId = workbook.addImage({
							base64: base64,
							extension: 'png'
						});

						// 当前工作表(当前excel页)加入图片,tl.col:excel第几列,tl.row:excel第几行,ext里面表示图片宽高
                        // 这里需要细细调一下,加入单元格后是紧挨着单元格顶部,要做一些偏移
						workSheet.addImage(imageId, {
							tl: { col: columns.length + ai - 11.8, row: ri + 1.2 },
							// br: { col: columns.length + ai - 11.1, row: ri + 2 }
							ext: { width: 104, height: 73 }
						});
					}
				}

				for (let ri = 0; ri < exportDataList.length; ri++) {
					// 设置除了标题之外,内容的行高,避免图片太高,这里太小,导致显示很乱
					workSheet.getRow(ri + 2).height = 60;
				}
				// 设置标题列的高度
				workSheet.getRow(1).height = 20;

				// 设置整个工作表的样式
				const font = {
					name: '微软雅黑',
					size: 10 // 字体大小
				};
				const font1 = {
					name: '宋体',
					size: 10, // 字体大小
					bold: true,
					color: {
						argb: '00000002'
					}
				};
				const border = {
					top: { style: 'thin' },
					left: { style: 'thin' },
					bottom: { style: 'thin' },
					right: { style: 'thin' }
				};
				const alignment = {
					horizontal: 'center',
					vertical: 'middle'
				};
				const headerFillColor = {
					type: 'pattern',
					pattern: 'solid',
					fgColor: { argb: 'F0F0F0F0' } // 浅灰色背景,您可以自定义颜色
				};

				for (let rowIndex = 1; rowIndex <= workSheet.actualRowCount; rowIndex++) {
					for (let colIndex = 1; colIndex <= workSheet.columnCount; colIndex++) {
						const cell = workSheet.getCell(rowIndex, colIndex);
						cell.font = font;
						cell.border = border;
						cell.alignment = alignment;

						// 如果是附件 (这里主要是文件的逻辑)
						if ((colIndex === 16 || colIndex === 17 || colIndex === 18) && rowIndex !== 1) {
							cell.font = {
								underline: true,
								color: { argb: 'FF1890FF' }
							};
							if (cell.value) {
								cell.value = {
									text: cell.value.split('/')[cell.value.split('/').length - 1],
									hyperlink: window.location.origin + cell.value,
									tooltip: '点击跳转'
								};
							}
						}
						// 如果是第一行,设置背景颜色
						if (rowIndex === 1) {
							cell.fill = headerFillColor;
							cell.font = font1;
						}
					}
					// 合并图片单元格
					workSheet.mergeCells('M' + rowIndex + ':O' + rowIndex);
				}
				// 合并文件单元格
				workSheet.mergeCells('P1:R1');

				// 添加一些数据到合并后的单元格
				workSheet.getCell('M1').value = '图片描述';
				// 添加一些数据到合并后的单元格
				workSheet.getCell('P1').value = '附件描述';

				// 工作簿写入excel
				workbook.xlsx.writeBuffer().then((buffer) => {
					// // 转换成Blob格式
					// const blob = new Blob([buffer], { type: 'application/octet-stream' });
					// // 导出excel,这里获得了blob,有很多种导出方法,可以用FileSaver.js(百度一下就有了),我这里就简单点了,用HTML的A标签导出
					// // 获取下载链接
					// const url = URL.createObjectURL(blob);

					// // 动态创建a标签
					// let downloadLink = document.createElement('a');
					// downloadLink.style.display = 'none'; // 隐藏这个a标签
					// document.body.appendChild(downloadLink); // 添加到DOM中

					// // 设置下载链接和文件名
					// downloadLink.href = url;
					// downloadLink.download = '问题汇总导出.xlsx'; // 自定义下载时的文件名

					// // 触发点击事件来开始下载
					// downloadLink.click();

					// // 下载后移除这个a标签
					// document.body.removeChild(downloadLink);

					// 使用saveAs下载 不会报出文件不安全
					saveAs(new Blob([buffer], { type: 'application/octet-stream' }), "问题汇总导出.xlsx")
				});

				this.loading.close();
		},

		imageToBase64(url, width, height) {
			return new Promise((resolve, reject) => {
				const image = new Image();
				image.src = url;
				image.crossOrigin = '*';
				image.onload = () => {
					const canvas = document.createElement('canvas');
					canvas.width = width || image.width;
					canvas.height = height || image.height;
					const ctx = canvas.getContext('2d');
					ctx.drawImage(image, 0, 0, width || image.width, height || image.height);
					const base64 = canvas.toDataURL('image/png');
					resolve(base64);
				};
			});
		},
		tableDataFormat(exportlist) {
			exportlist.forEach((item) => {
                // 这里是测试数据,分割是;,要是用这个测试的话要改一下下面的分割符 和 文件后缀
				// item.annexUrl = 'https://img2.baidu.com/it/u=101236606,1785081092&fm=253&fmt=auto&app=138&f=JPEG?w=727&h=500;https://img1.baidu.com/it/u=2607921640,3248579257&fm=253&fmt=auto&app=138&f=JPEG?w=629&h=500;https://img1.baidu.com/it/u=2976068608,3323494935&fm=253&fmt=auto&app=138&f=JPEG?w=500&h=500'
                // 这里是后端返回id,处理成字符串,大家未必用得上
				this.tableProp.forEach((val) => {
					if (val.options && val.options.length > 0) {
						val.options.forEach((item1) => {
							if (item1.value == item[val.prop]) {
								item[val.prop] = item1.label;
							}
						});
					}
				});
				item.uploadPic = [];
				item.uploadPic1 = '';
				item.uploadPic2 = '';
				item.uploadPic3 = '';
				item.uploadFile = [];
				item.uploadFile1 = '';
				item.uploadFile2 = '';
				item.uploadFile3 = '';

				if (item.annexUrl) {
					let fileArr = item.annexUrl.split(',');
					let filetype = ['.doc', '.docx', '.pdf', '.vsdx', '.ppt', '.pptx', '.xlsx', '.xls', '.xmind', '.zip', '.rar', '.7z'];
					// 移除图片类型以避免与图片类型的判断重叠,并统一转换为小写
					const exclusiveFiletype = filetype.map((type) => type.toLowerCase()).filter((type) => !['.png', '.jpg', '.jpeg', '.gif'].map((ext) => ext.toLowerCase()).includes(type));

					fileArr.forEach((fileUrl) => {
						// 将文件URL转换为小写,以便进行不区分大小写的比较
						const lowerCaseFileUrl = fileUrl.toLowerCase();

						// 先检查是否为图片类型
						['.png', '.jpg', '.jpeg', '.gif'].forEach((type) => {
							const lowerCaseType = type.toLowerCase();
							if (lowerCaseFileUrl.endsWith(lowerCaseType)) {
								item.uploadPic.push(fileUrl);
							}
						});

						// 然后检查是否为其他文件类型
						exclusiveFiletype.forEach((type) => {
							if (lowerCaseFileUrl.endsWith(type)) {
								item.uploadFile.push(fileUrl);
							}
						});
					});
					if (item.uploadPic.length > 0) {
						item.uploadPic1 = item.uploadPic[0];
						item.uploadPic2 = item.uploadPic[1] || '';
						item.uploadPic3 = item.uploadPic[2] || '';
					}
					if (item.uploadFile.length > 0) {
						item.uploadFile1 = item.uploadFile[0];
						item.uploadFile2 = item.uploadFile[1] || '';
						item.uploadFile3 = item.uploadFile[2] || '';
					}
				}
			});
			return exportlist;
		},
}
因为 excel 插件都是按单元格级别的,图片、超链接等如果想导出多个,就要像我上面那样一系列复杂操作,如果一行只有一个的话,会简单很多!代码肯定是可以运行的,复制即可使用,就是要调整一下字段,对应上你自己项目的真实返回数据
到此这篇关于Vue纯前端实现导出excel中的图片与文件超链接的文章就介绍到这了,更多相关Vue导出excel内容内容请搜索脚本之家以前的文章或继续浏览下面的相关文章希望大家以后多多支持脚本之家!