
使用vue-json-viewer实现JSON数据可视化详解
作者:水星记_
前言
接口的调试和测试是确保系统稳定性的重要步骤。为了让开发人员和测试人员能够直观地查看接口返回的 JSON 数据,使用合适的工具至关重要。vue-json-viewer 插件为 vue 开发者提供了一个简单而强大的解决方案。本文将详细介绍如何在 vue 项目中使用该插件,帮助你快速上手,提升接口测试的效率。
一、vue-json-viewer
vue-json-viewer 是一个用于在 vue.js 应用中展示 JSON 数据的插件。它提供了一种直观和美观的方式来可视化 JSON 数据,特别适合用于调试和展示 API 返回的数据。
为什么要选择 vue-json-viewer?
1.易于使用
插件的使用非常简单,只需安装并在 vue 组件中引入即可使用,适合快速集成到现有项目中。
2.美观的展示
vue-json-viewer 提供了友好的用户界面,能够以树形结构展示 JSON 数据,便于用户理解和查看数据层级。
3.支持复制功能
插件内置了复制功能,用户可以轻松复制 JSON 数据,方便进行调试或分享。
4.主题支持
插件支持自定义主题,开发者可以根据项目的设计风格调整 JSON 数据的展示样式。
5.预览模式
提供预览模式,可以在不展开所有数据的情况下,快速查看 JSON 数据的结构。
1.1 配置
| 属性 | 描述 | 默认值 |
|---|---|---|
| value | json对象的值,可以使用v-model,支持响应式 | 必填 |
| expand-depth | 默认展开的层级 | 1 |
| copyable | 展示复制按钮,默认文案为:copy、copied!, 你可以设置一个对象{copyText: ‘copy’, copiedText: ‘copied’} 来自定义复制按钮文案 | false |
| sort | 按照key排序展示 | false |
| boxed | 为组件添加一个盒样式 | false |
| theme | 添加一个自定义的样式class用作主题 | jv-light |
| expanded | 默认展开视图 | false |
| timeformat | 自定义时间格式函数 | time => time.toLocaleString() |
| preview-mode | 不可折叠模式,默认全部展开 | false |
| show-array-index | 是否显示数组索引 | true |
| show-double-quotes | 展示key双引号 | false |
1.2 事件
| 事件 | 描述 |
|---|---|
| copied | 复制文本后的事件 |
| keyclick | 点击key的事件 |
1.3 Slots
| 名称 | 描述 | Scope |
|---|---|---|
| copy | 自定义拷贝按钮 | {copied: boolean} |
1.4 快捷键
| 名称 | 描述 |
|---|---|
| alt + click | 展开当前节点下的所有节点 |
二、安装
可以通过 npm 或 yarn 安装 vue-json-viewer 插件。
npm install vue-json-viewer --save
或
yarn add vue-json-viewer
三、注册引入
3.1 全局注册组件
在全局 main.js 中引入并注册。
import JsonViewer from 'vue-json-viewer'
Vue.use(JsonViewer)
3.2 单个组件引入
import JsonViewer from 'vue-json-viewer'
export default {
    components:{ JsonViewer }
}
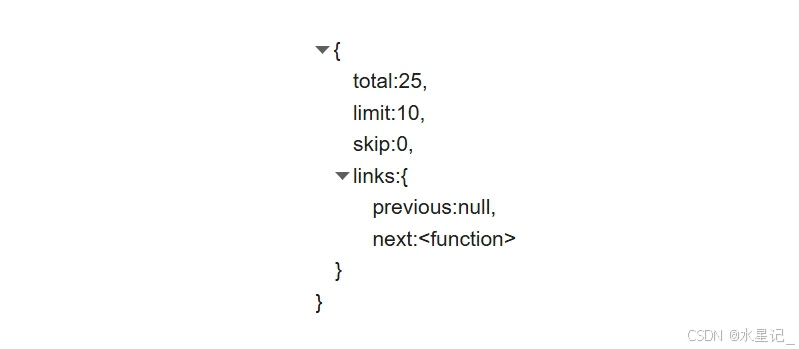
四、基础使用
<template>
  <div>
    <json-viewer :value="jsonData"></json-viewer>
  </div>
</template>

<script>
import JsonViewer from "vue-json-viewer";
export default {
  components: { JsonViewer },
  data() {
    return {
      jsonData: {
        total: 25,
        limit: 10,
        skip: 0,
        links: {
          previous: undefined,
          next: function() {},
        },
      },
    };
  },
};
</script>
实现效果
五、主题样式
有两个办法创建自定义主题 (e.g. my-awesome-json-theme)
添加 theme="my-awesome-json-theme" JsonViewer 的组件属性;
复制粘贴下面的模板并且根据自定义的theme名称做对应调整。
// values are default one from jv-light template
.my-awesome-json-theme {
  background: #fff;
  white-space: nowrap;
  color: #525252;
  font-size: 14px;
  font-family: Consolas, Menlo, Courier, monospace;

  .jv-ellipsis {
    color: #999;
    background-color: #eee;
    display: inline-block;
    line-height: 0.9;
    font-size: 0.9em;
    padding: 0px 4px 2px 4px;
    border-radius: 3px;
    vertical-align: 2px;
    cursor: pointer;
    user-select: none;
  }
  .jv-button { color: #49b3ff }
  .jv-key { color: #111111 }
  .jv-item {
    &.jv-array { color: #111111 }
    &.jv-boolean { color: #fc1e70 }
    &.jv-function { color: #067bca }
    &.jv-number { color: #fc1e70 }
    &.jv-number-float { color: #fc1e70 }
    &.jv-number-integer { color: #fc1e70 }
    &.jv-object { color: #111111 }
    &.jv-undefined { color: #e08331 }
    &.jv-string {
      color: #42b983;
      word-break: break-word;
      white-space: normal;
    }
  }
  .jv-code {
    .jv-toggle {
      &:before {
        padding: 0px 2px;
        border-radius: 2px;
      }
      &:hover {
        &:before {
          background: #eee;
        }
      }
    }
  }
}
实现效果

六、结合业务需求实现代码
<template>
  <div class="serviceTesting">
    <div class="nav">
      <span />
      <h3>接口数据测试</h3>
    </div>
    <el-card class="box-card">
      <div class="content">
        <p>接口</p>
        <el-select
          v-model="form.address"
          clearable
          placeholder="请选择内置接口"
          @change="onChange"
        >
          <el-option
            v-for="item in options"
            :key="item.value"
            :label="item.label"
            :value="item.value"
          >
          </el-option>
        </el-select>
        <p>GET</p>
        <el-input v-model="form.way" placeholder="请输入接口地址" disabled> </el-input>
        <el-button
          type="primary"
          icon="el-icon-s-promotion"
          :disabled="throttle"
          @click="onSend"
          >发送</el-button
        >
      </div>
      <div class="forms">
        <h4>参数列表</h4>
        <div class="line" />
        <el-table :data="tableData" border style="width: 100%">
          <el-table-column prop="name" label="参数名">
            <template slot-scope="scope">
              <el-input v-model="scope.row.name" clearable size="mini"></el-input>
            </template>
          </el-table-column>
          <el-table-column prop="value" label="参数值">
            <template slot-scope="scope">
              <el-input v-model="scope.row.value" clearable size="mini"></el-input>
            </template>
          </el-table-column>
          <el-table-column prop="required" label="是否必填">
            <template slot-scope="scope">
              <el-switch
                v-model="scope.row.must"
                active-color="#13ce66"
                inactive-color="#ff4949"
                disabled
              >
              </el-switch>
            </template>
          </el-table-column>
          <el-table-column prop="describe" label="参数描述"></el-table-column>
        </el-table>
      </div>
    </el-card>

    <div
      v-loading="throttle"
      element-loading-text="拼命加载中"
      element-loading-spinner="el-icon-loading"
      element-loading-background="rgba(0, 0, 0, 0.8)"
      :value="content"
      class="result"
    >
      <el-card class="box-card">
        <h4>响应结果</h4>
        <div class="line" />
        <json-viewer
          v-if="content !== null"
          :copyable="{ copyText: '复制', copiedText: '已复制' }"
          theme="my-awesome-json-theme"
          :preview-mode="true"
        ></json-viewer>
        <div v-else>
          <el-empty description="选择接口输入参数点击发送按钮获取响应结果"></el-empty>
        </div>
      </el-card>
    </div>
  </div>
</template>

<script>
  import JsonViewer from 'vue-json-viewer'
  export default {
    components: {
      JsonViewer
    },
    data() {
      return {
        options: [
          {
            value: '0',
            label: '测试接口1'
          },
          {
            value: '1',
            label: '测试接口2'
          }
        ],
        form: {
          address: '',
          way: ''
        },
        tableData: [
          {
            name: '',
            value: '',
            must: false,
            describe: ''
          }
        ],
        content: null,
        throttle: false
      }
    },
    methods: {
      onSend() {
        if (!this.form.address) {
          this.$message.warning('请选择接口地址')
          return
        }
        if (!this.tableData[0].name) {
          this.$message.warning('请输入参数名')
          return
        }
        if (!this.tableData[0].value) {
          this.$message.warning('请输入参数值')
          return
        }
        this.throttle = true
        // 请求接口
        port({}).then(res => {
          this.throttle = false
          if (res.code === '0') {
            this.content = res.data
          }
        })
      },
      onChange() {
        this.content = null
        this.tableData = [
          {
            name: '',
            value: '',
            must: false,
            describe: ''
          }
        ]
      }
    }
  }
</script>

<style lang="less" scoped>
  .serviceTesting {
    padding: 16px;
    .nav {
      display: flex;
      align-items: center;
      margin-bottom: 16px;
      span {
        display: inline-block;
        width: 8px;
        height: 22px;
        background: #409eff;
        margin-right: 5px;
      }
    }
    .content {
      display: flex;
      align-items: center;
      margin-bottom: 10px;
      .el-select {
        width: 300px;
        margin-right: 10px;
      }
      p {
        font-weight: bold;
        min-width: 30px;
        margin-right: 10px;
      }
      .el-button {
        margin-left: 10px;
      }
    }
    .el-card {
      padding: 10px;
    }
    h4 {
      text-align: left;
    }
    .line {
      width: 100%;
      height: 1px;
      background: rgb(246, 246, 246);
      margin: 10px 0;
    }
    .result {
      margin-top: 16px;
    }
  }
  ::v-deep {
    .el-card .el-card__body {
      text-align: left;
    }
    .my-awesome-json-theme {
      background: #fff;
      white-space: nowrap;
      color: #525252;
      font-size: 14px;
      font-family: Consolas, Menlo, Courier, monospace;

      .jv-ellipsis {
        color: #999;
        background-color: #eee;
        display: inline-block;
        line-height: 0.9;
        font-size: 0.9em;
        padding: 0px 4px 2px 4px;
        border-radius: 3px;
        vertical-align: 2px;
        cursor: pointer;
        user-select: none;
      }
      .jv-button {
        color: #49b3ff;
      }
      .jv-key {
        color: #111111;
      }
      .jv-item {
        &.jv-array {
          color: #111111;
        }
        &.jv-boolean {
          color: #fc1e70;
        }
        &.jv-function {
          color: #067bca;
        }
        &.jv-number {
          color: #fc1e70;
        }
        &.jv-number-float {
          color: #fc1e70;
        }
        &.jv-number-integer {
          color: #fc1e70;
        }
        &.jv-object {
          color: #111111;
        }
        &.jv-undefined {
          color: #e08331;
        }
        &.jv-string {
          color: #42b983;
          word-break: break-word;
          white-space: normal;
        }
      }
      .jv-code {
        .jv-toggle {
          &:before {
            padding: 0px 2px;
            border-radius: 2px;
          }
          &:hover {
            &:before {
              background: #eee;
            }
          }
        }
      }
    }
  }
</style>
实现效果

到此这篇关于使用vue-json-viewer实现JSON数据可视化详解的文章就介绍到这了,更多相关vue-json-viewer JSON数据可视化内容请搜索脚本之家以前的文章或继续浏览下面的相关文章希望大家以后多多支持脚本之家!